Installing Windows 10 without bios. How to configure BIOS to boot from a disk or flash drive. We go to BIOS from under the graphical interface of the operating system
Today we will look at:
Try to remember how often do you update your operating system? We think one of you once twice a year exactly reinstalls Windows to get rid of all accumulated systemic "garbage" and return the performance of the computer again to an acceptable level.
In this thread we will talk how to perform installing windows 10 from the flash drive through the BIOS, stagesfully describe all actions and tell about some nuances with which you will meet on the way.
BIOS preparation
The input to the BIOS is carried out by pressing the "Del" or "F2" key during the machine loading.
At the highest point, specify the connected USB flash drive, after which - restart the PC with the preservation of the changes made.
In detail with the screenshots, we described the entire entire process all this process topically in the topic "". The BIOS setting in this thread is described as detailed as possible and suitable for all versions of Windows.
If you did everything right, you will see the following inscription:
Press any key to start the installation.
The first thing you need to fill is a form where you need to specify the language, time zone and keyboard layout (in the future you can all be very easy to change).

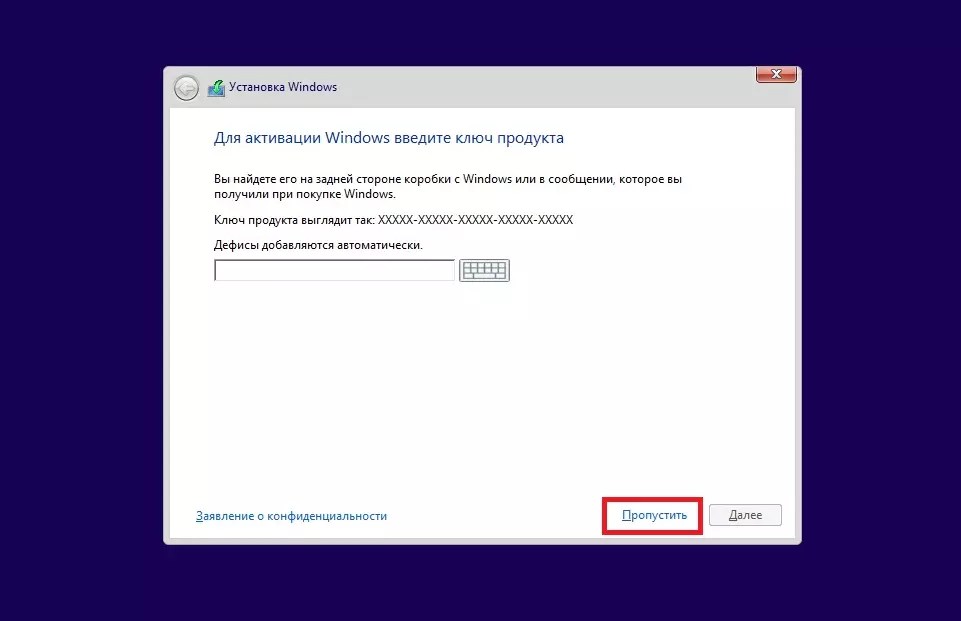
In the next window, you will need to enter the activation key, if you do not have it - press "I do not have a product key." If you do not have a key, then there is nothing terrible in this: after installing the OS on the desktop you will simply have an inscription that the license is not activated, but you can do it at any time.

After reading the User Agreement, select a selective installation type.
Selective installation will allow you to independently specify a place on the hard disk, where Windows will be installed 10 from the flash drive through the BIOS. It is worth considering that you need to choose a system disk (as a rule, this is a C disc). If earlier on the disk where you are going to install OS, the other system is stored or stored, then this disk must be formatted or deleted. If you select Removal, then remote section It can be restored by specifying the amount of memory that will be stored on it.
After selecting the system partition, simply wait until installing Windows 10 from the flash drive through the BIOS will not be completed.
At the end, you will need to perform a few more actions, such as the choice of region of accommodation, confirm the keyboard layout, account creation, and so on. See in the video in more detail:
As a result, you will receive a "clean" Windows 10, which you have just installed from a flash drive via BIOS. If you have completed all actions correctly, you will see the desktop and the label of the basket.
Outcome
So we disassembled you how to install Windows 10 at home without the help of specialists. We hope this material has become clear for you and you could independently reinstall Windows 10 from a flash drive via BIOS. In case you have any questions about the topic - contact the site administration for help in the comments, under this topic. We will help you solve the problems that have appeared.
In this manual "Installing Windows 10 from a flash drive," describes how to create a bootable flash drive, and use it for windows installations 10 S. uSB flash drives On a computer and laptop.
If you already have Windows 7, you can upgrade to Windows 10 using a standard system update mechanism - just enable the Windows 10 service center service.
Installing windows 10 from a flash drive can only be needed if you bought new computer without operating system and separately bought a disk from the OS. Installation (installation) Windows 10 from a flash drive, occurs almost the same as "seven" (read: how to install Windows 7 from the flash drive), but, as always, there is one point.
As a rule, licensed comes on a DVD. But several modern computers No longer equipped with a DVD drive. Examples of such computers are compact PCs intended for media centers, ultrabooks and netbooks. All these are compact devices, and there is simply no space in their case for a cumbersome DVD drive. What to do? It is necessary to somehow place on the USB flash drive, boot from it and install Windows 10 from the flash drive.
Creating a Windows 10 boot flash drive
Creature boot flash drive can be done different ways (Details how to create a bootable USB flash drive 10). The first of these is to use the standard tool from Microsoft - Installation Media Creation Tool., You can download to: https://www.microsoft.com/ru-ru/software-download/windows10.
Use this tool is quite simple. Run it, select what edition you will prefer. Also, the tool allows you to choose a bit. If you have less than 4 GB on your computer random access memory, I do not need to torment it with a 64-bit assembly.
When the program requests where to place the distribution, select a USB flash memory device. At the end of the program, you will have a ready-made loading medium (namely, a flash drive). Instruction: How to download and create a bootable USB flash drive in RUFUS
In order to install Windows 10 from a flash drive, log in to the BIOS (BIOS) setup of your computer and select the download from the flash drive (depending on the type of media). In stationary computers to enter the BIOS Setup, as a rule, the DEL key is used. On laptops can be other keys and even key combinations. Quite often uses the F2 key. Some BIOS output an invitation of about this type:
Press
After downloading from you will be taken in the language selection menu. As a rule, the Russian language will be immediately selected, and it will be necessary to just click further. If you ever installed previous versions Windows (version 7 and 8), then this window will seem to pain acquaintances.

After that you will see the window with the only button to install. Honestly, it was always interesting why it is needed and why not immediately go to the window with the terms of the license immediately?

After you accept the license terms, you have to choose the type of installation. Since the computer is new, then you need to choose - selective: (for experienced users).
Immediately after that you need to choose a disc. Why we have not discussed before system requirements? Yes, because the "dozen" will go on any modern and not very computer. If you are interested, you can install Windows 10 V virtual Machine with a single-core processor and one gigabyte of RAM. Why in virtual? Yes, because real Machine From 1 GB of "RAM" in 2016, it is very difficult to find, and the minimum system requirements of the minimum system requirements are checked. The system worked normally. Of course, to the best of your possibilities. But I think with the "iron" you will have everything well.
The only thing that is demanding the "dozen" (however, as the "eight") is to free disk space. Minimum (as assured in Microsoft) you need 20 GB for the 64-bit version and 16 GB for 32-bit. But Microsoft lies a little. The 64-bit assembly is literally in a matter of hours, up to 25 GB. But with 32-bit, everything is much more pleasant - it immediately after installation and the update took 6 GB. In the process of work, it will grow, but I think the declared 16 GB correspond to reality.
The process of installing the system will begin, at the end of which it will be rebooted. Depending on performance hard diskThis process can take from a few minutes to several tens of minutes. The SSD drives take place in a matter of minutes.

After rebooting
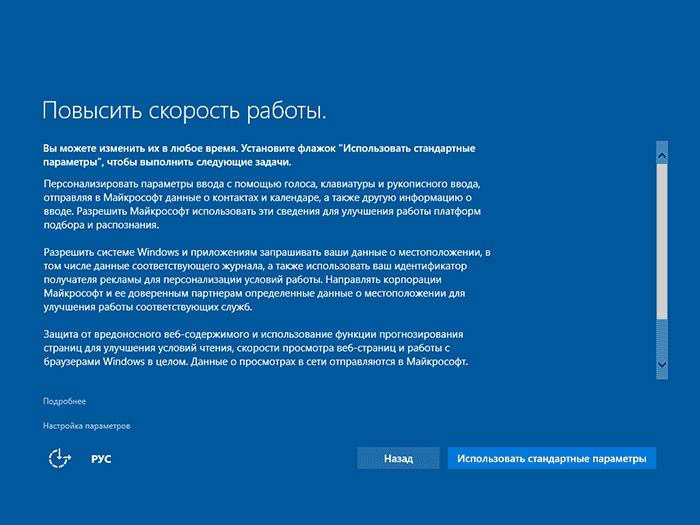
After rebooting (which will be fully automatic) you have to contemplate black screen for some time windows logo 10 and the inscription is prepared. Setting parameters, you can change after completion, so I propose not to spend time and click the "Use Standard Parameters" button.
Next, the OS will try to get critical updates from the Microsoft website, but this is only if the computer is immediately connected to the Internet, for example, a connection is used local network (to the provider or to the router), for all other types of connection, pre-configuration is required.
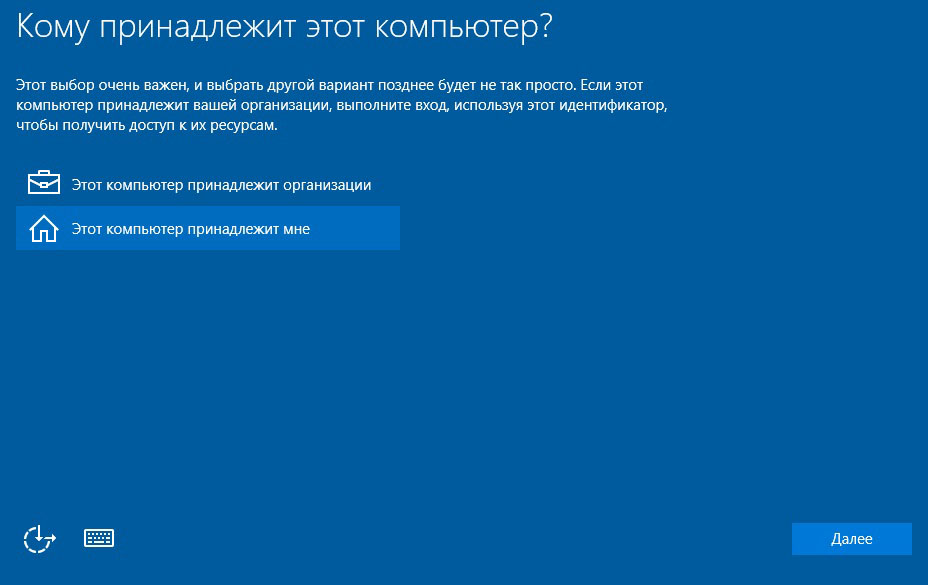
Who owns a computer?
Who owns your computer - Do you personally or your organization? Select the appropriate option when Windows will ask you about it. If you accidentally choose that the computer belongs to the organization, and in fact it is not so (the service will not be deployed on the network Active Directory.) You will see a message that the login is not possible. Nothing terrible, just click skip.
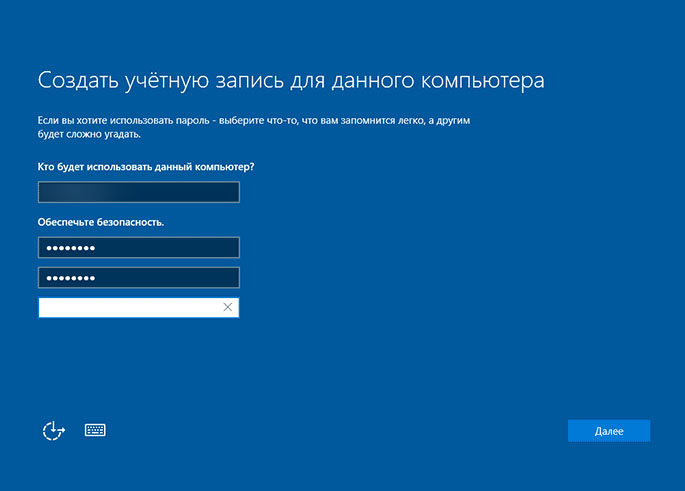
Creating a user account
The next setup of the installation is the creation accounting user. In Windows 10, unlike the "eight", do not propose to create an account microsoft recording When installing. It is also clear: communication with the Internet at the installation stage is not always there, and users are more likely to use ordinary local accounts. Later, if you want to use certain system functions, you will be asked to create account Microsoft.
So, enter the username and specify the password. You can not specify a password - in this case, the input to the system will be without a password. However, the presence of even the most simple password Significantly improves security when data encryption standard means Systems. Therefore, if you plan to work with the data that you want to encrypt using EFS, be sure to specify the password.
It remains very little
After creating the user, the system will suggest a little wait until it configures the applications. After setting up applications, the system will propose to choose whether you want to allow other computers and devices in this network to detect your PC. If there are other computers on your network, select Yes, if there are no other computers and work on the local network, then select No.

Actually, all. You will see the desktop with new version Windows. Do not switch: In the next article, new features "dozens" will be considered.
Video - installation of Windows 10 from a flash drive
Editor's Choice
How to install windows 10 from flash drives - step-by-step instruction + Some Soviets
The way to install Windows 10 from the flash drive does not constitute anything difficult for the Microsoft experienced user.
The same who installs such a platform for the first time or before it came across the distributions already ready and installed on the disk, it is worth learn several nuances - from creating boot media before the features.
Building:
Creating a bootable USB carrier
To create a loading flash drive with operating windows system 10 The user will need a drive with a volume of at least 8 GB - the size of the recorded files, depending on the selected platform variant, can reach 6.5 GB.
It should also be provided for on where Windows will be installed, not less than 16 GB of space - although, taking into account updates and system softwareIt is desirable to leave 40 to 60 GB.
For fast work Systems are best if it is installed on a solid waste drive SSD. - Such an option will cost more, so most of the applications (including games) is worth installing on.
Should be aware : To install, they usually release or create a whole section of the disk. Installation in the already existing and even filled with information volume is not prohibited, but it is not recommended, since it can create unnecessary problems when reinstalling the system.
The next step of creating a flash drive with the system is to download the appropriate image from the official Microsoft website (for example, a 32-bit or 64-bit version of the system).
Undesirable to install the system with third-party resources - In addition, such platforms are unlicensed, with them you can download and malicious code.
After that, you can download and install the disk recording program from the image - for example, (the utility is paid, but will work for trial period 30 days).

Further steps to create a USB flash drive with windows look like this:
- To the computer, to which the system image downloaded, a flash drive is connected;
- The Ultraiso program is launched and the button is pressed. "Trial period";

- The "File" and the "Open" command is selected in the menu, after which the image with the system opens;

- The section selects the rigid disk image recording command;
- In the window that opens, it is specified to which media files will be recorded (if the flash drive is installed one, the definition occurs automatically);

- Press the "Write" button.
Before recording the utility can request permission to format a flash drive.
The process of transferring files takes a few minutes.
After the recording is completed, the utility should be closed, (if the installation is performed on another PC, and not on which the record was recorded) and go to the following steps.
Installing download from a flash drive in BIOS
Before installing the system, in most cases it requires a change in the method of loading the system - instead of the default harsh (or solid-state drive) You will need to specify as boot disk USB flash drive.
To do this, it will be needed to move to the BIOS computer or laptop interface and change its settings.
To go to the BIOS, it is required during the computer booting to click on a specific key - most often it is listed on the screen.
For each computer and, moreover, the laptop exists its own way of entry - in most cases it is F2 or DEL, but sometimes it is F1, F8, F10 or ESC.

Should be aware : Key depends on the model motherboard. If the user could not determine what exactly press for, you should check several options. As a rule, this is a button from the top row of the keyboard.
After entering the interface menu required perform such actions:
- Using the arrows and the Enter key, find the Boot tab;
- Find and open Hard Disk Drives;

- Select the first line where the hard disk is usually already specified, press ENTER and select a USB flash drive in the drop-down menu;
- Return to the previous window and find item or Hard Disk Boot Priority;

- The flash drive is installed as the main disk when loading.
Now you can exit the menu, saving the changes made (the F10 key) and restart the computer.
From now on, the installation of the operating system begins.
Important : In some interfaces (especially if it is not BIOS, a UEFI) names and location of partitions and menu items will be different. But, in general, the steps to change the boot disk will be approximately the same.

The start of the installation of the OS.
If all previous steps (flash drive recording and changing the boot method) were performed correctly, the operating system is automatically installed on the reloaded computer.
Certificate of startup starts is the Windows 10 emblem on the screen.
First steps
Installing the operating system begins with a sentence of selecting a language, time format and method for entering information from the keyboard. In Russian-speaking versions of the operating system for all three default items, Russian is installed.

The following steps of installation Must be such:
- The "Set" button is pressed and the system recovery is selected;
- Enter the key to activate operating system (not necessarily do immediately - sometimes item can be skipped, after installation);
- Select the edition of the operating system (at the discretion of the user, if there is no license yet - or the key to which was purchased);

- Read the license agreement, agree with its terms and to click "Next";

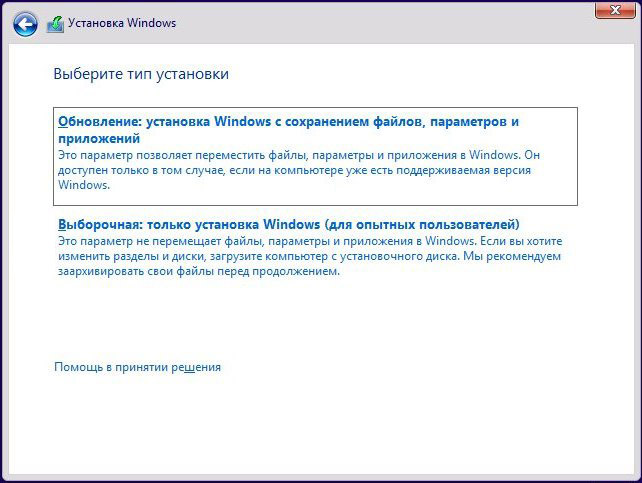
- Select Installation type operating system.

There are several options for installing windows.
The user can update the software, restoring system files and saving all parameters, programs and settings - while the old platform remains in the Windows.old folder.
The advantage of this method can be called no need to reconfigure web browsers and others. useful applications, reinstall utilities and games.
Another way - selective installation of the system, allowing you to get on the computer "clean" Windows, without the remaining system files.
At the same time, the user can run partitions to anew or use already created discs.
The result of this process becomes the appearance on the screen of the desktop "Clean" operating system, requiring spending some time on setting up.
Version 1703.
For version 1703, released less than a year ago, the final steps of installing Windows have some differences.
Setup is performed in a few steps:
- The region is selected from the proposed list - the functionality and system as a whole depends on this, and individual applications. If desired, the settings can be changed later.
- Select the first and additional (optional) keyboard layout and select a key combination to switch between them. By default, English is basic.

- Select a setup method (most users are suitable for the "For personal use" option).
- Configure parameters for the main account - at the same time, in the same way as for the 1607th version, you should either connect to the network and log in to the account, or enter temporary data in the offline mode, which can be subsequently changed.
- Enter user password (or choose the option "Next" to set it later).
- Configure privacy options by selecting the necessary items.
After that, the user is enough to wait until the system is installed, and perform all the necessary settings.
The same actions are necessary for the final stage of the assembly installation 1709.
System Setup
After the system is set to complete its setting - including downloading drivers of all connected and built-in devices (including sound, network, and,).
Some of these control programs are automatically installed by the system, the remaining set is performed manually.
It is advisable to do this as follows:
- for laptops - from the site manufacturer's models in the Support section;
- for desktop PCs - from the manufacturer's resources installed on it;
- for video cards - from AMD or NVIDIA web pages.
Drivers should not be installed from third-party resources or using type programs.
At the same time, control programs are often outdated, and sometimes viruses are downloaded with them.
Important : After all control programs are installed, and the operating system is activated, it is recommended to create an image to restore the system. This will help the next time to install the system is not entirely "from scratch."
Now you can install antivirus program And the minimum user needed package applications.
Possible problems when installing
By installing the operating system from a USB drive, the user may encounter a number of problems.
Sometimes a flash drive is simply not perceived by a computer or laptop, and the cause is the wrong selected recording format.
In order to guarantee the compatibility of the computer with the BIOS, when using the Ultraiso utility, you should select not USB-HDD +, and USB-HDD + V2.
The flash drive may not read for other reasons. For example, due to malfunction uSB ports or problems with the drive itself. In the first case, the question is solved by using another connector, in the second - recording for a new flash drive.
Faced with the inability to complete the installation of the operating system sometimes accounts for owners optical drives with connected. The problem is to stop loading the operating system files at 25-84% - the error message 0xc1900101-0x20004 appears on the screen. The problem is solved simply - just disconnect the cable from the drive, returning it to the place after installation.

In the list of problems with the installation, you can find the error C1900101-20017.
It occurs solely when trying to install the system on a computer with overclocked pentium processor G3258. Error is eliminated by disconnecting overclocking or one of the core cores.
It is often an error and a PC or laptops with a UEFI-load enabled. To solve the problem, it is recommended to change the BIOS settings. Make it is easy - just go to the BIOS interface when loading the system, find a parameter with the name and change its value to "disabled".
Summarizing
Installation from a flash drive is the fastest, and sometimes the only one (many modern PCs and laptops are no longer equipped with a drive for disks) method to get a modern operating system.
This will take not so much time and knowledge.
Depending on the performance of the computer, all the steps will take no more than 3 hours, and the starting user will receive a certain experience of working with software Microsoft.
At the end of 2019 with download windows 10 To install the methods described below, loaded windows version 10 1909 NOVEMBER 2019 UPDATE. If you have already been installed licensed windows 10 On a computer or laptop, obtained by any way, enter the product key when installing is not required (you should click "I do not have a product key" at the appropriate stage). More about the features of activation in the article: (you can work without activation, see). If you only need to fix the problems with the installed OS, while it starts, you can use a simpler method :.
- On the first screen of the installer, you will be asked to select a language, time format and a keyboard input method - you can leave the default values, Russian.

- The next window is the "Install" button, which should be pressed to continue, as well as the "System Restore" item below, which will not be considered within this article, but is very useful in some situations.

- You will fall into the product key entry window for activation of Windows 10. In most cases, besides those when you separately acquired the product key, it is enough to click "I do not have a product key". Activation will automatically after connecting to the Internet, if a licensed Windows 10 has already been installed on this computer or laptop, additional action options and when to apply them are described in the section " Additional Information"At the end of the leadership.

- The next step (may not appear if the editorial board was determined by the key, including from the UEFI) - the choice windows editions 10 for installation. Choose the option that was previously set (if the activation of the fixed digital license is required).

- Read the terms of the license agreement and accept them. After it was done, click the Next button.
- One of the most important points - selection of the type of installation of Windows 10. There are two options: update (it is possible to execute only in the case of installation new systemwhen on disk installed old version OS) - In this case, all parameters, programs, previous files are saved installed system, and herself old system Saved to the Windows.old folder (but this option is not always possible to run). I.e this process similar to simply updateHere will not be considered. Selecting Installation - This item allows you to perform a clean installation, without saving (or saving partially) user files, and during installation you can smash the discs to the partitions, format them, thereby clearing your computer from the files of the previous Windows. It is this method that will be described.

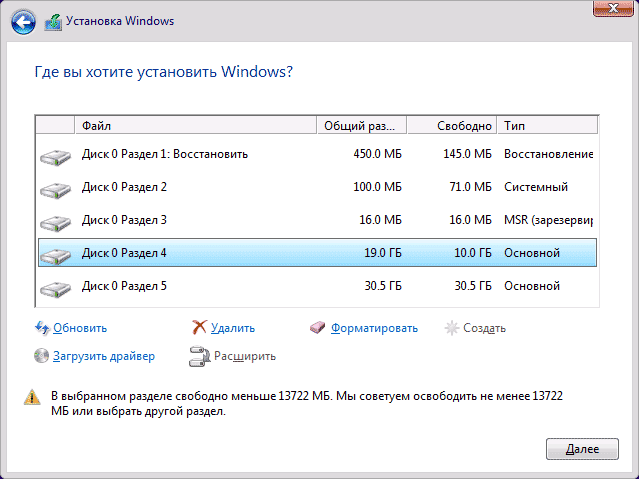
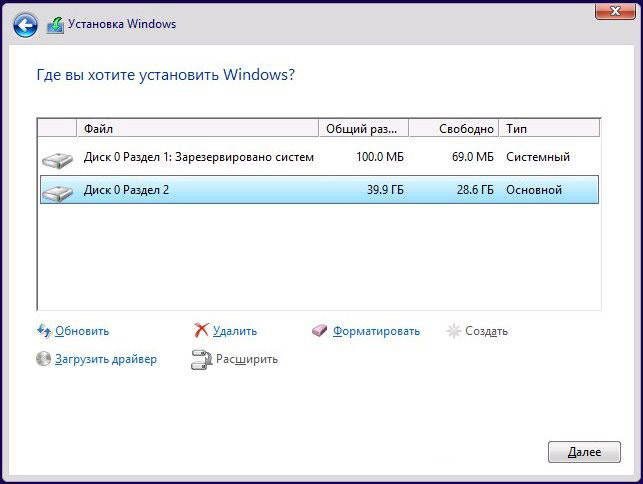
- After specifying the selective installation, you will be taken to the installation disk selection window. possible mistakes Installations at this stage are described below). At the same time, if it is not new hard disk or ssd, you will see where large quantity sections than before it was seen in the conductor, an example is shown in the screenshot. I will try to clarify options for action (also in the video at the end of the instructions I show in detail and tell me what and how can be done in this window).

- If there are several physical disks on your computer, they will be displayed as a disc 0, disk 1 and more. Everyone can have several sections. Regardless of which disc you install Windows 10, the disc 0 will be used to record system files, hidden partitions and bootloader. Therefore, ideally, install an OS on the disk 0 (otherwise, if this disk is turned off, there will be no system on another disk). If, for example, you purchased new SSD. and it is displayed as a disk 1, you can try to find a separate item in BIOS to specify the sequence hard disks and put SSD to first place, or change SATA loops (if this interface is used) between two disks to disc Because of the installation program as a disc 0.
- If your manufacturer has been pre-installed Windows, then in addition system sections On the disk 0 (their number and dimensions may differ 100, 300, 450 MB), you will see another (usually) section of 10-20 gigabytes. I do not recommend to affect it in any way, as it contains an image of a system recovery that allows you to quickly return a computer or laptop in factory condition In case of such a need. Also should not change reserved system Sections (except those cases when you decide to completely clean hDD).
- As a rule, with a clean installation of the system, it is put on the partition corresponding to the C disk, with its formatting (or removal). To do this, select this section (it is possible to determine it in size), click "Format". And after that, by selecting it, click "Next" to continue installing Windows 10. When messages appear on the installation of installation to this section, click on the message to get error information (they are discussed later in the instructions). Data on other sections and discs will not be affected. If you have installed Windows 7 or XP on your computer before installing Windows 10, a more reliable option will delete the partition (but not format), select the unintended area (unoccupied disk space) and click "Next" for automatic creation The required system sections of the installation program (or the use of already available if available).
- If you skip formatting or deleting and selecting the section on which the OS is already installed, the previous Windows installation will be placed in the Windows folder.
- The optimal method: If on yours system disk (Disc 0) There is nothing important, you can completely delete all sections of this disk one by one, select a single unoccupied space on the disk 0 and click the Next button, this will avoid almost any errors and problems. Create a D disk (if required) you can already install the system.
- If the previous system is installed on a section or disk C, and to set Windows 10, you will select another partition or disk, then as a result, you will be installed on your computer simultaneously with two operating systems with the choice of the computer you want.

Note: If you select a message that you can not install Windows 10 to this section, click on this text, and then, depending on what will be the full error text, use the following instructions: ,
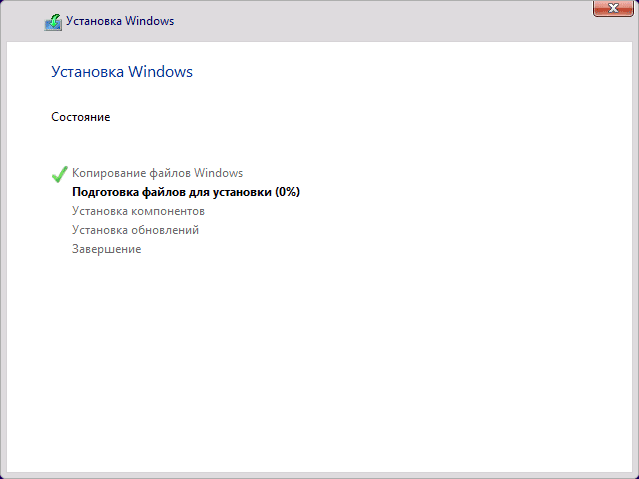
- After selecting your option to install, click the Next button. Copy will begin windows files 10 on the computer.

- After rebooting, some time of action will not be required from you - "Preparation", "Configuring components" will occur. At the same time, the computer can reboot, and sometimes "hang" with a black or blue screen. In this case, just expect this normal process - sometimes tightened on the clock. Important: If after restarting you again starts the Windows 10 installation program, simply check the hard disk or SSD boot into the BIOS or Windows Boot. Manager in UEFI, or disconnect the USB flash drive, or do not press any key when a request appears about it.

- The next step is to configure the main parameters of the system. The first point is the choice of the region.

- The second stage is a confirmation of the correctness of the keyboard layout.

- Then the installer will be offered to add additional keyboard layouts. If you do not require input options except Russian and English, skip this step (English is present by default).

- If there are active network adaptersYou will be prompted to connect to the Internet. You can do this, especially if you plan to use Microsoft account. If you need a local account - I would recommend not to connect to the network until the end of installing Windows 10. To do this, click on "I don't have the Internet" and "continue limited installation" in the next window.

- If there is a connection to the Internet, two options will be prompted. windows settings 10 - for personal use or for organization (use this option only if you need to connect the computer to the working network, domain and windows servers In the organisation). You should usually select an option for personal use.
- At the next stage of the installation, the account windows records 10. If there is an active Internet connection, it is proposed to configure the Microsoft account or enter the existing one. You can click "Autonomous Account" at the bottom of the left to create a local account (in Windows 10 home recent versions There is no item "Autonomous Account", but its creation is still possible, see). In the absence of an Internet connection, a local account is created. When installing Windows 10 last versions after login and password entry, you will also need to set control questions To restore the password during the loss.

- When using Microsoft account, you will see the offer to use the PIN code to log in. It will also be prompted to configure ONEDRIVE.
- When you select a stand-alone account, you will tell you about the benefits of using the Microsoft account (refuse), and then you will need to enter the computer username. Do not enter the administrator name, as it is fixed behind a hidden system account. You created by the user with any name in any case will be windows administrator 10.

- Enter the password for your account, confirm it, and then select and specify the answers to the control questions that will be used in case you forget your password.

- You will be prompted to include magazine windows actions 10 - new featureStore history of programs used, documents, sites with the ability to access other devices with the same Microsoft account. Enable or disable - at your discretion.
- And the final setting step is to configure Windows 10 privacy parameters, including the transfer of location data, speech recognition, diagnostic data transmission and creating your advertising profile. Carefully read and disconnect what you do not need. I turn off all the items, but if you have a laptop or tablet, you can recommend to leave the location and device search enabled, it can help find it in case of loss.

- Following this, the last stage will begin - setting and installing standard applications, preparation of Windows 10 to launch, on the screen it will look like an inscription: "It may take a few minutes." In fact, it may take minutes and even hours, especially on the "weak" computers, should not be forced to turn off or restart it at this time.
- And finally, you will see a worker windows table 10 - The system is installed successfully, you can start it with its configuration and study.

Video Instructions for installing Windows 10 with USB USB
In the proposed video instruction, I tried to visually show all the nuances and the entire installation process of Windows 10 from start to the end.
Actions after installing OS on a computer
The first thing to be concerned after clean installation Systems on a computer are installation of drivers. At the same time, Windows 10 will load many drivers of devices in the presence of an Internet connection. Most drivers will work properly, but just in case, consider that they can be downloaded:
- For laptops - from the official site of the laptop manufacturer, in the Support section, for your specific model laptop. At the same time, even if there are drivers on the official site only for Windows 8.1, 8 and 7, they can be installed in Windows 10, usually will work. Cm.
- For PC - from the manufacturer of the motherboard for your model.
- For a video card - with relevant NVIDIA or AMD sites (or even Intel), depending on which video card is used. Cm. .
Secondly recommended action - after successful installation all drivers and activation of the system, but even before installing programs, (embedded OS or using third-party programs) in order to significantly speed up in the future reinstalling Windows If necessary.
If, after a clean installation of the system to the computer, something does not work (for example,) or you need to configure something (for example,), with a high probability you can find possible solutions I have problems on the site, or use the search on the site in the menu by setting the question in your own words: with a high probability of solution will be found.
BIOS is a software package, which is configured to configure individual components from the computer hardware, as well as devices connected to it. You can get access immediately after turning on the PC, until the operating system is fully loaded. On some models of computers, instead of the traditional BIOS uses UEFI. This is a binder shell between the operating system and the "hardware". Therefore, before entering the BIOS in Windows 10, it is necessary to understand that on all devices it occurs differently. In this article, we will tell you how to go to BIOS on Windows 10.
Usually, Windows 10 is supplied in uEFI mode (except for some assemblies). To get into its settings, the OS must be installed on the computer, and the user is able to if you do not enter the system itself, then at least access the input screen and account selection.
How to open a UEFI from running OS (relevant for 32 BIT and 64 BIT versions):
- Click on the "Start" and enter the query on the keyboard. Start the application found from the top of the list from the "Best Compliance" category.
- Or click on the "Start" icon with the right mouse button and in the context menu that appears, select the desired application.
- Next, locate and click on the "Update and Security" option. If the search is complicated, then enter this combination into an empty Count "Find" (at the top of the window).
- Scroll through the list and select "Restore". On the left side of the window will display the user-friendly settings. Find the inscription " Special options Downloads »and" Restart Now "button. It is with its help that will be input to the UEFI parameters.
- Start the reboot process strictly using this method so that after starting the system, get to the screen you see in the screenshot below.
- Select the "Diagnostics" icon and go to "Advanced Parameters".
- The option that is dedicated to the UEFI settings appears here. Click on it and confirm the selection. After that restart the device.
After that, UEFI will open, which many users are used to calling bios. Produce need settings, then save changes made.
In safe mode, you can get through the menu Safe Mode.. After that, all necessary programs will be available to the user.
If the operating system does not load, but at the same time you can get to the user selection screen for the input, then you can get to UEFI from here. For this:
- Wait until the screen appears where you can select an account, then click on the "Power" icon.
- In the opened context menu, a button for reboot will appear. Click on it by holding the SHIFT key on the keyboard.
After that, the very " blue screen"(As in the screenshots above), where you can open UEFI through the" Advanced Settings "menu, following the instructions that are described above.
How to get into the BIOS after turning on the computer
By default, you can go to the BIOS (or UEFI) during the system launch. But keep in mind that on all models of computers this happens by pressing different keys.
- on laptops ASUS BIOS. Opened using the F2 button on the keyboard. Suitable for devices from other manufacturers, especially if you use an outdated laptop;
- in stationary computers need to press DEL. Suitable for some laptop models (Lenovo, HP).
Press the key immediately after the boot screen appears. If nothing happens, most likely you use an incorrect button.
UEFI performs the same actions as BIOS, but a little differently. The main differences of the UEFI from the traditional BIOS are that it stores all system information about the computer in a special file, which is stored on HDD (SSD) and has a graphical interface.
Immediately after turning on the computer at the bottom of the screen, there is an inscription: "Tap the name_klavshi to get into the BIOS." If it is not, then read the instructions for the device or use the search on the official website of the motherboard manufacturer (for stationary PC or laptop) to accurately learn the right button.
In other cases, the system simply does not have time to process the command. It happens because of the really fast (compared to the remaining OS from Microsoft) download "Dozens" In this case, you can try to disable this feature. To do this, you need to get in Pu. If you do not know where in Windows 10 control panel, then follow the instructions:
- Press the Win + R keys combination on the keyboard to invoke the "Run" utility. Here enter in the empty CMD graph and click OK.
- Through command line Enter Control.exe and press ENTER to execute the command.
- The "Control Panel" appears.
What to do if I can't do it? If the string is displayed in gray, then first click on the blue inscription "Changing the parameters that are not currently available" (administrator rights may be required).
- After that deactivate quick Start And save the changes made using the corresponding button.
Now when you turn on the computer, try clicking on the keyboard the desired button to call the BIOS (UFFI). After you set up the desired parameters, you can turn on the function for accelerated launch Systems.
Conclusion
Now you know how to get from Windows bIOS settings (UEFI). You can do it immediately after starting the computer. You can change necessary parameters and run the operating system in safe mode. If for some reason the button does not work, then try to disable the quick start or restart the device through the parameters menu.
Video
For clarity, we offer you to see and video dedicated to this topic.
 Cellular - what it is on the iPad and what's the difference
 Go to digital television: What to do and how to prepare?
 Social polls work on the Internet
 Savin recorded a video message to the Tyuments
 Menu of Soviet tables What was the name of Thursday in Soviet canteens
 How to make in the "Word" list alphabetically: useful tips
 How to see classmates who retired from friends?