How to put SATA drivers to the already installed Windows XP. How to connect the IDE hard disk to a new motherboard? Install SATA after installing Windows XP
should not be accompanied by you with any difficulties. At the request of the visitor of our site, let's go through all the steps connections Hard disk SATA. From setting to the system unit before determining it in the BIOS. We will install a disk drive Western Digital. (465 GB, IDE) SERIAL ATA II standard.
Note: You can also use articles on this topic: how to install in the system unit, and!
on maternal asus board P5K SE with four SATA connectors on board

the OPTIARC DVD RW drive is already connected to one connector and it works for rumors, well, now I will check everything and start working on the computer turned off.
First insert our hard drive in our special basket of our system Block, no video card is not necessary to remove, it is above and the hard drive we put a little lower it, he got up to the place proposed on him

It can be noted that there is enough space for ventilation under it, then fasten it with four screws. Between the basket and hard disk housing Special rubber washers, feature of this 6Ar1 case.
And here are our four connectors of SATA controllers on motherboard, the connector number three is busy drive, and three others are free, choose one of them, such as the number one connector

You will not connect the information SATA cable yet, it will not be to interfere with the connection to our hard disk of the power cable, so connect our hard drive and power supply.
Free cable comes from the power supply, connect it to the power connector on the rigid disk, connected

if there is no cable with SATA connector on your power supply, you will need such an adapter.

Now it is the queue of an information cable, with absolutely identical M-shaped plugs at the ends

connect one end of the cable to the motherboard, and the other to the hard disk


now we close the side cover of the system unit and turn on the computer.
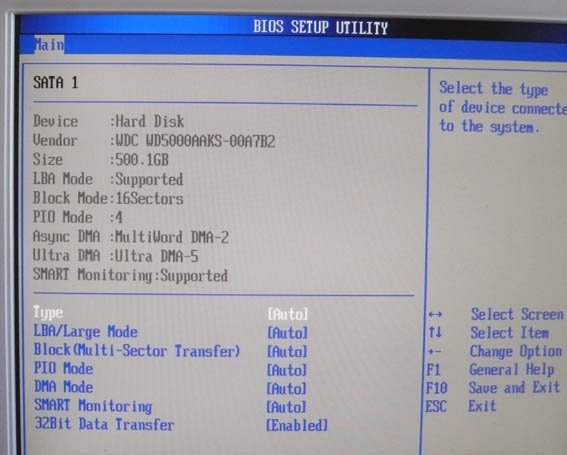
We immediately go to the BIOS and watch whether we are right Connected SATA hard disk. On the initial tab, Main shows that the first SATA controller determined our hard drive Western Digital, and on the third, as it should be our OPTIARC DVD RW drive.

All information about our hard disk
To install the operating system, we need to change the boot priority from the hard disk on the BOOT tab, go to this tab and change

Insert a Windows distribution disk drive, reboot and install the operating system.
And sometimes friends such seems to be a simple action like connecting SATA Hard Drive to the Motherboard, wraps with an adventure. Our reader Alexander collided with such a problem. SATA connectors on his motherboard were uncomfortable, near the connector PCI EXPRESS. Video card. So it was practically impossible to connect this very video card if the hard drive was already connected to the SATA connectors, the video card simply rested into the SATA interface cables and was not inserted completely into its PCI Express connector. Alexander came out of the position like this: bought two SATA interface cables, with a connector in the form of a corner and one even cut off this way and then everything connected.

In this article, consider the installation of hard drive drives. In particular, consider their configuration and physical installation.
In order to install in computer hard Disk, it is necessary to do the following:
- configure the drive;
- configure the controller or interface device;
- install the drive into the computer case;
- set up the system as a whole to recognize the disk;
- perform a logical separation of the disk;
- perform high-level formatting of sections or volumes.
Before starting hard installation Disc, it is advisable to familiarize yourself with the documentation for this drive, controller or the main adapter, system BIOS and some other computer devices. But, as a rule, it will not give anything to a simple user, so the documentation can be postponed to the side. In modern computer systems, it is optional.
If nevertheless, you decide to familiarize yourself with the documentation, the collector company will provide you with limited information about this device. As a rule, the full documentation must be sought and downloading from the manufacturer's manufacturer. The same applies to other devices of most systems that are presented today on the market.
Hard disk configuration
Before abandoning to mount hard disk, it must be configured. IDE drives most often require the parameter-driven switch setting or you can also use the option Cable SELECT and 80-core loop.
To configure the Serial ATA hard drives, these jumpers are not needed. There are cases that all the same drives have such jumpers installed directly at the factory.
SATA hard drives are connected to the SATA controller using a cable, forming, point-to-point connection.

Unlike hard drives based on the parallel interface of the Ata (outdated option), SATA drives do not have any leading nor driven devices. The picture shows that some SATA drives have jumpers to resolve compatibility. In modern hard drives with a data transfer rate of 300/150 Mbps to switch to a slower mode, which is necessary for correct operation of old controllers, you need to rearrange the jumper. For considerations of compatibility with drivers and other software, most controllers can operate in "compatibility mode", in which the "Lead-Ledoble" configuration is emulated, but physically this mode is not implemented.
Hard Disk Controller Configuration
The hard disk controller in old models is installed in the connector system board. All drives developed in lately IDE and SATA, have a built-in controller on the system board. Almost always the ATA device controller is integrated into the motherboard and is configured using the installer. bIOS Parameters. In this case, the separated controller does not exist. Some systems in addition to the integrated controller may have a controller on the extension card. This situation can occur when the integrated controller does not support more quick modes Data exchange (300 Mbps for SATA and 133 Mbps for PATA) peculiar to new hard drives.
In such cases, you do not need to resort to the installation of the controller in the motherboard, it is better to update the system fee itself, so you will receive additional functionality And spend a little more.
There are such cases when adding a controller card makes sense, for example, new Disc SATA "hangs" to the old motherboard, on which there is no this controller.
Controllers on extension boards require specified combination The following system resources:
- address Boot ROM (optional);
- interrupt (IRQ);
- direct Memory Access Channel (DMA);
- i / O port address.
Not all controllers use each of these resources, but there are such. In most cases modern controllers and systems supporting Plug Angle technology are automatically configured by the basic I / O system of the computer and the operating system. The system allocates resources that do not lead to conflicts with other computer devices.
If the operating system or equipment does not support Plug and Play technology, then the adapter must be configured manually. Some controller cards include utilities that allow you to perform such configuration. softwareOther controllers have a number of switches or jumpers for this.
ATA Interface Driver is part standard system BIOS Computer And allows you to load from PATA and SATA devices. In such systems containing sATA interface On the motherboard, the driver of this interface is also built into the BIOS. The BIOS provides the functionality of the device that needs a system to access the disk before it can download any file from it.

Note!
Despite the fact that Windows operating system (OS) supports standard drivers IDE / ATA, the interface of this type is usually embedded in the components of the Southern Bridge or the I / O Controller of the System Board Chipset and requires download special drivers. When using a motherboard, which is more new than your OS version (for example, a new motherboard purchased in 2010, which works in the operating room windows Environment XP), make sure that immediately after installing Windows, the microcircuit dial drivers were installed, supplied with motherboard. If the controller supports the SATA interface in ACHI mode or the SATA Raid array (Redundant Array of Independent Disks - an overweight array of independent drives), and the Windows XP system is installed on the computer or an earlier version, as a rule, is required for installation. Driver located on a diskette or previously recorded on installation disk Windows.
Keep in mind that all these drivers are included in the installation kit. Windows Vista. and 7. If the controller is the older installed operating system, the necessary drivers will most likely be part of the installation CD. At the same time, it is always recommended to search the Internet a fresh version of the controller driver and install it immediately after the operating system.
There are SATA controllers that have their BIOS, supporting ACHI, RAID, large discs or other functions. If you do not intend to use these functions or Bios maternal The boards itself has this support, then use the BIOS controller is optional. Many controllers on extension maps have switches, jumpers or support programs that allow you to enable and disable BIOS support.
In addition to functions bios downloads The controller provides other functions, such as:
- configuring a RAID array;
- configuration of the controller;
- diagnosis.
If a bIOS system The controller is enabled, the address space in the upper memory area (UMA) is required to place it, which occupies the last 384 Kbytes within the first megabyte system Memory. The upper memory is divided into three sections of two segments of 64 KB in size, while the first portion is assigned to the memory of the video adapter, and the last - for the system BIOS. C000H and D000H segments are reserved for adapter BIOS, in particular for hard drive controllers and graphic controllers.
Note!
The memory areas occupied by the BIOS of various adapters should not overlap. Most boards have switches and jumpers with which you can change the BIOS addresses, sometimes it can be done and programmatically preventing a possible conflict.
Installation of hard drive drives
Hard drive drives are mounted in the computer case. This requires the corresponding screws, brackets, facial panel, etc.
For the installation of some drives, plastic guides will be required, which are attached to the device on both sides and allow you to install it in the appropriate place in the housing.

These guides should be attached to the computer case or to the hard disk when buying.
Since PATA and SATA devices use different types Cables, check whether the cable is the controller and disk. To use the PATA mode with speed 66 Mbps and faster (up to 133 Mbps) you will need a 80-cable cable. It is also recommended to use it at lower data rates, such as 33 Mbps and less. To determine what your cable (40- or 80-core), count the tubercles on the loop - each tubercle corresponds to one dwell. One of the characteristic features of the 80-cilaf loop is the color of its plugs: inserted into the motherboard is painted in blue, and inserted into the drive and driven device - black and gray, respectively.

If you plan to install 3.5-inch hDD In the 5.25-inch frame, you will need another type of mounting linings. Most of the 3.5-inch disks have such lining included.
They can also enter the housing.

Note!
It is necessary to select the length of the connecting cable (loop). In some cases, the cable does not reach new hard disk. Try to move it to the closer compartment, or use a longer cable. The IDE drive cable is limited 45 cm than shorter, the better. However, in a set of some buildings, you can find longer cables, up to 67cm, moreover, having 80 lived. Long cables, especially having a non-standard, '' rounded '' length, is not recommended, it is not recommended that it relates to discs with a data transfer rate of 133 Mbps. Using too long cables causes errors to transfer and loosening the signal, it is also possible to distort the data on the disk. If you use a cable longer than 45 cm, then as they say, you yourself create problems.
After unpacking a new hard disk, you should be in the presence of the following:
- device itself;
- software (optional);
- mounting linings and screws.
Devices supplied as OEM, i.e. In packages, except themselves may not have anything else. In this case, you yourself will have to take care of cables, screws and other accessories.
Installation of the Hard Disk ATA (PATA)
To mount the Hard disk ATA, you need to perform the following steps:
1. Look, if there is an unused 40-core IDE connector in the computer. FROM pentium processor You can install four IDE devices (two each channel).

Tip!
To increase the performance of simultaneously used devices, such as drives and hard drives on optical disksThey are connected to different cables. Hard disk and drive is not recommended to "hang" for one loop.
2. Pay attention to how the cable is connected to the drive. The red power cable wire is connected to the first contact of the drive connector. Despite the fact that the plug has a special key from not proper connection To the hard disk, it can be easily connected incorrectly, which will lead to the failure of the device.

The first pin contact is most often oriented closer to the device's power connector. The plume has a special key for properly connected to the device.

Tip!
Remember that modern ATA hard drives to work in Ultra-DMA speed modes (66-133 Mbps) requires an 80-cable cable, and you can also use it to connect old devices. The 40-wire cable can be used to connect devices with speed 33 Mbps and slower. A plus of the 80-cable cable is that on devices you will have to install only CS (Cable SELECT) jumper, and you do not need to choose which of the devices will be the leading, and which driven. Today, the ATA connection is already quite rare, all modern hard drives are connected via SATA interface.
3. Set the Master / Slave / Cable SELECT switches on the back of the hard disk. When using a 80-cable cable, it is enough to install the Cable SELECT jumper on all devices. Otherwise, one of the devices connected to the loop must be the master (master), and the other is driven (Slave). Please note that some outdated devices when applying them as leading paired with another slave, require simultaneous installation of Master and Slave jumpers. But today, you are unlikely to get so hard drives to your hands.

4. Place the drive in the 3.5-inch chassis compartment and secure it with screws. When performing this operation, significant mechanical effort cannot be made - the drive must freely become in its place in the case.

Make sure the screws are not too long. If the screw turns out to be longer than the depth of the hole in which it will be screwed, you can damage the device and disrupt the thread.
5. To the rear of the drive, attach an interface cable. If an 80-cable is used, the blue plug must be inserted into the motherboard connector, black - in the nest of the drive device, and the gray (usually it is medium) - in the slot of the slave.

6. Connect the power cord to the hard disk, most often it is a four-room with a standard connector.

On this, the installation of the hard disk with the ATA interface is completed.
Consider connecting SATA hard drives.
Installation of hard disks SATA
Step-by-step procedure for installing the SATA hard disk is somewhat different from the installation of the ATA disks.
1. Check if there are unused SATA connectors in the system.

2. Gently insert the hard disk in the compartment of the appropriate size, if necessary, using the lining, and screw the fastening screws.
3. Connect the SATA data cable to the SATA controller. Data cables can be combined in one shell with SATA power cable. When using a separate data cable, one connector is connected to the drive, and the other to the SATA controller.

4. Connect the corresponding power cable to the drive. Some SATA devices have two power connector: standard 4-pin and special 15-pin - in this case, feed the power to any of them (but not two at the same time). If the device has only a 15-pin power connector socket, and the power supply does not offer such a plug, you will have to additionally purchase a special adapter "4 to 15" (if it is not included in the device kit).


Power connection through a special adapter "4 V 15"
Attention!If the device simultaneously has 2 power sockets (standard, 4-pin, and SATA type, 15-pin), in no case serve power on both connector simultaneously, otherwise you can damage the device.

system configuration
After the hard disk is mounted in the computer case, you can start configuring the system. The computer must report information about the drive so that it can be loaded from it when power is turned on.
In Windows 2000, XP, Vista and 7 systems, a command is used. They can be found on the boot CD operating system. If the operating system will be installed on the new disk, its separation and formatting will be executed as part of the General OS installation process.
If you want, you can form sections and format manually formatting before installing the operating system, but for this you have to use special programs. It is easier to do this during the installation of the system and its means.
Automatic definition of hard disk type
Almost all the PATA and SATA drives in modern BIOS provides automatic definition of types, i.e. From the drive, on request, its characteristics and necessary parameters. With this approach, it is practically excluded errors that can be allowed when entering parameters manually.
And so, proceed.
1. Turn on the computer and press the key you need to enter into bIOS settingsAs a rule, it is Delete or F1. If the BIOS provides automatic definition of devices, it is recommended to set this mode, as they will be determined optimal parameters Devices. SATA devices can also have the support of ACHI and group multiple devices in the RAID array. Set the ACHI parameter for SATA disks if it is supported, and exit the BIOS setup program.

2. Restart the system. If a installed device not bootable and you work under windows control XP or later version of this OS, the new drive will be automatically determined during the download process, and the necessary drivers will be installed for it. It should be noted that the system will not see a new device as that (i.e., it will not be assigned a letter) until the disk partitions are created and formatting them.
If a new device is bootable, you will have to boot from the CD again to create partitions on the new disk, perform formatting and install the operating system on it. If the motherboard supports SATA in ACHI mode or SATA RAID arrays and you run running Windows XP or more early version This OS, to install the device, you will have to use a floppy disk with the controller drivers or rewrite these drivers to the installation windows disk Or use the floppy drive. Otherwise, the system does not recognize the gesting disk and the process of installing the system will not be possible.

I note that all required drivers Already integrated into new operating windows systems Vista and 7, and when they are installed, problems with the definition of the hard disk controller does not occur.
Determining the type of drive manually
If the computer has a system board that does not support the automatic definition function, you will have to enter the corresponding information in the BIOS manually. There are several standard combinations in BIOS, however, they are most likely outdated, as they provide support for the drives of only a few hundred megabytes, and even less. Most often you have to choose a custom type hard Disc, and then specify the values \u200b\u200bof the following parameters:
- number of cylinders;
- number of heads;
- number of sectors on the track.
The required parameter values \u200b\u200bcan be found in the documentation attached to the hard disk, but they can be printed on the sticker on the hard disk case. Be sure to remember or write them down.
The last option is preferable, since the parameter values \u200b\u200bwill be required to you if the system BIOS is unexpectedly "forget" due to the discharged battery on the motherboard. Recorded information is best stored directly inside the system unit, for example, they can be glued to the body using a tape sticky. Sometimes it allows you to save a lot of time.
In the event that you cannot determine the correct values \u200b\u200bof the parameters of your hard disk, contact the manufacturer's website. You can also use one of the diagnostic utilities available for download via the Internet.
Depending on the bIOS manufacturer and its versions you can configure other rigid parameters Disc, in particular, the data transfer mode and addressing logical blocks.
Still, if your motherboard BIOS does not support the automatic definition function, you need to think about the upgrade of your computer, and replacing the outdated system board to a more modern, which includes many different functions, including support for modern hard drive drives.
Computers are complex devices whose work provides many different elements. One of them is a SATA controller. What is myself this device? How to work with him? How to take care of his speed? Here is an incomplete list of questions that will be discussed within our article.
It is a technology with which the storage devices like a hard disk and optical wire can exchange data on high-speed cable with a motherboard. It is optimal to use the connector with the smallest number. Ideal are subject to SATA0 or SATA1. For possible is the use of other ports.
When working with hard disks, it is originally necessary to use SATA0. It is installed on the system carrier. Each subsequent must have a number one more and so on. If there are several hard drives and RAID mode is used to increase the storage location, one wire is connected to the connector, and then everything else is supplied to the controller.
Modes of work

Controllers determine how the hard disk will exchange data with the motherboard. There may be three interaction principles:
- SATA IDE controller operation mode. The easiest option. With it, the hard disk functions as an IDE or rata. In this case, it has limited potential, and also does not differ in speed. But this mode is very valuable if it is necessary to ensure the compatibility of interaction with the equipment, which is already outdated. You can also use it in cases where the computer has only one hard disk and does not need to use various functions of the drives.
- SATA AHCI controller operation mode. In this case, the use of advanced drive functions is possible. As an example, you can bring Native Command Queuing and "hot" replacement. Also, a significant advantage is a high interaction rate (if compared with the previous option).
- Operating mode rAID controller. With this setting of several separate hard drives, you can create a single data storage array. It is distinguished by the redundancy of information, as well as higher speed. The first is achieved through the creation backup Hard disk, and second - bundle disk space. When this mode works, AHCI functions with it.
Notes
Initially, it is necessary to set the mode of operation in which the SATA controller will be operated correctly for a laptop or computer, and only then to engage in the operating system. After all, if it is done later, the OS may incorrectly work until the refusal. So, this may occur due to the fact that the disk driver will be disabled or the wrong BIOS parameter is used.
Causes of faults

Suppose PC stopped working with a hard disk. This malfunction may have several reasons:
- Cables are loosely connected.
- Winchester failed.
- It does not work or slows down the SATA controller.
In the first embodiment, you need to check the cable fit density. In the second, most likely, you need to replace the device. And in the third - to put correct settings. For such changes, administrator rights are necessary. If they are, you can start solving a malfunction.
How to enable SATA controller in computer bios?
Initially, you need to go to the BIOS. There is no single standard here - each machine uses a separate special key to do this. To find out, you need to get acquainted with the instructions on the screen, which occurs immediately after turning on the computer. Moreover guaranteed result It must be pressed more than once.
After the input is successfully completed, you need to find an Integrated Peripherals item. If it is not, it will be suitable for anyone who is consistent in meaning. It contains all the parameters that belong to the internal capabilities of the motherboard. Now you need to find Onboard Sata Controller. If it is not, just look for any entry where the "SATA controller" is written. This parameter can only be set to disabled and enabled (respectively disabled and enabled). It is necessary to trace it to be activated.
You can click on the F10 and the input button to save changes. If this is not done, the system itself will propose to make these actions. After that, you should restart the computer and once again go to the BIOS to make sure that the Winchester was detected. You can understand this by the Standard CMOS Features item. Now we know how to enable the SATA controller. Let's deal with the modes.
AHCI connection

This is done with the help of the same bios. To make changes to go to the Control window. After that, you need to search for IDE, AHCI or RAID. They must go along with SATA. Also additionally on some devices is the word "Mode". The same mode that we do not need, turn off, and the necessary, on the contrary, connect (it all is done also by changing the disabled to enabled and vice versa).
If, when you try to change the mode, a message is displayed that no disk is not located, which means there are no necessary drivers. Therefore, it will be necessary to enter the operating system and with the administrator's rights first to establish them. This can be done and using the OS installation disk. But still less costly time is the first option. Also do not forget that made in basic system I / O changes need to be saved to start acting. How to do this, it was said in the previous paragraph.
In general, here, how to switch the SATA controller in aHCI mode or the other you need. At the same time, an accurate following instructions are important to not touch anything superfluous. Now let's pay attention to two options that can be useful when configuring a computer. Moreover, the main topic of the article is already disclosed, and we will now deeper our knowledge.
SATA CONTROLLER MODE.

This option is used to indicate the operation mode. This we already spoke. Now let's pay attention to how and what works in this case. If you set the IDE mode, then the need to use additional drivers when working with technique, which uses this technology. RAID mode is compatible with all OS starting with Windows 2000. The only feature is that there are outdoor carriers for drivers (if the technique of the same year of release, as the operating system). Otherwise, their role can successfully execute a flash drive or CD. But talking about creating makes sense only if there is at least two hard drives. Positively on their work will affect the same brand and volume. And if the party and Firmware coincide - it is already the ideal conditions for using this regime.
Ansi is more new technology And with old (relatively) systems are not compatible. Due to the fact that this mode is positively affecting the speed of technology, it is recommended to stop on it. Moreover, if RAID and ANSI can still be run on representatives of operating systems and computers starting from generation 2000, with Windows 9X they will not help: they simply do not have the drivers that would combine work software and equipment. Note that the changes must be made before the OS is installed. If you change the mode when the operating system is already installed, you can detect on your computer " blue screen Death ", on which information about the error and the impossibility of correct work will be displayed. If there is no desire to see him and demolish the OS, then it is necessary to enable the controller driver to one that will work with new settings.
History of development

The first of the family controller is considered to be SATA 150. It is an interface that uses serial tire data transmission. Works at a frequency of 1.5GHz, thereby providing throughput 150 megabytes per second. The standard has spread due to a number of advantages that previous developments have not been. So, the architectural advantages of the tire, the small size of the connectors and the cable, convenience when used and the overall reliability of the connection played a role. Also, when connecting to one port, two devices does not arise here conflicts and problems do not appear.
The second generation of SATA 300 provides operation at a speed of 300 megabytes in one second. Theoretically both options are compatible, but problems are not excluded. But, justice for the sake of, it is worth saying that even the most modern hard drives have not yet learned to act faster than 130 megabytes per second, therefore there is no particular sense to chase the numbers in this case. Therefore, when using the types of controllers there is no difference. It is important only that the first is connected.
Conclusion

The SATA controller is definitely an important part of any computer. This is a device that allows us to access data, which represents value. Also, it is also worthy of what success managed to achieve the developers of this part in speed. In addition, this suggests that there is a significant reserve for increasing the capacity of hard drives without finalizing data transfer technology, which makes it unlikely that it will be outdated and unnecessary in the next few decades.
Hey! I entered a very interesting question.
My reader collided with the installation problem old hard IDE connector disk on the new motherboard, where only installed sATA controllers. And the problem is not even so much need to use old hard Disk, how much to gain access to information that was kept on the old Winchester.
Need to connect the old hard drive to the computer arises from many users, so I offer my decision.
This is how SATA / IDE hard disk connectors look like.
Of course, these connectors are not compatible with each other. The IDE connector connects to the motherboard with a wide flat loop, and the SATA connector is a thin SATA cable.

The fact is that manufacturers of motherboards are trying to save on any trifles. Why install outdated connectors on the board, if almost no one uses them? The connectors will only take an excess place and increase the cost of the motherboard.
In addition, I propose to get acquainted with this article - the cheapest way to connect the IDE device, which will also help you solve the question.
We are looking for a decision!
So, we can do as Not professionals. We install the old IDE hard disk to another computer with IDE connectors, copy it all necessary information on the flash drive or outdoor hard Disk, then copy all the information to a new computer. Fine, information is saved, but what should we do with the old disk? Just put it on the shelf and forget about it - this is not our method.
We will go different ways, so to connect the hard disk IDE we will need a PCI controller - SATA / IDE.
Controllers may differ from each other by the manufacturer, the number of connectors can be implemented on different chips, but these differences do not affect the principle of working with them.
This is what the miracle of technology looks like. And here is a link to a similar option for ordering from China - http://aliexpress.com/pci-ide-sata (Note that the controller on the link has a PCI Express-X1 connector)

The cost of such a controller is about 400-500 rubles. And it worries its value by 100%, as in return we get the opportunity to install both old railway cards for new parents and new hard drives on old motherboards.
This controller has several SATA connectors on board and one IDE controller. We should not forget that we can connect 2 devices to one IDE to the controller, which is why there are connectors for connecting 2 devices at the IDE.
All we need to do it connect the PCI-SATA / IDE controller to the motherboard. To do this, we just need to stick it into the connector PCI motherboard and fix the bolt.

After connecting the connector, we can only fix the hard disk inside the case and connect two wires to it (data cable and power).
So we get next scheme Connections.

- connect the controller to the motherboard;
- connect the IDE loop to the controller;
- we connect the loop to the hard disk;
- we connect the power to the disk;
Note that connectors iDE power Hard drives and SATA are also distinguished. Usually, on the computer's power supply and those and other connectors, there is enough with a margin, but sometimes to connect SATA hard drives you have to use this Molex adapter (PATA) - SATA.

If you do not have enough Molex power connectors, use special splitters.

After we have dealt with the connection, we only have to turn on the computer and make sure that the hard disk is defined in the system. To do this, just go to "My Computer" and watch your local disks. In addition to existing ones should be added local disks of the new railway?
I also want to draw your attention to the fact that, although the kit goes driversThis given the controller does not need them. The system itself will find the necessary drivers.
For the last, I will add another argument in favor PCI-SATA / IDE controller. You can safely install the operating system to the hard disk connected through such a controller, which is repeatedly proved.
This is how this very useful device can make life easier for us.
As always, leave your impressions, comments, wishes for the article in the comments below. I try to answer each of them.
See you in the next lesson, where I will tell how to test hard disk on broken blocks.
PS. I hope many readers have noticed that the site has changed a bit. Now he likes me even more! I would like to know your opinion on the new design site.
Installing a hard disk on a computer - the occupation is not complicated and there is nothing to be frightened if you have to do it yourself, even if you have never seen your computer in the open form. I'll explain everything now, and everything will succeed.
Installing a hard disk to a computer will be required if you are going to update your device, collect your computer from scratch or want the second HDD. This instruction will help you in the first two cases. But in the case hDD replacement I will not tell how to extract the old one, I think there will be no problems with this, but I'll show you how to put a new one. But about the connection of the second hard, I will tell you somehow another time.
Installing a new hard disk begins with screwing it to the case. This is done with bolts. There are threaded holes in the hardware housing, there are grooves in the computer case. Through them and fits.
Make sure that the installed device does not interfere with the ventilation inside the system unit, and that all wires and loops are calmly reaching it without stretching.
Only on the service https://doctorsmm.com/ in a limited period of time, there are discounts for the sale of views in instagram. Hurry up to have time to purchase a resource with the most convenient high-speed mode to video or broadcast, and experienced managers will help you deal with any matter.
Connecting a hard disk to the motherboard
Bolts are fixed, and go to wires and loops. Connect with which the HDD will communicate with it.
Depending on the type of HDD, they will differ - ATA (IDE) and SATA. The first older, second new, but both types are still on sale.
Connecting the IDE hard disk to the motherboard is carried out with a loop, which is characterized by a large number of contacts, pins, and therefore it is wide. The plume contains a lock that does not allow you to connect it incorrectly. Therefore, it is impossible to be mistaken. Connect using an HDD loop IDE and motherboard.
Connecting the SATA hard disk occurs with a narrow loop. It will be impossible to confuse the socket of connection on the motherboard, since SATA is suitable only in the correct connector. With the SATA loop, you should connect the HDD with the motherboard.
Connecting a hard disk to power
In harsh iDE discs And SATA varies and power cables. Most for one and other species or there are special adapters.
For connecting hard disks IDE is used by the 4-pin Pyrov connector. Peripheral Power Connector. For SATA hard drives, the SATA Power Connector connector is needed. In both cases, it is impossible to confuse the connection, so do not be afraid that you do something wrong.
Differences of the connection of hard disks IDE and SATA
It would seem that the connection procedure is the same, but in fact the IDE is slightly different from SATA in that it is necessary to establish the position of the jumper, the so-called jumper.
The motherboard is usually supplied by a pair of connectors for IDE devices, and each can be connected to two devices. In each pair there may be one Master device and one slave, and it is impossible to be two identical. Hard disk must have a Master position if Windows is loaded from it. The second device in the same branch of the connection must be Slave.
If all this is hard to understand, simply put jumper on the master if only one hard disk is in your computer.
Jumper Connection Map You can find on the hard disk housing itself.
With SATA there are no such problems. Leading and slave positions are installed via BIOS. When connecting the SATA hard disk, you will need to configure it as bootable if the operating system is installed on it.
 How to pay a domain name
 Domain zone of tokelau islands
 What is domain what problems may be
 Yandex Wordstat: detailed instructions for using the service and grouping operators and a complicated request
 Editing DBF files
 Xenu Link Sleuth - What is this program how to use the Xenu program
 Methods Copy and insert text from keyboard without using mouse