Victoria hard disk diagnostics. Victoria hard disk checking. We restore the hard disk using the Victoria program
"Victoria" - a PC program is aimed at an extensive range of users. Used to restore information of hard drives with sATA interfaces And the IDE of their testing. The program allows deep, on all sides and quickly evaluate the condition of your hard drive.
Main features
- - Shows complete technical information About the hard disk
- - manipulation with sound noise level
- - recovery and change of the physical volume of the drive
- - You can view S.M.A.R.T. Installations, instant assessment of the status register and pseudographic scales.
- - Full and evaluation modes of constructing surface graphics
- - able to determine the controllers available in the SATA / ATA system, as well as additional
- - method of redistribution of sectors from the reserve hides surface defects
- - Measurement and control of hard drive
- - Tests the interface and buffer memory, during reception and transmission of information, on the presence of bugs and distorting data
- - It is possible to start and stop the spindle drive of the drive
- - cleaning all the hard drive or its part
- - puts out the adjustment speed of reading by graphic methods
- - Allows you to measure random, linear, non-linear read speed from the disk.
- -Can the shaft rotation frequency
- - Copying data by hard disk sectors
- - Indication of hardware modes, visualization of error codes through indicator lamps
victoria How to use?
Download the program by reference. Unpack the disk image with extension .iso available there rewrite on the disk. It is important not just to write this file to the disk, but to write out the image.
Next you need to run the program. This is done with BIOS. Insert our disk and turn off the computer. To get to this BIOS, you need to click on the computer on the keyboard on DEL or F2.When you will enter the BIOS in the blue menu.
Choose " Advanced Features."Boot Sequence and you need to select the boot with CD / DVD. Then you need to save everything and quit "Save and Exit Setup". If your bios menus does not have such items, then look for something similar and with the word boot.
With the correctness of everything done you automatically leave the BIOS and starts Victoria

Run "Victoria" and data recovery
When you run the program for the first time, you will need to click on the "P" keyboard to select the drive you need. In all menus, the item you need is selected by the "Down" and "Up" keys. When moving the cursor, the indication will be noticeable, which means the readiness of the hard disk.

The drives of working normally burn two DRDY and DRSC indicators, may burn inx.
The AMNF indicator can burn in the error register. The remaining should be inactive.
Now choose the item you need the ENTER button and the program is looking for external controllers And hard drives on them. After they define all the good and truly present HDDs in the "Master" position. The remaining drives will not be seen. Then, after finding additional ports on the screen, information appears in the form of a table.
It contains the name of the Developer of the Controller (VENDOR Code), the name of the controller (ID CODE), the class (EXT, INT, RAID), the port address (if not found, then dock), the name of the HDD (only if it is ). In order, everything will be numbered in order and you will need to choose the desired one.
It is possible that Victoria does not find drives on all Promise controllers. And therefore, click on F2, thereby opening the passport of our drive. In the passport itself there are data on hDD characteristics And its parameters are described. When analyzing the disk, the program takes into account the data in the passport.

Testing Winchester
In Victoria there is a good hard drive scanner. It allows you to diagnose the hard drive to the presence of failures, interface errors and floating defects. Most drives program can test at the limit speed. And it does not depend on the type of interface cable and controller.
Unlike other utilities of this type, exclusive algorithms are applied here. They include the timer adjustment, depending on the ability to speed the hard drive. Supported standards are automatically recognized. This can be tested both fast and slow HDD. Its own original way Measuring time intervals makes it possible to work with a program via virtual DOS on Windows and almost does not reduce accuracy.
The surface test is closely associated with the drive passport. LBA 28 and 48 BIT modes are supported and automatically recognized. All that it was possible to make automatic was done and settings are not required from the user.
Linear reading (verification)
Conducts the surface test in the LBA addressing. Made for quick and accurate diagnostics of the state of the surface. During the test, the entire HDD address space program splits on conditional identical sections. The access time is measured to each site and the rectangle of the corresponding color is drawn on the screen.
Random reading
Test surface at which the random number generator is involved. This generator issues the address of the sides. Specifies the range in the test menu. The result obtained by the test pretty accurately describes the speed of the drive in real tasks.
Butterfly reading
The "Butterfly" algorithm alternately reads the end and the beginning of the disk space with a shift to one block. It differs from random the fact that this test scans the entire surface and all sectors on a certain law and has the end. Performs scanning much slower linear.
Pio reading
In this case, the real reading of the sectors from the hard drive. Low speed - 2-8 megabytes per second. Therefore, this reading is better to produce in small areas. Effective to detect drive bugs and checking the interface and read channel. To increase the read speed, it is necessary to enable maximum mode (PIO-4) in the BIOS.
Pio reading to file (reading in file)
Distinguished by this method of reading "not to file" What information from HDD is written in the current directory to the file. Victoria processes bad blocks so that instead of defective sites, zeros are put. In case of error, the sector is read twice. First, with block access, then under the sector.
Recording (Erasing)
There is erasing data by sectors. Applied to remove some defects. The speed of erasing is close to pio reading. But there is more fast way Remove information through security subsystem.
Recording from File
The contents of the file are written to the disk in sectors. Through the built-in manager, the window will open where you can select the file. The speed of such a record reaches six MB / s. The procedure is happening with the participation of a visual scanner. Useful to use for cloning small disks and adjust the destruction of file systems. Maximum file size 2GB.
In order to test the surface of the hard drive, we use the F4 key. You will see the menu. It should select "Linear reading" and below "Ignore Bad Blocks" (ignore bad sectors). Select the gap button, navigate the arrow keys - "up" and "down".

It is worth paying special attention to the third point. It has such functions as: entry from a file and recording (erasing). When using them, data from the drive is erased. You can lose data and using "BB \u003d ERASE 256 SECT". It is located in the fourth menu.
After selecting the action you need, scanning is launched. Results will appear after time in a special window.

During the scanning process, problems may arise. Hard disk freezes due to system malfunction. If a diagnostic test is hanging, then the program after the timeout continues in 16 seconds. To refer to Timeout Victoria shows the "T" symbol, the frequent hanging program may mean that HDD does not respond to requests. You can solve such a problem by pressing F3 (Reset). If something is incomprehensible, then use the reference system (key F1).
Checking the program interface
In order to do this, click F4 on the third menu item. There is a record of information cycles in the memory of the hard drive buffer, and then reads it from there. Comparison of read data with recorded, also produced. Measured and time reading. In the event that the read does not match the recorded, the program reports this. For a full view of a hard disk state, it is necessary to diagnose it quite a long time.
To exit the program, click on "x". After you come out, you will find yourself in Volcov Commander. The output from which is carried out by the F10 key and confirming YES. Next section "DOS". Ctrl + Alt + Del exit. PC restarts and you need to not forget to get a disk from the drive and select the download from the hard disk.
Legend indicators
- Drive.Ready (DRDY)- Hard disk is ready to work and take commands
- Drive.Seek.COMPLETE (DRSC.) - Past value that HDD graduated from installing the head on the track is outdated.
- Busy (Busy) - The drive is engaged in data processing or "foss." Until this indicator burns, everything else does not work and Victoria responds only to RESET (F3).
- Index (Inx) - After each hard drive, this indicator appears. Not all devices are used.
- EROR (ERR) - Means what an error occurred. By her code, you can find out what kind of register.
- Data Request (DrQ.) - Hard disk is ready to start the information exchange process with the interface.
Error codes
- UncorrectableData.Error (UNC) - Information is not adjusted by redundant code, it is unreadable. An error may be due to the damage to the hard drive or violation of the data checksum.
- IdNot.Found. (IDNF.) - Not found sector. It mainly means that the microcode or the bottom level format is destroyed. This error appears in working properly, if you contact the address that does not exist.
- ABORTED COMMAND. (Abrt) – hard disk refused to execute the command due to the fault or the command cannot be performed because Not supported by the drive.
- AddressMark.Not.Found. (Amnf.) - means the impossibility of reading the sector. Whole is a consequence of a hardware problem.
- Track 0 NOT FOUND (T.0 Nf.) – it does not work because of the impossibility, perform the recalibration of the starting cylinder. If you have a modern hard drive, this error may indicate the inoperability of magnetic heads or microcodes.
Above the information is provided to enjoy the Victoria program. This program is free, which is a big advantage. It also does not require installation, it takes very little memory, it works fast. Includes many modes and thus all the above exceeds similar programs (Dalas, HDDL, Veryfi, Vivard, etc.).
Victoria Test Disc Surface
In this article, I will consider the main aspects of working with the free Victoria HDD program designed to verify hard disks. For these purposes there are many tools, but Victoria is the most famous program.
Basic information about Victoria.
What do we talk about her almighty Wikipedia:
(Rus. "Victoria") - computer programintended for evaluating performance, testing and small repair of hard drives. Developed by Belarusian nadividual entrepreneur and programmer Kazan Sergey Olegovich. Free (Freeware). Works running Windows and DOS. "
Thus, according to this information, it is clear that the program is free and can work in Windows Wednesday, which we actually had.
Where can I find, download the program Victoria HDD?
On the official website of the developer of the program http://hdd-911.com/
Information about the versions of the program (versions of many, I will give the most popular):
- Latest version - 4.2 of the API release (December 31, 2006): VCR42.exe 566.24 KB.
- Version - 4.3 BATA (June 13, 2007): VCR42.exe 454.06 KB.
- - Added work with physical windows discs via API - only in Windows class NT / 2000 / XP.
- - Supports IDE, SATA, USB, Firewire, Flash, SCSI drives and BestCrypt virtual disks.
- CD, FDD, etc. are also supported. "Logic" (but still uncomfortable). SMART is still working only on IDE and SATA HDD;
- - Through the API, it became possible to test the system hard drive;
- - Fixed a bug, as a result of which doubled the doubted speed on the "Butterfly" test;
- - Fixed a bug that leads to the emergency completion of the program on the hard drive with a damaged Smart table;
- - fixed glitch, resulting in an emergency when adjusting AAM on some systems;
- Test version - 4.46B (August 13, 2008): vcr446free.exe 600.80 KB. Experimental version. After the vacation period, work will continue on the release (unfortunately, still does not seem to be continued). Changes:
- - The buffer and the HDD interface is added to the passport;
- - Added indicators and disk LED indicators;
- - Added unofficial support for the PC3000 UDMA fee;
- - Help has a detailed description of the timers;
- - it became possible to accurately work on computers with variable clock frequency;
- - The definition of NCQ, PEC, SATA generation, etc. Added to the passport.
- - added Winchester-dependent SMART for IBM / Hitachi drives;
- - Added Super-Smart support for IBM / Hitachi ("Factory" attributes);
- - Fixed a bug, as a result of which the Security Erase status was displayed in version 4.3;
- - Added display of limit temperatures that have ever experienced a screw (for those screws that support);
- - The work indicator is made showing the activity of tasks;
- - Added receipt serial number and versions of the company via API, for SCSI devices;
- - And much more ... See the WhatNew file in the program catalog.
The downloaded file file is a self-extracting archive, so before you open it, it is better to create a separate folder and place the archive there, and then unpack everything. After you have done these actions, you will receive a set of files that should be similar to it:
Then you need to run the program by clicking on the green "VCR446F" icon. The program window opens and you will see the following: 
Program Interface
There are black stripes from above:
It contains the hard disk registration number, the firmware version, the amount of memory and time.
Tab "Standart"
Below and you will see tabs, each of which contains a specific group of parameters. By default, we turn out to be on the Standart tab. On the left side of which there is a block called "Drive Passport": 
It contains complete information about the hard disk installed by the manufacturer. The "Passport" button is necessary only if this information is not shown for any reasons.
Let's look at the right side of the same tab "Standart". The right upper side has a block in which you can choose devices. There is an opportunity to choose from a list that contains hard drives, drives of optical disks and FLASH drives. The sequence depends on the priority of the download installed in the BIOS of your computer, usually hDD It goes from above, as in the screenshot below: 
Below you can see another block called "Seek, Acoustic Management & Bad'er", which means "positioning, control of acoustics, generation of defects" in free translation. It is designed to control the noise level from the hard disk. 
Usually, the low robe of the hard disk is caused by the rotation of the plates, which cannot be slowed down, and therefore, it is also impossible to reduce this hum. Cressing and snapshoting, on the other hand, are caused by moving hard disk heads when reading and writing data. Unlike the hum of plates, "crackling" of the heads can be noticeably reduced by software methods without losing performance.
To do this, in fact, all modern hard drives have this new technology Under the name Aam (Advanced Acoustics Management) - advanced acoustics management, which can significantly reduce the crackling produced by a hard disk, reducing the positioning speed of the heads. However, manufacturers rarely include this hard disk function.
To reduce "crackling", do the following:
- Run Victoria. To the right you will see the slider of accurate AAM adjustment, and the "Seek" button to the left of it.
- Move the slider to the right or left, click, "SEEK". When you press "Seek", the hard disk will start changing the location of the heads - in this way, you can choose a comfortable noise level for yourself;
After the actions done, you do not have to install Victoria into autorun to save the parameters, since - when you move the slider, the AAM parameters are stored directly in the hard disk, thus the desired noise level will remain even after reinstalling the operating system.
In the same tab, the temperature of the hard disk and read delay is shown.
In this tab, however, as in the other, the right there is a block with the following buttons:
- "Break All" - in case the test device turns out to be damaged to prevent the program hanging or accidentally completing, press this button.
- "Sleep" - by pressing this button you can stop the disk.
- "Recall" is a diagnostic directive. Used to force the head to move to the zero position and rotate the plates if they were stopped.
- "PASSP" - acts like the "Passport" button in case the program does not show information about the disk.
- "POWER" - not quite sure why this button, but judging by the "Power" name, most likely regulates the power supply of the hard disk.
SMART Tab:

"SMART" internal diagnostic hard system disk. The tab itself consists of two parts: the main part - shows the information, the right - control. 
These are the main indicators of the disc manager.
Right side:
 The "Get Smart" button - when pressed, allows you to display the information on the left side of the SMART tab. A little to the right - the indicator, it shows the overall status of the disk, for example "good", that is, everything is fine;
S.M.A.R.T.
So what is it? Wikipedia quote:
S.M.A.R.T. (from English. self.— monitoring, analysis.and.reporting.technology. - Self-control technology, analysis and reporting) - technology for estimating the state of the hard disk of the built-in equipment of self-diagnosis, as well as the mechanism of predicting the time of failure.
What we will see in the Victoria HDD on the tab S.M.A.R.T.

Each attribute (string) consists of seven cells (columns):
- ID - Attribute number S.A.R.R.T. Different programs Assign various names to attributes depending on or something else. But the attribute ID always remains unchanged
- "Name" - title of the sign.
- "Value" - the current value of the attribute in "parrots" (abstract units of measure).
- "Worst" is the worst value that the parameter has reached for all time of the disk.
- Threshold "- meaning in" parrots ". If the number in the "Value" column reaches threshold In the "Threshold" column, the situation is considered critical.
- "Raw" (DATA) - this indicator is the most important and necessary to assess the viability of the disk. The actual values \u200b\u200bof this attribute are expressed in various units that will show you the current status of the disk. How these indicators are calculated only by the manufacturers of disks and understand what it would be difficult if not the next column
- "Health" - this column shows us on a normal understandable language about the status of the current attribute (excellent (green), satisfactory (yellow), bad (red)).
Thus, at our disposal 19 signs:
- 1. Raw. Read. Error Rate. - reader error frequency. Decisive parameter.
- 3. SPIN.— Up. Time. - The time needed to achieve the required speed of rotation. It is measured in milliseconds or tens of milliseconds depending on the disk model. Also a very important parameter.
- 4. Number of. SPIN.— Up. Times (The number of disk inclusions) - shows how many times the disk turned on / off. It can not be equal to zero, even if it is a new disc from the package, as even new discs are tested in the factory.
- 5. Reallocated Sector Count - Shows the number of sectors re-assigned to a special reserved disk area. Probably the most important parameter.
- 7. Seek. Error Rate. - shows the frequency of errors of moving the magnetic head unit. Also important parameter.
- 9. Power ON. Hours Count (Power-on Time) - Shows the number of hours that has worked hard disk for all time.
- 10. SPIN.— Up. RETRY Count - Displays the number of spindle starts.
- 194. Temperature. (HDA TEMPERATURE, HDD Temperature) - Hard disk temperature.
- 197. Current Pending. Sector Count - The number of "suspicious" sectors of the hard disk, which have not yet been marked as bad, but already differ in reading from the stable sectors. Important parameter.
- 198. Offline scan. UNC sectors. - the number of defective sectors found as of S.A.A.R.T., according to the set of parameters in the built-in firmware. Important parameter.
- 199. Ultra DMA CRC. Error Count - The number of errors that occur during data transfer in the external interface (in the cable). An increase in this feature indicates a faulty hard disk cable (interrupted, twisted, etc.), cable or bad contacts.
- 200. Write Error Rate. (MULTIZONE ERROR RATE) - shows the total number of record errors. May indicate defective surfaces or faulty heads. Important parameter.
Tab "Tests" or how to restore a hard disk using Victoria
On this tab we can a little more than just to see the parameters. Here we will be able to spend full testing of the disk and even repass it a bit. In order to start testing, you must click on the "Start" button, after the test is running the inscription on it will be changed to the "STOP" to stop the test until it is complete if you need.
During the inspection, which can last a few hours (depending on the volume of the disk) will be detected by bad, damaged sectors Disk surfaces.
In the left side of the window, the tested hard disk sectors are graphically displayed, the test control unit in the right part: 
- "Start LBA" - the initial dough block (by default "0").
- "END LBA" is the end block of the test (the default last sector).
- Pause button - pause.
- Button "Start" - the beginning of the test.
- The drop-down list "" block size (default "256").
- The drop-down list "" - the maximum response time.
- The small button "RS" - resets the values \u200b\u200bnext to color squares on "0".
Scanning 
Indicators: Verified Volume, Check Percentage and Scanning Speed.
Test types:
- "Verify" is the same as "Read", but without data transfer.
- "Read" - read data is checked with transmission to RAM, the best option.
- "WRITE" - in this case, all the data will be rewritten and is therefore lost!
Below icons for selecting the test method. Let's go to them.
- "Green triangle" - scanning from the first to the last sector.
- "Gray triangle" - from the end to the beginning.
- "Two gray triangles with a question mark" - watching random sectors.
- "Two gray triangles with vertical line" - the so-called "butterfly method":
Testing the surface with the butterfly algorithm, when the beginning and end of the disk are read alternately, each time with the same offset (256 sectors), as a result, the head is in the end of the test. hard zones disk.
By default, select "Green Triangle", if you do not know how to recover HDD using Victoria.
Go down and select the action that will be performed when the failure block is detected. Options:
- Ignore "- IGNore.
- "Erase" - Overwrite Sector.
- "Remap" - Program Marks The Sector As A Non-Working and Replaces It Working One.
- "Restore" - Used in Cases If You Really Need To Restore The Sector. Available Only With Paid Version.
- "Ignore" - ignore (do nothing).
- »Erase» - Erase, overwrite the sector.
- "Remap" - the program notes the sector as non-working and replaces it with a working backup.
- "Restore" is used in cases where the sector needs to be restored. Available only in paid version.
If you want to simply test the disk without making changes and click "Start". On the left side, multicolored blocks will run - these are proven sectors, they will be the following colors. 
The most important is the first three tops. Green and orange - means that they are semi-dimensions. Red and blue with a cross - completely destroyed. After the end of the test in the number of sectors of different colors, we can conclude about the possibility of further use of the disk, that is:
If there are a lot of green and orange, it is a sign that the disk time is coming to an end.
Many red and blue - it is categorically recommended to save all data from the disk (if it is still possible) and buy a new
With a small number of damaged sectors, you can try to restore the disk by selecting when testing "Remap", while Victoria will restore damaged sectors by replacing them to others.
There are two more tabs "Advanced" and "Setup", but I think that they are unlikely to be needed by the usual user and are used only by professionals.
Thus, we described almost all aspects victoria programs And they found out how to use it. I hope you have already checked your hard drive and know how to restore a hard disk using Victoria. Please leave your suggestions and comments.
In this material I will talk about the program - Victoria, I will explain how to use Victoria HDD and I will describe its general functionality. Hard disk is one of the most important components of the computer system. It really depends on the reliability and efficiency of its work, and if the winchester breaks down or starts "refrigerated", the computer simply stops functioning normally. At the same time, there are software tools that allow you to effectively identify and eliminate hardware malfunctions in the work of the hard disk - this is the program of Victoria HDD.
The Victoria program has more than a fifteen-year history, the last update of this product is dated long than 2008. The Creator of the Program - the Belarusian Programmer Sergey Kazansky managed to create an application that works with hard drives at a low level directly through the I / O ports. Free Applications Victoria, its high efficiency, teamwork support and other bonuses led to the high popularity of the "wiki" in the medium of both lovers and profile IT professionals, including service centers professionals. Next, I will tell you how to use Victoria.
What is able to program Victoria
Among the advantages of the Victoria program, experts note the following:
- The program is simple and does not require a special installation;
- The application has modest sizes;
- This software is able to conduct a disc check at a low level;
- Effectively finds and corrects bad sectors, blocks and other hard disk hardware dysfunction;
- Knows how to read data s.m.a.r.t;
- Using Victoria, you can calculate the speed of recording and reading from the disk;
- Knows how to work with the noise coefficient of the Winchester;
- Supports various variations of tests;
- Supports the AHCI interface;
- It has a versatile character and supports the absolute majority of HDD drives.
How to use Victoria HDD
Before contacting the program functionality, I will note that Victoria works only with the physical state of the disk, file system errors and software problems in most cases remain unnoticed by it (in the latter case you will help you tools like Scandisk, NDD and others).
At the moment there are two main versions of Victoria HDD:
- The first version allows you to work with the program right under the Windows OS, with its functionality in some cases can work less reliable (the correction of failed sectors is not always efficient).
- The second version allows you to run the program from the boot disk (flash drives).
Since most users work with Victoria through Windows, I will consider this particular program option.
- So, as already mentioned, to use the Victoria program, it is enough to download it to your computer and run the executable file (the program does not require unpacking). The program itself can be downloaded on one of the popular software portals, since the official website of Sergei Kazansky, the downloading of copyright programs is often not working.
- After starting the Victoria program (be sure to run it on behalf of the administrator), you will see a window in which there will be five main tabs.
- In the "Standart" tab on the right you will see all the hard drives detected by you, clicking on each of them, you will get their full passport data (model, firmware, cache, etc.).
- Click on the disc needed to us right, and go to another tab called "Smart". Click on the "Get Smart" button, and you will receive full details on your disk.
Pay special attention to the ReallyCated Sector Count parameter and Reallocated Event Count (number of reassignment operations). The higher this indicator, the worse the case of your hard disk.
Pay attention to the SMART option attributes in Victoria:
The next (third) tab is called "Test". Here we can directly spend the test surface test with Rempe (reassignment of the sector from the reserve).
- To test the test to the "Remap", just on top of the tick on "Read" (read the sector to the computer), and then click the "Start" button.
- The Victoria program will begin the procedure for checking the surface of the hard disk, fixing the number of sectors with different reading delay. As you can see, you are not so difficult to use Victoria.
- The more delay - the worse the hard drive works in this place, and the greater the likelihood of problems. After the procedure is completed, you will see a complete picture of the performance of your hard disk, as well as see the statistical results of the remap.
- The rhombus with the arroders allows you to move the cursor around the disk surface map and watch the statistics of the sectors, the remaining parameters can be left by default.
- What a visual work looks like with the Test tab you can look at the video.
The following Advanced tab presents these SEC field data, and the MBR OB or OFF indicator includes and turn off OS partition recognition.
In the last tab, the SETUP presented various system settings programs.

Using Victoria - Briefly about the main
Thus, for the program, we need to choose disc In the Standart tab, get it in the "Smart" tab (not in all the hard drives it works), and then and then pass Test by selecting the "Read" and "Remap" options. After the end of the test you will receive statistics on the results obtained.
Conclusion
Despite the fact that the latest update "Victoria" dates back to 2008, this software product works perfectly on Windows 7 and newer versions of the operating wINDOVS systems. At the same time, it represents the highest value for specialists of service centers, allowing to effectively monitor monitoring and restoring the functional of a plurality of rigid disks. If you notice the failures in your hard drive - then you have a great opportunity to try the functional "Victoria" in the case, and on own experience Make sure the practicality and convenience of this program.
In contact with
Users often personal computers Faced with the problems of the hard disk that affect the operation of the system. The main causes of the hard disk breakage are: battered sectors in HDD I. faulty file system. In this material we describe a detailed hDD Problem Fix Process, as well as describe methods for recovering information on hard drivesIf it is faulty or completely failed. I also want to note that the problems that are associated with a hard disk must be paid to special attention. For example, if the HDD becomes completely defective, then you can hardly restore information from it. That is, all your documents, personal videos and photos, as well as other files may be wounded forever.
Read SMART readings from Winchester
If you do not copy files on your computer, programs after opening freeze, then possible cause This can be faulty HDD.. Usually such behavior of the operating system is connected with faulty sectors In the hard disk. To be sure that the problem is related to the bits of the HDD sectors, and not with malicious programsThe first thing you need to confirm this guessed. If the computer described above is observed, we will install a utility on it Crystaldiskinfo.. This utility describes the condition of all the hard drives installed on your computer. You can download CrystalDiskInfo from its official site http://crystalmark.info. The utility supports Windows, starting with XP and ending Windows 10.
To verify the hard drive information utility uses self-diagnostic technology Smart.. SMART technology Used on all manufactured HDD. Below is an example of SMART reading test using the CrystalDiskInfo utility in Winchester WD1200JS.. From this window it can be seen that the program found its condition as " Okay"- This means that this hard drive is in perfect order and should not be worried about it.
In the following image in the SMART readings, the CrystalDiskInfo utility detected the state of the screw message Anxiety" This message means that there are already broken sectors in the hard drive or it overheats.

If you see a message " Bad"This will mean that all broken sectors are reassigned on the hard drive and in a short time it will completely cover.

In both cases, when the program has discovered messages " Anxiety"And" Bad"You should do backup All data on the computer, since soon the screw will be unusable.
One of the solutions that can temporarily repair your screw is a utility Victoria.. This utility can do Remap Bad SectorsThat is, it will reassign the broken sectors to the backup. In the next section, we describe the Remap Bad Bad sectors in detail using the Victoria utility.
We restore the hard disk using the Victoria program
Utility Victoria. Created by the Belarusian programmer and is distributed free of charge. You can download the utility on its official website. hDD-911.com.. Victoria utility is distributed in two versions for Windows and DOS. In our case, we will download the version for Windows. After starting the Victoria utility on Windows, we will fall into such a window.

To correct the hard disk, we need to go to the tab "Tests". On this tab, we are interested in the area with radio buttons to the Ignore, Erase, Remap and Restore, as well as the Start button. To correct, we need to select the Radio button Remap and click Start.

After these actions, the Victoria program will begin the correction of sectors that can take a long time.

After reassigning sectors, the Victoria program will be able to restore the broken sectors, and the CrystalDiskinfo utility will be issued "good". But the magic correction may not occur, since the backup sectors can simply be missing and Victoria will not help anything. In this case, one output remains - full replace HDD. . In addition to treating the screw in Victoria also provided check of indications SMART on the "tab" Smart.».
I would like to note that all the operations you make using Victoria, you do at your own risk. Using the utility, an inexperienced user can damage the Winchester, as well as deprive it of warranty service.
Correct the file system problems on the hard disk
Many users on Windows computers often have problems associated with file System Errors NTFS. File system malfunctions arise due to malicious utilities and varying software. Also often problems in the file system occur by inexperience PC user itself. For example, the improper handling of the utility Acronis Disk Director.. To solve the task, Windows itself will help us. In Windows provided file system correction tool. To fix it file System On a specific section, you need to go to its properties. In our case, it system section Windows 10 operating system. To start the correction, we need to go to the " Service».

On this tab there is a button to check that we click.

After this action, a window will appear in which you need to confirm our actions.

Confiring the actions, Windows will scan this section.

After scanning, the system will display a message with the scanning results for errors.

Using this method, many users restored the normal operability of the operating system without resorting to its reinstall. If the problems lies in the HDD itself, then no disc check and reinstall OS in this case will help. The only option in this case will be what can be resorted to the Victoria utility or to make a complete replacement of the screw to a new one, reinstalling Windows.
We restore discs using Acronis True Image 2016
Software is the perfect tool to create a complete backup All local sections, including systemic. This opportunity is used by many administrators worldwide. Created backup local disks can be restored in a very short time. For example, if the system has undergone a virus or HDD broke, in this case you restore all OS discs in a short period of time. You can find Acronis True Image 2016 on its official website www.acronis.com. Running the program under consideration, we will fall into such a window.

First of all, we will show our readers how you can create a backup copy of the local sections of Acronis True Image 2016. On the first tab, the backup is seen that the entire computer is selected for backup. That is, a complete backup of all local sections will be carried out, including systemic. In the next block, you need to select a space for backup. In our case, this is a local disk E. After selecting the type of backup data and saving them, press the Create Copy button located in the lower right corner.

Depending on the volume of the data being saved, the backup time will depend on.

Complete backup, We describe the process of restoring the computer. For this we need to create boot disk Or Acronis True Image 2016 USB flash drive. You can do this by clicking on the tabs Tools / Create Creation Wizard" Below is the master that should open.

In this wizard, we will choose the first paragraph and continue. In the window that appears, select where we save the boot drive: in image or on the flash drive.

After saving the boot drive, the wizard will display the final window.

By creating a bootable flash drive or an optical disk with Acronis True Image 2016, you can proceed to data recovery. To do this, be loaded with boot flash drive When starting a computer. After downloading from the boot drive, we fall from the Acronis True Image 2016 menu. Select the first item in this menu, and then fall into the main Acronis True Image window.

In the program window, go to the "" tab and find the previously created backup of the entire system.

Now to restore system Disk With Windows I. local disksClick the button Disc recovery.

In the master that appears, choose the item " Restore discs and sections"And continue.

In the next window, select all local disks and continue the work of the wizard.

In points " Destination»For the first and second discs, choose the original HDD. If a lot of hard drives are installed in the system, then be careful not to confuse the screws. In the final window, click the start button.

The restoration time of the backup depends on the volume and hDD speeds. In our case it took 10 minutes.

From the example you can see how easily you can make a backup of the entire computer, so if you master the Acronis True Image 2016 software package, then you can easily restore its performance in cases if the system is infected or the hard drive broke. Also, after the program's development, you will not have questions about how to restore data from the hard disk.
Recovery of information with Recuva
There are cases when when reinstalling Windows or when using Acronis software users mistakenly erase all the information from the hard disk. If you have this situation, it is not worth upset, since all the information can be restore. A free utility will help us in this task. Recuva.. You can download the utility on its official website www.piriform.com. After starting the utility, the user falls into the wizard that will help you to restore all the data. Below is a sequential work of the wizard.

From the example, it can be seen that the recovery of information using Recuva is a fairly simple process and almost any PC user will cope with it.
Summarize
From this article, you can emphasize that the restoration of the hard disk The task is slightly simple, but also looking from the situation, even the usual PC user can cope with it. I also want to advise the owners of laptops to handle it most carefully. For example, if the laptop falls or subjected to a strong blow, it can damage the HDD. In addition, if you independently revealed a problem screw, then do not be afraid to open the laptop housing or a fixed computer, as the HDD replacement is a fairly simple task. And we, in turn, hope that our material will be useful to our readers and allow you to restore a hard disk.
Video on the topic
Restore hard disk using special programs. They allow you to test the hard drive, as well as correct minor malfunctions. Often, this is quite enough to continue fruitful work. From the article you will learn about one of them called Victoria.
What is the utility capable?
Victoria HDD hard disk check is completely free. Also, the program has many functions and is designed not only to professionals, but also on inexperienced users. So, now you will learn how to check the hard drive of the Victoria program.
Modes
In its operation, the utility can use the standard Windows toolkit (API) or to work offline through ports. Offline mode provides more reliable data, is different additional tools For recovery, it allows you to test not only internal, but also external drives.
What is the benefit of the utility?
Victoria program allows you to:
- speed up the computer;
- ensure the stability of work, both the programs and the operating system itself.
This allows its capabilities to:
- repair of faulty hard disk sections;
- replacing damaged sectors reserve;
- pulling broken sectors.
Does Victoria be used?
Experienced users will notify that perform the correction of the battered storage sectors by replacing them with backups and means of the OS itself ( operating system). That's right, but for this you need to check the volume of the hard disk volume. However, the specified method is characterized by some disadvantages, for example, working with an active partition occurs exclusively in DOS mode, no detailed information, There is no possibility to choose a method for treating a malfunction. Therefore, it is better to restore the hard disk using Victoria HDD, which is deprived of these shortcomings.
Working with the program
If you decide to use the program in question, it is better to look for the most recent version. After all, it has already corrected bugs that were in the previous ones. You do not need to install the utility. It spreads in archival form. Unpack the resulting archive and go inside. There you will find only one executable VCR447.exe file. To make it easier to use it, make it label on the screen.
If your PC is worth Windows 7 or higher, then the file starts must be executed only on the name of the administrator. Having made the right click on the shortcut, select "Running from the administrator" record in the context menu and click on it.

Before the opening of the Victoria program window, several pop-ups will appear in front of you:
- Unknown Error.
- Invalid handle.
- Porttalk Driver Not Installed.

This is warned by specialists that there is no driver to work with ports in the system. Click OK and all.
Getting to work
The graphical interface utility opens on the Standart tab. In the right part of it, specify the disc that is subject to verification. Even if he is the only one, then you still need to point to it. Then its data will appear on the left.

Important! It is strictly forbidden to enter any passwords. This option is only for specialists. Next, go to the SMART tab and on the right side, click on Get Smart. The table shows the display of 242 parameters of your hard disk.

These data system removes from the disk immediately after installing it on the PC, and the Victoria is already taken from the system. You can view them, but the most attention is paid to the fifth point, the Health column. It contains that information for which you launched the utility. What does the color of these circles mean?
- green - HDD sectors feel perfectly;
- yellow - There are problems;
- red - the values \u200b\u200bof the parameters are not allowed.
The RAW column displays how much broken disc sectors detected.
Test Test.
Move to the Test tab. The scanning process is based on measuring the segment of the time running from sending a request to return the response from each of the drive sectors. When scanning a disc, the utility is evaluating the scanned sectors and produces their sorting in color and state (to the left of the colors of the sectors is indicated by the maximum response time in milliseconds):
- three gray - fine;
- green - not bad;
- orange - satisfactory;
- blue or red - bad.

Actions, according to the selected modes, will be applied to the HDD sectors that you will notice.
Modes of work
The utility has four modes of operation:
- Ignore - check without attempts to treat faulty sectors;
- Remap - replacement of damaged sectors reserve;
- Restore - an attempt to restore damaged sectors programmatically;
- Erase - Deleting Bad blocks from a disk memory using low-level formatting. It is impossible to try to try the regime, since there is a chance of damage to the plots, which in the future can still earn. Full the first three.

Reserve sectors, what is it?
The operating system separates the backup area on the hard disk. Most often, it is the most slow from everyone and is located closer to the HDD Center. Its size is approximately 10% of the total. When broken sectors appear, OS moves data from them to this backup area. True, it does not fulfill it itself, but during the launch of the disk checks on the Windows tools errors or using external programs.
Diagnostics
If you have already selected the mode and noted the sectors for treatment, then press START.

Attention! If, after clicking on the start, the diagnostics did not start, then, most likely, you did not mark your drive on the Standart tab. You must return, do it and re-run the check.
Testing process can be observed on the screen. In earlier versions of Victoria, the test sectors were displayed in the form of a grid.

However, this graphic mapping gave a significant load on the processor for large volumes of hard drives. As a result, in latest version 4.47 The developers replaced the grid by a graph that appears within a few minutes after the start of the scan.

Disable visualization, if you remove the GRID checkbox.
Meaning buttons
After starting the test, the start name of the START button changes to STOP, which allows it to press it to stop the process.

If you click on the PAUSE button, it will change the name on Continue, the scan will pause. Click on it, and everything will last from the same place where it stopped.
Attention! Complete all programs that can access the checked hard disk. If they are not removed from memory, the readings will lose accuracy, and the number of orange sectors will increase much. It will happen due to the fact that some of them will use open programs.
Will the life of the Winchester last, thanks to Victoria?
You can programmatically cure up to 10% of broken sectors, as well as restore the work of any of the sectors on the active volume, if it became the result of the system failures. Physical breakdowns Victoria does not eliminate.
However, if the faulty sectors restore, and the remaining move to the backup area, the disk will still serve. True, it is better not to use it to install the system, but only as an additional one.
 How to pay a domain name
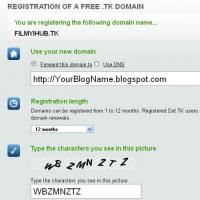 Domain zone of tokelau islands
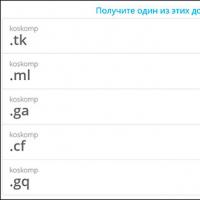 What is domain what problems may be
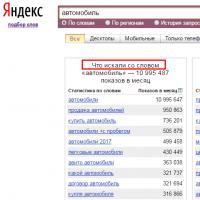 Yandex Wordstat: detailed instructions for using the service and grouping operators and a complicated request
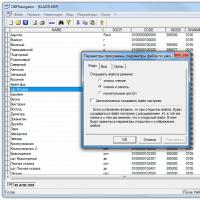 Editing DBF files
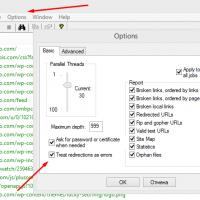 Xenu Link Sleuth - What is this program how to use the Xenu program
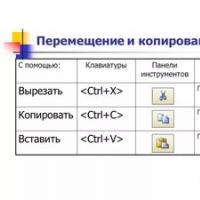 Methods Copy and insert text from keyboard without using mouse