Advanced Bios Features where to find. Launch CMOS Setup Utility. Disable the audio card in the bios
Currently on many motherboards used version 6.0pg Phoenix Award BIOS firms Phoenix. It is as popular with manufacturers, as well as competing. PHOENIX AWARD BIOS 6.0PG combines the most modern opportunities By setting up a computer hardware configuration and has a familiar interface similar to the already "classic" interface.
As always, if the manufacturer performs Phoenix, you can meet the described version under the most different names. The most common option is the Phoenix Award BIOS 6.0PG, several less often uses Phoenix Award Workstation BIOS 6.0PG, sometimes it is Award BIOS 6.0PG or Phoenix Bios. 6.0pg.
Main menu
Calling the BIOS Setup utility, you get to the main menu of this program (Fig. 1). Let us dwell on the options grouped in one or another menu item.

Fig. 1. Main menu PHOENIX AWARD BIOS version 6.0p
Part of Gigabyte motherboards originally display only "safe" BIOS Setup options, hiding required for overclocking or accurate parameter adjustment random access memory, processor, tires ... To access all settings, click Combination
Standard Cmos Features.
Traditionally, the first section (Fig. 2) contains settings:

Fig. 2. Standard CMOS Features
On Foxconn motherboards this section may be called System Information.
Advanced Bios Features.
This section (Fig. 3) focused options responsible for:

Fig. 3. Item Advanced Bios Features
Advanced Chipset Features.
Turning to the options of the section (Fig. 4), you can set:

Fig. 4. Point Advanced Chipset Features
Often, this section also sets, sometimes there are options that are responsible for ,.
Power Management Setup.
The section (Fig. 6) includes options related to the extended configuration and power management system:

Fig. 6. Power Power Management Setup.
PNP / PCI Configurations
The section (Fig. 7) contains settings regarding expansion cards:

Fig. 7. PNP / PCI Configurations item
PC Health Status
This section (Fig. 8) is responsible for system monitoring:

Frequency / Voltage Control
Here (Fig. 9) are options that allow you to specify:

Fig. 9. Point Frequency / Voltage Control
Sometimes it is moved to this section, etc.
Motherboard manufacturers often rename this section, often carrying all the options into it ,. This is especially true of enthusiast products. So, on the motherboards ABIT partition can be called SoftMenu. or SoftMenu Setup., Products DFI - Gene Bios Setting., Foxconn - Fox Central Control Unit or Quantum Bios., Gigabyte - MB Intelligent Tweaker (M.i.t.), MSI - Cell Menu. etc. To emphasize its importance, the renamed partition can be moved to the first place in the main menu.
Load Fail-Safe Defaults
Load Optimized Defaults.
Loading the BIOS Setup parameters that ensure maximum performance, it may be necessary to manually adjust some parameters to ensure stable work.
Sometimes the last two points of the main menu are called Load Optimized Defaults. and LOAD PERFORMANCE DEFAULTS. respectively. Please note the purpose of the point Load Optimized Defaults. Changes in this case, in fact, to the opposite: it loads the safe values \u200b\u200bof the options.
Set Supervisor Password.
Control
Management in version 6.0pg is very similar to the one accepted in version 4.51pg. If the end of the main menu item is a triangle, then when you select this item, you will be taken to the appropriate section of the BIOS Setup, if there is no triangle, you are immediately invited to make anything or another (say, set a password, confirm the output, etc.). To select an item in the main menu, you must use the cursor keys to bring the pointer to it and click
If the options in this section are too much and they are not placed on the screen, the vertical scroll bar appears to the right of them, signaling about this fact.
If, being in the main menu, you press the key
To select a particular option in one of the sections, all the same cursor keys are used, changing the option value - keys
If the left of the option is the triangle (often as a "value" of such an option is inscription Press Enter.
), when selecting this option and press the key

How to install a system date and time? How to load a computer from a CD or Flash Drive? These and other distribution questions you will receive an answer, having acquainted with the basic BIOS settings and how to edit them.
Introduction
If you do not know what BIOS is (Bayos) and what this firmware is needed, we advise you to read our previous material telling how the computer is started, and what role playing in this process " basic system input / output. " In the same article, we will meet the BIOS setup program, which is most often called the BIOS (CMOS) Setup Utility.
By the way, in most cases, users use the abbreviated names of this program, calling it the BIOS setup or simply BIOS. For example, you can often hear such expressions as "go to the BIOS" or "Open BIOS", which is not correct, as in both cases it is about entering the BIOS Setup settings program, which is only part of the BIOS.
In most cases, BIOS SETUP is used by ordinary users only to configure system time and date or selection of boot devices. But in fact, this program can have a lot of opportunities. With it, it is possible to control the operation of the processor, RAM, chipset and other important PC components, monitor the temperature regime of devices and carry out many other useful actions.
SETUP UTILITY SETUP IN BIOS (CMOS)
In order to start the BIOS setup program, it is necessary to press a specific key or a combination of the PC procedure during the initial testing procedure. In the overwhelming majority of cases in desktop computers to enter the BIOS SETUP, the DEL key is used, less than f1 or F2. In the laptops, on the contrary, the functional keys (F1, F2, F11, F12) are involved most often for these purposes.

Find out exactly which of the keys are used to start the BIOS Setup, you can from the instructions for the computer or system board. Also, in some cases, during the passage of the POST procedure, a hint is displayed on the monitor screen, which key must be pressed to enter the settings.

True in modern computers and laptops, screen prompts are more common, but in any case, find the desired key will always help the search query on the Internet.
In addition to the need to know the desired key, to hit the BIOS Setup, it is equally important to choose the right moment of its press. In order not to be late, it is better right after the start of the PC boot repeatedly press the input key. In most cases, this method is guaranteed to launch the BIOS settings.
BIOS (CMOS) SETUP UTILITY interface
The BIOS SETUP program has a text interface without any design triggers and is controlled exclusively using the keyboard. This is explained by the fact that the graphic shell of this application has practically not changed since the 80s, so everything looks very simple and ascetic.
In the general case, the BIOS Setup interface is two types: with the location of the main menu in two columns or horizontally. To understand what type in front of you can immediately after logging in to the program and open its main window.

In the first case, you will see a list of sections placed in two columns on a blue background. This option is characteristic of versions of BIOS, developed by Phoenix Technologies (Awardbios, Award Modular Bios, Award WorkstationBios). They are traditionally used in their system boards, manufacturers such as MSI, Gigabyte, Foxconn, ECS and others are used.

In the second case, a window with a gray background appears before you, in which the menu with the main sections will be placed on top of the screen, as a blue horizontal strip. Such an interface is usually inherent in American Megatrends BIOS (AMIBIOS, APTIO AMIBIOS) used in maternal asus boards, Intel, ASRock and some others.
Despite such differences in the interface of these two options, all BIOS SETUP sections have a similar representation. What would make sure of this, let's look at the structure of the program windows in both cases.
At the top of the screen, you will always find the name of the current section (in the case of the horizontal menu, the name is highlighted) or subsection.

The main part of the screen is covered by the area in which the list of subsections is located (designated by triangular arrows) and the parameters of the selected partition. To the right of the name of the parameters are their values. It should be noted that if the parameter is highlighted in a pale color (blue or light gray), it either has a read-only status and is only informational in nature, or to edit it, you need to change another associated parameter.

The right side of the screen usually occupies a column, which displays a brief reference information on a dedicated parameter or subsection, as well as prompts for possible actions and the use of control keys (American Megatrends). In the BIOS setup program with a blue background, the tip of the use of function keys is usually located at the bottom of the screen.
As you can see, despite different color design and small differences in the location on the screen of the working items, in essence both interface are very similar, and you present information to users practically the same way. That is why techniques of work with the parameters of the BIOS in both cases are almost the same.
To navigate the menu and select the desired parameters, subsections or partitions, the arrow keys are used, and to open them, the "Enter" key ("Enter"). For returning to the previous screen and output from the current settings, the ESC key corresponds. Also with this key, you can exit BIOS Setup without making changes to the settings by pressing it in the main menu. In addition, the functions of the "F1" keys, which causes the help and "F10", which is initializing the exit from BIOS Setup, from any place of the program to save the changes made. Pageup / "Pagedown" or "+" / "-" keys are traditionally used for consistent integrity of the available values \u200b\u200bof the variable parameters.
In addition to the above keys, other function keys ("F2" - "F9", "F11", "F12") can be used to work with the BIOS settings, but their purpose, depending on the board and its manufacturer, may differ. However, it is easy to understand that each of them is in charge. It is enough to contact the prompts arising from the screen or POLYTAST the manual to the motherboard.
Main sectionsBios. Setup. With the head of the main menu (blue background)
Each motherboard model in many cases has its own unique set of customizable parameters, but the names and thematic focus of the main sections of the BIOS Setup are usually unchanged.
Standard CMOS. Futures.
This section focuses the main (standard) computer settings, which include: Installing System Dates and Time ( Date, Time.), disk drive parameters ( IDE Channel), as well as various information about the system (information about the installed processor, the number of RAM and others).
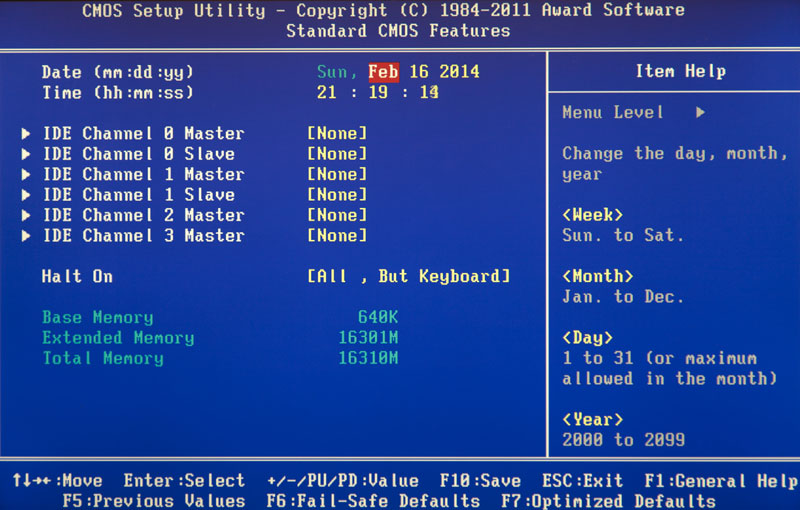
By the way, the date and time setting for most users is one of the most key reasons for visiting BIOS Setup.
Advanced Bios. Features.
This section contains extended BIOS settings. The most common one can be attributed to:
- Cash Memory Management central processor
- The parameters associated with the nuances of the computer loading. For example, here you can enable / disable NumLock mode, accelerated download mode ( Quick Boot), as well as the display of the logo of the manufacturer of the board during the procedure of self-testing ( Full Screen Logo Show).
- Select the sequence of the loading device survey ( FIRST / SECOND / THRD BOOT DEVICE). Another most demanded feature in the BIOS Setup, along with the date and time setting.
- Enable / Disable SM.A.R.R.t Disc Self Control Technology

It is worth considering that, depending on the board and modification model, the settings set in this section may vary.
Advanced ChipSet. Features.
This section describes the settings of the chipset installed in the system fee, as a result of which the parameter set here directly depends on its type and modification. In most cases, there are options responsible for the operation of RAM (frequency and timing and timing adjustment), data exchange bus between the processor and RAM, the AGP / PCI-E graphics tire and video adapter.
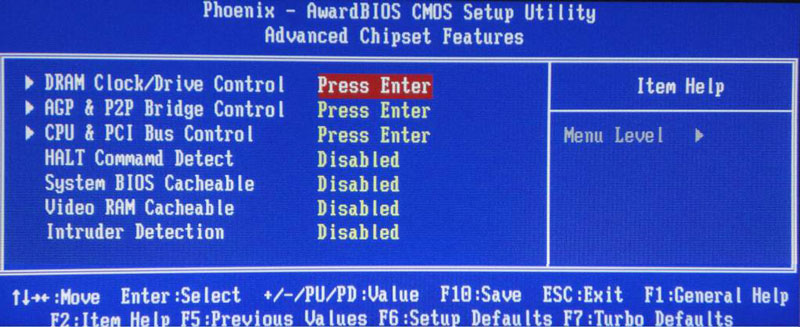
It should be noted that in some situations, it is by changing the parameters of this partition that you can increase the speed of the computer or as they say to make overclocking. True, B. lately Options responsible for increasing the speed of the PCs are most often taken out by manufacturers in a separate specialized BIOS section.
Integrated. Peripherals.
This section contains the parameters responsible for the work integrated into motherboard, peripheral devices, such as: Hard drive controllers, USB ports, sound and network adapters, and others.

For example, here you can enable / disable the built-in sound cardSupporting USB input devices or select RAID mode to create solid disk array.
Here are collected options responsible for power supply and power saving modes of the computer. Almost all modern computers allow power management directly from the operating system, but for this requires support from the BIOS specialized ACPI standards, the mode, and the functions of which are regulated just in this section.

Also, here you can specify which actions should occur when you press the power button, configure the conditions for including the PC and its transition to the reduced energy consumption or exit from the "hibernation".
PNP / PCI Configurations
This section contains the Plug and Play technology control parameters responsible for the distribution of resources between the PC devices and their quick configuration, as well as the PCI bus settings. As a rule, these functions are successfully implemented by the system and do not require manual intervention. Therefore, in modern computers, this section may be absent at all.
PC. Health Status ( H / W. Monitor)
Modern motherboards are always equipped with sensors controlling the operating temperatures and voltages of the main devices, as well as the speed of rotation of the cooling system fans. All their indicators are just displayed in this section.

In addition, in PC Health Status, you can control fan operation modes and configure the alerts for overheating cases, stop the cooler or opening the case cover.
Frequency / Voltage. Control
This section contains parameters that are responsible for installing operating frequencies and voltage values \u200b\u200bfor the processor, RAM, video cards and other devices. By default, all frequencies and voltages have recommended values \u200b\u200band configured automatically, which guarantees a reliable operation of the system.

However, the value of some parameters of this section can be changed manually. This makes it possible to overclock the processor, memory and other components, forcing them to work at elevated frequencies. It only needs to be remembered that on the one hand, overclocking makes it possible to increase the overall performance of the system, and on the other, it may cause faults in the work of the PC and cause the failure of the overclocked iron (for example, when installing overestimated voltage values). So here should be very careful.

It is worth noting that many major motherboard manufacturers options for setting the frequencies and voltages are carried out in a special section with the original name, for example MB Intelligent Tweaker (M.i.t.) or Cell Menu. .
Load. Fail SAFE Defaults.
This is not a partition, but a command dropping all BIOS settings to default values \u200b\u200bat which the stable operation of the entire system is guaranteed. After selecting this item, you will open the window in which you need to confirm the reset of the settings by pressing the "Y" key.

A command that sets the BIOS settings values \u200b\u200bin such a way that the optimal performance of the computer with the preservation of the stability of all its components is ensured. In this case, the parameters that are subject to automatic change depend on the system board model and can be varied.
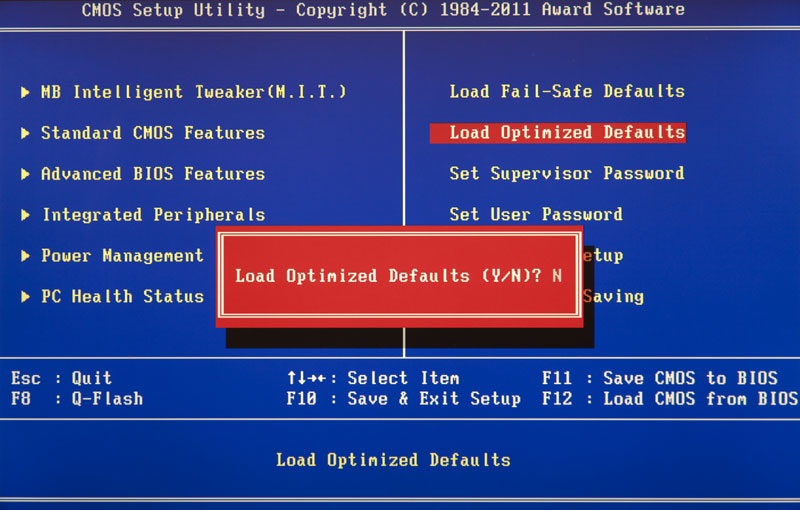
However, note that such optimization of settings in some cases can lead to unstable operation of the system due to the incompatibility of installed equipment. Then you should return to the default settings using the command. Load Fail-Safe Defaults and try to configure the desired parameters manually.
Set Supervisor Password.
A command that allows you to install, remove or change the administrative password that is used for full access To all BIOS settings, as well as when loading a PC.
Set User Password.
A command that establishes a user password that allows you to access the BIOS parameter values. That is, most settings will be closed for editing. Same this password You can use when booting a computer.
Main sectionsBios.Setup.with horizontal main menu (gray background)
As we have already noted, the confirmation interface BIOS exists in two basic versions that differ not only for the external design and location of the main menu, but also by layout of parameters by partitions. So now let's get acquainted with the second type of interface, which is used by such leaders in the system boards market, such as Asus or Asrock.
Main.
Based on the name, according to developers, this section contains the main BIOS settings, which include the time and date, settings for installed disk drives and general system information (BIOS version, processor model, volume installed memory). In this way, Main. is almost a complete analogue of the selection already familiar to us .

As you probably have already guessed, the most popular option in this section is to configure the system date and time.
Advanced
As a rule, this section has the greatest number Options for configuring components and PCs and includes several significant subsections at once. Here are the parameters responsible for the work of the central processor ( CPU Configuration.), RAM, video adapter, chipset ( ChipSet.), PCI data transmission tires and Plug and Play technology ( PNP / PCI Configuration, PCI PNP.), built-in peripheral devices ( Onboard Device Configuration.), USB ports ( USB Configuration.) And other equipment.

Also in this section, you can find overclock options that allow manually to set the values \u200b\u200bof the frequency and voltages of the processor, memory, as well as the PCI-E tires. In some cases, additionally users are available for RAM delay adjustment (timings / latency). In many models of motherboards, the parameters responsible for overclocking are made in a separate subsection (for example, JumperfreeConfiguration.) or even an independent section of the main menu ( AITweaker Overclocking. or Extreme.Tweaker.).
Due to a sufficient large set of components and a variety of parameters, section Advanced Practically does not have a unified structure. Depending on the BIOS board and developer model, the number of subsections / settings and their names can vary greatly. After all, if you compare with the BIOS Setup version, which has a blue background, it turns out that in the section Advanced The contents of the five sections immediately collected: Advanced Bios Features, Advanced Chipset Features, Integrated Peripherals, Frequency / Voltage Controland PNP / PCI Configurations.
Power
This section of its content and essence is identical to the sections. and PC HEALTH STATUS (H / W Monitor).
Here are the parameters that are responsible for power supply and energy saving PCs, monitoring operating temperatures and stresses of its main components, as well as control of the fan rates.
Boot
Already from the name it is clear that this section is responsible for configuring computer loading parameters. It is here that are placed in demand by many users, settings for determining the sequence of the loading device polling and switching on / off the "NUM LOCK" key (subsection Boot Settings Configuration.).

In many cases section Boot Includes subsection Securitycontaining installation commands, removal or changing administrative and user passwords. In the Sore Version of BIOS Setup, password management parameters can be transferred to a separate section of the same name.
Tools.
Most of the motherboards from the popular ASUS manufacturer, contains an additional partition in which the auxiliary tools are placed to update the BIOS ( EZ Flash 2.), disconnect / power on the mini-OS on the Linux kernel ( Express Gate.), creating profiles individual settings BIOS ( O.C. Profile), as well as checking the network cable during PC loading ( AI NET 2.).
EXIT
This section is responsible for logging from the BIOS settings menu and combines such commands as:
- EXIT & SAVE CHANGES - Provides a way out of the program with the preservation of all changes made by you.
- EXIT & DISCARD CHANGES - Exit the program without saving all changes made.
- Load Setup Defaults. - Returns the BIOS settings by default values \u200b\u200b(reset to factory settings).
- Discard Changes. - Canceling made changes without exiting the program.

After selecting any of the above commands, a window appears in front of you in which it is necessary to confirm its execution by pressing the "Y" key, and then "input"
Setting time and date
When you first turn on the new computer, it is better to immediately condemn the installation in BIOS Right System time and date values, thereby specifying the basic landmark, both for the operating system and for softwarecapable of functioning without an installed OS.
To get into the BIOS settings menu, immediately after starting the computer, press the desired key (as a rule "del" or "F2"). After the Main Menu of the BIOS Setup menu appears, to achieve the task, make several non-slip manipulations.
Bios. Setup with blue background
Use the arrow keys to move the cursor to the section and click "Enter" ("Enter"). Often, this section is first and nothing should be moved anywhere, but there are exceptions.

In the window that opens with the options, we find two options you need - Date (date) and Time (time). Use arrows to move between the parameter values. You can use both the "+" / "PGUP" or "-" / "PGDN" or "-" / "PGDN" or "-" / "PGDN" or "-" / "PGDN" or "-" / "PGDN" or "-" / "PGDN" or direct input. To fix the set values, the "Enter" key is designed.
The overall action algorithm here is quite simple: set the cursor to the desired field (highlighted in red), enter or select its value and click "Enter". Next, go to the next field and repeat it until all parameters are installed.
After all values \u200b\u200bare entered, press the "F10" key to save the changes. In the red window that opens, we enter the letter "Y" by clicking on the keyboard the same key. After rebooting, new time values \u200b\u200band dates take effect.
Bios. SETUP with gray background
Using the "←" and "→" keys, select the section Main.Although in most cases this does not have to do this, as it is almost always located first and opens by default immediately after entering the BIOS Setup.

We find this section of the System Date (System Date) and System Time (System Time) parameters and move the cursor to the "↓" and "" keys. Next to enter values, we use either the keys with numbers or the "+" and "-" keys. To move between fields inside one parameter, the Tab key is designed here. After entering the desired value, click "Enter".
Changing the boot device
When installing the operating system or conduct preventive work With the already installed OS, it is often necessary to ensure the download of the computer is not from the hard disk, but from the optical media, USB flash drive or any other storage device. Therefore, one of the most sought-after tasks, for which ordinary users have to "climb" in the BIOS settings, is the need to change the boot device.
Bios. Setup with blue background
After opening the BIOS setup program, move the cursor to the section and click "Enter".

Key "↓" go to the parameter (First boot device) and again press "input".

Further before you opens the window with a list of devices that can be selected as boot. If you plan to launch a PC with optical disk, I choose the value of CDROM using the arrows and then as usual "input". If you need to boot from a flash drive or an external portable disk, select the USB-HDD option. In the same way, you can choose the second and third loading devices ( SECOND. BootDevice.and Third.BootDevice.).
It is worth considering that if several hard drives are installed in the computer or solid-state drivescontaining the system and being bootable, then to specify the sequence of their survey, a special item is intended Hard DISK. BootPriority..
In order for all the settings you make, do not forget to press the "F10" key, then "Y" and finally "input".
Bios. SETUP with gray background
After opening the BIOS settings window using the "→" key, select the item Bootand click "Enter". Next you can expect two options, depending on the BIOS version.

In the first case, you will see a list of assignments of boot devices. They are indicated as 1st, 2nd and 3rd boot devices (respectively, the first, second and third boot devices). Moving the list is made by the "↓" keys, the selection of values \u200b\u200b(HDD, CDROM, USB, Removable) - "Enter" or "+/-" keys.

In the second case, the section Boot will contain several subsections, among which in this situation we are interested in Boot Device.Priority.. Move the cursor on it, and click "Enter". Immediately after that, you will open a window with a list of boot devices, the choice of which is carried out in the same way as described above.
The owner of several drives should pay attention to the subsection Hard DISK.Drives.. It is in it a choice of priority boot disk Among the hard drives installed in the computer. If you have several optical drives installed, in this case the choice among them the priority device can be organized in the subsection CDROM. Drives..
After completing the settings, it remains to press the "F10" key, and then "input" to save the changes made.
Conclusion
Despite the fact that BIOS still remains the most common system used for initial setting Equipment and booting PCs, its time is inexorable coming to an end. To date, most of the system boards are equipped with a new promising software boot interface - UEFI, which has a modern graphic shell and has much greater functionality.
Nevertheless, BIOS is still early to write off from the bills. After all, the mass implementation of UEFI began only a few years ago, while BIOS is the main boot system For several decades. Therefore for a long timeA huge amount of computers with BIOS will be used by many users.
The article describes in detail the widely used modern versions of the BIOS, all BIOS settings as they affect the operation of the computer, are given recommendations for changing and optimizing the computer work as a whole.
1. What is BIOS?
Basic Input / Output System, or abbreviated Bios. This is a basic I / O system, which is located in a separate chip of the motherboard and is the most important link control between the computer and the operating system. BIOS determines how the computer components configuration is configured when it is turned on, as its devices interact with each other, how the data is input / output.
Tasks that solves BIOS
- Initialization and initial testing of computer hardware (post-testing).
- Setting and configuring hardware and system resources.
- Distribution of system resources.
- Identification and configuration of PCI devices.
- Working out basic functions of software appeals.
- Processing software interruptions from system devices.
- Basic I / O functions and interaction of devices among themselves.
- Computer power management, shutdown, translation to "sleep mode", etc.
The BIOS settings significantly affect the performance of your PC. Motherboards of different manufacturers use different BIOSs, so it is impossible to bring some one instructions for their use, especially since, as we released new processors and motherboards, the BIOS options become more complex, but on the example of several models you can get general ideas about adjustments. .
BIOS version
BIOS for computers is made by several large manufacturers. Among them, the most famous is the company AWARD SOFTWARE. Therefore, consider some versions from Award. I do not put the task of a detailed consideration of this issue, but only I want to introduce you to this section in the shortest form to only have general view On existing BIOS versions and understand which version you will face when you enter the adjustment on your computer. Therefore, I will introduce all this only in the form of drawings and names to them, starting with older versions. At the top of the drawing, below - name:


Joint BIOS from Award + Phoenix. Used on modern motherboards.
There are also versions of bios from Ami, Phoenix, Intel and other manufacturers, but they are not as often as presented above.
How to find out the BIOS version on Windows XP?
The easiest way: Start → All Programs → Standard → Service → System Information. Or start → Run and enter the program "Starting program" enter MSINFO32 and click OK:

In any of the two cases, such a window will open with the data of your computer, where you can see the BIOS version:

The same can be done using programs, such as Sandra, Everest, etc. And I want to offer you a convenient SIW program that does not require installation, you can download it. It gives the data a little more:

2. How to enter the BIOS settings?
Please contact the BIOS settings very carefully and respect. Inappropriate adjustment can bring a computer into a non-working state or deduce its individual components.
When you turn on the computer and start the operating system boot on the monitor screen, a message is displayed about how you can go to the BIOS settings. A hint that appears during the POST procedure has something like this: Press Del to Enter Setup, but, as a rule, not all users notice this and do not have time to press the desired key, in our case delete to enter the BIOS SETUP. Alternatively, the key that you want to use to enter Bios Setup can be found from the manual for the motherboard.
Missed the input moment in the settings? No problem! And even if OS was loaded, nothing terrible. If for any reason the instructions for the motherboard is not, and there is no screen tip, make a reboot and at the very beginning of the download when the equipment is tested, hold or continuously press the Delete key, less often F1 or F2. It must be done before loading the operating system! With the right to comply with the procedure for actions, you will soon log in to the BIOS SETUP program, where the necessary settings are made.
3. Reset default settings
In case you have overdoing with adjustments or misinterpret some bIOS Parameters, Finally confusing in the settings, for example, doing this for the first time, you should not despair. You can very just return all settings to the factory.
Option number 1
Turn off the computer power, remove the side cover system Block. On some motherboards, there is a special button to zero the BIOS, we are looking for it, and all, the BIOS is reset (drawing at the bottom):

Option number 2.
If there are no zero buttons, there is a Motherboard CMOS jumper. It is located not far from the BIOS battery. We rearrange the jumper to adjacent pins for a few seconds and return to the place (drawing below).
BIOS is decorated in the form of several programs. The program with which the settings are made are called the BIOS Setup. It should be noted that by clicking on the Dell or F2 keys when the computer is loaded, we are not in the BIOS, but only in the program to configure it. These settings are stored separately in a special microcircuit dynamic memorycalled CMOS memory or just CMOS:

Option number 3.
If it is difficult to find a jumper, you can try a way to reset the settings by removing the battery for 15-20 seconds. To do this, we are looking for a battery on the motherboard - it is big and clearly visible. Gently, holding, to not fall, take it out of the nest, clicking on the retainer. Through set time Insert the battery to the place to the characteristic click of the retainer. The settings are reset to the default values, that is, to the factory (drawing at the bottom).
This small battery or simply batteries, just ensures the power of the CMOS memory when the computer is turned off, which is usually located nearby. The battery must provide voltage of 3 volts. And when she sits, the computer will not be able to boot, one of the messages will appear on the screen: CMOS-Chercksum Error or Battery Low Lewel. One of the first signs of the discharge of the battery will be a violation of the date and time readings. To eliminate this problem, it is enough to change the battery on the motherboard:

Option number 4.
In versions of the BIOS, such as the type of Award BIOS 6.0 PG with a classic interface (similar to be considered further) in the initial BIOS SETUP program window there is a separate Load Fail-Safe Defaults option (the second on the right). If you choose it, you can restore standard BIOS factory settings. This may be required if your experiments with BIOS led to an unstable computer work, and you do not know how to manually correct the error.
Most manufacturers use their own ways to accommodate individual BIOS options and their settings.
The BIOS setting in most cases causes user difficulties due to the lack of description in their native language. For our leadership, we used the Motherboard Gigabyte GA-P55A-UD6, which has a clearly designed BIOS with large quantity functions I. wide range Settings. Of course, all these tips can easily use other manufacturers in BIOS-ah, only minor differences in naming, placement and ranges of parameters may occur.

Entrance to BIOS - how to enter BIOS
First of all, you need to find a way to enter the BIOS. After turning on the computer displays the image as a greeting. This may be information about system testing (as in Fig. 1) or the logo of the motherboard manufacturer. If you press the PAUSE key during the download, you can read the list of messages in more detail. What we need will be seen the boot screen below. In the event of this motherboard, you will enter the BIOS after pressing the key (: BIOS SETUP). This is characteristic of the overwhelming majority of motherboards, although there are exceptions. Some models for entering the BIOS, the keys are answered, or.

Setting the time and diagnostics of drives
The settings in the BIOS are usually divided into logic groups Depending on their purpose (Fig. 2). The focus on the word "as a rule", because there was no BIOS in which the blatant disorder and the lack of logic. In the case of maternal gigabyte boards The order is exemplary.

Time, date and availability of channels for drives Install on the Standard CMOS Features tab (Fig. 3). For each channel (IDE Channel) you have three options (choose them from the drop-down menu to the right, between square brackets): Auto, Manual, None. By default, the AUTO parameter is set everywhere. After turning on the computer, the connected discs are automatically recognized. If you want to speed up the computer load, set the None value for unused channels. During loading, the computer will only take place by connected drives, and will not spend time on the detection subsequent.

At the bottom of the bottom you will see the Drive A parameter, the floppy disk drive. Most likely, it is not on your computer (the floppers were replaced by USB devices), in this case, set the None value.
Setting up loading parameters, i.e.
Download, that is, the main launch of the computer (even before booting the operating system), manage the functions on the Advanced Bios Features tab (Fig. 4).

If two or more hard disks are installed in the computer, then using the Hard Disk Boot Priority option, you specify on which you download the operating system.
The Quick Boot option disables the detailed hardware tests when you start the computer. If you do not have any problems with the computer, this option must be enabled.
Three more functions - First Boot Device, Second Boot Device and Third Boot Device - allow you to determine which type of drive will first be attempting to boot the operating system. If the system is installed on the hard disk, in the first of them, set the Hard DISK value (Fig. 5).

If you need to load with optical drive (for example, for windows installations From the disk), choose the CDROM option. The same function in the F12 key, but it is turned on when it turns on only a one-time load from an optical drive, while the loading method installed in the BIOS will be on an ongoing basis (before change).
Other important settings options on this tab:
- HDD S.M.A.R.T. Capability - Enables hard disk testing (if there are no problems, install it in disabled).
- Limit CPUID MAX. TO 3 - allows you to identify the processor through the system. This option should be disabled in operating systems newer than Windows 2000, in almost all new computers.
- No-Execute Memory Protect - Protects from attempts to overflow memory buffer.
- Delay for HDD (SECS) - draws the attention of the BIOS to the timely definition of the old, slowly working hard disk. In the case of all new disks, you must set 0.
- Backup BIOS Image to HDD - Creates a copy of the BIOS on the hard disk, which you can use if the BIOS motherboard fails.
- Full Screen Logo Show - Enabling the appearance when booting a color logo-screensaver of the motherboard manufacturer (if you do not please, install on disabled).
- Init Display First - The function indicates where exactly the computer must first look for a video card (external or integrated). Correct settings - This is another acceleration of the computer download.
Components of motherboard
Integrated Peripherals (Fig. 6, Fig. 7) On this tab, first of all, the settings for the operation modes and the ports of the computer. Here you can also enable, or disable unused controllers.
Few people today use devices connected via Serial Port (serial port, so that ONBOARD Serial Port 1 should be installed on disabled.


PCH SATA CONTROL MODE (Fig. 8) is used to determine the method of operation of controllers: IDE (default for most disks), RAID (creating disk arrays - systems of at least two hard drives operating in the described method), AHCI (improves performance Hard disks with the SATA interface is performed using the mechanisms intended for this, for example, a queue for reading data).

An option that is visible at the top of the Extreme Hard Drive (XHD) is actual only for Gigabyte motherboards - allows you to increase the performance of system disks, through a simple and fast addition of an additional hard disk.
Other useful BIOS settings from this tab:
- Green LAN - The system recognizes the connection of the network cable, if not connected, the network controller will be automatically turned off.
- Smart LAN1 (2) - controls the operation of the cable network connection. After the diagnosis there will be a report on possible problems.
- Azalia Codec - Enables / Disables the built-in audio codec.
- USB Controllers - Enables / Disables USB Controllers.
- USB Storage Function - Recognition of data storage devices connected via USB connector.
- USB Legacy Function - in old systems, such as DOS or Windows NT, includes support for USB devices, such as a keyboard or mouse.
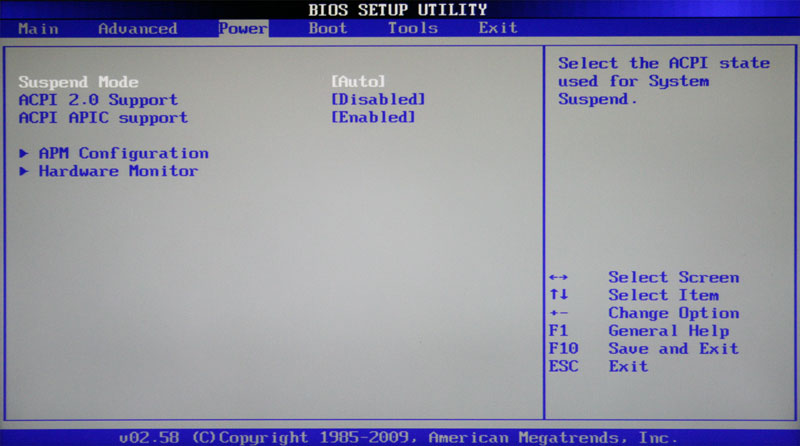
Methods of energy saving in BIOS
The Power Management SETUP tab (Fig. 9) groups the functions establishing energy savings. In principle, the default settings should be enough.

ACPI Suspend Type - Indicates a way to disconnect the computer in power saving mode: S1 disconnects the display, stops the processor clock and power of the hard disk, and S3 disables all components except the keyboard and RAM.
Resume by Alarm - setting up automatic computer waking at the specified time.
Soft-off by PWR-BTTN - Specifies the POWER button in MS-DOS mode: The Instant-Off function disables the computer immediately, and Delay 4 SEC - after pressing the button for less than 4 seconds, the computer goes into sleep mode.
PME EVENT Wake Up - allows the output system with sleep mode, signal from the PCIE or PCI device.
Power On By By Ring - awakens the system with a modem signal that supports this feature.
AC Back Function - Sets the way of the computer after the power loss: Soft-OFF - the computer remains off, Full-On - turns on automatically, Memory - Restore the system to the state of the last sleep mode.
Fan speed, temperature and limit values
Functions are collected on the PC Health Status tab (Fig. 10) - are responsible for controlling the voltage and temperature of important components, and also allow the fans connected to the motherboard (coolers) connected to the motherboard. With their help, the boundary temperature values \u200b\u200bare set, as well as the method of operation of the fans. Here you can also familiarize yourself with the readings of the sensors built into the fee. The processor temperature sensor is especially important, which informs the experienced user that the system works in safe conditions.

CPU WARNING TEMPERATURE - Sets the value after which a warning of high processor temperature appears (Fig. 11).

- CPU Fan Fail Warning - Enabled (Enabled) Displays a warning if the processor fan does not work.
- System Fan2 Fail Warning - as above, if you connect the second fan.
- Power Fan Fail Warning - as above, but this applies to the power supply fan.
- System Fan1 Fail Warning - as above, but relates to an additional fan.
- CPU Smart Fan Control - includes automatic adjustment of the speed of rotation of the processor fan.
Saving and protect access
Functions associated with saving and restoring parameters, as well as to protect access to a computer, are located to the right of the main BIOS menu (Fig. 12). Their choice leads to immediate execution (do not open the menu tabs).
The Load Optimized Defaults option, discards the BIOS to settings installed by the default manufacturer. You can use this feature if you are not sure that the BIOS is configured correctly if the computer works unstable.

Using the Set Supervisor Password and Set User Password parameter, you can set a password to access the BIOS, as well as the required operating system. When Save and Exit Setup is selected, the current settings will be saved, and the computer is rebooted.
The EXIT WITHOUT SAVING function restarts the computer, but without saving the changes you made.
BIOS Setup - Overwar Shrine
All functions of the enhanced menu of setting the operation of the main components or motherboard, processor and memory boot, Gigabyte stores on the MB Intelligent Tweaker tab (M.I.T.).
Here you will find additional tabs with very important information: The values \u200b\u200bof the basic frequency of the processor, memory, the amount of installed memory, working temperature processor and chipset, as well as topical voltages of the processor and memory (Fig. 13).

On the M.i.t. tab Current Status More detailed information on the parameters of the entire processor and memory. Here you can't make any changes.

Advanced Frequency Settings - (Fig. 15) This tab contains the most interesting functionsused during overclocking.

The most important is Bclk Frequency (MHz) (Fig. 16) - the basic values \u200b\u200bused to create all operating frequencies of components through the corresponding coefficients. For new intel processors, nominal value of 133 MHz.

The CPU Clock Ratio option is visible at the top, it sets the processor multiplier. This figure is multiplied by the value of the base, sets the operating frequency of the system. In the example of the figure, the multiplier is x22, which, with BCLK 133 MHz (the actual value of 133.3 MHz) gives the frequency of 2933 MHz.
The QPI CLOCK RATIO option sets the QPI bus frequency multiplier (components used in case the internal connection between the two systems is placed in one processor housing).
System Memory Multiplier (SPD) This is another multiplier of memory - setting it in the value of X10, gives the frequency of memory of 1333 MHz - nominal for Intel Core i7 800 chips.
In most processors, the maximum maximum values \u200b\u200bare installed for all multipliers. This means that overclocking is more than installed by the manufacturer the ceiling is not possible. The restriction can be circumvented by increasing the base frequency.
There are also changes clock frequency tires PCI EXPRESS. (PCI Express Frequency (MHz)). The default value in this case is 100 MHz.
Advanced CPU Core Features tab (Fig. 17) provides access to additional parameters Processor - allows you to enable or disable various ways to save energy or Turbo mode.

Also here you can specify the number of active nuclei (Fig. 18). The photo shows the optimal parameters, for the correct operation of the system with one exception - turbo mode must be enabled (enabled).

The parameters of the RAM memory are set on the Advanced Memory SETTINGS tab (Fig. 19).

At the top you will see the System Memory Multiplier option is a multiplier of the memory frequency (Fig. 20). 
Component voltage You set on the Advanced Voltage Settings tab (Fig. 22).

If you do not have big experience in this area, it is better to leave all the default settings, that is, a car or Normal - too high voltage It may lead to the entire computer. However, during overclocking, the increase in these values \u200b\u200bis needed to obtain good results and stable operation of the system.
It does not work here "the more, the better," this requires long testing of the computer with the specified voltage and the combination of these values. In short, this is a lesson for the most experienced users who are well focused on the computer, have great experience and pay a lot of time experiments. Manufacturers offer various ways to change the voltage: to the selected value (for example, from 1.2 to 1.35 V), or from the selected value (eg: 1,2 + 0.15 V).
Specific settings for AMD processors
The BIOS settings described above include universal options, but are suitable for mat. Cards with LGA 1156 socket, that is, for Intel processors. The functions of overclocking motherboards for aMD processors They have fundamental differences, therefore require a separate description.
As an example, we used the maternal mSI card 870A-G54. You will find on the Cell Menu tab in the Cell Menu tab (Fig. 23).

In this case, instead of BCLK, we have an ADJUST CPU FSB Frequency (MHz) (Fig. 24). Her name is misleading - AMD has been abandoned many years ago fSB tires on boards for processors. Thus, we have the case with the output frequency (HTT) 200 MHz.
Motherboard BIOS signals allow you to promptly determine and eliminate the faults that occurred in the computer. Ignoring these signals can lead to irreversible consequences, failure of individual components or computers ...If you were looking for the BIOS settings in the pictures, they got along the right address.
WRITING Changes will be a lithium battery built into the motherboard and support the required parameters when the voltage loss.
Thanks to the program, it is possible to establish the steady interaction of the operating system (OS) with PC devices.
Attention! The BOOT network configuration section is present, allows you to adjust the parameters for the speed of the system loading, the keyboard settings with the mouse.
After completing the work or familiarization with menu Bios. Setup Utility, you need to click on the burning key Exit, automatically saving changes made.
Main section - Main menu
Let's start working from the MAIN partition used to modify the settings and adjust the time indicators.
Here you can independently configure the time and date of the computer, as well as make the configuration of the connected hard drives and other drives.

To reformat the functioning mode hard disk, you need to choose hDD (For example: "SATA 1", as shown in the figure).
- Type - This item indicates the type of the connected hard disk;
- LBA Large Mode. - responsible for supporting drives with the volume of more than 504 MB. Thus, the recommended value here is AUTO.
- Block (Multi-Sector Transfer) - For faster work here, we recommend choosing AUTO mode;
- Pio Mode - Includes the hard disk operation in the outdated data exchange mode. It will also be better to choose AUTO;
- DMA Mode - gives direct access to memory. To get a higher reading or write speed, select AUTO value;
- Smart Monitoring - This technology, based on the analysis of the drive, is able to prevent the possible disk failure in the near future;
- 32 Bit Data Transfer - The option determines whether the 32-bit data exchange mode will be used by the standard IDE / SATA chipset controller.

Everywhere with the "ENTER" and the shooter, AUTO mode is displayed. The exception is a subsection 32 Bit Transfer, in need of fixing the Enabled setting.
Important! It is required to refrain from changing the "Storage Configuration" option, which is in the section "System Information" and prevent the correction "SATA.Detect.Time.out. "

Section Advanced - Advanced Settings
Now we will proceed to the settings of the PC basic nodes in the Advanced section, consisting of several sub-paragraphs.
Initially, it will be necessary to establish necessary parameters Processor and memory in the Jumper Free Configuration system configuration menu.

By selecting Jumper Free Configuration, you will be transferred to the Configure System Frequency / Voltage subsection, there is an opportunity to perform the following operations:
- automatic or manual overclocking of hard drive - Ai overclocking;
- change the clock frequency of memory modules -;
- Memory Voltage.;
- handmade voltage installation of chipset - NB Voltage.
- changing port addresses (COM, LPT) - Serial and Parallel Port;
- installing Controller Settings - configuration Onboard Devices.

Power section - PC meals
Power item is responsible for PC power and contains several subsections that need the following settings:
- Suspend Mode. - exhibit automatic mode;
- ACPI APIC - Install Enabled;
- ACPI 2.0. - Fix Disabled mode.

Section Boot - Download Management
It is allowed to determine the priority drive, choosing between the flash card, drive or hard drive.

If a hard disks Several, then in the Hard Disk subparagraph, the priority hard drive is selected.
The PC boot configuration is installed in the Boot Setting subsection containing a menu consisting of several items:

Choosing Winchester
PC boot configuration is installed in the Boot Setting subsection,

- Quick Boot - acceleration of the OS load;
- Logo Full Screen. - Disabling the screensaver and activate the information window containing information about the download process;
- Add on rom - setting the focus on the information screen of the modules connected to the motherboard (MT) by slots;
- Wait For 'F1' IF Error - activation of the functions of the compulsory press "F1" at the time of the error system identification.
The main task of the BOOT partition is to define the download devices and the task of the required priorities.
- ASUS EZ Flash. - With this option, you have the ability to update the BIOS from such drives, like a flush, flash drive or CD.
- Ai Net. - Using this option, you can get information about connected to network controller Cabil.

Exit section - output and saving
Special attention, it is necessary to pay an exit item that has 4 working modes:
- Save Changes. - We maintain the changes made;
- Discard Changes + Exit - We leave the factory settings in action;
- Setup Defaults. - Enter the default settings;
- Discard Changes. - We cancel all your actions.

The above step-by-step instructions explain in detail the purpose of the basic sections of the BIOS and the rules for making changes to improve PC performance.
BIOS setup
BIOS settings - detailed instructions in pictures
 How to reflash iPhone with PC and iTunes
 Best Bitcoin Wallets for iOS Download application wallet on iPhone
 Lenovo Vibe X2 Description, Features, User Reviews
 The computer does not see the flash drive: causes and solving the problem
 About Windows Update From Wannacry Encrypter Virus
 Hot browser keys
 New Mac Mini turned out to be five times more powerful than the predecessor