Configuring mail server for Android. Creating an email on a smartphone with Android OS. Adding a new Email account on Android
When using the Internet you need to often undergo different registrations that allow you to maintain communication with each other. On PC make it much easier. But if you are a device device with an android operating system, then it is recommended to use applications to simplify the task.
Increasingly, the owners of gadgets use social networks to send investments and documents. But e-mails were also not forgotten. Owners of devices with Androids have the opportunity to enjoy a special email application, which is initially in the smartphone. But there is also an opportunity to visit Play Market, where you can download other programs for the application of mail. Another popular option - Mail.ru.
From our article you will learn how to set up mail on android. It is proposed to consider each of the options in detail.
Setting up smartphone
To begin first with the question, how to configure email on the phone android. When entering Email on Android OS, you will be prompted to find an existing mail. For instance, [Email Protected] And enter the password. In the event that you have not previously been registered, it is worth passing this stage. For ease of use, you need to immediately configure email. There is an opportunity to enter immediately a couple of accounts, if you have. Settings in this case will be common. There are initial. For each account you can make personal settings. Let's get acquainted with them as well.
Server settings


Personal settings
You can decide on our own way that you will come for the category of letters. For example, it can be exclusively social networks and alerts from various kinds of shops on the Internet. In order not to miss important messages, it is worth indicating that you wish to receive notifications about new messages on the Android OS. A warning method can also be chosen by you personally.
If the messages come only from real users, and you should remove from E-mail, then you can select the autoresponder installation option. You can choose how to download attached files or they will be displayed immediately, or you can open them later. Those. If you are connected to a meringable Internet, then inconvenience will not.
General settings
In the event that you are resorting to frequent archiving or delete the letter, you can do so that the actions are performed at the expense of simple lugs. This gesture will really simplify your task.
Responding to messages from the conference, your message comes only to the sender of the letter. In this case, it is worth changing Yandex or E-mail mail in the settings. Then the answer will come to everyone.
In fact, we looked at the most important settings of the application. There is no point in those who are less popular on those who are less popular. But this article does not end.

About the application Mail.ru.
The article discusses the most popular postal service today. The device of the device with android can use the application that is described by us above. You can also configure your gadget for yourself. It is not necessary to use something concrete at all. When entering you, you will be prompted to enter a mailing address.
Application settings are very similar to those that were disassembled us above. For this reason, it makes no sense for this reason. The choice of a postal application for Android OS will depend only on you. You have the right to personally determine which interface you like working more more, where the space and other aspects are more organized.
Setting up mail on android
So, run the email client. In the setup item, select "Add Account", the form will display the form where you want to enter the username and password, and after clicking on the Next button.
The next screen will be invited to choose a protocol, according to which work with the client will be carried out. Mail servers, as a rule, work with POP3 and IMAP protocols, where the first takes the mail to copy data from the user's smartphone.
The IMAP protocol allows you to work with mail on the server. Choose that it is more convenient for you and press "Login". If the email is in one of the common mail services, the program will independently install other settings and connect to the server. In the opposite, you will need to enter - the name of the incoming and outgoing mail server, security parameters and ports.
One of the most sought-after functions in any modern smartphone is an email client that allows you to receive and send emails from various services, whether it is standard Google search engine services, Yandex or third-party mail services, such as Mail, Beeline and others. In this material, we describe you in detail how to set up mail on your android and how to create backup copies of your letters!
You can configure the mail not only by the standard tools of the system itself, but also using specialized applications downloaded from the Google Play service, as well as directly from the browser, authorized under your account.
And so, the mail setup process can be divided into three different categories:
- Mail Setup by system tools in OS Android.
- Setting mail in applications.
- Setting up mail in android in browsers.
Attention! Which service you did not use to send and receive emails - the essence of the work of Email does not change. Almost all projects for working with emails use identical technologies.
1. Setting mail to the means of the operating system itself
And so how to set up mail on android? Standard means of this system allow you to receive and send letters from an attached email address, for example, the same Gmail or connecting a separate address to work with mail. We will consider both options.
First option - Standard Mail from Google
Initially, consider the option of working with standard mail from Google. As soon as you add an account for your smartphone running the Android operating system, the mail will be configured automatically, and all letters will be downloaded to your device, as read earlier, not open.
To work with accounts and their setup, you need to go to the "Settings" tab, select "Accounts and Synchronization", and then enter the account in which your Mail is attached. In this case, we are talking specifically about Google - the Gmail service, which is used by millions of people around the world.
Second option - Connecting mail from third-party services
Suppose you use mail from Yandex or Mail.ru. What to do in this case? As mentioned earlier, the principle of operation of postal services is the same, the only thing - the difference between some settings in the records.
To configure mail in any other service, you need to select an e-mail application in the main menu and open it. First try logging in with automatic setup. To do this, it is enough to enter an email address in the Email and password in the Password field. Once the data is entered, click the Next button.
If the system gives an error, return to the previous item and click the Manual Setup button. On the example, we will tune mail mail.


In the window that appears, you prescribe settings as in the picture:

For outgoing messages, put the following parameters:

Attention! All parameters for your email client can be viewed on the official website, for example, on www.mail.ru or www.yandex.ru, enrolling in the appropriate section. In the "Help" section, find the item in which the mail setting is mentioned on the smartphone, and see the list of parameters that must be prescribed for your account.
Once all the data is specified, you will need to click on the "Finish" button, after which the system will check the accuracy of the entered data and is synchronized with the mail server. All your letters will be automatically downloaded to the phone. At any time, incoming letters you can remove from your phone, after making copies. It is also worth considering that several mail accounts can be connected on one smartphone, for example, if you work immediately with Yandex, Mail.Ru and other mail services!
2. Setting up mail in applications for android
Above, we described the method that allows you to connect and configure mail in the standard Options of the Android operating system. In the same paragraph, we are talking about specialized applications that are designed specifically for each service, for example, Yandex Mail or Gmail, Mail.Ru and many others. The procedure in this case will be the following:
- Determine what your mail and where is registered. For example, if you have a mail of this type - [Email Protected]then it belongs to yandex if [Email Protected], then to Mail.ru and so on.
- Go to Google Play and enter the name of the postal service, for example, the same Yandex or Yandex, Mail.Ru, Rambler, and so on.
- Load the program (email client) for this postal service and run it.
- Specify the username and password. As practice shows, in most programs, the email address can be entered both just login and fully mail.
- The system will check the correctness of the entered data and automatically download the letter from the server to your device.
Each program has its own design, its own specific settings, a separate functionality, so each user itself determines whether it is worth checking mail through the official mail service application or specify its e-mail through the standard settings in Android.
You can set several programs, for example, to work with Mail, Yandex, Rambler, Just keep in mind that this significantly increases the power consumption of the battery.
3. Setting up mail in android in browsers
Due to the fact that most users prefer to go online from mobile devices and smartphones, many mail services have developed a mobile version with which the site is automatically adjusted for the diagonal sizes of your device. All these operations are carried out in the browser, for example, Safari or Google Chrome, Opera.
In order for you to go to your postal service, you need to open any browser on your device and write its name or immediately to go to the official website, for example, at www.yandex.ru to work with mail from Yandex. Next, you go to the Mail tab, enter the login and password. We recommend that you save the password in the browser so that each time does not enter it when you authorize.

Subsequent times you will fall into your email account automatically, as soon as the page opens. You can also add a page bookmark page in the browser settings to get into the postal service with one click.
As you can see, set up mail on android is simple enough, and there are many ways for this! If you proceed from statistical data, it is possible to say with full confidence - most users prefer to work with mail to use the standard Android settings or specialized applications. Exit via mobile versions from the browser is carried out only those people who cannot independently install the application from Google Play or register settings in android. How to do you - only you decide! Good job!
Email is required to send / receiving letters and files. At the same time, the Gmail mailbox, in addition to the basic functions, is used to access Google's services, including Google Play apps. Therefore, registration in Gmail is obligatory if the use of search gianta services is supposed. In addition, it will facilitate registration and work with other postal services.
How to create email Gmail
Mailbox registration is carried out via the Internet and account item, the mobile device settings section. It is recommended to use the second option, because then you do not have to add to the smartphone created separately.
Instruction:
Activate Wi-Fi or mobile Internet.

Go to the settings section, select Accounts.

In the new window, click on the "Add Account" string.


Then you need to enter the name and surname. Enter these data is optional, suitable and alias.

Specify the floor and date of birth. Important! If the age of the user is less than 18 years, the system may refuse registration. Then you have to create an account using a PC, and then make the finished account in the phone.

Next you need to enter the "Username" - the name of the Gmail mailbox. Often the name may coincide with the name of other users, then the system will offer to change the name or select a free name formed on the basis of the name and surname.


The system then will ask you to come up with a password consisting of at least eight characters. Below you need to re-enter a password to confirm.

The next window requires you to enter the phone number, which is optional. In case of failure, click on the "Skip" button.

The service will be offered to familiarize themselves with the "confidentiality and terms of use", which must be adopted. To appear the button, you must scroll down the page down.

On this, the creation of Gmail email and part-time Google account is completed.

It remains to go to the Google Account Settings and set the service synchronization settings.
How to create an email of another service
Registration of an electronic box of another service occurs according to a similar principle as in the case of Gmail. The user is available to check in the Internet or in the appropriate application. The second option is easier and more convenient, in terms of writing and watching letters.
Instructions for creating mail through the application:
You need to activate the Internet, and open the Google Play application store. Looking for typing the preferred mail service.

After installing and running the application, select the "Post Mail" item.


With the reluctance to enter the phone number, a proposal will appear to create a secret question and password, as well as enter the test word. Next, click on the "Finish" button, after which the registration is considered to be completed.

The created e-mailbox is automatically attached to the downloaded application, where in addition to viewing and sending messages, binding e-mailboxes of other services is available.
Do not know which email client to choose and how to set up mail on android? What email address can be operated in a particular application and what features does each of them offer? This review will help you answer these questions.
To configure mail on your mobile device, you will need one of the mail applications. After downloading from Play Market, you must enter a login and password from your box. That's all the setup. Mailbox - multipurpose and comprehensive method of exchanging messaging between people of different countries. This is not a messenger, as many are used to thinking. And the full replacement for old letters, which in due time was written by hand. So when using, try to comply with the rules of decency and write competently! Consider the most popular postal programs.
Gmail (download)
Basically, all users of the Android phones are used by default Gmail. First, it is associated with an automatic installation of 90% of the devices running the "green druid". The entrance to the mail also occurs, due to the fact that the login and password from Google and mail account are the same. Spending files, you can save to google disk, but choose another drive will not work, only Google!
The exact and correct execution of their tasks, everything is properly sent, the alerts come, receiving news on subscriptions and so on. But, after all, the 21st century in the yard. People have not been evaluated for a long time, for example, machines for the ability to go. Therefore, I would like something more.
Some options implemented in other custom clients are missing: the interface and the design subject cannot be changed, highlight and, for example, delete all messages are also not possible. Moreover, it is often posted when opening office documents and PDF files from mail. Strange, considering a whole billion download, and besides, this is Google.
 Photo: Gmail on Android
Mail Mail RU (download)
Reliable, for many years of use never failed and did not depend. Focused on the Russian audience. Allows you to use several mailboxes immediately and besides different. Implemented, however, not very good. Using one mail as the main, alerts will come from all other registered in the program, given the permanent distribution of spam, permanent alerts, vibrations and extraneous sounds are very bored.
The interface is very convenient. Everything is intuitive and simple, nothing bothers until you scroll down. Some games, additional extensions that do not have absolutely no relation to the options of the mailbox. What for? Unclear.
The unequivocal plus is a great implementation of the background download of documents, files, pictures and everything else, considering that many do not support it.
By summing up: good functionality, but with unnecessary additions.
 Photo: mail ru on android
Yandex Mail (download)
Yes, Yandex seems to have analogues with absolutely all from Play Market.
You can only register / log in with the owners of the mailbox with the Yandex domain. The design is good, understanding, and in its own way. Dark stylistics, surprisingly, looks great and creatively. For greater convenience, developers and designers allocated the main folders of the mailbox with different colors, for example, "incoming" - yellow, pleasant color, "important" - red checkbox. The eye is not annoying. Huge plus Yandex for design.
You can also add additional accounts. For even greater convenience, a SWIP Action System is entered, that is, to remove the letter, simply swipe on the letter tab from the right edge, to the left. The letter will be deleted.
Work perfectly, minor alerts come, but they can be turned off and it's good! There are no cool features, but the developers are apparently very careful about the clients of Yandex Domain.

 Photo: Yandex Mail on Android
 MY MAIL (download)
Universal Email Client, allowing you to register with users with accounts in the following systems: My.com, Yandex, Google, Rambler, Exchange and others.
The interface and external design is incredibly similar to the Mail.Ru mail application. Moreover, from the first opening of the application, sroping the tab down, you can notice familiar extensions. Those of the most we condemned to Maler. I suspect that the entire interface was copied at the Mail Developers, and the functionality too. Absolutely nothing new.
It is convenient to use, but unnecessary expansions are still annoying. Verdict: You can use, considering the impressive number of installations - more than 1 million.


Email box (download)
Good mail customer with a small amount of advertising. Supports many domains. Functionality is large, but the design is worth "pushing". Advanced settings allow you to edit the interface for your needs. In particular, we liked the increase and changing fonts. A variety, extensive settings, and it's great, because badly visiting people have to squint or do glasses to consider sometimes microscopic characters.
The developers were not particularly "steamed" with the design, as he was made mediocre. But with the ability to adapt it to itself. This is a plus, and minus at the same time.
Russification and translation fails, translators apparently did not give this special attention to this: frequent errors, incorrect leaning words, incomprehensible "lower underscores" between words. In our opinion, advantages and minuses equally - use, especially if your eyesight fails.


INBOX (download)
New utility from the creators of Google. Suitable only by gmail mailbox users. Honestly, much cooler and more convenient than the original. A bunch of useful chips, the possibility of grouping in semantic content, more pleasant design, beautiful icons. Added the ability to read and remove swipe letters to the right and left, respectively.
Many users are pleased to consolidate records. Inbox is a small slider on top, allowing you to display only fixed records - a very convenient and simple solution. Special attention deserves grouping, noticeably reduction time of searching for the desired message. The grouping occurs automatically, as well as the opportunity to make email addresses in a specific group. After that, InBox adapts, will find even more similar letters and will place them in the desired category. Excellent copes with its task.
Sometimes hangs when loading a large package of documents, but it is not critical.


Yahoo (download)
Unfortunately, in Russia, the services of Yahoo are few people use. And in vain. Yahu is a similarity of foreign Yandex. There is a swipe system. But unlike analogues, letters are not deleted, but archived, automatically removing at the expiration of a certain time. Do not necessarily have mail with a special domain. Universal utility and supports many other domains.
To register, you will need a little more user information (name of the name, age, date and year of birth, floor). This is due to the fact that the described Email client automatically creates and registers a Yahoo account that allows you to use almost all extension capabilities. When creating an additional account, new accounts will be created.
The creators provided a change in fonts, the theme of registration, the overall stylistry of the program. An interesting thing is the lack of passwords. When registering, you will need to enter only the key that will be sent to the specified email address. The solution is great, given the "ability" of people to constantly forget passwords.
 Photo: Yahoo Mail
Aqua Mail (download)
Convenient multifunctional email client, allowing to recognize Gmail, Yandex, Yahoo, Hotmail, Fastmail, Apple, Rambler, Mail and other mailboxes. Excellent optimization, there were no freezing. Aqua is definitely the most impressive and steep in terms of the number of features and settings. Combining messages in chains, gestures, turning, design of signatures using color and text formatting, a certain adaptation to network traffic, night mode, output mode, work with calendar and contacts - just a vigorous number of different functions.
Many utilities considered in this article have widgets, but the full screen is only aqua. A very light and simple widget, nothing superfluous, after a certain time you start using them more often and more often. It is also worth noting the absence of an annoying promotional signature. Get even more functions possible after purchasing the Pro version of AQUA, but where even more?
 Photo: Aqua Mail
Dear readers! If you have any questions or there are comments on the topic of the article - please leave them below.
Setting up an email on the Android smartphone or tablet is one of the first steps after buying a new device, of course, if you plan to receive and send an email on your mobile gadget. Otherwise, this stage can be skipped.
If you use the Google Gmail mail service services, you don't need to customize anything, all the settings will be automatically applied in your Google Account. When using other mail services, access to your mail must be installed manually. Let's wonder how to set up mail in android smartphone.
Mail Setup in Android Smartphone
Configure the standard mail client in the Android operating system is easy:
- Run the embedded program "Email" client. Depending on the smartphone, the program interface may have a different appearance, but the algorithm of action will be similar.
- If you still do not have mailboxes, the program will invite to create a new one. If you already have an email address on any service, then go to the application menu, select the item " Settings"And then -" Add an account».
- A form will appear on the smartphone screen to add a username and password. Press the " Further».
- On the next screen, you will be asked to choose the protocol in which you will be working with mail. Mail servers support two main protocols - POP3 and IMAP. POP3 protocol takes mail copying data from service to your

smartphone, and the IMAP protocol allows you to work with mail directly on the server. Select that you are more convenient and click " entrance».
- If your email is on one of the common mail services, the client program will try to independently install the remaining settings and connect to the server with mail. Otherwise, you will have to configure mail transportation parameters - the name of the incoming and outgoing mail server, ports, security parameters. There is nothing difficult in this, all data represents your postal service that you just have to enter your hands.


- To enter the name of the servers and other parameters, click " Manually"And enter the provided data of your service that are in the help section. For example, the mail assistance section
With the correct setup of email in the smartphone, you can really receive and send messages from anywhere.
You read this:
- The main difference between the smartphone from the ordinary mobile phone is the ability to install different applications from a huge variety provided by Google Play. Google Play - [...]
- After the first setup, most often need to transfer your contacts from an old phone or smartphone. If your previous phone worked on the Android platform, then it is possible to contact [...]
 How to pay a domain name
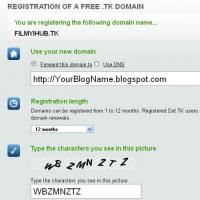 Domain zone of tokelau islands
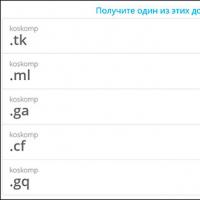 What is domain what problems may be
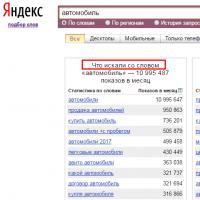 Yandex Wordstat: detailed instructions for using the service and grouping operators and a complicated request
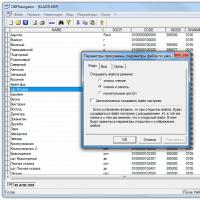 Editing DBF files
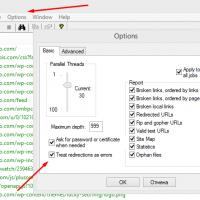 Xenu Link Sleuth - What is this program how to use the Xenu program
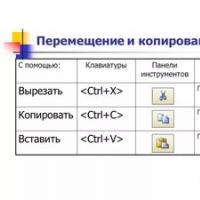 Methods Copy and insert text from keyboard without using mouse