As in BIOS, switch IDE. How to change AHCI on the IDE on a PC or laptop? What is AHCI mode
ADVANCED HOST CONTROLLER INTERFACE (Ahci.) - The mechanism used to connect information drives using the Serial ATA protocol, which allows you to use advanced features such as the built-in command order (NCQ) and hot replacement.
It is intended to replace an outdated classic ATA controller that supports compatibility from top to bottom with the original IBM PC / AT, and supports direct memory access only as an addition. The main real problems of this controller are the lack of hot replace support (despite the fact that ESATA supports it) and command queues, on one channel (in the case of SATA, each device has one channel) - Only one command can be played simultaneously. Thus, the use of the possibility of ATA NCQ, even with the support of it by the disk itself, is impossible on the classic ATA controller.
When switching, with the already installed Windows, the ATA controller, which is part of the South Bridge, to the "AHCI" mode, will mean, for the installed operating system, the involvement of an incompatible logic of the LEA controller is equivalent to installing the ATA controller system, excellent From the existing, and physical switching of the boot disk on this fee.
In that the case of Windows When loading does not find boot disk and emergency stop with bsod STOP 0x0000007B, incaccessible_Boot_Device.
The text is taken from the free encyclopedia http://wikipedia.org/
So, since you came to my site, it means that we have appeared a common problemwhich you have appeared after buying a new SSD (for example in WH .RU). And reading the text above, you could understand its root. For some reason, Microsoft still cannot make a free transition from one driver to another. And to do this, users have to work a little, but in principle quite a bit. To solve the problem, it is necessary before switching to the BIOS installed in Windows driver Ahci., More precisely, make a small amendment in the registry. This is an instruction for operating windows systems 7, Windows Vista and Windows Server 2008 R2. For Windows 8, the instruction is a bit different and available on the link:
I. Manual switching Windows 7 to AHCI mode
1) go to the registry. To do this, use Win + R and in the window that opens, we write regedit.:
2) A built-in "Registry Editor" will open. On the left side of the window we go along the way:
HKEY_LOCAL_MACHINE \\ SYSTEM \\ CURRENTCONTROLSET \\ SERVICES \\ MSAHCI

3) Double-click Open the parameter Start. and change the value to 0
(default is the value " 3
"- AHCI is not supported):

4) That's all, we close the registry and reboot the computer.
5) During the boot, go to the BIOS and enable AHCI support. How to do this can be read in the instruction manual for your motherboard. Save the settings and restart the computer.
After windows startup The AHCI driver itself will install and restarts again. After restarting, hard drives will work already in the AHCI standard.
Good day.
Quite often ask me how to change the AHCI parameter on the IDE in BIOS laptop (Computer). Most often they face it when they want:
Check hDD Computer Program Victoria (or similar). By the way, such questions were in one of my articles :;
Install the "old" Windows XP on the relatively new laptop (If the parameter does not switch, the laptop simply will not see your installation distribution).
So, in this article I want to disassemble this question in more detail ...
The difference between AHCI and IDE, selection of mode
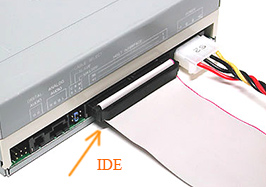
IDE is an outdated 40-pin connector that used to be used to connect hard drives, drives and other devices. Today, in modern computers And the laptops this connector is not used. So, the popularity drops it and it is necessary to make this mode only in rare specific cases (for example, if you decide to install the old Windows XP OS).
SATA came to replace the IDE connector, which exceeds the IDE thanks to the increased speed. AHCI is a mode of operation for SATA devices (for example, discs), providing their normal functioning.
What to choose?
It is better to choose AHCI (if you have such an option. On modern PC - it is everywhere ...). You need to choose an IDE only in specific cases, for example, if you are not "added" to the SATA drivers.
And choosing IDE mode, you kind of "force" a modern computer to emulate his work, and it does not exactly lead to productiveness. Moreover, if we are talking about a modern SSD disk when using which you will win in speed you will receive only on AHCI and only on SATA II / III. In other cases, you can not bother with its installation ...

About how to find out in what mode your disk is running - you can read in this article:
How to switch ahci on IDE (on the example of the laptop TOSHIBA)
For example, I will take more modern laptop TOSHIBA L745 brands ( by the way, in many other laptops, the BIOS configuration will be similar!).
To enable IDE mode in it, you need to do the following:
1) Go to the BIOS laptop (about how it is done told in my previous article :).
3) Then in the Advanced tab, go to the System Configuration menu (screenshot below).
4) In the SATA Controller Mode tab, change the AHCI parameter to the compatibility (screen below). By the way, you may have to switch the UEFI boot in the CSM BOOT mode (so that the SATA Controller Mode tab appears.
Actually, it is the Compatibility mode that is similar to the IDE mode on Toshiba laptops (and some other brands). You can not search for IDE - you will not find it!
Important! On some laptops (for example, HP, Sony et al.) The IDE mode cannot be turned on at all, since the manufacturers have strongly cut down functionality BIOS devices. In this case, you will not be able to install on a laptop old windows (however, I do not quite understand why do it - all the same, the manufacturer does not release the driver on the old OS ...).
If you take a laptop "Older" (for example, some Acer) - then as a rule, switching is even easier: just go to the Main tab and you will see SATA MODE in which there will be two modes: IDE and AHCI (just choose the desired, save the BIOS settings and restart the computer).
I finish this article, I hope that you can easily switch one parameter to another. Good job!
One of the main elements of any computer deviceAs you know, the hard disk on which the information is stored. With regard to hard drives of any type, such a term is used as AHCI. But many users not only know how to enable AHCI, but do not even have the idea what it is. Consider the value of the main term and the action necessary to activate this mode in Windows-systems.
What is AHCI?
Modern hard drives connected to the motherboard through the paper can use two modes: IDE (compatibility with outdated equipment) and AHCI - newest StandardMotable as Advanced Host Controller Interface, allowing you to repeatedly increase the performance of the device itself and the installed operating system due to a faster data reading.
Almost all modern SSD discs. An increase in performance when accessing them is shown in the case when AHCI is set. But this is not the most important thing.
What is the AHCI mode?
Let us last as if you turn on the AHCI mode in Windows, and look at the advantages that a modern computer user can retrieve when the mode is activated.
First of all, with activated AHCI mode, you can change or install additional hard drives, as it is called, "on the fly" (even without turning off the computer or reinstall the operating system). This is undoubtedly a huge plus for servers.

The second aspect is associated with the fact that during the installation of such a mode, special NCQ technology is entered, which reduces the number of displacement heads, accelerating the simultaneous use of access to the Winchester with different applications, programs and services. Finally, the AHCI activation is favorably affected by the performance of the entire system. Of course, according to the reviews of specialists and users, at home the gains of performance will not be particularly observed, but provided hard installations disk SSD. This mode is still better to include.
What should not be done and what to pay attention initially
But the most important error of most users is that they are trying to activate the use of exceptional primary settings bIOS systems (At least, this can be read in most reviews for emerging problems). This is strictly prohibited without performing preliminary action in the operating system.
You can activate the Mode in BIOS only if OS is installed on the "clean" hard disk. If you perform such a procedure with an existing OS on board, Windows will issue an error when starting and goes into mode constant reboot. Then they start, they say, the user turned on the AHCI mode in Windows, but nothing good came out of this. What to say? The basic rules may have been violated, since various actions should be taken in different modifications of the system.
How to check whether AHCI mode is active?
But to start, check whether the mode is enabled. Perhaps its additional activation and will not need.
In the simplest case, when starting a computer terminal or laptop, you need to go to the BIOS settings and refer to the SATA MODE section.

In the operating system itself, you can use the Device Manager, called from the "Control Panel", Administration or Console "Run" by the DevmGMT.msc command and go to the IDE ATA / ATAPI controller section. When the mode is enabled, the AHCI controller will be displayed in standard devices. If it is not in the list, you will have to decide how to enable AHCI in the system. Again, the solution depends on which version of Windows is installed on the computer.
How to enable AHCI mode in windows 7
So, for beginnings, consider the "seven". For the seventh and tenth versions of the action look somewhat similar, but for Windows 8 differ quite strongly.

- First of all, call the registry editor (Regedit in the "Run" console).
- Expand HKLM branch.
- Through the System, CurrentControlSet directories and the End Directory of Services to reach the MSAHCI folder.
- On the right, you should call the START parameter editing menu and set its value to zero.
- Now in the Services directory, you need to find the IASTORV directory, in which the action described above is performed for the Start parameter.
- Only upon completion of these procedures, the question of how to enable AHCI in BIOS without catastrophic consequences for the system will cease to be a problem.
Actions in Windows 8 / 8.1
For Windows 8, the above technique will not suit, because there is a simpler solution. In this case, you first need to set the mode of minimum system load in safe mode. How to enable AHCI? Quite simple.

- To do this, the command line is first called (necessarily on behalf of the administrator), and it is prescribed by the BCDEDDITIT / SET (CURRENT) SAFEBOOT MINIMAL combination.
- After that, it is necessary to reboot, at the very beginning of the restart, enter into the Bois settings and is already there to switch the IDE mode to AHCI.
- After saving the settings, a reboot should again, the command console is called, and it is prescribed the BCDEDDITIT / DELETEVALUE (Current) string, after which another computer restart.
In principle, the question of how to enable AHCI in the "eight" can be resolved through the use of a special utility from Intel (naturally, in the presence of a processor that is this manufacturer).
- First, from the official resource, you must download the driver in the form of the F6FLPY file and the setuprst.exe setup.
- After that, the desired hard disk is selected in the Device Manager, the driver update procedure is applied, and as the driver itself manual mode The downloaded F6FLPY file is specified.
- Next, a reboot should be necessary, and after the start of the system with an already activated AHCI mode, to complete the configuration of the computer, the executable setup file of the SetupRst is running.
How to enable AHCI in Windows 10?
As already mentioned, for the tenth version of the action system, several similar to those are manufactured in Windows 7. The only difference is to choose the folders and parameters.

- IN system Registry We find the SERVICES directory. Here, the Storahci directory is used for the Start parameter.
- Next, zero values \u200b\u200bare set for parameter 0 in Storahci / StartOverride and IASTORV / StartOverride directors.
- After that, you can proceed to activate the main value in the settings of the primary I / O system of the BIOS.
By the way, in the eighth version of the system editing similar parameters, it is also possible to produce. But why, if there is a simpler rational solution to the problem?
AHCI Activation in BIOS
To enter the settings on stationary computers, the DEL key is most often used, and for laptops - F2, F12, combinations with ESC and FN keys or special buttons on the panel like Assist in Sony VAIO.

Here you need to find a section or settings for AHCI mode. How to enable the desired parameter in the BIOS? Simply on the SATA mode setting string, use the input key, and select the option to make an confirmation arrows as another pressing enter. Do not forget when you exit, save changes (F10 + Y) and overload the system. When you start the start, the system will automatically install the necessary drivers.
Possible problems
Unfortunately, sometimes in transition to AHCI mode, unforeseen errors may occur. Perhaps the hard disk itself does not support such a mode of operation. In this case, there is nothing to try to activate AHCI.
On the other hand, if the system is loaded, but some errors are issued or failed after switching from IDE to AHCI, you can try to troubleshoot the problems using the specially developed utility from Microsoft called Fix IT.
If it does not help, neither another will have to call the BIOS settings and change the mode of operation of the hard drive. Note: If AHCI is activated without performing preliminary action in the system registry, which were described above, such methods may not work. The output will be either the restoration of the system using removable media, or full reinstall Windows. So be alert. However, I want to hope that it will not reach this (of course, provided that the whole sequence was performed precisely in the order that was given in the description).
When repeated or clean, it is possible to initially enable this mode in the BIOS, then not to rush in search of the solution to activate it or eliminate problems and failures in the computer or laptop.
Instead of the result
In conclusion, it remains to add that inexperienced users who are not familiar with the intricacies of the primary BIOS system and Windows operating systems, without any particular need to activate this mode. Anyway on modern computers with powerful processors and large volumes random access memory Performance growth will not be particularly noticeable. There is no point in the old terminals or laptops to use such a mode. Basically, as already mentioned, such settings are more suitable for servers when several dozen child terminals on the local network are circulated to the hard disk.
AHCI is the compatibility mode of modern hard disks and motherboards With SATA connector. Using this mode, the computer processes the data faster. Usually AHCI is enabled by default in modern PCs, but in the case of reinstalling OS or other problems, it may turn off.
To enable AHCI mode, you need to use not only bios, but also operating system, for example, to enter special commands through "Command Line". If you do not have the ability to download the operating system, it is recommended to create blood flash drive And with the help of the installer, go to point "System Restore"where you need to find an activation item « Command line» . To call, use this small instruction:

If the flash drive is not started with the installer, then, most likely, you forgot to place the priorities of the download in the BIOS.
Enable AHCI in Windows 10
It is recommended to initially install the system load in « Safe mode» With special commands. You can try to do everything without changing the type of loading of the operating system, but in this case you do this at your own risk. It is also worth noting that this method is suitable for Windows 8 / 8.1.
To make the right setting, you need:

After the settings produced, you can proceed directly to turning on the AHCI mode in the BIOS. Use this instruction:

Enabling AHCI in Windows 7
Here the power process will be somewhat more complicated, since in this version of the operating system you need to make changes to the registry.
Use this step-by-step instruction:

Log in ACHI mode is not so difficult, but if you are an inexperienced PC user, then it is better not to do this job without a specialist, since there is a risk that you can knock down certain settings in the registry and / or BIOS, which may entail Computer problems.
What to do if you have a hard disk with sATA interface, and before installing the OS, you forgot to switch to the BIOS option "SATA MODE" With meaning IDE on value SATA. (The name of the option in the BIOS may differ)? Usually, already installed Windows After switching the value of this option issues blue screen. Some do not find anything better, how to reinstall the OS. But there is another way.
I recently had such a problem. Tested the hard disk in the client laptop with the MHDD utility, having previously switched to the BIOS option "SATA MODE" into IDE mode. After testing, I forgot to switch back and installed the operating system. I found my mistake already at the installation of the drivers in installed systemWhen I did not want to install the Intel Ahci driver. Fortunately, the problem was able to solve without reinstalling the OS, just fighting in windows registry. About how to do it, read on.
First of all call the "Run" dialog box. It is called through the Start menu or the Win + R keys combination. In the "Run" dialog box, we enter and execute the command. "REGEDIT" (without quotes).
In the registry key that opens, we find the following section:
HKEY_LOCAL_MACHINE \\ SYSTEM \\ CURRENTCONTROLSET \\ SERVICES \\ MSAHCI
In this section, we need to change the "Start" key value to 0. 
Now we find the following section:
HKEY_LOCAL_MACHINE \\ SYSTEM \\ CURRENTCONTROLSET \\ SERVICES \\ IASTORV
And also change the value of the "Start" key to 0. 
After the actions described above, reboot PC. When rebooting, we enter the BIOS and change the value of the "SATA MODE" option with an IDE value to AHCI. We maintain changes bIOS settings And reboot the computer.
After rebooting, Windows will find new equipment and installs its driver. After that, you can safely roll the Intel Ahci driver, because now our hard disk will work in AHCI mode.
 How to pay a domain name
 Domain zone of tokelau islands
 What is domain what problems may be
 Yandex Wordstat: detailed instructions for using the service and grouping operators and a complicated request
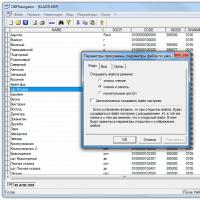 Editing DBF files
 Xenu Link Sleuth - What is this program how to use the Xenu program
 Methods Copy and insert text from keyboard without using mouse