Reinstall Windows 7 complete. Reinstalling Windows for Dummies: detailed instructions. bios setup
The need to re Windows installations 7 can be caused by various reasons: the effects of a virus, crooked installed drivers or programs, or simply a desire to return the laptop to the state it was at the time of sale. Currently, almost all commercially available devices allow you to reinstall Windows 7 in two ways: use the built-in recovery tools provided by each manufacturer, or install Windows 7 over your existing operating system, overwriting all data stored there.
The first method allows you to return the laptop to a pre-sale state, retaining the system license, which is usually included in the price of the device, and also eliminates the need to reinstall the utilities included in the device. The second method allows you to write a "clean" system to the device without unnecessary programs provided by the manufacturer for some users, but deprives it of the opportunity to use the paid licensed Windows 7.
Launching recovery of licensed Windows 7 on a laptop
If you have never reinstalled the system after purchasing a laptop, you can use the built-in factory reset, which is tantamount to reinstalling the operating system. This is possible due to the fact that the manufacturer creates in a hidden section hard disk is a recovery image that is only a few gigabytes in size.
For start Windows recovery 7, press a special key several times during the start of the system boot, when the manufacturer's logo appears on the screen. You can usually find out which button or their combination should be pressed from the information at the bottom of the screen, where something like Press F2 for Recovery should be written.
The main laptop manufacturers have the following system recovery keys: MSI - F3, Samsung - F4 (you can also use the built-in Samsung Recovery Solution III utility), Fujitsu Siemens and Toshiba - A8, ASUS - F9, Sony VAIO and Packard Bell - F10, HP Pavilion, LG and Lenovo ThinkPad- F11, Acer - Alt + F10. You can get more specific information about each device on the manufacturer's website.
Restoring the laptop to factory state
Reinstalling the operating system using the manufacturer's boot image is straightforward. Let's take a look at this operation using an Acer laptop as an example.
When the manufacturer's logo appears, press the Alt + F10 keys simultaneously. Press several times to make sure it works.

The screen will display the standard Acer eRecovery Management utility for system recovery. If the program asks for a password, and you are sure that you have not changed anything standard settings, try factory passwords 000000, 00000000 or AIM1R8.
You need the item "Full recovery ...". Please note that when using this utility, all information on the system drive C: will be deleted, so copy in advance required files to another medium.

A warning will appear in the next window, which must be read in order to avoid various surprises.


The file recovery process takes approximately 15-20 minutes. This is much less than a complete reinstallation of the system would require.


After the operation is completed, all that remains is to click OK to reboot the device.

Windows 7 Initial Configuration Utility
After the computer restarts, the system restore utility will start, in the first window of which you should select the language for the keyboard layout and click Next.

After that, enter the username and the name of the computer, and in the next window agree with the license agreement.


Method automatic update should be chosen based on your preference. Most often, it is best to use the recommended settings.

Enter the time, date and time zone.

After that, a desktop will appear in front of you, at the bottom of which the installation progress of drivers and utilities will be shown. This usually takes about 20 minutes. Typically, an antivirus is included as standard with the device, which from time to time will make a request to enter information into the registry. Click OK.

After the process of installing drivers and programs is completed, the utility will delete temporary files and reboot the system.

Usually, after that, a request for preinstalled antivirus (most often McAfee or Symantec) appears for activation. The optimal solution will uninstall this software and install a better antivirus instead (for example, Eset Nod32 Smart Security or Kaspersky Internet Security).
It should be noted that in some cases the system image on a hidden partition may be damaged, which will make it impossible to reinstall Windows 7 on a laptop while retaining the license. To avoid this, create a recovery disc in advance using the Acer eRecovery Management utility. To do this, you need two DVD-R discs.
Factory reset on non-brand notebook computers is the same as described above.
Reinstalling Windows 7 on a laptop
Some users prefer to abandon the use of the licensed Windows 7 included in the laptop, replacing it with another system. This can be due to several reasons. Firstly, not all users like the factory configuration of the device, which includes programs and utilities that take up space on the hard disk, and secondly, some people prefer to replace Windows 7 with another version of the system, for example, change the 32-bit version to 64-bit or Starter to Home Basic or Professional. In addition, some users even prefer to use all kinds of "assemblies" that include many programs.
In this case, reinstalling Windows 7 on a laptop will be no different from a standard operating system installation. First you need to prepare boot disk with Windows 7 recorded on it or, if the device is not equipped with a DVD-ROM, a bootable USB flash drive.
The first step is to download Windows 7 from the Internet. If you want to use the system according to your license, you should download exactly the version for which the key is indicated on the laptop. Usually the inscription looks something like this: Windows 7 basic OEM 32-bit (x86). Accordingly, you should download a similar version of Windows 7, since the key indicated on the bottom of the laptop is only suitable for it. If you are going to use pirated copy system, you can choose any version of the OS you are interested in.
Create a boot disk
After you have downloaded the system image, you should burn it to DVD, for which you can use free program ImgBurn. Insert a blank disc into the DVD-ROM and run the ImgBurn program. In the window that appears, click the Browse button and specify the path to the Windows 7 image.

Specify the minimum speed in the program settings.


After the recording process on DVD disc will be completed, will appear small window... Click OK, then the disc with the Windows 7 recorded on it will be automatically ejected from the DVD-ROM.

Preparing to install Windows 7
Now you need to put in BIOS boot devices from the disk, otherwise the computer will run the installed on HDD Windows... To open the settings
BIOS, repeatedly press the key that is indicated at the bottom of the screen during system boot.
In the BIOS settings, you should find the First Boot Device item, where you can change the settings so that the DVD-ROM is the first. Please note that while the BIOS is running, the mouse buttons will not work, so you will have to use the arrow buttons on your keyboard to perform all the necessary actions.

Press F10 to save settings and exit BIOS.
Reinstall Windows 7
After that, all that remains is to insert the Windows 7 disc into the DVD-ROM and restart the computer. After a while, a black screen will appear in front of you with the inscription Press any key to boot from Cd. Press any key. The installation of Windows 7 begins.


In the next window, click on the Install button.

Ten minutes later, a window with a license will appear in front of us. Check the box to accept its terms and click Next.

In the next window, select the Full installation item.

After that, you will see a list of sections, including system disk... Select it and click on the Format button. The system will delete all information from the partition.

After the drive is formatted, click Next. The process of unpacking the files will begin, which usually takes about 20 minutes.

You need to wait for the window with fields for entering your name and the name of the computer (can be anything).

Password fields can be left blank.

Enter the product code found on the bottom of your laptop or on a sticker.

In the next window, select the Use recommended settings item.

Configure your time zone.

In a few minutes, a worker will appear in front of you. Windows table 7.

Now you know how to reinstall Windows on a laptop by simply resetting the laptop to factory settings or installing a new clean system on it.
According to technical documentation and advice from experienced system administrators the Windows 7 operating system should be reinstalled once a year. This is done in order to eliminate registry errors, clean the hard drive and test broken sectors... In other words, you need to reinstall it so that the system does not "slow down".
Currently, there are six editions (versions) of Windows 7. Description of the main features is presented in the summary table.
| Feature \ Version | Initial | home Basic | Home extended | Professional | Maximum | Corporate |
|---|---|---|---|---|---|---|
| Technical support | Valid until 2020 | Valid until 2020 | Valid until 2020 | Valid until 2020 | Valid until 2020 | Valid until 2020 |
| 64 bit version | No | Yes | Yes | Yes | Yes | Yes |
| Maximum volume random access memory, GB | 2 | 8 | 16 | 192 | 192 | 192 |
| Creating a "home group" | No | No | Yes | Yes | Yes | Yes |
| Using multiple monitors | No | Yes | Yes | Yes | Yes | Yes |
| EFS data encryption | No | No | No | Yes | Yes | Yes |
| Domain connection | No | No | No | Yes | Yes | Yes |
The choice of edition should be approached both from the hardware side and on the basis of the intended future use.

Important! Pay attention to the warning about illegal copies. According to the license agreement, you can make no more than two copies for each license key.
Installation instructions
Step 1. To install the system, you need to enable booting from disk. Enter BIOS.

Step 2. Switch to the Boot tab.

Step 3. Enter the Boot Device Priority menu.

Step 4. Highlight the option corresponding to your DVD drive.
Important! Please note that BIOS supports both built-in drives and external ones. In this case, an external (USB) DVD drive is used. It should be noted that BIOS may give an incorrect designation, in this case DVD-RW is used, but the device itself is named CD.

Step 5. Increase the priority of the boot device by pressing the "F6" key.

Step 6. Save the configuration changes and restart the computer (key "F10").

Step 7. Set the system language to the default format and keyboard layout, and then proceed to the next page of the installation wizard.
On a note! This article installsWindows 7enterprise, English version. However, at step 7, you should specify the default Russian keyboard layout - otherwise, after installing the system, you will have to register an additional layout through the registry, or using third-party software.

Step 8. Click the Install Now button to go to the next screen.

Step 9. Read the terms of the license agreement. If you agree, check the "I accept the license terms" option and proceed further.

Step 10. At this stage it is recommended to use the “Custom” item, even if you are installing Windows 7 on XP. If you intend to keep the data from the previous system, then do not format the disks and go to step 14.

Step 11. To format the hard drive, or divide it into logical volumes, expand the "Drive options (advanced)" menu.

Step 12. Use the appropriate command to format.

Step 13. At the request of the installation wizard, confirm your consent to clean the hard drive partition.

Step 14. Specify the hard disk volume for installing the operating system.

Step 15. Wait for the installation wizard to finish. It takes place in five stages:
- Copying system files on HDD(Copying Windows files).
- Expanding Windows files.
- Installing features.
- Installing updates.
- Cleaning of unnecessary files after installation (Completing installation).

Step 16. At this stage, the installation wizard will automatically restart your computer, after which the installation will continue.

Step 17. After the restart, preparations begin for the first login to the installed system.

Step 18. Set your PC username and name. Keep in mind - given user will have administrator rights.
On a note! When working in a domain, it is recommended to use English-language names. If your computer is not included in the domain (stand-alone), the language of the name does not matter.

Step 19. Set a password if desired. This option is recommended but not required.
On a note! If you use a password, it is advisable to leave a hint for yourself. It is best to use the first character of the password as a hint.

Step 20. Select your operating system security settings. The "Use recommended setting" option implies the installation of all important and recommended updates, "Install important ..." - only important ones, "Ask me later" - manual setting after installing the system.

Step 21 Set your time zone.
On a note! In some versions operating systems until now, the transitions to winter and summer time have been preserved. To disable them, you need to download the appropriate updates and install them. However, there is another way - you can specify the same time zone, but in a different country. In this case, instead of the Krasnoyarsk time zone, the Bangkok zone is selected.

Step 22. Install current date and time.
On a note! Usually the date and time are set correctly initially. The data is taken by the system from the BIOS, so if you see an error, check its settings, it is possible that the battery on the motherboard has run out, and the date has been reset for a period latest firmware BIOS.

Step 23. Wait for the end of the process of applying the settings.

On a note! At the first login to the system of any of the users,Windows 7 selects screen resolution modes, and scans public documents to present them to the user.
Step 24 To Russify the system, use the function " Windows update»And start searching for updates.

Step 25. For installation desired language interface, check the optional update KB972813 and start the installation process.

Conclusion
We have described the nuances of installing Windows 7 Enterprise, but it is worth remembering the differences in setting up a "stand-alone" station, and belonging to a domain. The general recommendation is to check as often as possible for updates to the system and its parts (eg, services, drivers).
Video - Installing Windows 7 from a Disc
What should we have in our arsenal to reinstall windows 7?
An installation disk with the same "seven" will be enough. However, there are still options for reinstalling the OS not only from a bootable disk, but, for example, from a USB drive (flash drive), from an HDD or from an emergency recovery disk. But fundamental differences there is no process among these options. The order of operations is the same both on a stationary computer from a disk, and on a laptop without a disk (from a USB drive).
If you decide exactly to reinstall windows 7 over old system then all your data will be saved. However, once again it will not hurt anyone to play it safe. No one is immune, for example, from a sharp drop in voltage in the network, a power outage, or just a failure in the program itself. So we still advise you to copy all the valuable information to a USB flash drive or disk.
You may also need drivers (for a video card, for motherboard and etc.). Make sure you have all the driver discs that came with your computer. If something is missing, then before reinstalling windows 7, the missing drivers should be downloaded from the Internet.
Having prepared all the drivers, saving the necessary data to removable media, we can begin to repair the computer.
Windows 7 reinstallation process
We do all the manipulations directly from the computer, while setting up the BIOS is not required. Loading installation disc and click "install" in the window that opens.
site prepared step by step instructions how to reinstall Windows 7.
Correct reinstallation of the operating system consists of the following steps:
- Saving data to external media.
- Create a bootable disk.
- Formatting hard disk(optional).
- System installation.
- Copying a working system from with Acronis True Image.
- The system is put on top of the old one.
- Everything is removed and reinstalled.
The first and last point is required if you are afraid of losing important files when reinstalling.
Saving data
There are two options for reinstalling the system:
In the first case, all data is saved (settings, passwords on sites, files, etc.), but glitches can also be saved. If you put on top, then this section on saving data is irrelevant for you.
Formatting the disk deletes all data. There are several ways to avoid losing the files you need:
- Copy your personal information to another drive on your computer. Suitable if you have 2 hard drives.
- Reset files to external storage (HDD, USB flash drive, memory card, smartphone).
- Save files to the cloud (Yandex Drive, Dropbox, Google Drive).
- Confidential files can be saved in WinRar archive with a password and send it to yourself by email. After reinstalling Windows, the archive will remain in the mail.
What to copy from old Windows? Check the following places:
- Desktop, My Documents, Disk C.
- Browser bookmarks.
- Browser and torrent download folders.
- Save games.
- ICQ / Skype correspondence.
Additionally, everyone can installed programs(Start> Control Panel> Programs and Features), so that after installing a clean OS it is easy to remember all your favorite programs. Fill in the screen on Vkontakte or Facebook, then it will not be lost.
Create a boot disk
If you have a licensed Windows DVD, you do not need to create a bootable disk (USB flash drive, memory card), you can skip this section.
More often than not, there is no disk, then you need to download from the Internet windows image 7 and write it correctly to an external drive. We recommend looking for the image of Windows 7 Ultimate (aka Ultimate), if you have more than 4 GB, then choose not x86, but x64 version.
You can't just copy the image, you need to do boot drive eg via UltraISO. To do this, you need to download the program itself and find a drive with a volume of 4 GB or more:
- Run UltraISO with administrator rights.

- From the File menu, click Open.

- Select the downloaded OS image file.

- Select it, click on the top "Boot", and then "Burn the hard disk image ...".

- In a new window, check: 1 - the correct flash drive / memory card / external drive is selected; 2 - is the same image file; 3 - the recording method must be "USB-HDD +", click the "Burn" button.

- All information from the flash drive will be deleted.

- The process of recording the image will begin.

- Wait, the successful completion of the operation looks like this.

The device is ready, now you can reinstall Windows from it. Save it, it may come in handy later. By the way, you can use the drive after that - fill in any files in the free space, the main thing is not to accidentally delete the "system" files.
Video for recording an image to a USB flash drive via UltraISO:
It is not necessary to use a USB flash drive or a special memory card with a card reader. You can take a card from the phone as a memory card, and the phone itself will act as a card reader. Even the built-in memory of the mobile is suitable for a boot disk, if it is detected as a drive when it is connected to the system.
How to set boot via BIOS
Restart your computer, look carefully at the messages displayed, somewhere they will indicate which button to press during boot to get into the BIOS. It can be Del, F1, F2, Esc, Tab, or another. As a last resort, use the "scientific poke" method.
 The button for entering the BIOS is indicated when the computer is restarted.
 Bios are different. In them, something like the following will be waiting for you. In the first case, go to the "Advanced BIOS Features" section. 
In the second "Boot", control the arrows on the keyboard. 
In any case, this setting is somewhere nearby, you will find the boot order (it may look like First / Second Boot Device), select the first drive where you installed the Win7 image.

Look for the section with the exit from the Bios Setup Utility with saving the parameters. The computer will reboot and boot from the image will begin, which will initiate the installation of Windows 7.

Installing the operating system
As we already said, reinstalling Windows 7 is possible in 2 versions: over the previous copy of Win and with the removal of the old system. If you want to put on top and save all the data on the disk where you put the OS, then do not format it.
Tip: If you have only one physical disk, but a large enough volume (from 200 GB), first copy important data, and then divide it into logical drives C and D. On C it is convenient to install Windows with formatting, and on D to permanently store files. This is also useful for Acronis True Image to work. You can partition the disk during the OS reinstallation process.
- You copied important files, made a boot disk, set the boot in BIOS, and rebooted the PC. For about a minute, a download will be shown to you.
- Then Windows will please you with a window, check the language settings, click "Next".

- Accept the Microsoft license terms.

- Select the type of installation. Above "install over the old OS or update", below "complete reinstallation of Windows 7".

- Specify which disk to install the OS on. If you wish, you can format it (do not format it if you want to save the data on it), click "Next". If you receive an error about the impossibility to put on this disk, then turn off the computer, disconnect all other disks and USB-drives, and run the installation again. Also, here you can divide the physical disk into logical ones, carefully - do not confuse which one you want to share, when dividing, all information is deleted from it.

- 10-20 minutes copying files. The computer will then restart. This means that the files have been copied, and then the installation is proceeding from the hard disk. It is necessary to disable boot from the image in the BIOS, and put it back from the HDD. The flash drive is no longer needed, you can get it from USB. If not change BIOS settings, then after the reboot, the boot from the flash drive and copying will start again.

- After rebooting, a window will appear for specifying a username and password (the password is optional).

- If there is a key, enter it, if not, just click Next.

- Select update settings. The license is renewed without problems, pirated version activation can fly off. Postpone the decision until later if you don't know what to do. Many people turn off updates.

- Enter your time zone.

- A little download and you're on Windows 7.

Windows 7 reinstallation video:
- Disable hibernation (useful for systems on SSD, allows you to free up disk space).
- If the OS is on an SSD, transfer temporary files and browser files to the HDD.
- Disable updates (there will be no unnecessary consumption of traffic, activation will not fail, you will not have to wait a few minutes before turning off to install updates).
- Install the drivers for the video card, sound card.
After installing all applications and settings, use Acronis program True Image to make a "clone" local disk... In case of problems, you can restore an exact copy of the system and the entire C drive in 5 minutes, and you do not need to reinstall everything.
After that, you are the happy owner of a cleanly tuned OS, and no experiments or failures are scary now. If something fails - 5 minutes and again everything is fine!
Let's move a little away from our topic, since a large number of users ask us questions, how to properly reinstall Windows 7? Using a computer or laptop for a long time, the operating system becomes cluttered, due to unknown files there is practically no space left on the hard disk and the computer or laptop starts to load slowly, and have a negative impact on the operation of the operating system. As a result, there is no other way out but to take the computer or laptop to the workshop to reinstall the operating system, while laying out a tidy sum of money. But why waste money, and at the same time not small ones, if reinstalling Windows systems 7 can be done by yourself. Below is detailed, on a computer and laptop without harm to them.
To install Windows 7 you will need:
- Disk with the operating system;
- You will need to go to bios, and then put down the cd-room value in the first boot device item;
- and finally, install the system directly.
:
Before proceeding with the reinstallation of Windows 7, you must have a disc with the operating system. You can choose at your discretion either licensed software or any pirated copy. Here, each person has the right to choose for himself, someone thinks that it is quite possible to spend money on buying a licensed version, while someone else will find a hacked version of the operating system in a few minutes and download it via the Internet. If you already have a disk with the operating system, then you can proceed directly to its installation, and if not, then, following the instructions below, you need to burn Windows 7 to disk:
To do this, you will need: a blank disc in DVD-RW or DVD-R format and, of course, the Windows 7 operating system itself (the download link can be easily found on the Internet, since there are more than enough sources, you just need to clarify that for use at home you perfectly fine Home version Premium).
- Click on Browse, select the Windows image and click open;
- Set the minimum speed for recording;
- After burning the image to disk, a corresponding window will appear and the drive will automatically open.
That's it, the first stage of reinstalling the Windows 7 system is complete and there is nothing complicated about it. We look further ...
: bios setup
Now, having a disk with an operating system, the task is to make the Windows installation window appear when you turn on your computer or laptop. To do this, you need to enter the BIOS and make small settings in it.
To do this, restart the computer or laptop and press the delete key at the time of their launch, or for someone it may be F1, F2, F3 ..., during the launch, as a rule, you can see which key should be pressed.

After all the actions have been completed, you should see blue screen bios. While in bios, the mouse will not work, so all subsequent actions will be performed using the arrows.
In order to set the boot from the disk, you should enter the section Advanced Bios Features => First Boot Device and set the CD-Room parameter. Then you need to press the F10 key to restart the computer or laptop and at the same time save all the parameters. It should be noted, no matter what version you have bios procedure remains unchanged and as a result the parameter should be set to CD-Room.
If all actions are performed correctly, Boot from Cd / DV should appear during computer startup, and after it Press any key to boot from Cd ...
Then press any key, in the event that a gray bar appears Windows boot, then all the work has been done correctly.
Reinstalling the system
After completing the above steps, you must wait 10 minutes for the computer or laptop to fully boot. After the download has occurred, the language selection window will drop out, where the standard settings are made and after which you need to click next,

and then click on the "install" button.

And once again, wait about 10 minutes until the license window appears. Then you should put a tick on the consent and acceptance of the license terms, and click next,

then select "complete installation".

After completing the above steps, you must select on the screen the disk where the current operating system is installed, click on "disk setup", and then on "format". You should be aware that these steps will delete all files on this disk! Therefore, it is worth taking care of backup their files in advance before reinstalling the operating system.

Then you need to click on, the inscription “Unpacking Windows files"As soon as it appears, you can relax a little and go to the kitchen to drink tea with bagels (well, or beer, as you like), because for the next 20 minutes you will only need to wait until a window appears.

In the window that appears, you will be asked to enter a username, which is what we do

You should skip entering your password

Then you need to enter the product key, if it is not there, then you need to click next.

Then you need to select the item "Use recommended parameters"

Then set the time zone,

wait another three minutes, wait for the Windows window to appear.
That's it, the reinstallation of the Windows-7 system is complete!

After reading this article, it becomes clear that you can not only find out, how to properly reinstall Windows 7, but also to understand that this can really be done on your own.
P.S. The algorithm for reinstalling other operating systems (for example, Windows XP, Vista) is insignificant, but still different, there are some nuances.
Internet radio is an excellent assistant in writing interesting and informative articles. You can listen to Internet radio directly on our website.
 The smartphone heats up when charging: what to do?
 How to Download Music to iPhone with iTunes
 How to Download Music to iPhone with iTunes
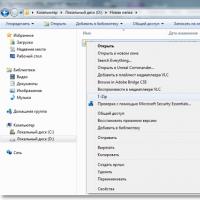 Unpacking a damaged archive
 How to clear the internal memory of your phone from unnecessary files
 Close windows 10 update window
 Computer drawing programs