Download the operating system for Android 6.0. Updating Android: how to update to a new version, rollback? Guide in details
At the Google I / O 2015 developer conference held at the end of May, a new version of Android was announced, and on October 5, the final version of the system was released for the first gadgets, including Nexus 9, Nexus 7 2013, Nexus 6, Nexus 5, as well as the Nexus Player media center. In this article, we have prepared for you a description of all the new Android 6.0 Marshmallow products, the review of which will certainly interest those who plan to switch to a new operating system in the next six months (of course, when official or custom firmware updates for the most popular hardware devices are released).
Interface
The first change that becomes apparent right away the first time the system boots is the updated phone boot animation, which uses the updated logo of the Mountain View company.
As for the initial setup of the smartphone, everything remains the same as in.
Before we begin our acquaintance with the visual component, we need to clarify one nuance. The same “Google Now” application that was part of the interface model of previous versions of Android is used as a shell. A reasonable question may arise: why should I upgrade to 6.0, if on my phone with an old system I have the same interface as on new products. As it happened before, in Marshmallow all innovations are hidden "under the hood", that is, they are not visible at first glance. Exactly, this is what will be discussed in this material.

The first notable innovation is the unlock screen. Here the purpose of the keys has changed (for example, pressing the bottom left icon launches "Google Start", whereas in the previous version the "dialer" was called). Moreover, from now on, you need to drag icons right from the corner, which at first glance is not very convenient.

No changes were made to the desktop. A colored microphone and an updated logo of the developer company appeared along with the updated Google Now build. What is really worth noting is that now you can delete applications directly from the desktop, before that you could only delete shortcuts.

Together with this function in the application menu, "Google Start" introduced a change in the scrolling orientation. If in previous versions it was possible to scroll through the list from right to left, now the combination is applied from top to bottom and vice versa. A search field is always displayed at the top of the screen, below which are the four most frequently called programs. The order of placement of programs is simple - first there are applets that start with a number, and then all the rest in alphabetical order.

Finding applets works just like lightning fast. Users who use a large number of games and applications on their phone will surely like this. From now on, you will not have to carefully look for the necessary program, leafing through the list. You can only set the initial letters, and in a couple of moments you will be working with the application.
Certain changes also affected the animation of launching, minimizing and switching between applications from the task manager. All animations work very smoothly and smoothly.
Google Now on Tap
The release of Android 6.0 was accompanied by a new feature called "Google Now on Tap", which provides the ability to search in a specific program. By holding down the home button for a few seconds, the new mechanism will analyze the screen contents. You can search for data on an open web page, in mail, messages, twitter, music player and other programs. It should be noted that only data located in the active part of the display are subject to such analysis. The analysis procedure itself is incredibly fast.
How it works? For example, let's use such a search at the moment when a musical composition is played in the smartphone player.

When you launch "Google Now on Tap" we get a summary of the song in pictures, Google search, YouTube, and in addition to this information about the artist on social networks and on Youtube. In general, working with this tool is quite convenient. The main disadvantage is the inaccessibility of this feature if Russian is specified as the main language in the smartphone settings. Let's hope that in the next updates there will be multilingual support as well.

App permissions
In our Marshmallow review, we'll cover a conceptual change in app permission management. If earlier, when installing the applet, the installer asked for permission to access the calendar, SMS, contacts, multimedia files and other objects, now the installation goes smoothly and without any questions. Now requests for individual permissions appear when the user is already working with the corresponding applet, and at a certain point in time there is a request for access to a file, photo, microphone, GPS coordinates, etc. installing the program, now all this happens gradually and measuredly.


Storage and external media management
A new interesting item has appeared in the main settings table - "Storage and USB-storage". Using this menu, you can find out about the contents of external or internal drives (for example, a USB flash drive or microSD memory card connected using an OTG cable). Although this integrated file manager can only delete, move and share files, the very fact of its presence is undoubtedly pleasing.


Battery usage and battery saving
Quite profound changes have also been made to the mode of using the battery. Now, in the statistics of energy consumption, you can see not only the battery life of the gadget, but also the actual indicators of energy consumption in mAh.

But that's not the point. The main innovation introduced back in the Developer Preview is the Doze save mode. What is its use? Apps in Android can now be configured to save battery power when they are running. In the currently available version, almost all applets are configured so that the battery works with them economically (the only exception concerns Google Play services). The essence of the Doze function itself is to increase the battery life of the smartphone in stand-by mode. If earlier during the night the battery sat down by 15-20%, now the representative of the fifth line of Nexus smartphones for sleep mode is quite enough 1-2% of the discharge in one night. To achieve these results, there is no need to turn off Wi-Fi or use airplane mode. Real magic, isn't it?


Fingerprint scanner support
The Android 6.0 firmware includes a special API that allows you to unify the fingerprinting tools for authorization in programs. Now all that remains is to wait for the equipment of new models of smartphones with the scanners themselves, since even in the phones of the Google Nexus series, in which Marshmallow is only available, fingerprint scanners have not yet been delivered. We expect the availability of such a hardware solution in the next models.

USB Type-C support
The latest hardware version of the USB interface called Type-C (or simply USB-C) is becoming more and more fashionable. The main advantage of USB 3.1 over the previous version 3.0 is twice the bandwidth. If the earlier version provided data transfer rates up to 5 Gb / s (625 Mb / s), then the new interface allows you to increase it to 10 Gb / s. In addition, this type of connection uses a completely new connector. In addition, following the specification of the standard, Type-C uses currents of 1.5 and 3.0 A, while the voltage is 5 V. As a result, this gives a significant increase in the charging speed of the gadget.

An auxiliary bonus of the new interface is the ability to charge tablets, smartphones and phones from one another, which is useful in field conditions, on the road and in other situations where there is no access to another outlet.

Let's summarize
In fact, Marshmallow, which we reviewed with an emphasis on global and noticeable innovations, has been massively bug-fixed. Although there are almost no external changes, you can see that thanks to the optimization of the Lollipop code, many tools have become smoother and much faster. The autonomy has increased significantly, especially in stand-by mode. New goodies are good news, such as Google Now on Tap, a function for fine customization of applet permissions and a storage manager. In the next minor builds, you can expect a multi-window mode both on tablets and, probably, on smartphones, as well as support for Android Pay technology for making contactless payments.
Photo material for the article: / applepack.ru / itc.ua / xdrv.ru / gottabemobile.com
Exactly a year ago, our laboratory released a review of the latest mobile OS Android 5.0 Lollipop at that time, but now, according to the new Google policy, a major system update will take place about once a year. So now is the time to consider a replacement for Lollipop, which has been renamed Marshmallow aka Marshmallow.
Last time we started our review with the old version of the system, because there was something to criticize, but in this case there were no major changes in terms of the interface and general provisions. Therefore, it is worth slightly changing the approach.
It is necessary to clarify that the review was carried out on my personal device - LG Nexus 5, so we must take into account the fact that the smartphone is completely clogged with applications, and the battery has already “sagged” after two years of use. However, this is even more interesting.
Interface
The original interface has not undergone major graphical changes:

 Android 5.1 | Android 6.0.
If you do not look closely at the animation, then it is not so easy to find the differences between the new and old versions.

 Android 5.1 | Android 6.0.
In the curtain, the order of the icons has changed by default and we were promised that they can be customized, as the owners of custom firmware have done for a long time. Apparently, this does not apply to LG Nexus 5, System UI Tuner is not available for this model.
 The triangle, as it were, hints to us that there are two buttons.
The main complaints that users had are still not fixed. For example, the Wi-Fi button (screenshot above) on the top curtain still performs different functions when you click on the network name or on the icon. Was it really difficult to use a switch that was more obvious to the user, and instead of a triangle, insert a well-known gear?
Interestingly, changing the orientation of the desktop to horizontal is also not available on the LG Nexus 5. Apparently, the Developer Preview and the completeness were allowed to play around.

The keyboard hasn't changed, but it was pretty good anyway. The only thing missing is the more familiar to many "classic mode", when the second row of characters is shifted to the right (like on keyboards). But this is already nit-picking.

 Android 5.1 | Android 6.0.
The application menu is now scrolling down and equipped with an alphabet search, which is activated by a long press on the slider. In my opinion, the vertical orientation of the list is less convenient, because earlier it was easy to remember which desktop the program was on, but now you have to scour this “sheet” every time.
In addition, the first row of applications in the list is highlighted with a bar, representing the most frequently opened applications. Again, it is not entirely clear why, if the user in 99% of cases will place this icon on the desktop and / or in the lower status bar?
In addition, you can now remove applications from the desktop, for this you do not need to go to the applications menu.

The situation is exactly the same with the widget selection menu. In my opinion, Windows Phone haunts someone ...

When selected, in addition to the classic Cut-Copy-Paste set, the Share button is now available. This nice little thing was called Direct Share, and it allows you to share selected links through different applications directly, without Copy-Paste. True, the application itself must support this function.

Separate volume control for calls, alarms and media content is now done directly from the pop-up window. It remains to wait for a full-fledged mixer that would adjust the volume for each active application, as we are used to in Windows 7 and higher. Well, not all at once.

By the way, the "Do Not Disturb" function, also known as DND, allows you to cut off all notifications and sounds except for the priority ones. This priority is set in a separate menu.
However, for all the time of use, I have not found an application for this mode, because there is no way to shove individual contacts (or a group of contacts) into the "Non-priority" group, including those from different social networks or instant messengers. Once this is implemented on a par with the profile manager, it becomes a killer trick. In the meantime, the good old "Airplane mode" for me is better than any DND.
The 5.0 Lollipop update brings many new and exciting features. Android OS received a unified design and a new vector of development. The next 6.0 Marshmallow update is considered a pass-through because it does not contain such large-scale changes. At the same time, the new version of the system includes some important additions that were lacking in previous versions. For an overview of the system, take the Motorola Moto MAXX 2 (XT1565) smartphone as an example.
Interface
In Android 6.0, the Material Design concept was retained in full. Therefore, the changes in the interface are only cosmetic.

Desktop
Personalized search service Google Now, invoked on the desktop from the far left screen. At the same time, such an innovation is visible only in the Google launcher installed on Nexus / Pixel C devices or downloaded separately from the Google Play app store.
Application menu
The arrangement of programs is made in the form of a grid, with scrolling from top to bottom, and not from left to right, as in Android Lollipop. At the top is the search, and the first row is reserved for 4 frequently used applications. This is followed by programs with the Russian alphabet, and then with the English alphabet. You cannot change the order.
It is worth noting that the above changes only apply to the Google launcher. In third-party shells and in different devices, such as Moto MAXX 2, swiping remains the same, and there is no search in the application menu.
Lock screen
Visually, the lock screen remains the same. It is available to indicate text or personal information under the clock, for example, the contact information of the owner. The text is set in the security section of the device's system settings.
The quick launch icon for calls, in the bottom left corner, has been replaced with personalized prompts. Apparently Google considered this function more important than quick access for dialing a phone number.

Notifications
The notification system has received some improvements. Now in the rectangular area - cards, below the text of the message, buttons are displayed that allow you to perform basic actions without going to the application or the corresponding section of the settings. For example: install or postpone system updates, activate power saving mode, etc.
Long holding your finger on the card allows you to open the item for managing application notifications. Among the proposed options are: complete blocking of displaying notifications, priority is to show notifications in the "do not disturb" mode, and allow displaying notifications.
Three modes of displaying notifications on the lock screen are also available: show completely, hide personal information and turn off the display.
Innovations
Application rights
When installing the program from Google Play or unknown sources, a sign appears with a list of the required rights (permissions) for the application to function. It is not known what rights are used in reality, and what are conceived for the mercenary purposes of the developer. And the user has only two choices: agree and grant the application full access or refuse to use the program.
In Android 6.0, the permissions requested during installation are disabled by default. Now you need to confirm the rights required to run the application and basic operation. The rest of the permits are confirmed or rejected during operation. Moreover, previously issued rights are disabled in the settings section of a specific application.

Adjusting the volume of notifications
In previous versions of Android, the volume buttons only changed the level of incoming notifications. The volume of other sound signals had to be set separately in the settings section or directly in the application.
In the sixth version, volume control is divided into three channels: incoming notifications, multimedia and alarm clock. Moreover, the volume change is made automatically and applies only to the application of the corresponding channel. For example, in the player - changes affect only the volume of music or video, in the alarm clock for notifications, and on the desktop or in the settings - the volume of the call.
To set the preferred volume, you do not have to go to the settings or the corresponding application. When you press the volume button, at the end of the slider there is a button for opening / hiding channels.
Do Not Disturb Mode
In Android Marshmallow, the list of Do Not Disturb features has expanded. The duration of the mode is set from the "quick settings" panel. There is also a transition to the system settings, where rules are set and automatic mode switching is configured at a specified time. For example, turn off notifications before bedtime - from 22 00 to 7 00, at a scheduled meeting from 11 00 to 11 45, etc.
Work with text
In Android 6.0, the text selection mode has changed. When you move the border to the right, the whole word is highlighted. Whereas to the left - character by character. Also, after selecting text, a context menu automatically appears with a choice of actions: copy text, cut, send, etc.
It is worth noting that the "send" function in Android Marshmallow is called Direct Share. This is a useful and functional way to share information with another user. At the same time, the developer of a particular application is responsible for the implementation of this function.
System Tuner UI
A hidden settings menu that allows you to customize the icons in the Quick Access Toolbar. To display an item, you need to hold down the gear icon for a few seconds in the expanded status bar. A similar operation will remove the item from the system settings menu.
Transferring application data to a memory card
Android 6.0 Marshmallow brings back app data migration. If, when installing a program or game, there is not enough space on the internal drive, the system allows you to transfer data to an external drive. In this case, the content is stored in an encrypted form and requires preliminary formatting of the memory card.

Backing up app settings
Application settings are now saved to the cloud. This allows you to spend less time setting up a new device.
Settings
The system settings section remains the same. Only new functions have appeared, hidden mainly in the submenu.
Screen
The item for selecting the font size has appeared, where a comfortable value for the text height is set.
Applications
In earlier versions of the OS, the section contained data about installed applications, active ones using RAM and disabled ones. Now the section contains detailed information of installed applications: the amount of used disk space, transferred data, allowed rights and notifications. Also about the amount of energy consumed, used and the maximum consumed amount of RAM.

Clicking on the gear-shaped icon will open an additional section of settings. This is where the default applications are changed, for example, if two players are installed and you want the files to open in a particular player. Shows which applications are allowed to influence system settings. Battery saving is configured. By default, all applications have a checkbox - "save".
Memory
The section shows the amount of used and free space. For a detailed overview of the available information, just select the category of interest - videos, applications, etc. It also shows the size of the application cache, which is deleted by touching a category.
There is also a built-in file explorer. The manager's capabilities are limited, but it will do for primitive actions.

Battery
In the "battery consumption" information, the calculated energy consumption is shown: by the screen, Wi-Fi or other application. Recommendations for extending battery life are also shown. For example, for the screen - setting a lower brightness, and for Wi-Fi - turning off the module in sleep mode. Moreover, for convenience, buttons are displayed to go to the corresponding item in the settings.
Security
Android 6.0 supports system-level fingerprint reader. It is also available to disable unlocking the device using a reliable device - smart watch or key fob, or in a safe place - at home, at work, etc.
There is protection against a sudden reset to factory settings. If an outsider takes possession of the device and clears the data, you will have to enter the data of the previous Google account to start the system. This information is stored in a protected data area, which is difficult to access even with an unlocked bootloader.
Attention! The first step is to back up all your data. Copy all photos, videos, documents and other information you need on your device to a safe place.
Manual update will inevitably lead to the complete removal of all user data from the device's memory, and with proper bad luck, it can turn your Nexus into a brick. All subsequent actions you perform at your own peril and risk!
Downloading the image
Manual Android installation comes from an image. You can find and download the desired image on the corresponding page of Google Developers. In our case, Android 6.0 is being installed on the Nexus 5, and therefore we find this device in the list.

Download and install the tool to download the image to the device
In order not to waste time and effort downloading and installing the entire Android SDK, it is recommended to turn to the ADB Installer utility available at XDA-Developers. Here is a direct download link from Google Drive. The utility weighs only 9 megabytes, its installation is extremely simple and takes less than a minute.
Don't be intimidated by the DOS-style interface. We confirm each request with the English "y" and pressing Enter.

Agree and install Google USB Driver.

Now, if you look at the root of the C drive of your computer, you will find a new folder there adb... It contains everything you need to manually install an Android image.
We return to our image, which has already been downloaded and stored on disk as a TGZ archive. It must be unpacked with any suitable archiver. For example, 7-Zip.

The TGZ archive hides another archive, this time in the TAR format. It also needs to be unpacked. As a result, you will have a folder with such content.

For convenience reasons, it is better to give this folder some short name (for example, I chose a60m). A little later, you will understand the meaning of the short name. Also, do not hide it in a dozen subfolders. It seemed to me optimal to place the folder with the unpacked image inside the adb folder. It turned out like this.

The preparation process is almost complete, and all that remains is to make the necessary settings on the mobile device itself.
First, enable USB debugging. To do this, go to "Settings" and scroll to the very bottom of the screen. Here you need to find the item "For developers".

If this item is not there, then go to "Settings", find "About phone", the last in the list is "Build number". We tap on it seven times.

After the message about receiving the developer status, go back to "Settings" → "For Developers", find the item "Debugging via USB" and enable it. A warning will appear - we confirm.

Turn off your mobile device and turn it back on. At the very beginning of the download, you see a black screen and a white Google sign. If on the same screen at the bottom of it there is an open lock, then you can skip the next step.

If there is no lock, then we have to unlock the bootloader.
We connect the mobile device to the computer via USB and enable debugging.

Run the Windows command line as administrator.

On the command line, write:
adb reboot bootloader

Such a menu will appear on the mobile screen.

Notice the LOCK STATE line. The bootloader is now locked.
Attention! Executing the following command, in fact, will reset to factory settings, all your data and applications will be deleted from the device!
To unlock the bootloader, write in the command line:
fastboot oem unlock

A warning will appear on the screen of the mobile device and asking you to confirm the operation. Use the volume buttons to select Yes and press the power button.

We are waiting for the OK message and the Finished message to appear in the command line interface.

The LOCK STATE setting on the bootloader screen has now changed to Unlocked and your Nexus is ready to accept the new Android.

The magic begins
Let's go back to our unpacked image. Inside, among other files, you can find a script flash-all... Our task is to run it through the command line. You can do this by being in the image folder. Changing the folder in the command line is carried out with the command cd.
If you did everything the same way as I did, then your folder with the image is also called a60m and is located in the adb folder in the root of the C drive. To get into this folder through the command line, run the command:

And here it is - the moment of truth. We write flash-all on the command line.

Installation begins. The process takes a fair amount of time.


Please be patient and wait for the command line interface to prompt you to press any key to exit the command line.

For safety's sake, it makes sense to close the bootloader again. To do this, we sequentially execute two commands in the command line with a mobile device connected to the computer, and then press the power button.
adb reboot bootloader
fastboot oem lock
Don't forget to turn off USB debugging in developer settings. You can also delete the folder with the unpacked image from your computer.
Ready!
Please accept my sincere congratulations. You can now manually install any supported version of Android on your Nexus.
As you all know, Google has released the official Android 6.0 Marshmallow firmware images for most Nexus devices. For those who do not intend to wait for an OTA (Over The Air) update for their device, we present you with a kind of instruction on how to install Android Marshmallow on your Nexus. I want to say right away that if you have ever flashed ...
As you all know, Google has released the official Android 6.0 Marshmallow firmware images for most Nexus devices. For those who do not intend to wait for an OTA (Over The Air) update for their device, we present you with a kind of instruction on how to install Android Marshmallow on your Nexus.
I would like to say right away that if you have flashed your device at least once, then this instruction is practically no different, the only difference is in the presence of a new firmware image. And if you do this for the first time, then this instruction will definitely come in handy for you.
For those who do not want to read or who like to watch everything with their own eyes, at the very bottom of this material there will be a video of the journalists of the Androidauthority.com website. Despite the fact that the video is flashing an older version of Android, the steps you need to follow, this does not change.
What do you need to get started?
- Nexus line device and USB cable for connecting to laptop or computer.
- The bootloader on your device must be unlocked.
- Installed Android SDK with ADB and Fastboot programs. Download here from this link!
- Factory image of Android 6.0 Marshmallow firmware. You can download it here! Currently, Android Marshmallow images are available for devices such as the Nexus 6, Nexus 5, Nexus 7 (2013), Nexus 9, and even the Nexus Player.
- An archiver installed on the computer that can work with formats such as .tar and .tgz
Now you can get down to business. ATTENTION!!! You do everything at your own peril and risk, despite the fact that it is very difficult to programmatically kill the Nexus, we are not responsible for the actions that you perform. Read the instructions carefully and you will succeed.
- Turn on your device in bootloader mode (fastboot mode). In order to do this, you need to turn off your smartphone / tablet, and then while holding the volume down button, press the power button (Volume- + Power button).
- If you have not done this before, then connect your device to your computer and execute the "oem unlock" command, by this action you will unlock the bootloader. ATTENTION: All files from your device will be deleted!
- Using the archiver, extract all files from the .tgz archive. Then use the archiver again to extract all the files from the .tar archive. When you complete these steps, you should have a folder with several files inside.
- Move all the files that you received from the above archives to the "Platform Tools" folder, which is located in the already installed Android SDK.
- If all the steps are correct, then after connecting the device, all ADB commands should already work. To check if the connection is correct, enter "fastboot devices" at the command line. If your device appears in the list, then you did everything right.
- In the folder with the firmware, which is already in Platform Tools, there is a file called "flash-all". Double clicking on this file will start the Android Marsmallow installation process on your Nexus.
- After starting the firmware process, in no case, do not disconnect your device from the computer. If you do this, you can definitely get a "brick".
- After the firmware process is over, your smartphone / tablet will reboot and that's it ... Congratulations, you are now the owner of a Nexus device running Android 6.0 Marshmallow.
 Information and communication technologies in music education
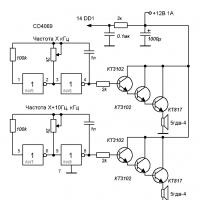 Yagma Medical Physics High Wave Impedance Devices
 Features of the formation of information competence Formation of information competence of schoolchildren
 USB programmer (AVR): description, purpose
 Hp pavilion dv7 parsing. Computer resource U SM
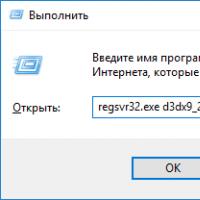 How to install DLL files on Windows?
 Disable firewall Firewall interferes with playing how to disable