How to recover hidden files in windows 7. How to configure the visibility of hidden files and folders in Windows. What is a hidden file in Windows
By default, in any version of Windows, the ability to see hidden files... This is necessary so that inexperienced "dummies" do not accidentally delete anything and disrupt the operation of the OS. The solution is quite logical, since these folders are rarely needed. And even then - only to a few users. But still, sometimes it becomes necessary to view hidden files.
For example, during Windows optimization and garbage cleaning. Many programs ( Microsoft Word, Skype) create hidden files in the process. Over time, they become unnecessary, but they are stored on disk and take up extra space.
Very often, the need to enable hidden folders and files arises from gamers. After all, it is in them that the save from many games is stored.
Also, the display of hidden files is required for users who want to hide documents on a USB flash drive, but do not yet know how to find them later. In general, there are a lot of reasons.
I note right away that in different Windows versions this setting is done in different ways. Although some of the methods may be the same. Therefore, below are some instructions on how to enable hidden files in all Windows - "seven", "eight", "ten" and XP. Plus is given universal way running on all OS.
How to open hidden files on Windows 7?

If you need to disable their display, then in the same window, check the box "Do not show ...".
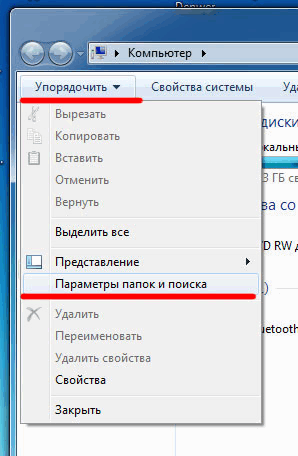
Second way:
- Go to Start, open "Control Panel" and click on the "Folder Options" shortcut.
- Select the "View" section, scroll down the slider and activate the "Show ..." item.
- Save the changes by clicking "Apply".
And the third way:
- Open any folder you like.
- Click the Alt button and a menu like this will appear.
- Click on Tools - Folder Options.
- A familiar window will open: to enable the display of hidden files, go to the "View" tab and check the "Show ..." item.
As you can see, there is nothing complicated here. Choose whichever method suits you best and use it at the right time.
When you enable viewing of hidden files in Windows 7 in any of the above ways, they will be visible everywhere. Including on a USB flash drive. You just need to connect it to a PC or laptop - and you will see hidden folders (provided that they are there). The same goes for the external HDD.
We have dealt with the “seven”, now let's move on to the “eight”.
How to enable hidden files in Windows 8?
There are also 3 options to choose from here. The first two are described above in the instructions for Windows 7. That is, you can enable hidden files in Windows 8 by typing the control folders command. Or by selecting the "Folder Options" shortcut in the "Control Panel".
But there is another way to show hidden files in Windows 8:
- Open any folder you like.
- Select the "View" section.
- Click on the item "Show or hide", and then put a check mark in the item "Hidden items".

Done. And not only in the current folder, but also in the rest. The same methods will help to display hidden files on a USB flash drive or external HDD disk- you just need to connect them to your computer or laptop.
The last method, which works on Windows 8, is also suitable for the "ten"
To enable hidden files in Windows 10:
- Open any folder.
- Select the "View" section.
- Check the box for "Hidden Items".

After that, you can see hidden folders and documents in any section hard disk or on a USB flash drive (it must be connected to a PC).
If you want to hide folders again, uncheck this box.
There is also another way to enable the display of hidden files in Windows 10:


Done. Now you can open any hidden files on Windows 10. As you can see, the methods on different OS versions are quite similar, but differ in small nuances.
Piggy is not used by so many users today, but still we will consider it. You can view hidden files in XP like this


All - now you can open or delete hidden folders and documents.
If you don't want to understand the differences between different versions of Windows, you can use the universal method
In this case, you just need to install file manager Total commander(link to download). The program sees hidden documents and works on all Windows.
How to see hidden files in Total Commander? To do this, you need to do the following:


Now all folders and documents in Total Commander will be visible. And for this you don't even have to go to Windows settings and change the options for displaying folders.
Need to see hidden documents? Launch Total Commander and go to desired section hard drive. Or plug in a USB flash drive and then open it through this file manager.
As you can see, all ingenious is simple. Now you know how to show hidden files and make them visible. And if necessary, you can easily find them. The only advice: if you find any unfamiliar folders - do not delete them. After all, they may contain important system files, deleting which will disrupt Windows.
Hello everyone! Today we will look at the basic knowledge of Windows, without which you can't go anywhere. All modern Windows operating systems by default hide system files and folders from our eyes so that you do not accidentally harm yourself and delete them. However, there are many reasons when access to these files becomes necessary - then the question of how to show hidden folders in Windows 10 is brewing.
When can this be useful? For example the hidden folder AppData / Roaming contains great amount user data (the same save toys)... Or maybe you just don't like that the system is trying to restrict you - you can and even need to view hidden folders!
Many users use hiding various files and folders to protect information. It is clear that the method is so-so, but I know people who hid the folder ... and do not know how to get into it (hid from themselves)
I decided to tell you about three ways to open hidden folders and files in Windows 10 (although it will work fine for any other OS from Microsoft)... In this regard, the Ten has gone far ahead and there is an opportunity to show required files in a couple of clicks, without wandering through the system settings.
How to show hidden folders in Windows 10 via File Explorer
The shortest way to get to what you want is to use a small setting in the standard and everyone's favorite Windows Explorer... Find the "View" tab and make sure you have the "Hidden Items" checked. That's all - the system will show you hidden files and folders.

Hidden files and folders in Windows 10 through "Folder and search options"
If the method above appeared only with Windows 8 ... then the second option probably lives from the very first versions (at least in Windows 98 it was, and earlier I didn't even have a computer).
Click on the "File" tab and select "Change folder and search parameters" in the drop-down menu.

In the window that opens, go to the "View" tab and mark the item "Show hidden files, folders and drives", click "Apply"

By doing this, we have enabled the display hidden folders in Windows 10 - as you can see, everything is simple to disgrace.
How to open hidden folders on Windows 10? - Control Panel
If the two previous methods seemed too simple to you, then meet the longest and most inconvenient option with the display of hidden files in Windows 10 (for those who like to complicate things).
You can enable the display of hidden files through the Control Panel. In fact, we use the second method with setting up the explorer, only we do it not from the program interface, but from the global system settings.
Go to the Control Panel and for easy search, change the view to "Small icons" and find the item "Explorer Options".

On the "View" tab, check the "Show hidden files, folders and drives" item and click the "Apply" button. From now on you will be able to see hidden files.

You will most likely be warned that showing hidden files is not entirely safe - edit them wisely and knowing what you are doing ... (if you want to show system files, uncheck the "Hide protected system files" checkbox)
Outcome
We have reviewed with you 3 different ways show hidden folders in Windows 10. Please note that system files are also hidden and just ticking the “Show hidden files” checkbox is not enough ... you need to configure the settings according to the third method in the control panel - then you will see everything at all!
In Windows 7, Windows 8, Windows 10 and Vista, for safety and security purposes, you can hide important files and folders so that other users do not accidentally delete / change important data, or simply from viewing prying eyes. If necessary, these same files are quite simple to display, which we will discuss later in this article.
also in Lately very often there is a case when users' files and folders become hidden, as if everything that was deleted was deleted and instead of them shortcuts with the same names are created, which is a consequence of a virus infection of the computer / removable media.
It can also happen after installing or checking the computer with an antivirus. If you have just such a case associated with a virus, the instructions below will also help you to display hidden files and folders. But to completely remove the virus, read the article How to remove a virus with shortcuts.
The first and easiest method that I always use is with Total Commander. Open the program, select desired disk and just click the "Hidden Items" button and you will see everything that was hidden (marked with a red exclamation mark).
If you do not have the program installed, use also quite simple ways described below.
Show hidden files and folders in Windows 8.x or 10
Use the View tab and click the Options button.

On the View tab, check the "Show hidden files, folders and drives" option at the very bottom. If you want to get to hidden Windows system files, uncheck the option "Hide protected system files"

Hidden files will appear semi-transparent. If you want to completely remove the "hidden" attribute from a file or folder, right-click on it and select properties. On the General tab, clear the Hidden check box.

In most cases this helps, but sometimes it so happens that the checkbox cannot be removed from the option, because the hidden attribute is inactive. If so, scroll down a bit and follow the instructions given.
Windows 7 or Vista
Open any folder and choose Folder and Search Options from the Organize menu.
Just like in the previous example, check or uncheck the boxes of the required options and click OK.

What to do if a folder has a hidden attribute inactive
In case you cannot remove the attribute hidden the folder with the above method, the code below can help you in this situation. Just copy it, paste it into notepad and save it as folder with .vbs extension instead of txt to get folder.vbs. Then copy and paste the file to the drive you want ( USB flash drive, SD card or HDD), where you want to display hidden files and start it with a standard, double-click.
Remember to change "d:" to your drive letter.
'Reset file attributes for all folders within a specific drive
'Change d: to the letter of the drive where the script will be applied
cDrive = "d:"
Set FSO = CreateObject ("Scripting.FileSystemObject")
ShowSubfolders FSO.GetFolder (cDrive)
WScript.Echo "Done with fix."Sub ShowSubFolders (Folder)
str = ""
For Each Subfolder in Folder.SubFolders
str = str & "" & Subfolder.Path
subFolder.Attributes = 0
ShowSubFolders Subfolder
Next
End Sub
After starting the file, you should see all hidden folders, but not files (note), since this method applies only to folders. And for files use the following method:
- Open the Run dialog box, type cmd and press Enter.
- Enter your drive letter, for example d: and press Enter.
- Then enter the following command:
attrib d: \ *. * / d / s -h -r -s
Now, all hidden files should be displayed.
Often, beginners, and sometimes avid Internet users, cannot always answer some questions. For example, many people still do not understand the question of hidden folders. On the other hand, there is absolutely nothing complicated in this, and once you understand this function, you can enjoy its undeniable advantages.
Thus, I propose to talk about this burning issue, because it worries a huge number of users! Let's figure out how to see hidden folders in Windows 7, and in two words I'll tell you how to hide them.
How to see hidden folders
In fact, everything is very simple, as you will now see for yourself.
There is another way that allows you to answer the question "how to display hidden folders in windows 7"? By and large, it does not differ much from the previous one:

How to hide folders
Well, we've sorted out the main question, I also want to tell you about how, perhaps, not everyone still knows how to do this.
- Click on the folder or file that you want to save, with the right mouse button, select "Properties".
- We need the "General" tab, then in the "Attributes" block, click "Hidden" - "OK".
- Now a window will appear with a proposal to change the attribute, while in it you can choose what exactly you want to hide: just a folder or data attached to it (folders and files).
- Done, the folder is hidden. Please note that it is not completely hidden, but simply looks a little lighter than the rest. To make it completely invisible, go to "Control Panel" - "Folder Options" - "Appearance and Personalization" - "Folder Options" - "View". In the "Advanced options" area, check the box next to "Do not show hidden folders, files and drives" - "Apply". That's all, you have hidden the folder, now it is not visible at all.
Now you know how easy it is to hide folders and bring everything back painlessly.
In Windows 7/10 operating systems, it is possible to set the "Hidden" attribute for folders and files, after which they are no longer displayed in Explorer, ie. become "invisible". Usually this setting is used when the user wants to hide some information from prying eyes... But this function is also a built-in security tool for the Windows system itself. Part of the so-called system folders that store important OS files are hidden by default so that novice users cannot damage their contents and thereby not disrupt the system. In this article, we will talk about how to display hidden folders and files in Windows 7/10, regardless of whether they are system ones or not.
Enabling the display of hidden folders
Windows 7
In the "seven", to display hidden folders and files, go to Explorer, and then in the top menu, select Tools - Folder Options. If this menu is not shown for you, then press the button Alt and it will appear immediately.
Next, in the "Folder Options" window that opens, go to the "View" tab and in the list of additional options set the switch to the "Show hidden files, folders and drives" position. After that we save the settings using the "Ok" button.

That's it, now you can see hidden folders and files. If you need to display the Windows 7 system directories, then you should uncheck the box next to "Hide protected system files (recommended)" by clicking "Yes" in the window with a warning message.
An alternative way to get to folder settings in Windows 7 is to use the Control Panel tool. We go into it through the Start menu, and then to the "Small icons" display mode, click on the "Folder options" item. Then we do everything in the same way as described above.

Windows 10
IN Windows system 10 in order to enable the display of hidden folders and files, you need to go to the Explorer menu sequentially along the path View - Options - Change folder and search options.


Folder display settings can also be accessed through the "Control Panel". Open it, and then go to the "Explorer Options" section.

Here we act according to the already known scheme.
Using the Windows search bar
In both Windows 7 and Windows 10, you can quickly navigate to folder settings using the Start menu search bar. In the "seven" it is enough just to enter the query "Folder options", in the "top ten" - "Explorer options".

 Making money for a car How to make money if not 18
 Earning money on traffic on the Internet: step by step instructions
 Yandex Direct doesn't sell?
 Delivery. Yandex.Delivery Yandex.Delivery
 Practical lessons: registration at Wildberries, working with a personal account and other important tasks Supply of wildberries
 How to enter the personal account of tiu ru
 How "black" and "white" promotion on Instagram works: interviews with developers of the deferred posting service Parasite service