What program to format the disk to record the film. How to format the hard disk in various ways. Formatting a hard disk via Windows command prompt
How to format disk? This question often ask users just bought a new one. After connecting a new non-formatted hDD Begins to display in the system. However, it cannot be opened and it will not work with it.
In order to bring such a disk to the operating status, you must at least fulfill its formatting. In addition, if necessary, you can perform on logical sections, we have already talked about this in one of the previous articles.
Disk formatting is a preparation for recording files. When formatting, the required logical information is recorded for storing data and load the operating system (if necessary).
Format disk using standard windows utilities
Windows operating system to format a new disk in several ways. The simplest spomob will format through My Computer.
- Open "My Computer"
- Find the required disc
- Right click and select "Format"
After that, the disk formatting window will open, here you can specify the volume label, choose a quick or full formatting, as well as specify other formatting options if they are available.

After clicking on the "Start" button, the disk will be formatted. Similarly, you can either any other removable drive.
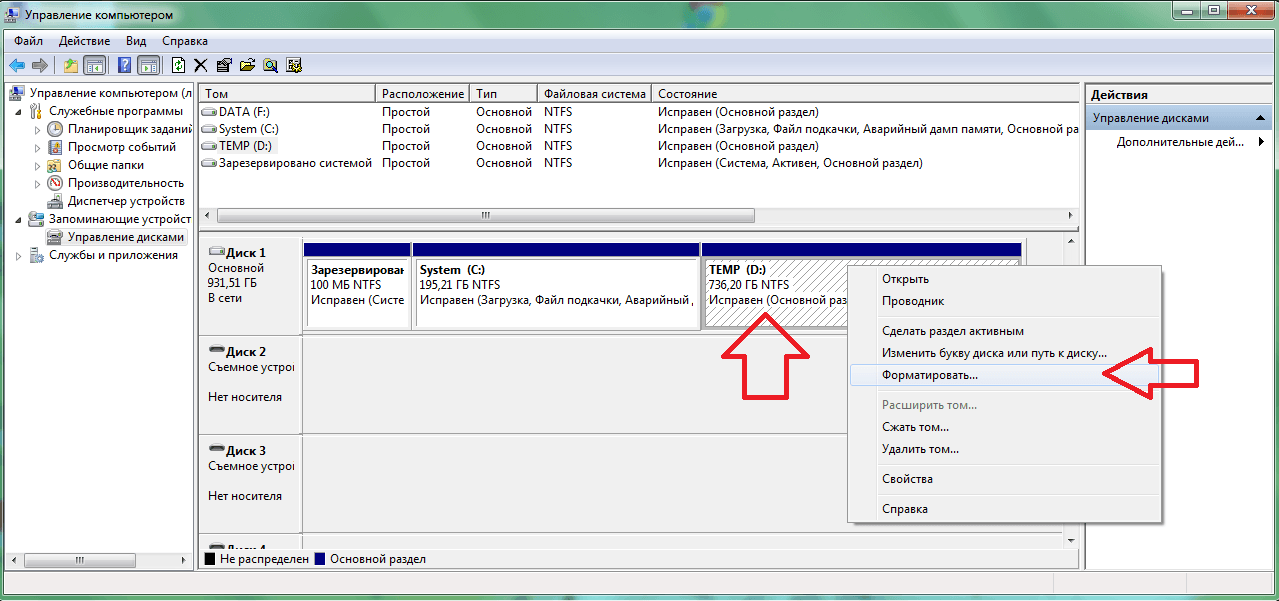
Another disk formatting method Is formatting through "Disk Management". In order to start this program built into the operating system, you must pass along the path: Start - Control Panel - System - Administration - Computer Management - Disks Management.
Here you also need to select a disk for formatting to click right-click and select "Format". After that you will get the ability to specify formatting parameters.

Another way to format a disc is formatting through. In order to start the console, press the "Start" button and enter the CMD in the search string.
Formatting disks through the console is performed using the format command to find out what parameters can we transfer this command to enter Format /?. As you can see, after that, we will have a detailed help on the Format team. The disk formatting command may look like this: Format D: / FS: NTFS / V: DATA / Q. In this case, the D disc: will formatted into the file nTFS systemThe DATA label is assigned to him, and the formatting itself will be performed in the "fast" mode.

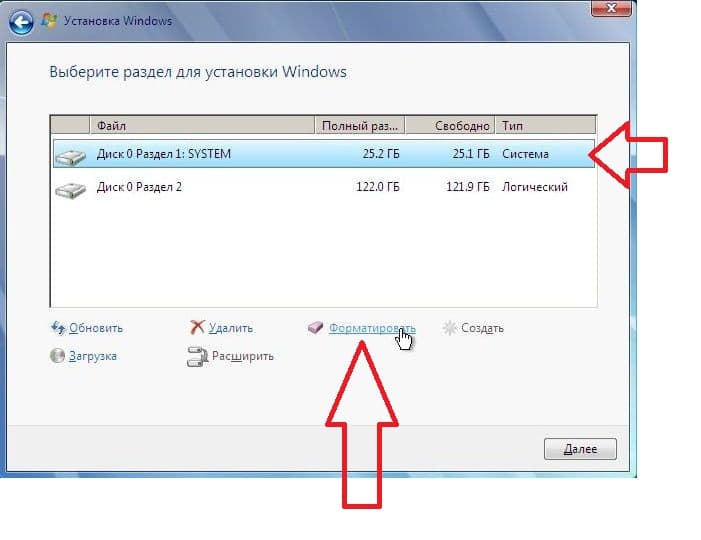
If you have a need to format a C drive: most likely you are planning to reinstall the operating system. Most. simple way This will make it, will be the use of the capabilities of the installer. Here you need to select a C drive: and click on the text link "Format"
This article contains instructions for recording on laser CD and DVD RW discs in the Windows 8 operating system. To record CD and DVD Disc on windows 8 do not need to search and install some additional programs. In Windows 8 there is a built-in tool for recording laser drives.
Laser can be divided into two groups:
- ONED record. On this disk write data only once. Designations of such disks - CD-R, DVD-R, DVD + R.
- Multiple recording. On such a disc write data more than once. Designations of such disks - CD-RW, DVD-RW, DVD + RW.
If you insert a clean CD-RW or DVD-RW drive into the drive, then windows Explorer 8 I will give a request for formatting this disk (when you try to open this disc). This will be a request to choose from one of two file systems:
LFS. - more often called UDF.. File system for batch recording on CD and DVD discs. Allows you to use the laser disk exactly as the usual disk. You can copy and delete files easily, as if it is not a laser disk, but a regular disk or flash drive. The UDF file system in particular is used on DVD-Video discs and on video cameras that save recording on RW discs.
Mastered. This is a drive entry in the ISO9660 file system. ISO9660 file system is traditional file system For laser drives. Designed before the appearance of RW disks. Audio CD, MP3 discs, discs with computer programs - written in this file system.Record CD and DVD RW Discs in UDF format
UDF file system is used for batch recording on laser disks. Depending on the UDF version, it is supported. different versions Windows. For example, Windows XP supports only the UDF 1.50, 2.0, 2.01 versions and does not support version 2.50.
The UDF file system is also used in video recording and playback systems and audio, such as DVD players (DVD-Video discs are manufactured using UDF version 1.50). There are models of camcorders that record the filtered material on DVD-RW discs.
In order to use such a disc at first it must be formatted. If you insert a clean CD-RW or DVD-RW drive into the drive, then the Windows 8 conductor will give a request to format this disc (when you try to open this disk in Windows Explorer):
Formatting to the UDF file system may take some time, for example, a CD-RW 700 MB can be formatted for 10 - 12 minutes. DVD-RW discs are formatted faster than CD-RW.
If the RW disk is not empty (there was already a record on it), then it can be formatted differently. After the disk is identified by the system and appears in Windows Explorer, you need to click on it, right-click and select the menu item "Format":

After that, in the dialog box, specify the formatting options:

After the format is completed, you can copy files to this disk directly through Windows Explorer:


But the recording speed on the UDF disk is lower than on a regular disk or USB flash. In addition, when using the UDF file system, compatibility problems with household players are possible. If you record the MP3 files on the UDF, this disc may not be played on the automotive player.
If you write a disc for playback on household appliancesIt is better to use the ISO9660 file system:

Or first learn whether your household player supports UDF format discs.
Recording CD and DVD RW Discs in ISO9660 format
Any user data (photos, mp3, movies, programs) can be recorded on RW disks in ISO9660 format. The advantages of this file system are that it is supported by old household players to a greater degree than UDF. The disadvantage of this format is that the record must be done at a time. You can not record or delete separate files on a disk with this file system.
Re-entry on RW discs ISO9660 is possible, but before that, the entire disk must be erased.
This is the inconvenience of the disks in the format ISO9660. The need to record a single time and the need to erase the entire disk when recording.
The ISO9660 file system can be used in two ways. If you insert a clean (erased or new) RW disk Then Windows 8 Explorer will automatically give a request to format this disk (when you try to open this disc) and you need to select the second type (Mastered):
If the RW disk already has an entry, then it needs to be erased. After the disk is identified and appears in the conductor, you need to click on it, right-click and select the menu item " Erase this disc":

Thereafter


Now you can record files on the disk.
Recording files in the ISO9660 format is performed in two stages. First you need to copy files to this disk:

You can drag the files from another window. And you can go to another folder, allocate and copy files, then open the RW disk again and insert copied files on it:

Files are inserted and the disk is ready to write. If you need to add more files - just repeat the previous step. Find the necessary files, copy them and paste the disk on the RW.

In order to record files on the disk you need to click the right mouse button and select the menu item " Write on disk"This operation performs actual file entry to disk. After it, add new files will not be possible:


Summary
In both formats, and UDF and ISO9660, you can record any files. Photos, movies, programs, music. The difference between two formats is only in the convenience of recording and compatibility with household appliances (players).
DVD -Disc can be formatted (Clear, delete content) only if it is RW, i.e. it is designed for a multi-track information on it. Delete information from DVD -R disks is not possible. Format disk can be in two ways.
How to format a DVD disk easier way
To clean the disk, insert the disk into the drive, wait for the download. By double-clicking the "My Computer" shortcut, select your disk in the pop-up window. Right-click on the disk image, select "Clear" or "format" in the menu that appears. The way is bad only by the fact that not everyone in standard set The programs are intended for recording and formatting the disks of the utility.
How to format a DVD disc in Nero StartSmart
- Run the program.
- At the top are chosen in the DVD drop-down list.
- Slightly below, among the icons, choose the window with a plus - "add-ons".
- We choose "Clear DVD". The "Erase Rewrked Disc" window will be released and two actions to choose from "quickly erase RW-d" and "Full erasing of the rewritable disk". It is better to choose a complete erasure to clear the disk for sure and not have problems with the recording of information on it in the future.
- We click "erase."
- All, disk formatted, and is ready for further record information on it.
From this article, you will learn how to format a CD / DVD-RW disk that has problems with playback or downloading information. Keep in mind that the recorded (full) CD / DVD-R disk is not formatted. During disk formatting, all data that is stored on it will be erased.
Steps
1 in Windows.
- 2 Open the Start menu. To do this, click on windows logo In the lower left corner of the screen.
- 3 Open the conductor. To do this, click the icon as a folder in the bottom left part of the Start window.
- 4 Click on this PC. This tab with the computer icon is located on the left side of the conductor window.
- 5 Click the icon optical drive. It has a gray disk look and is in the "Devices and Disks" section in the middle of the page.
- 6 Click on management. You will find this tab in the upper left part of the conductor window. Under the "Management" tab, the toolbar opens.
- 7 Click Formatting. The icon of this option is located on the left side of the toolbar and has a gray disk with a red round arrow. The Formatting window opens.
- 8
Select the file system. Open the "File System" menu and select one of the following options:
- UDF 1.50
- UDF 2.00 - To use the disk in XP and old versions.
- UDF 2.01 (default) - To use the disk in modern operating systems.
- UDF 2.50
- UDF 2.60 - To use the disk in modern operating systems. Supports Blu-ray.
- 9 Click Start, and then click OK. The disk formatting process in the selected file system will start.
- 10 Click OK when the query appears. The formatting process will be rapid.
2 in Mac OS X
- 1
Insert the CD-RW disk or DVD-RW disc into the computer. Take the disc so that the surface with the sticker look up and paste it into an optical drive.
- If there is no optical actuator on the computer, buy an external drive.
- In Mac OS X, you cannot format the disk as in Windows, but you can erase information from it and reformat it to eliminate errors.
- 2
Click the transition. This menu is located on the left side of the menu row, which is located at the top of the screen. The drop-down menu opens.
- If the menu bar is not displayed, click on the desktop or open the Finder.
- 3 Click on the utility. This option is at the bottom of the transition drop-down menu.
- 4 Double-click the icon Disk utility. You will find this icon in the "Utilities" folder - it has a disk with a stethoscope.
- 5 Select a disc. Click on the disk name in the "External" section, which is located on the left side of the disk utility window.
- 6 Click on the Erase tab. It is located at the top of the disk utility window. A window will open with the disk properties.
- 7
Click on completely. This option will allow you to completely erase and reformat the disk.
- Or select "Quickly" to quickly erase the disk, but in this case, the errors that may be on the disk will not be eliminated.
- 8 Click on erase. So you will erase and reformat the disk. When the process is completed, you can record music or video on the disk.
- If you use third-party program, such as Roxio CD Creator or Nero, you can simplify the disk formatting process.
- CD-RW drive can be formatted many times because it is a rewritable disk.
Warnings
- CD / DVD-R disk can only format once. Files from this disk can not erase.
Since there is a section on the forum about information carriers (including optical, such as CD and DVD), it was decided to write an article about such not very, unfortunately, the popular method of recording disks as a batch record. Perhaps, after reading, someone will interest this method.
Batch method for recording CD / DVD-RW discs or how to use optical RW discs like a flash drive or HDD
Nowadays, various flash drives, portable HDDs have almost completely outset optical CD- and DVDs, which in their time used quite a lot of popularity due to relatively low cost and very spacious volume (for those times anyway). And the reasons for this, of course, a lot. This is their size, and constant damage of discs due to scratches and cracks, and low recording speed, and noise when working a drive.
Yes, even the process of writing data on such discs could only occur session: we decide in advance what data to write, set them the program, recordings. Subsequently, if you need to add something to the disk, we open a new session, and this is a loss of a few more unnecessary megabytes (on DVDs - dozens megabytes), since they are discharged under official information. Well, it is impossible to remove some individual files from the disk in principle, it is necessary to fully wash, then re-overwrite data on the blank, leaving only what you need ...
Of course, the complexity and inconvenience of the data recording procedure on such disks pushes most users. After all, it is much easier to stick a USB flash drive in a USB port, copy what you need; If there is something unnecessary, you can delete. But not many know that in fact, it is also possible on optical disks. After all, the writing laser, in theory, it's like writing. Decision - Batch recording method (Packet Writing.), invented by the way, long enough.
The essence of the method
In contrast to the session recording method, when the entire session with the data and service information And immediately recorded entirely to the disk, the packet method of recording allows you to record the data not immediately, but in small portions (packages). Thus, you can contact a disk as with a conventional flash drive: write, edit, delete data directly on it.
Pre-RW-Double formatted (this operation takes 10-15 minutes of time), the UDF file system is written to it, after which the disc can be fully used on any type drive in the Linux family operating systems (in the presence of a installed package udftools.), as well as Mac OS X and Windows Vista / 7/8. In earlier windows versions (Windows 98 / ME / 2000 / XP) will need to install additional software, such as Nero Incd. or Roxio Drag-to-Disc, eg. In the absence of such software in the same Windows XP, for example, data from such a disk can only read.
In this article, I will consider the DVD-RW preparation process for use in a packet recording mode in Windows XP and Windows Vista operating systems. For those who have Windows 7 or Windows 8 installed on the computer, the preparation process in principle is similar to Windows Vista.
CD / DVD-RW batch record in Windows Vista / 7/8 operating system
As I said, before using our RW-blank (in my case it is a DVD-RW disc), you need to first format it. In Windows Vista / 7/8, this procedure is extremely simple, you do not need to install any additional programs.
1. Insert our RW drive into the drive tray.
2. If there are some data on it, we erase them. To do this, click 2 times with the mouse button on the icon A computer On the desktop (or execute the menu command Start \u003d\u003d\u003e Computer). In the window that appears, we find the icon of our drive, click on it with the right mouse button and select the item in the menu that appears Erase this disc.
The disk erasure wizard window appears. Click FurtherThe erase process will begin. After completing it, click Ready.
3. Now that we have a clean drive, you can immediately begin formatting. Just climb 2 times on the drive icon, will appear small windowwhich will be prompted to enter a label of the future disk. Enter the desired label, you can leave existing; Subsequently, it can be changed.
Click on the round button with the arrow Show formatting options.

The window will expand, formatting parameters will appear. Here will be located two switches that set the data recording method to disk. The default switch will be installed. Live file system "This is just what we need, so we leave it involved." Now we need to decide on the version of the UDF file system.
It all depends on which operating system this disc It will be used by default in Windows Vista a version of UDF 2.01 is offered. If the recordable disk will be used on computers with operating room windows system Vista or later, you can leave version 2.01. If the disk is planned to be used in more early versions Windows is recommended to change the version to 1.50. To do this, immediately under the switch Live file system Click on the link Change version, in the appeared window in the drop-down list, select the version of UDF 1.50 and click OK.
4. We determined with the parameters, you can proceed to formatting. Click on the button Further. A message that warns us that formatting may take the time and that cannot be turned off the computer during the formatting process. We agree, click Yes. The formatting process will begin, a window appears on the screen that displays its execution.

The duration of this operation largely depends on the allowable recording speed of the discharge itself, as well as from the maximum recording speed supported by the drive. In my case, a 4-speed DVD-RW Dwarf was used, the formatting procedure took about 15 minutes.
5. After completing the formatting procedure, the window that displays its progress will disappear. You can start working with a disc.
Write, delete, edit files on the disk can be in any program, in any file Manager. Disc is retrieved in the usual way: close all programs that use the disk, then remove it. When you insert a disk in the writing drive on a computer with Windows Vista / 7/8, you can immediately use it.
CD / DVD-RW batch record in earlier versions of Windows
Before windows Vista manufacturers software For recording CD and DVD in their software packages, special recording utilities were built optical disks Batch method. Ahead AG Software (Nero Ag Software) has produced a utility AHEAD / NERO INCD, Roxio - Drag-to-Disc(previously known as DirectCd.), NTI - NTI Filecd..
In truth, such utilities were very buggy. And since the batch record technology was very successfully implemented in Windows Vista, software manufacturers for recording CD and DVDs in subsequent versions of their packages decided to abandon their own batch recording utilities.
These utilities are usually paid. To find latest versions At the office The sites of manufacturers are extremely difficult. I will use Nero Incd v4.3.
Nero Incd installation process is simple enough: Run installation file.Introduce serial number, Install the program and reboot the computer. After the reboot, you can proceed to work with our RW disk.
1. Insert the RW-blank into the drive.
2. Click 2 times on the icon My computer On the desktop, in the right-click window that appears, click on the icon of our drive. In the menu that appears, select the item INCD Format.

3. The formatting settings window will appear on the screen.

Parameters Some: It is proposed to specify the type of formatting and a disc label. What pleases, unlike Windows Vista, there is a quick formatting that will take less than a minute (however, it will not be checked for damage discs).
The UDF version selection can be activated by going to Options and installing there check box Allow expands. Format options. After that, the button will appear in the formatting window. ExtendedBy clicking on which you can choose the desired version UDF.
Choose a quick format, set the desired label and click Start. Formatting will take a few seconds, after which the disc can be used.
A disc recorded in Windows Vista in a packet recording mode, for some reason, not managed to record in Windows XP via Nero Incd. However, a disk formatted in Nero Incd without problems opened in Windows Vista and it could be recorded on it.
How to cancel a batch record on the disk?
Simple disk erasure. In Windows Vista, this can be done with OS tools, or third-party using Nero Burning ROM. In Windows XP, with the same Nero Incd utility, climbing in the window My computer on the drive icon and selecting item Incd erase.
Modified April 17, 2013 by Shadow Th How to reflash iPhone with PC and iTunes
 Best Bitcoin Wallets for iOS Download application wallet on iPhone
 Lenovo Vibe X2 Description, Features, User Reviews
 The computer does not see the flash drive: causes and solving the problem
 About Windows Update From Wannacry Encrypter Virus
 Hot browser keys
 New Mac Mini turned out to be five times more powerful than the predecessor