Transfer of a real machine in VirtualBox. Transferring virtual machines with XenServer to Hyper-V. Transferring a virtual machine with XenServer to KVM
Hi friends! Today for lovers virtual machines Vladimir prepared just awesome stuff!
Hi Admin, please tell me how to transfer virtual virtualBox machine on a regular computer?
A few months ago, Windows 10 came out and I was afraid to install it directly to my computer, and installed on a virtual machine, then installed in the operating system all the programs you need: browsers, free OpenOffice, Skype and so on, after a while began to notice that the tenth I liked Windows and I even had the idea to move it to an ordinary computer! Is it possible? I did not find such information on the Internet.
How to transfer VirtualBox virtual machine to a regular computer. Or how using the VHD2DISK program to transfer Windows 10 from a virtual machine to stationary PC
Hi friends! Transfer VirtualBox virtual machine to a regular computer possible and often such a need arises from system administrators, developers are different software and others computer specialistsAlso, it may be needed to the usual PC user.
- Note: There is a website created specifically for lovers of virtual machines.
For transfer, you can use yet a little known program VHD2DISK. - designed specifically to transfer virtual operating systems to physical hardware, or in other words - to create an exact copy virtual disk VHD on the usual hard disk.
So, we have VirtualBox virtual machine with Windows 10 installed on it.
Disk management
Disc 0., this is a virtual disk with the installedWindows 10.
When creating a virtual disk, I specified 250 GB size. On the disk (c :) operating system installed, and on (E :) there are various files.

First we convert the VDI virtual disk belonging to the virtual machine into the VHD format.

File -->Virtual Media Manager.
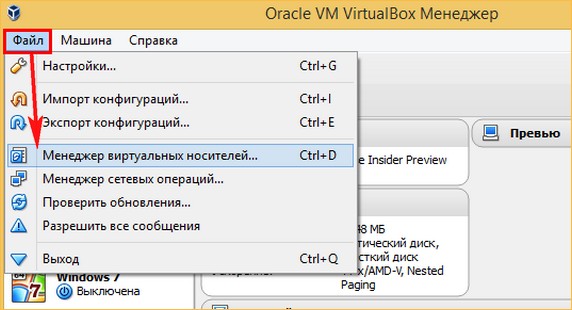
Select the left mouse VDI virtual disk belonging operating systemwe want to transfer to a regular computer and click on the button Copy.


We celebrate item VHD (Virtual Hard Disk).
Next.

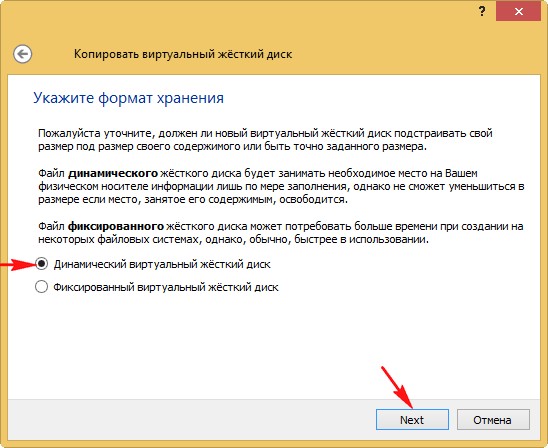
We celebrate item Dynamic virtual hDD .
Next.
Close the left mouse on the Explorer button.

Select the place of saving the future copy of the virtual hard disk, I will choose a disc ( G:), since it has a lot of free space.

Copy.

There is a short process for converting a VDI virtual hard disk to VHD format.

At the end of the process, click on the button Close.

On the disk (G :) Near the VDI virtual hard disk, it has a copy, only in VHD format.

Disk management
To deploy a copy of the virtual disk you need to fully clean the physical hard disk without sections.
Open the disk management snap.
I will choose Disk 1..
I remove all sections on it.


VHD2DISK.
The VHD2DISK program is the time. Download it on the official website:
https://docs.microsoft.com/en-us/sysinternals/downloads/disk2vhd.
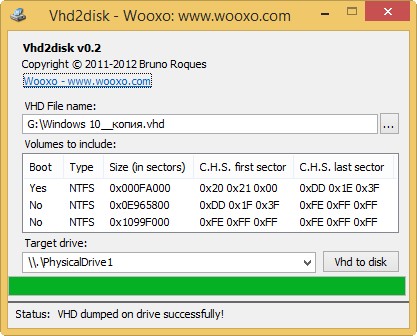
Run the program. In the main window, we click the left mouse on the Explorer button.

In the opened conductor, we find a copy of our VHD virtual disk, highlight it with the left mouse button and click Open VHD..

In field Target Drive. We must specify the sequence number of that rigid disk, to which we will deploy a copy of the virtual disk. Click on the arrow.

In the drop-down list choose PhysicalDrive1.how to deploy the contents of the virtual disk VHD we will be on Disk 1..

Click on the button VHD TO DISK..


The process of copying the contents of a virtual hard disk VHD to a regular hard drive begins.
The process is successfully completed.
Status: VHD DUMPED ON Drive SuccessFully!(VHD is successfully copied to the hard drive!).
We go into drives, click Act-->Refresh.

As you can see, a hard disk (disk 1) is an exact copy of the VHD virtual hard disk from the virtual machine and installed windows 10.

We try to boot in Windows 10.
Reboot your computer and enter the download menu, select our hard disk (copy of the VHD virtual disk with Windows 10).

Preparation of devices

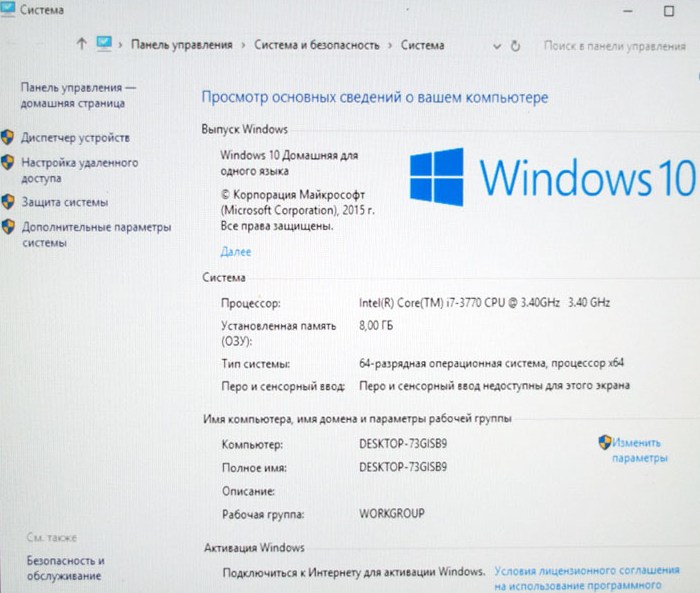
Windows 10 is loaded!

Disk management.

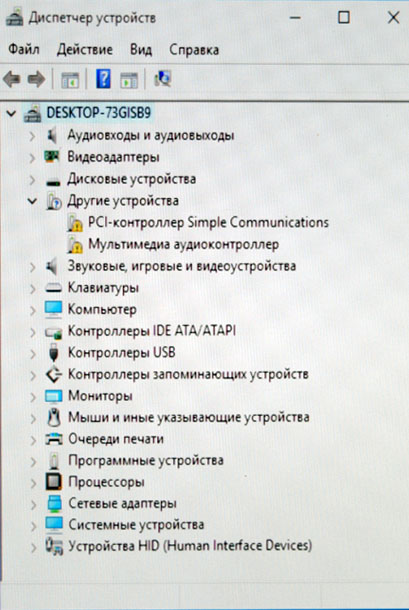
There are several devices without drivers in the task manager, but for us it is not a problem, you set the drivers.
I always liked the free hypervisor XenServer, often used it. But recently decided to gradually move to another hypervisor. Which one - I did not yet decide finally. The reasons for the refusal of XenServer and general thoughts about modern hypervisors will tell more further. The article will consider detail the issue of transferring virtual machines with XenServer on Hyper-V.
If you have a desire to learn how to search and exploit vulnerabilities in information networksI recommend to get acquainted with online course "Workshop by Kali Linux" in Otus. The course is designed for those who have no experience in information securityFor admission you need to go through.
The article initially wanted to write on the installation of XENSERVER 7 on MDADM RAID1. I always liked Xen for the opportunity to install it on MDADM. This allowed to use a hypervisor on any hardware with two hards, providing simple fault tolerance at the level of the disc. It is convenient and budget. The same can be done at KVM, but personally, I also like the control in the form of an application for Windows. It can be easily connected to a variety of servers and manage everything from one place. As a plus, in comparison with KVM, it is easier and faster to install and configure to work, transfer someone to management.
Actually, the draft article on installing XenServer on the software raid I prepared and tested. At first glance everything works. Problems began when I began to check the fault tolerance and disconnect one hard. As it turned out, XenServer cannot be loaded normally if the MDADM raid goes to the state of degreaded. I was very upset by this fact and spent continuously for almost a day to deal with the situation and try to solve the problem. But I did not succeed. And on the Internet, I didn't find a recipe for a solution, but I found confirmation of this problem.
It seems that XenServer from version 7 no longer supports work on MDADM. This is even mentioned in the official FAQ:
- Does Xenserver Support A Software-Based RAID IMPLEMENTATION?
- No, XenServer Does Not Support Software RAID.
I checked on version 7.0 and 7.1. The result is the same - the system is not loaded if the raid falls apart. And on the Internet there are articles where it is described how to transfer clean installation Xen 7 on MDADM. Looks like these people simply did not test the failure of one of the disks. While you do not check, it seems that everything is in order. The problem here is that XenServer 7 moved to CentOS 7. And there are many innovations, in particular SystemD. I definitely could not determine what particular problem. There is some kind of compatibility in loading modules, the xenserver kernel and the MDADM version. At CentOS 7 was a similar bug at the time of the exit, but it was promptly corrected. And on XenServer, the developers scored this, since the support of MDADM and did not promise. As a result, the hypervisor remained without the possibility of installing on MDADM. It is unacceptable for me, since MDADM is actively using. If any disk fails, the system at the time of loading is infinitely hanging with the message:
A Start Job Is Running for Dev-MD0.device
I still have a lot of virtual machines under the control of CentOS 5. The feature of this version is that for normal operation on XenServer, a special kernel-xen kernel was installed on the system. As a result, when transferring the system to another hypervisor, it refused to work. It is necessary to seriously work in a file to start it. It was important for me to work out this moment, since in work you will have to gradually leave XenServer aside or Hyper-V or KVM. I have not yet decided finally, since I did not work at KVM to start the virtual machines with Xen, but the Hyper-V managed. About this and tell.
Transferring a virtual machine with XenServer to KVM
The virtual machine transfer itself is a simple copy of the disk from one hypervisor to another. For Bacup Xenserver I use the free version of the Alike Free program. Unfortunately, it is no longer in a free editorial office. The developers closed a free project, there is only trial version from paid. But I stayed and the distribution, and the keys for free version. I continue to use it. Simple I. convenient programwhich allows you to make incremental backups of virtual machines. She knows how to unload backups in vHD. format. All you need to do to transfer virtuals - create the same machine on the Hyper-V and as a disk specify the transferred VHD image with XenServer. But if you then simply run a virtual about, you will get an error.
ERROR 13: INVALID OR Unsupported Executable Format

There is nothing surprising in this, the modified kernel for Xen works only on the hypervisor itself. To work in another environment, you must install the standard Linux kernel. That's what I will do next. The task turned out to be very difficult, I had to roam a lot in various nuances. First of all, not to forget the experience gained, I am writing this article. Although I understand that there is few people use such experience. It is unlikely that there are many people who will endure already removed from the support of the CentOS 5 system from the XEN hypervisor somewhere else to another place. In a good way, the system must be rearranged, and I will gradually take it. But still you need to have a finished instruction in case of any surprises.
The method described below is a virtual machine load recovery method is a universal tool for solving download problems. linux Server. If for some reason you do not load the Linux server, the bootloader broke or problems have arisen after updating the kernel, told on how to update and replace the kernel and bootloader can help solve this problem.
Restore Linux Server Download
In order for the virtual machine to work on Hyper-V, as I said, it is necessary to establish a standard core. To do this, load in a virtual machine with boot disk CentOS 7 and choose mode.

To select this section, you need to select the main menu Troubleshooting.. We wait for the download and choose the first proposed option.

Immediately climbing our restored system. First of all, you need to update the system and install the standard kernel. Most likely, through YUM, you will not succeed, since the links at the CentOS 5 repository have become inactive, after the construction of the system ended on the 31st. You need to change the file /etc/yum.repos.d/centos-base.Repo.By editing the paths of the relevant sections on the following:
BaseURL \u003d http: //vault.ceptos.org/5.11/ oSupdates./ $ BASEARCH / BaseURL \u003d http: //vault.ceptos.org/5.11/ addons/ $ BASEARCH / BaseURL \u003d http: //vault.ceptos.org/5.11/ extras./ $ BASEARCH / BaseURL \u003d http: //vault.ceptos.org/5.11/ centOSPlus./ $ BASEARCH / BaseURL \u003d http: //vault.ceptos.org/5.11/ contrib/ $ BASEARCH /
All strings with MirrorList must be commented, and BaseURL is changed to the specified. After that, you need to start the system update.
# YUM CLEAN ALL # YUM UPDATE
Now establish the standard Linux kernel, and from Xen delete.
# YUM Remove Kernel-Xen # Yum Install Kernel

Now check the version of the existing kernel libraries in the system.
# LS -L / LIB / MODULES /

We take the latest version and collect the image of initrd.
# mkinitrd -v -f /boot/initrd-2.6.18-419.el5.img 2.6.18-419.el5
Edit the configloader /Boot/Grub/Grub.conf.So that it chose when downloading this version of the kernel.
Parameter dEFAULT \u003d 1. Corresponds to the second line of the menu, as the countdown goes from 0. That is, just the necessary updated kernel will be selected. We update the bootloader on the disk.
# GRUB-INSTALL / DEV / SDA
If you get an error:
/ Dev / SDA Does Not Have Any CorreSponding Bios Drive.
Use the following command:
# GRUB-Install --recheck / Dev / SDA
In theory, this could be completed. We actually performed the full restoration of the server Linux server. But as it is about XenServer, there is another nuance. If you try to download a virtual machine now, then everything will go smoothly until the very end of the download, and then the error will come out.
INIT: ID 'CO' RESPAWNING TOO FAST: disabled for 5 minutes
She will hang endlessly. Related to access to the XENSERVER virtual machine console. In another environment, the parameter must be changed. To correct the error, you need to edit the file / etc / inittab. Find in it a string
CO: 123457: Respawn: / Sbin / Agetty XVC0 9600 VT100-NAV
Commit it, and take a comment from the row instead
1: 123457: Respawn: / Sbin / MingeTty Tty1

Now you can restart the virtual. It must safely boot. At least I had so.
Unfortunately, the above method could not force the same virtual machine to boot hypervisor KVM.. I do not know why. After selecting in the loader of the core version, the system simply hangs in this position.

And nothing further happens. There are no errors. I don't even have ideas because of what it can be in which direction to move to run the virtual. If someone has ideas how to do it, I ask the Council. I would really like to move virtual machines with CentOS 5 on KVM. I tried to transfer already recovered virtuals with Hyper-V to KVM, converted a disc with VHD to QCOW2, but all without a result. They still hang out the same way as if I transferred them directly with Xenserver.
Conclusion
The transfer of virtual machines works well within a single hypervisor. In case you transfer from one to another, with a lot of probability, get some problems. I often come across this, especially with Linux and FreeBSD. Most often begins problems with discs and loadload. The letters of the disks will change, it is necessary to edit FSTAB, the loader does not start. Sometimes the network may not work. Everywhere you have to deal with the place and solve emerging problems.
Workshop by Kali Linux
The course for those who are interested in conducting tests to penetrate and want to practically try themselves in situations close to real. The course is designed for those who have no experience in information security. Training lasts 3 months to 4 hours a week. What will give you this course:- Search and operate vulnerabilities or flaw configurations in corporate networks, Web sites, servers. Focus on the Windows Penstress and the security of the corporate segment.
- Study of tools such as Metasploit, SQLMAP, Wireshark, Burp Suite and many others.
- The development of the Kali Linux toolkit in practice - with it there should be any specialist in IB.
There are several ways to convert the installed Windows to the image for a virtual machine. The created image can be used, for example, for testing, to check the stability of the system after installing any update, or in order to fix the status of the old machine before making changes.
Most virtualization programs support the conversion feature of the installed Windows OS in the image of a virtual machine. Some solutions are already supplied with built-in functions, but in some cases for the same purpose it may need to use third-party products.
In this guide, conversion instructions are collected windows installations in virtual images Microsoft Hyper-V, VirtualBox and VMware.

Transferring Windows to Virtual machine Microsoft. Hyper-V is performed very simply thanks to the program Disk2vhd from sysinternals.
The program is portable, it can be started from any location on the disk after unpacking the archive. The application requires administrator rights. The program can be used to create a virtual machine from one or more volumes on the computer.
Note: You can run a program in command line mode using the format:
The main application window displays the destination path and file name, and slightly below - available volumes. Please note that you need to choose a target location with sufficient free storage space, otherwise the image creation process will be interrupted.
The user must select the target path and file name (with the VHDX extension), as well as the volume to be included in the virtual image.
You can choose only windows section Or even convert non-system sections to VHD images, without choosing a Windows partition.
DISK2VHD comes with two additional parameterswhich are specified when starting. The first sets the VHDX output format. You can disable this parameter to use VHD.
VHDX has several advantages, such as supporting larger virtual disks (64 TB against 2 TB), best defense From damage, remote online resizing, etc. VHD is required mainly for compatibility purposes, for example, when the product does not support VHDX, as well as when you want to convert the image in VirtualBox.
The second parameter allows you to use shadow copy Toma
Disk2VHD Processes selected volumes and turns them into images of virtual disks that are stored in the selected location.
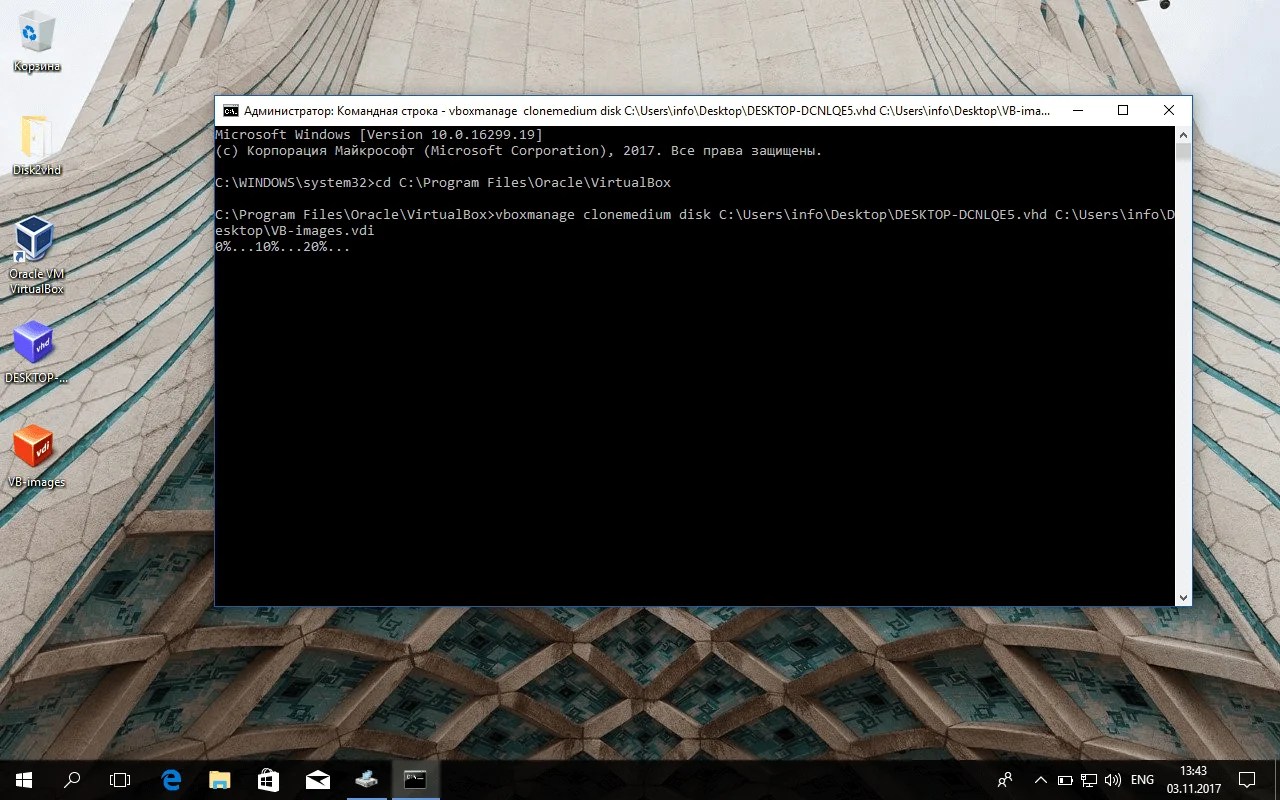
After you received the VHD image, you can use the VboxManage command line tool, which comes with VirtualBox, to clone media and save it in another format.
- Press the Windows key, enter cmd.exe.Hold Ctrl + Shift and press the ENTER key to run command line with administrator rights.
- Go to the VirtualBox folder in the system, for example, C: \\ Program Files \\ Oracle \\ VirtualBox Using the CD command.
- Use the VBoxManage Clonemedium Disk command to convert VHD disk image to VDI format. For example: VBoxManage Clonemedium Disk O: \\ Source.vhd O: \\ output.vdi
Conversion may take some time depending on the size of the image and the available resources of your computer.

You can create virtual images. windows Windows for Vmware. Using VMware VCenter Converter. You can download the program from the official website of the VMware, but it takes account. On our site utility available for download without registering.
Note: The program creates a virtual image of the full machine. IN graphic interface There is no possibility to exclude hard drives or sections.
The size of the installer is approximately 170 megabytes. During installation, you will be asked to join the Customer Service Improvement Program.
To convert startup windows system In a virtual image for VMware, select the "Convert Machine" option in the main program interface to get started.
After loading the wizard, make sure that the source type is set to "enabled" and selected "this local computer". You can also create virtual images. remote computersBut for this you need to specify the name or IP address of the device, as well as credentials.
Select VMware Virtual Machine in the Title section on the next page and select the target folder to save the image.
Creating an image may take some time, depending on the number of volumes, their size and resources of the device.
 Magnetometry in the simplest version The ferrozond consists of a ferromagnetic core and two coils on it
 Effective job search course search
 The main characteristics and parameters of the photodiode
 How to edit PDF (five applications to change PDF files) How to delete individual pages from PDF
 Why the fired program window is long unfolded?
 DXF2TXT - export and translation of the text from AutoCAD to display a dwg traffic point in TXT
 What to do if the mouse cursor disappears