The esp section. What is an EFI system or UEFI partition? Computer help at Serty. Creating an EFI partition in front of Windows
When we install Windows to blank (unlabeled)
HDD or a formatted section in the usual way - using installation media, we don't need to bother creating EFI- markup of the operating system. All necessary partitions, in particular the boot EFI are created automatically if the computer is in BIOS UEFI... But if Windows needs to be installed in a different way.
And to another hard drive with its own independent bootloader, if there is a question about restoring the system's performance after deletion hard disk with a boot partition, in such non-standard situations, manual work will be required.
Windows to the second connected to the computer GPT-disk is not installed with its EFI-structure. In a typical installation from the installation media, the bootloader of the second system is written to the existing one EFI-partition - the one that is on the first disk.
What makes the second Windows vulnerable- it will not be able to exist on its own if the bootloader of the first system is damaged. Or if the first hard drive fails or is simply disconnected. To have second Windows had its own independent EFI- markup, during its installation you need to make the first system invisible - disable its carrier in the settings BIOS, if possible, or hardware. This is not always convenient, and sometimes impossible in the case of laptops.
The second Windows with its own independent boot loader can be installed by programs like or WinToHDD... But they will ask you to tell them the boot EFI-chapter.

It is very easy to create one on an empty hard disk.
1. Creating an EFI partition on an empty hard disk in the command line
So, we have initialized as GPT medium without markup and data.

We start the command line.
Be sure to do this on behalf of the administrator.
We enter one by one:
diskpart lis disk sel disk 1 (instead of 1, specify the number under which the required hard disk is listed above) creat par efi size = 100 format fs = FAT32
lis disk sel disk 1 (instead of 1 specifies the number under which you denote the hard disk you need) creat par efi size = 100 format fs = FAT32 |

In the disk management utility, we see that the second hard disk has EFI-section on 100 Mb... Now we can form a regular section to indicate its type to programs or WinToHDD as a system partition WITH .

2. Creating an EFI partition on an empty hard disk using the Bootice utility
Who doesn't like the command line to create EFI-partition blank media can use the utility with graphical interface... It is free and can be downloaded from any software portal on the Internet. In the main window, select the second hard one. We click.

Then - "Re-Partitioning".

First of all, put a check mark GPT in the graph "Partition table type"... Then check the box "Create ESP partition"... And at the top in the graph "Settings" remove all values "Size" except the last... We press "OK".

As a result, we get the disk layout with EFI-section on 128 MB and a partition that contains the rest of the disk space.
But what if the hard drive is not empty? If it has a structure and stored user data. Or do we want to restore Windows that has lost its bootable EFI-partition after failure or disconnection of the hard disk, on which its bootloader previously existed. And there are solutions for this case. To restore a system without a bootloader, we naturally need an environment to perform certain operations. In one case, the usual Windows installation media will work. Otherwise, we will work with a manager disk space, so we need a functional and reliable LiveDisk WinPE... One of these is LiveDisk Sagittarius... Image download site - Sergeistrelec.Ru .
Note: the operations below cannot be performed on discs dynamic type... The disk that is left without the Windows Mirror bootloader must first be converted to a base type. This can only be done by third-party means.
3. Creating an EFI partition at the end of Windows
So, we have, for example, the second Windows, which has lost EFI-loader after a disk break with the first system.

How do I start it? The simplest and quick way- create EFI-section at the end of the system partition and re-create the bootloader. You don't need anything else for this command line... Boot from the Windows installation media, immediately press Shift + F10. This combination will launch the command line. If we use LiveDisk Sagittarius, we start, respectively, from it.

And already on board we will use the command line.
In it we enter:
diskpart lis vol sel vol 1 (instead of 1, specify the number under which your partition with the system appears above) shrink desired = 100 creat par efi format fs = FAT32

Here is the specified section compressed into 100 Mb and in the vacant place was created EFI-chapter.

Now we can recreate the bootloader.
On the command line, exit :

Everything - Windows health restored.
4. Creating an EFI partition in front of Windows
The boot partition usually exists at the beginning of the disk, before the system partition. This does not have to be, but is done for the purpose of speeding up Windows startup... To UEFI found the bootloader faster. On SSD such optimization is unlikely to be tangible, but in the case of HDD you can even compete for a fraction of the performance.
On board LiveDisk Sagittarius we launch. We make a click on the system partition, on the side panel of operations, click "Change of size".

Pull the slider on the map a little to the right, so that in the column below "Unoccupied space in front" there were several MB... Next, instead of the drawn number, we enter 105 ... To make it work 105 MB... We press "OK".

As a result, the program will free up the correct value of disk space, in our case 102.01 Mb... And leave a small tail behind the section. We press.

We confirm.


Now we launch the command line. And we create EFI-section is exactly the same as described in item 1 articles.

Here EFI-section is created.

It remains only to recreate the bootloader, as described at the end item 3 articles.

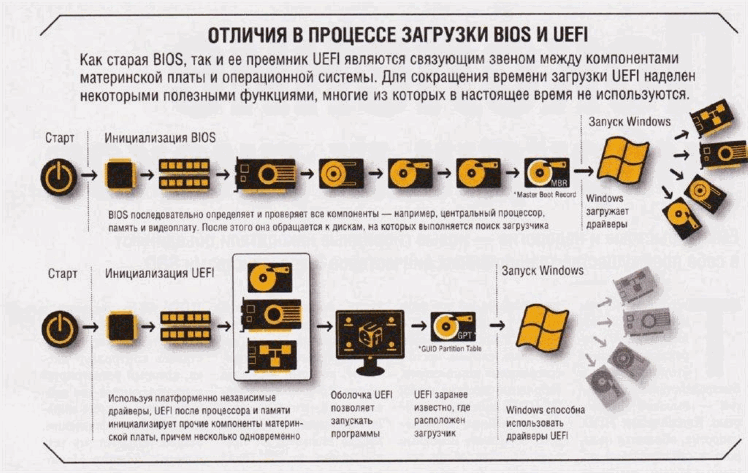
As soon as we turn on the computer, it immediately starts running a miniature operating system that we know as the BIOS. She is engaged in testing devices, memory, loading operating systems, allocating hardware resources. Many functions of this set of programs (their size is usually about 256-512 Kb) allow you to support old OS like MS-DOS, giving them many options. Since the days of the PC / AT-8086, BIOS has changed very little, and by the time the first Pentiums were launched, its development had almost stopped. Actually, there was nothing to change in it, except for a dual BIOS, support for network facilities and the possibility of flashing. But there are many disadvantages: the starting entrance to real mode processor, 16-bit addressing and 1 MB of available memory, the inability to have a "repair" console. And of course, eternal problem support hard drives... Even now, drives up to 2.2 TB are guaranteed to be supported, no more.
Back in 2005, Intel decided to change the BIOS to EFI / UEFI (Unified Extensible Firmware Interface). The EFI system is a more advanced base operating system. On some Unix platforms and Windows UEFI has been working for a long time, but the massive transition has not yet taken place, despite good intentions. And they are as follows:
- The presence of the notorious console for repairing system parameters and installing the OS;
- The EFI section makes it possible to perform some actions without loading the OS (watching movies, starting music);
- Internet access and therefore availability installed drivers network, TCP / IP stack, etc.);
- The presence of a graphics mode and custom scripts;
- Support for giant disks;
- Storing UEFI on new format (GPT) partitions;
- Full support for all hardware from the start.
UEFI can use a general-purpose runtime machine like the JVM to use device-independent code, which opens up huge horizons for creating "bootable" software.
There is also criticism of this technology. In particular, its implementation can lead to cutting off new players from the operating system market: for this there is always some kind of technological loophole in the code. Like, for example, the inability to boot Windows 98 from modern BIOS. Worse, you have to forget about the millions of MS-DOS programs and other systems that relied on BIOS functions to operate. Perhaps they will still be emulated, but there are doubts about that. And among them there are probably important programs that there will be no one to rewrite. However, all these are solvable issues - at least due to virtual operating systems. But the fact that new types of viruses will appear is for sure, and we will be able to see it pretty soon.
Hello! Windows 8.1 does not boot on a laptop with UEFI BIOS and I can not do anything. When loading, an error appears on the File: \ EFI \ Microsoft \ Boot \ BCD screen ... I studied all the Internet articles on this topic, but in my case nothing helps.
What has been undertaken by me!
- Loaded from the installation Windows disk 8.1 and searched for the installed operating system with the command bootrec / RebuildBcd, an error occurred " Scanning installed systems Windows completed successfully. Total Windows systems detected: 0»
- Deleted partition (300 MB) encrypted (EFI) system partition containing all Windows 8.1 bootloader files with the command del vol then applied Automatic recovery boot, the system recreates this partition, but does not boot. Making this section active on the command line didn't help either.
- Also formatted the same partition (300 MB), Encrypted (EFI) with the command format fs = FAT3 and recreated it.
- Tried writing a new boot store for Windows 8.1 with the command bcdboot.exe C: \ Windows, where (C :) is the partition with the operating system installed Windows system 8.1 and I get an error againFailed to copy download files.
I entered commands that pass successfully, but Windows does not boot.
bootrec / FixMbr
bootrec / FixBoot
I don't know what else to do and how to restore the Windows 8.1 bootloader. Can you tell me?
Hello friends! My name is Vladimir and I will answer this question.
If your Windows 8.1 does not boot and you used all the available tools to restore the boot loader, then you can delete the responsible for booting the system: the encrypted (EFI) system partition 300 MB, as well as the MSR partition 128 MB and recreate them.
In Disk Management, you can only see encrypted (EFI) system partition 300 MB, MSR partition 128 MB visible only on the command line when entering a command"Lis par".

Note: If you have no experience, do not perform this operation unnecessarily, use first the other methods from section about. If you want to experiment on a working laptop, then do not start work without first creating backup of these sections, and it is best to create.
We will delete and recreate partitions:
1. Section (400 MB) containing environment Windows recovery 8.1 (you can completely get rid of this section and use, if necessary, the recovery environment located on bootable media with Win 8.1).
2. Section (300 MB) encrypted (EFI) system partition containing all Windows 8.1 boot loader files.
3. Service partition MSR (Microsoft System Reserved) 128 MB, required for partitioning GPT disks.

We boot the laptop from and in the initial window of the system installation press the keyboard shortcut Shift + F10,

a command prompt window opens, enter the commands:
diskpart
lis dis (lists physical disks).
sel dis 0 (select the laptop hard drive 931 GB, and the second drive 14 GB - bootable USB drive Windows 8.1).
lis par (showing all partitions of the selected disk, the first three partitions will be deleted).
sel par 1 (select the first section
del par override (delete the partition, to delete the ESP and MSR partition or the laptop OEM partition, you must specify the override parameter)
sel par 2
del par override
sel par 3
del par override
That's it, we have deleted all three hidden sections.


Now, if you select a disk and enter the lis par command, then we will see only two partitions on the laptop hard drive:
Section 4 - installed Windows 8.1
Section 5 is a hidden recovery partition with factory settings.

Create a re-encrypted (EFI) 300 MB system partition, as well as a 128 MB MSR partition
Enter the commands:
diskpart
lis dis (display a list of disks).
sel dis 0 (select laptop hard drive).
create par efi size = 300 (create an encrypted (EFI) system partition 300 MB).
format fs = fat32 (format it to FAT32 file system).
creat par msr size = 128 (create a 128 MB MSR partition)
System partition (system EFI section or ESP).
The computer must contain one system partition on the disk. On EFI and UEFI based systems, this partition is called the system partition EFI or ESP. This section is usually stored on the primary hard drive. The computer boots from the system partition. This partition has a minimum size of 100 MB and must be formatted using the FAT32 file format. This partition is controlled by the operating system and should not contain any other files, including Windows Recovery Environment tools. The standard configuration of disks in the GPT partition on a UEFI system is shown in Fig. 1.
Rice. 1 An example of configuring disk partitions on a PC with UEFI.
An EFI Partition (ESP) formatted in FAT32 is required for GPT partitioning on UEFI systems. The standard size for an EFI partition is 100 MB, but on 4K Native Extended Format disks (4KB sectors) it has been increased to 260 MB due to FAT32 limitations. PC makers can store some of their tools on this section, so its size varies by manufacturer.In GPT markup, the EFI partition performs one of the roles assigned to the System Reserved partition in the MBR markup. It contains the Boot Configuration Repository (BCD) and the files required to boot the operating system.
Basic n principles of construction and operation of a file system based on FAT-32.
1) Each element FAT tables(starting with the second) corresponds to a cluster in the data area with the same number.
2)Number initial cluster file indicated in catalog line defining the File. Thisroom is also a link per element of the FAT table, which contains room next file cluster,and is a link per element of the FAT table, which contains the number of the next cluster of the file etc.
3) A cluster is a continuous sequence of sectors (of a fixed size). This is the addressable "chunk" of the file.
4) FAT table element code may still determine free cluster, defective cluster and end-of-file sign.
5) File in the FAT section - this is a sequence of clustersspecified withdirectory lines and FAT table elements.
6) All operating systems can work with a FAT-32 partition (the main factor in using FAT-32 in ESP).
As a result high-level partition formatting, by writing system information to data blocks of a numberthe initial sectors of the partition is created logical drive (volume) file system FAT32 type, which consists of from three main areas( rice. 2) arranged in the following order:
- "spare" area (area of spare sectors);
- file allocation tables area (FAT1 and FAT2);
- file and directory area (data area).
Root directory is stored in the data area as a regular file and can be expanded as needed.
Updated: October 2013
Purpose: Windows 8, Windows 8.1, Windows Server 2008 R2, Windows Server 2012, Windows Server 2012 R2
This section describes how to set up disk partitions, including hard disk drives (HDD), solid state drives(SSD) and other BIOS-based Unified EFI (UEFI) computer drives.
In this section
Partition configurations
This section describes the default partition configuration and the recommended partition configuration.
Default configuration: Windows Recovery Environment Tools partition, System partition, MSR partition, and Windows partition
The default Windows installation configuration includes the Windows Recovery Environment Tools partition, the system partition, the MSR partition, and the Windows partition. This configuration is shown in following scheme... This configuration enables BitLocker Drive Encryption and stores the Windows Recovery Environment on a hidden system partition.
Using this configuration in a custom Windows installation you can add utility tools such as Windows BitLocker Drive Encryption and Windows Recovery Environment.
Recommended configuration: Windows Recovery Environment partition, system partition, MSR partition, Windows partition, and recovery image partition
The recommended configuration includes a Windows Recovery Environment partition, a system partition, an MSR partition, a Windows partition, and a recovery image partition. This configuration is shown in the following figure.
Windows Recovery Environment partition and system partition are added before adding Windows partition... The last to be added is the recovery image partition. This order of the partitions will help keep the system partition and the Windows Recovery Environment partition safe during actions such as deleting the partition containing the recovery image or resizing the Windows partition.
System and service partitions
By default, system partitions are not displayed in Explorer. This is done in order to prevent the user from accidentally making changes to the system partition.
 How to make money in Minecraft: creating maps, hosting a server and selling resources Creating a Minecraft server
 How to set up Skype on Android How to use the mobile version of Skype
 The basics of programming for beginners - where to start learning, the best courses and lessons What you need to study as a programmer
 Skilled sailor Able Seaman What is 1 point in degrees
 How to change a cartridge in a printer: step by step instructions
 About microcontrollers for beginners - the history of creation, the main types and differences What is the difference between a microprocessor and a microcontroller
 Personal information space of the teacher (from work experience) IV