How to download to internal memory. Instructions for transferring programs from the internal memory of an Android device to a removable memory card. Using third-party programs
Probably, each of us faced the problem of lack of memory or simply wanted to transfer applications to a USB flash drive, since the memory was already full, and games and applications could not be transferred to MicroSD and annoyed by the notification "Not enough memory on the device, some functions may be limited."
Even if I uninstalled many applications and games, there was still not enough memory. But how to increase memory without losing everything? Later in this article we will look at and find out how to solve this problem.
Immediately I want to warn you that neither I nor the site administration are responsible for your actions. You do everything at your own peril and risk.
P.S The article uses the most simplified words for better understanding.
To continue, you will need:
- MicroSD Card with a class of at least 6 (preferably 10 class) and a size of more than 4 GB
- (To create a second section)
- (For transferring apps and games)
- (For transferring games with cache)
To increase memory, we will have to transfer your applications to the so-called second section of the MicroSD card (needed for transfer), and we will create it ourselves. If you already have a second section on your map, you can skip this item.
Creating a second microSD partition
1. Save all files on another medium (For example, on a computer)2. Disconnect the MicroSD card along the path "Settings / Memory / Disable memory card"

3. If you have ROOT rights, install, if not -

4. After starting, double-click on the "+"  5. Select “Ext4” in Part 2. If you have Android 2.2-2.3 device, select "Ext 3"
 6. In Part 2, select the size, how much you want to allocate memory in MB from the card for applications and games (The more the better)
  7. Look at the first graph with a white bar, with the amount of memory remaining and enter these numbers in Part 1
 8. Check if you did everything right. If everything is correct, click on the menu button or on the so-called "three dots in the corner", and click on "Apply changes"
  Everything, the most difficult thing is over, you can reconnect the memory card (Settings / Memory / Connect the memory card), transfer files back to the USB flash drive, but before that you can notice that the size of the memory card has decreased. This is as it should be, because we have created the second section.
Setting up the transfer to the second section
We need to install the program (Google Play)
After installation, open the app. You should see a window like this. Select "Ext 4" or "Ext 3" for Android 2.2-2.3 and click on "OK".


After rebooting, open the app. You should see a list of applications.

We will now look at what can be migrated and what is best not to migrate.
Let's just say that system applications should never be transferred. You never know what will happen. Therefore, it is better to transfer custom applications (Those that you installed yourself). I do not advise you to transfer those applications that you actively use (for example, Browser or WhatsApp there, and the like).
And to make it more convenient, the application has sorting. To do this, you need to click on "Even three stripes" and select "Custom".


A list of your applications should appear in front of you. Now you can select those applications that you want to move to the second section and send them there. Click on "Three Dots", then on "Several", select the applications to transfer and click on "Send".


A few minutes of waiting and you're done! You have more memory, and you can still download games and applications and transfer them. If you dig into the Link2SD settings, you can enable auto-link. This is a function that automatically transfers the application to the second section of the map, thereby making your life easier.

Also in the settings you can change themes, buy the Pro version and so on. But now is not about that. In general, we figured out the main problem. But, I want to tell you, Link2SD does not transfer game cache (Game cache is .obb files along the path Android / obb / "game package name"). So what should we do? Let's talk further.
Transferring game cache and data to a microSD card
Cash games can be transferred using an excellent program called. I must say right away that the cache is transferred to the flash drive itself, and not to the second partition.
Open the application, and swipe from the left edge of the screen to the right edge (Swipe) and click on "Application Analyzer"


The internal storage on your device may not be enough for all the applications you need. Modern programs and especially games can be very voluminous. This problem can be solved by moving them to an SD card.
But there are also pitfalls. Cards are slower than internal memory. Therefore, games and other resource-intensive applications may slow down after the transfer. To reduce the loss of performance, preferably with a minimum speed of 10 MB / s. The higher the better.
In addition, the moved applications will stop working as soon as you remove the memory card. And when you put it back in, it is possible that some of them will start to glitch and give errors.
So apps are worth moving around if you're willing to sacrifice speed and stability for free space.
Can you transfer applications to a memory card
It is important to understand that not all devices provide this opportunity. There is no list of models that support transfer. To find out if your device belongs to them, you just need to try moving applications to the map. This process is reversible and uncomplicated.
Also, even if yours allows you to migrate, you won't be able to do it with all applications. Some games and programs allow only part of their data to be moved to the map, and many do not support transfer at all.
How to move apps to SD card
Although the process of moving games and programs on different firmwares is slightly different, the procedure is similar everywhere. This generalized instruction should be suitable for everyone.
Manually
First, make sure the memory card is inserted into the machine. Then open Android settings and select the "Applications" section. In the list of games and programs, click on the one that you want to transfer to the map.
When the menu of the selected application appears on the screen, find the navigation button and use it. After transferring in the same menu, it will be possible to return the application back to the internal memory.
If the button is missing or not pressed, the program may not support navigation. Repeat these steps for other games and applications. If you fail to transfer anything, it is likely that this feature is not available on your device.
Automatically
Some devices running Android 6 or later allow the card to be used as part of the internal memory. This option makes it possible to transfer all applications at once.
To make the card work as part of the internal storage, go to the settings and open the section dedicated to memory management. Find the SD card menu in it. Use the "Format" command, select the "As internal storage" option and follow the system prompts. If this option is not available, this option is not available on your device.
Formatting will erase all data from the card. After that, it cannot be used on other devices until you format it again.
Then confirm the transfer of applications to the card. From this moment on, the device will begin to perceive it as part of the internal storage, transfer old applications and install new ones on the card.
To return the program back to the device memory, you need to use the "Format" command again by selecting the "As portable storage" option. Before formatting, the system will offer to transfer applications to internal memory.
Using third-party programs
If your device does not support any of the listed methods, but is unlocked on it, you can try to transfer applications using third-party programs. For these purposes, there are, for example, the Link2SD and App2SD utilities. But even their creators do not guarantee the performance and stability of this method. So be careful.
ATTENTION: starting with android 4.4 and higher, Google disabled the built-in function to transfer data to a memory card, and only some manufacturers integrate it on their own and not all applications can be transferred - therefore, if you do not have a transfer button, you can go directly to the third section.
All applications that we install on our smartphone on Samsung Galaxy, Lenovo, Xiaomi, Alcatel, Meizu, Asus Zenfon, Nokia, Huawei, Sony Xperia, Prestige, Irbis tablet and so on, go to non-removable internal memory.
Unfortunately, with the increase in the number of installed applications, photos, music, videos, and programs, our device begins to suffer from a lack of free space for additional files - especially the cheap models.
For this, android has a very useful function to transfer the data of individual applications to external storage - a micro SD card.
If your smartphone or tablet has a slot for a memory card, then you can easily transfer most of your applications, photos, music, videos to the memory card and in this way free up space in the phone's memory.
To do this, you can use one of the three methods provided below: built-in means, through a computer (laptop) or using an external program that is not included in the built-in set.
The method using the program is the most effective, since the built-in function is increasingly being removed by hardware manufacturers xiaomi, redmi, lg, zte, redmi 4x, htc, asus, huawei, samsung, meizu, lenovo, lg, samsung, fly, alcatel, redmi, sony xperia , prestigio and you won't find it on most even the best modern smartphones.
NOTE: depending on the version of android, for example, android 6.0, android 7, android 5.1, android 4.4 and so on, there are also nuances when moving files from the phone to the sd memory card.
By the way, there is another way. It is even more efficient, as the tricks described below do not always work.
The first way to transfer data from android phone internal memory to sd card is built-in tools
Android has a feature that allows you to move your app to the map. Just go to Settings> Application Manager.
Here it should be noted right away that, for example, in my Samsung Galaxy with android 6 the "Application Manager" function was, and when it was updated to android 7.0, it disappeared. A good optimization has appeared instead.
If you have an application manager, you can see the games and programs installed on the SD card, as well as those that can be transferred.
Therefore, then tap the application that interests you, and then in the new window find the item "Transfer to SD card" - click on the button.

After a while, the application will be moved.
The second way to transfer data from android phone internal memory to sd card is through computer

This method works well for moving multimedia files such as photos, movies, songs, pictures (and more).
With a computer, you have the ability to quickly transfer music, video and other data to your SD card using a USB cable (set it as a USB stick).
When browsing the contents of a smartphone, you can see two separate media: internal memory and external sit card.
For convenience, you can use the Apowersoft Phone Manager program. If you do not have a computer, you can use the File Manager program, which you must first install yourself on your android phone.
The third way to transfer data from android phone internal memory to sd card is with apps
If you want to transfer applications and games to your memory card, you can find programs in the Google Play store that will quickly do this process. I recommend using AppMgr III (known as App 2 SD).
Download it. However, not all applications installed in the smartphone's memory can be transferred to the memory card. Pre-installed in the system, usually cannot be moved.
After launching AppMgr III, you will see which you can transfer. With AppMgr III, you can quickly transfer everything to your memory card at once, rather than one at a time.

To do this, press and hold your finger a little so that it appears in a red wrapper, and then select "Move All". You can also check the list of installed applications and files that you want to transfer to the memory card.
Which applications can be transferred to the memory card and which are not recommended or not

Can all applications be transferred to a memory card? No, everything is impossible. Why can't you transfer everything? Therefore, it is not provided for by the android system, the phone manufacturer or the author of the application.
You cannot transfer whatsapp (whatsapp), facebook to an SD memory card - if it was built initially, updates, play market, youtube, firmware and others are initially built-in.
Some smartphone owners want to transfer the cache, especially from the game - this is available using the program - "FolderMount".
You can also easily transfer maps: from Yandex navigator, navitel (even recommended from navitel), garmin, cityguide, google maps.
Sometimes they ask me how to transfer viber and the VK application to a sd flash card. It depends on the smartphone and android version. Sometimes the system allows sometimes not.
A lot of information that cannot be transferred through the programs and built-in tools of the smartphone can be moved using a computer, for example, a folder, song, pictures, downloads, arch, various audio, SMS messages, a gallery - more precisely its contents, pictures of a vibe and so on. Good luck.
The memory on smartphones is non-rubber, despite the huge amount of information that many of us store on them. That is why some manufacturers to this day do not give up the possibility of expanding the built-in memory using microSD cards.
The current flagships support cards up to two terabytes, which greatly increases the internal reserves of smartphones. However, this does not solve another problem - all applications are automatically installed into the internal memory, and its amount cannot be expanded. In this regard, we decided to write an article on how to make sure that everything is saved to a memory card. It offers several ways for owners of different devices at once - from budget models, which have 4-8 GB built in, and ending with flagships on the latest versions of the Android operating system.
We save applications to a memory card using standard means
In most modern smartphones, the procedure for transferring applications (games and programs) can be done with a few taps. Unfortunately, there is no way to activate their automatic installation on MicroSD. Therefore, we will have to be content with manual transfer. So, for this you must follow these steps:- Go to the "Settings" menu;
- We find there the item "Applications". In some sections, it may be referred to as "Application Manager";
- We select the application we need there. In our case - the game "CSR Racing";
- The information in the window is updated. Now you need to tap on the "Move to SD card" button;
- After a few seconds, the label on the button will change to "Transfer to device", which tells us about the successful transfer of the application and freeing up the internal memory.
We use Clean Master to transfer data to a memory card
As noted above, this method is analogous to the previous version of transferring to an SD card. We suggest that you immediately start reviewing the instructions:Ready! The memory on the device itself is freed. By the way, if we compare the two methods already presented, then we advise you to choose the second one - using the Clean Master application. So you will spend significantly less time due to the fact that you can select several games and programs at once.
We connect the memory card with the internal memory
In Android 6.0+, a way to expand the memory using an SD card has become available. True, we want to warn you right away, it works only on some devices - not all manufacturers have implemented this function in their shell. So let's get started:
It is also worth noting that not all SD cards are suitable for this kind of operation. It is important that the external memory card belongs to the 10th class and corresponds to the declared read and write speeds.
Swap the internal memory of Android with a memory card (Root required)
Another well-known method, most used on devices with a small amount of internal memory, is to replace the internal memory with an SD card. You should already be rooted and installed the Root Explorer application. You should follow these steps:
Ready! From now on, everything you download will be automatically installed on the SD card. As you can see, there are a fairly large number of ways to make everything saved to a memory card, you only need to choose one of them, depending on which OS version you have installed, what exactly you want to get and whether the device has Root.
Instructions for transferring programs from the internal memory of an Android device to a removable memory card.
Usually, a memory card in a tablet or phone has one partition with the FAT or FAT32 file system. In order to be able to move and then run the program from the memory card, the card must contain two sections. One of them will be used as usual for storing data, and the other will be used for programs moved to the card.
Important! It is the second of the sections that will be used to move programs to it. This must be taken into account for further work.
V Android version 2.2 and higher, the ability to transfer applications to a memory card is already available in the system, but for those who have a tablet or phone with an earlier version Android, and there is no possibility or desire to update the firmware, there is nothing left but to use third-party applications.
So, to transfer the programs already installed to the internal memory, we need two programs to the memory card. A program for creating and deleting partitions of the file system, and a program for transferring programs to a memory card.
Preparing the map
Let's start with the first program. There are many programs that allow
manage partitions on physical data carriers, but we will stop, probably, on the simplest and most convenient of them. This program .
You can download it at the following link: download
The program works with operating systems Windows 2000 / XP / Vista, and Windows 7.
To work, we need two things - the program itself and the card reader.
Getting started with the program MiniTool Partition Wizard Home Edition.
Attention! Before working with the program MiniTool Partition Wizard Home Edition, save everything that is written on the memory card, since all data on the card during the work with the program will be destroyed.
1. Download and install the program. We take out the memory card from the device and insert it into the card reader. Windows will detect the new drive and display it as a "removable drive". 2. We delete the partitions on the memory card. To do this, run the program. All disks that are currently connected to the computer will be displayed in the lower part of the program window. This is a hard drive, a USB flash drive, if connected, and our SD card.
The picture shows an example. We see two hard drives, 465 and 74 gigabytes in size, and a 3.8 gigabyte SD card with two partitions on it:
Right-click on each of the sections, and select the option " delete"- delete the section.
Before this step, you should make sure that you select partitions on the memory card, and not on the hard drive or other disk!
1. Create a section for your data. To do this, right-click on the free space of the memory card, and select the option “ create».

2. In the window that opens, in the drop-down menu " Create As:"Choose" Primary", And in the menu" File System:"Choose the type of file system FAT if the partition is less than 2 gigabytes in size. If you want to create a partition larger than 2 gigabytes, select the file system type FAT32... Using the slider, set the size of the section and click " OK».
3. We create a section for programs that we will transfer to the memory card. To do this, again right-click on the free space of the memory card, and select the option “ create". In the drop-down menu “ Create As:"Choose" Primary", And in the menu" File System:»Choose FAT32 as a file system. Again, using the slider, set the size of the section and click " OK».
4. We apply all the changes we made. To do this, click in the upper left corner of the program window button " Apply". After that, the program will create and format the partitions.
Important! Program MiniTool Partition Wizard Home Edition does not make any changes on the memory card until you press " Apply". Up to this point, you can cancel operations using the " Undo", Or completely reject all changes by clicking" Discard »
Now that the card is ready, you can install it on your tablet or phone and start the very process of transferring programs to it.
Transfer of programs.
To do this, we need to download and install the program on a tablet or phone. Link2SD.
Program download link: Link2SD market.android.com
Attention! To work with the program you need Root rights. How to get the rights Root on your tablet, described in the corresponding thread of our forum.
When you turn on the phone or tablet, the program mounts the second partition on the memory card and makes it available to the operating system.
It is very easy to work with the program. After the first launch of the program, a window for selecting the type of file system on the second section of the memory card will appear. Select the type of section that you created in the first part of our instructions. Then a window will appear about granting the Root program rights, and they should be given to it. After that, the program will create a mount point for the second section of the map in the system, and ask you to restart your phone or tablet.
After restarting the tablet, you can start transferring applications from the internal memory to the card.
1. Run the program Link2SD... A list of installed applications is displayed on the tablet screen.

2. Select the program to be transferred to the card. In the window that opens, click " Create Link»
3. The following window will open. If we want to transfer temporary files (cache) to the card, put a tick in front of “ Link davlik-cache file too"And click" OK»

4. The program will "think" for a while, and in case of successful transfer of the application, it will display the message " application linked to SD card.»

5. Click " OK", We exit Link2SD, and now we can run the moved program.
Applications already moved to the memory card in the Link2SD program list contain a corresponding mark.

Questions and answers:
-Can all programs be transferred to a memory card?
No, some programs can only work correctly when installed in the internal memory of the device.
-Can I cancel the transfer of the program and return it to the internal memory of the device?
Yes, you just need to select it in the list and click " Remove Link»
-What happens if I update a program that has been moved to the map?
When updating a moved program, the application file itself and data files will first be saved in the internal memory of the device, and then the program Link2SD will automatically transfer them to the memory card in the background. No manual required move the updated app.
-How much space does the program take in the RAM of the device during daily use?
The program starts only the process of mounting partitions on the memory card, and itself is not in the device's memory during normal use.
Some remarks.
Program Link2SD itself determines applications that have been moved by means of the Android operating system itself (in versions Android 2.2 and higher)
System applications cannot be transferred to a memory card. Program Link2SD will not give you this opportunity.
When you connect your device to your computer, the OS Android will unmount the first FAT the file system partition of the memory card. However, the second partition will remain mounted, and you can run programs from it.
Program Link2SD does not move the program folder itself from the internal memory, only the program and cache files themselves are transferred.
Normal 0 false false false RU X-NONE X-NONE MicrosoftInternetExplorer4 MiniTool Partition Wizard Home Edition
 How to update iPad: instructions
 How Do Not Disturb mode works on iPhone
 Nokia 3310 when it came out. How they find us
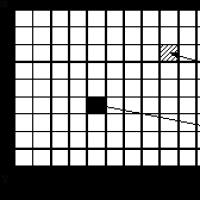 History of computer graphics in Russia 1 history of development of computer graphics
 Complete order: How to organize icons on a smartphone Complete order: How to organize icons on a smartphone
 Xiaomi Huami Amazfit Bip is the best smartwatch without any but even if
 What is Jailbreak and what is it for?