How to install the xp operating system. Reinstall Windows Xp for Dummies. Operating system releases
A fairly convenient option when loading Windows XP on a device is to use a special flash drive. The WinToFlash program will help you here. When it starts up for the first time, you must agree with the user agreement and click OK. Next, the main application window is displayed, which looks like this.
Since the program has been fully translated into Russian, the process of working with it is greatly simplified. For creating bootable flash drive you must use a wizard. It assumes support at all stages. this process... There is another approach to the implementation of the task. To do this, open the "Advanced Mode" tab and click on "Transfer Windows XP Setup to a Drive". Select the appropriate drive if not specified. After that, the button "Create" is pressed.

Now you need to set the location Windows files XP. There are various options - they can be located on a hard disk, CD or as an image. The last point deserves a separate consideration. In the presence of ISO image, you should open it with any archiver followed by unpacking. 
The next step is to specify which USB flash drive should become bootable. Be sure to consider the fact that this will entail the deletion of all data without the possibility of their recovery in the future. It is recommended that you save important information to the HDD... The conversion process itself takes some time and you just need to wait.
As you can see from the written manual, creating a bootable Windows flash drives XP using WinToFlash presents no problem. The application provides two main modes of performing this task. The wizard accompanies the user and is the classic approach. Advanced mode allows you to set certain parameters... For example, this can include the choice of the type of bootloader, specify the correction of some errors, and more. If this does not tell you anything, but you do not need to use the extended mode.
You can download the program on the official website of the developer //wintoflash.com/home/ru/
Creating a bootable USB drive using - WinSetupFromUSB
It is quite popular when creating bootable flash drives WinSetupFromUSB program... It is freeware and offers a simple process for getting things done. This application provides the ability to use for a wide range of purposes. 
The process should be considered in more detail:
- The USB flash drive must be inserted into USB port device and run the program.
- It is required to indicate the path to the flash drive. If it is the only connected storage device, it will already be set by default. When the location is specified, Bootice is pressed.
- A special Bootice window is displayed, where you need to click "Perform format". There will be several items to choose from, among which you need to specify USB-HDD mode (Single Partition). A formatting message is displayed and must be confirmed. As in the previous case, it is recommended to save all important references beforehand.
- When the formatting is finished, you need to click "Process MBR", where you select the item "GRuB for DOS" and click the "Install / Config" button. When the process completes, Bootice can be closed.
- Now you need to specify where the files of the Windows XP operating system will be taken from. As with the previous method, there are several approaches, but the principle of operation remains the same. When the location is specified, the "Go" button is pressed and waits until the task is completed.
The main advantage of WinSetupFromUSB is its in-depth approach that allows for a lot of functionality. The program is great for advanced users.
Preparing the hard drive during Windows XP installation
Before you begin the process of installing Windows XP on your computer's hard drive, you need to prepare it. It should be understood that installing multiple operating systems on one logical disk is impossible, since in this case none of the systems will be able to work correctly. Therefore, before starting the installation, it is necessary to format the HDD partition on which we will install.
We start from the previously created bootable USB flash drive, 
After that, the monitor will display the message “ Installing Windows XP Professional ". During this time, the process of loading the drivers that are necessary for the OS installation program to work occurs. 
After that, a window appears, which offers to choose one of several options for continuing work. We need to start installing Windows XP, so press the Enter key and agree with the first point.

We read the license agreement from Microsoft and agree with it by pressing the F8 key. 
After that, we see a window in which we are asked to restore the previous version of Windows. You will see this message only if one of the versions of Windows XP is already installed on your computer. In any case, we recommend not performing a system restore, but proceeding with the installation new version, since only this option is able to solve all problems and ensure stable and reliable operation of the computer. To do this, press the Esc key. 
The installer now shows us a list of logical partitions on the hard drive. It is recommended to install a new Windows versions XP to the same partition where it was previously installed old version, as a rule, this is drive C. Select this section and press the Enter key. 
Now we have to choose the type of file system that will be created on the logical disk after formatting. For modern computers in most cases, the NTFS file system is best suited, so select the "Format partition in NTFS system" item and press the Enter key. 
After that, the installation program will show a window with a warning that all information from this partition hard the drive will be deleted during formatting. If all important information you moved it to other sections in advance - feel free to press the F key.
The formatting process begins, which may take quite a long time, depending on the size logical drive. 
Once the formatting process is complete, the installer will automatically begin copying the Windows XP files to your computer. 
After that, it will be executed automatic reboot computer. The system will boot from hard disk computer and the Windows XP installation process starts in graphical mode.
Windows XP installation process - main step
This section will directly answer the question "How to install Windows XP". This information is absolutely identical both for the process of installing Windows XP from a CD, and for installing Windows XP from a USB flash drive on a laptop. Stages "Collecting information", " Dynamic update"And" Preparing for installation "occur without our participation. After that, we are asked to configure the language, regional standards for displaying numbers and currencies. To do this, click on the "Configure" button in the "Location" section. In the drop-down menu, select your country and click OK. After that, again click on the "Configure" button, but this time in the "Language" section. In the first drop-down menu, we can select the language that will be used by default when the computer boots. Below you can add input languages by clicking on the "Add" button (by default, two languages are available, Russian and English). If you click on the "Keyboard Options" button, we will get to the menu, in which you can set the key to disable the mode Caps lock and also change the keyboard shortcut to switch keyboard layouts. Finishing language settings click "Next" and go to the next window. 
Here we are asked to enter our own name and the name of the organization. Enter absolutely any data and click "Next". 
Now you need to enter the 25-digit license key to your copy of Windows. This key is located on the box if you are using licensed copy... In the case of pirated products, it must be in text file... Introduce given key, check the correctness of the entry and click the "Next" button.

After that, a window appears for setting the computer name and password of a user with administrator rights. In case of work on home computer, you yourself choose a name that will later be assigned to your PC in your home network. If you are working on a corporate computer, check it with your network administrator. Remember or write down the administrator password that you set in the same window, as it will be required every time you start Windows. 
In the next window, we are given the opportunity to customize the date and time. We choose desired settings and click "Next".

After that, go to the "Network Settings" window. It is best to skip the local network setup at this stage and perform it later, after the installation is complete. To do this, select the item "Typical parameters" and click the "Next" button. 
We leave the working group unchanged "WORKGROUP" and click on. 
After that, copying starts. system files to your computer hard drive. Wait for the installation process to complete, after which the first Windows startup XP. If at this time starts automatic setting monitor - wait for it to end and click OK. 
In this window, left-click on "OK" 
After that we will see an animated window Windows greetings XP. 
After that, a window appears with a request to turn on the automatic Windows updates... From experience, it should be noted that it is better automatic update leave disabled. And update the system manually.

Next, we will be asked to configure the Internet connection and activate a copy of the OS. This step can be skipped for now. 
Are you ready to register with Microsoft? To this question we answer "No, some other time" and click on.

The next window prompts you to enter the name of your account, as well as the names of other users who will also work on this computer. notice, that Accounts with the names Administrator and Guest were created during the installation of the OS. 
This completes the installation of Windows XP, click the "Finish" button and enjoy a clean operating system.

Everybody has to install or reinstall Windows XP for the first time. Many are afraid to do it on their own and entrust the installation to specialists, although even a novice user can easily cope with this procedure.
Actually, the process of installing any version of Windows is initially developed by Microsoft specialists in such a way that even a beginner can handle it. After reading this article, you will learn how to do this and understand that installing Windows is not difficult.
* Preparing to install Windows XP
If you want to install or reinstall Windows XP on a not new computer - transfer from the system partition (Usually C) all the files that you want to keep to other partitions of the hard disk. This does not apply to programs, they still have to be reinstalled.
It is advisable to have disks with drivers from:
- motherboard
- video cards
- other devices
 Basically, Windows has its own driver library that it uses during installation, but there is no guarantee that everything you need will be found. Although you can always find the missing driver on the Internet. If you are reinstalling an already working system, make a backup of the installed drivers and save it on any partition except the system one.
Programs such as Double Driver and others like her. It is very easy to find a description of the process and download the program via Google.
Of course, you must have a disk with the operating system itself. If you downloaded the image installation disk on the Internet - burn it to disk.
* Install Windows XP
Windows XP disk load into the drive (floppy drive). Now we need to put in BIOS boot from this disk.
To do this, we reboot the computer and at the very beginning of the boot we begin to press the DEL key (for laptops, the F2 key) over and over again until we get into the BIOS. Then we will need to find the tab responsible for setting the priority of the download.
In different BIOS versions this tab may have different names. One of the most common options is as follows: Find the "Boot" tab on top (move with the arrows on the keyboard), go to it (press Enter) and set with the arrows or +/- keys to the top position - "CD / DVD Drivers" (now there is "Hard Disk Drivers "). For more information, see the video at the end of the article.

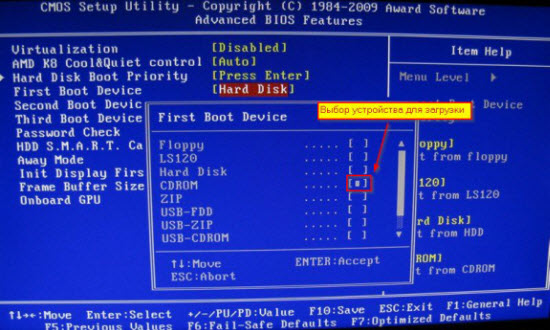
One more BIOS option: find the tab "Adwanced Bios Features"And go into it (Enter)

Next, we are interested in a parameter that indicates to the system from what it should be loaded in the first place. By default, this line is "Hard Disk" (or HDD - hard disk). Again, select it with the arrows, press Enter, select "CDROM" from the list that appears (instruct the system to use the CD drive to boot), press "Enter", press F10 (save changes) and again "Enter".
V different versions BIOS names of tabs and parameters may differ slightly (for example, instead of CDROM there may be a DVD, etc.), but the meaning of the actions is now clear to you and you can always figure it out. You can go into the BIOS in advance for review before reinstalling the system and find all the necessary parameters so that you do not look for anything later.
After pressing the last "Enter", the system goes to reboot and starts to boot from the Windows XP disk, which we previously inserted into the drive. This will be evidenced by the following screen:

We press any key, even a space bar, and the installation begins.

The Windows XP setup program starts. We are offered a choice of one of three actions and the keys that correspond to them are indicated. Since we want to install Windows XP, we press "Enter", respectively.

A license agreement appears, which usually no one reads. We press "F8" to continue (by the way, all the keys that you can use for actions are displayed in the tips that you see in front of you and at the very bottom).
On next step we are asked to select the partition of the hard disk into which the operating system will be installed. Usually this is section C. Select it with the arrows on the keyboard and press "Enter".
If you are installing Windows XP on new computer, then your hard disk has not yet been divided into partitions and it's time to create them. As it is written in the tips, to create a partition, you need to press "C" on the keyboard and select the size of the future partition in megabytes.
Let's say if you want to allocate 50 GB for the system partition - this is 51200 megabytes. The section has been created. Press "C" again and create the next section. At a minimum, it is enough to divide the hard disk into two partitions: partition C for the operating system and programs, with a capacity of 50 GB, and one more partition for everything else (for all the remaining free space).
However, we cut as many sections as you need. After creating the partitions, select the one into which we will install Windows XP, and press "Enter".
In the next window, we are asked to format this section. We choose exactly the option that is shown in the picture below and no other. We press "Enter".

Most likely, no drivers will be needed, since in assemblies from the Web, often everything is already included. After that, do not forget to enter BIOS again when rebooting and change the first boot device from CDROM back to HARD DISK (HDD).

Those who install the licensed version, or an assembly without automatic installation and activation, you have to go through a few more steps. The first is regional settings. Here you can configure the language and regional standards for your country. The default is "Russian". Click "Next".

Then there will be a window for entering the name and organization, you can enter any, it does not matter. In the next window you will need to enter the key Windows activation XP. If the license - look on the box from the OS. Either buy online or find elsewhere. Enter the key - "Next".
Then we enter the computer name (any) and the password (remember). Next, we set up the time and date for ourselves. If a window appears with configuring network parameters - just click "Next". That's all. Windows is installed. Do not forget to reboot and change the first boot device in the BIOS to HDD.
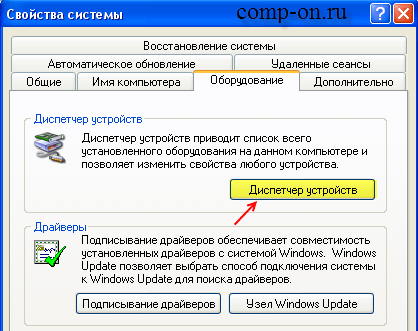
After starting the freshly installed operating system, go to the device manager: "My Computer" - "View system information" - "Hardware" - "Device Manager".


We look at devices marked with yellow question marks as having no drivers. Install drivers on them. If it does not work automatically, we look for drivers on the Internet by name or device code and update it manually.

By double-clicking on any device, we get a window with all the information about it. On the Driver tab, information on installed driver, on the "Details" tab you can find out the device code.

On this topic, the installation of Windows XP is complete. If after installing the operating system and everything necessary software you will make a copy of the system partition with the Acronis program, you will always have at hand an image of a fresh working operating system without bugs and everything else, which you can deploy at any time.
Windows XP installation video
Reinstalling the Windows system for many users remains something mysterious and unknown, when in fact it is easy and quick. If you decide to switch to Windows system XP and perform the installation yourself, then this article will help you cope with all the difficulties and answer many questions.
What to do before installing Windows XP
During installation, files on Local disk C will be formatted. Optionally, you can delete all the contents of the computer, cleaning it completely, however, if you dear photos and programs, it is better not to do this.
If your file system is divided into several disks, transfer important data from drive C to any other. After reinstallation, you will lose your photos, music, programs installed on the C drive.
Capturing Windows XP Image
The system is installed from any storage medium: optical disk, usb media, flash drive. If you do not have an operating system disk, you will have to create one yourself. For this, programs for creating and recording images are suitable:
- Daemon tools;
- Ultra Iso;
- Alcohol.
It is more convenient to use Daemon Tools, since it is distributed free of charge on the official website: https://www.daemon-tools.cc/rus/products
Go in and download the product.
For complete instructions on recording images, see the article
- Install the program following the instructions of the installer;
- Go to the section for recording the image;
- Insert the disc into your computer;
- Select media and start recording.


Installing Windows XP
When you have a disk with an operating system or a flash drive in your hands, you have saved the most important files- it's time to start installing.
- Go to BIOS. To do this, you need to reboot the system by clicking on a special button when turning it on. Most often, this is F7 or F12. Pressing the correct button will take you to the BIOS menu. Be careful, as you need to have time to press the button before the boot splash screen appears.
- BIOS is different, it all depends on its version. Most often, it is designed as tabs. You need to find the “Boot” tab.
- In it you will find the item “Boot Device Priority”. This section configures the primary media from which the system will boot. Default loading in progress from the hard disk, but during installation this priority needs to be changed to yours optical disc or a USB flash drive.


- Now select the primary medium with the “+ -” keys. With the help of the screenshot below, you can easily understand how a memory card is translated and how a CD is translated. Your media should be on the “1st Boot Device” line.
- Remember the sequence of devices that was originally installed.


- Now all that remains is to click on install and wait for the system to install. It will take up to an hour, during the process the computer may restart itself several times.
- Once the installation is complete, you will receive a complete new system Windows XP.

Things to do after installing Windows XP
This is not the end of the procedure. First of all, you need to go to BIOS again and set the boot priority to the one that was originally.
- Then download the drivers.
- If you do not have a driver disk, then use this trick:
- Go to the control panel from the Start menu.
- Find the Hardware and Sound tab.


- In this section, click on the "Task Manager" item.

- Now you can see all the devices on your computer. Right-click on them and select "Update Drivers".
As you can see, reinstalling the operating system is not that difficult.


Most often, on the Internet, you can find instructions on how you can install Windows 7, 8 or 10 with a second system when Windows XP is already installed on the computer. It is relative easy task, which even an inexperienced user can cope with, since a newer operating system always keeps the bootloader of the old one and automatically creates a menu in which the user can choose which system to boot - the new or the previous one when booting. In this article, we will consider the opposite situation - when Windows 7, 8, 10 is installed on the computer, and the user wants to install Windows XP in parallel. The piquancy of the situation is that after installing Windows XP, the previously installed Windows 10/8/7 will stop loading and its bootloader will have to be restored.
Installing Windows XP with a second system after Windows 7 / 8.1 / 10
If you have a stationary computer, then it would be even better to use an SSD for modern Windows 7 / 8.1, and a classic hard drive for XP. In this case, you can temporarily disable the SSD with Windows 7-10 so that you do not accidentally erase anything from it, calmly install XP and then proceed to configure the boot sequence.
METHOD 1. Installing Windows XP with a connected hard disk with Windows 7 / 8.1 / 10 or installing Windows XP on another partition of one physical disk
This is a common situation faced by most users. In addition, this method is suitable for inexperienced users who have several physical drives, but do not want or cannot disconnect the hard drive with Windows 7 / 8.1.
Attention! This method not suitable for SSD. If you want to install XP and 7 / 8.1 on solid state drive, you will need to first prepare the disk for XP using the Alignment Tool, then install XP, and only then you can install Windows 7 / 8.1.
Step 1 Prepare the partition for the second operating system.
Create a partition on your hard disk where you will later install XP. If you need to partition your disk or reallocate space between existing chapters, use free program MiniTool Partition Wizard Home (Download from the official website).
Important! Prepare Sections ONLY on Windows 7 / 8.1 / 10 BEFORE installing XP! We strongly advise you NOT to partition the disk in the XP installer! All you have to do in the XP installer regarding partitions is to select the desired partition and execute it. quick format!
Let's say you have three partitions on your disk:
- Bootable (100MB for Windows 7 or 350MB for Windows 8/10)
- System, where Windows 7 / 8. / 10 is installed.
For Windows XP, you create a fourth partition. Where it will be located and from which section to cut off the area is up to you. Of course, it is more logical to arrange the sections like this:
- Bootable
- System, where Windows 7/8 / 8.1 is installed.
- Section for installing Windows XP
- User data disk.
Although you will format the partition in Windows XP Setup, you can format it in Windows 7/8/10 so that you can set the label. And the label will help you not to make the wrong choice desired section in the XP installer.
Step 2 Install Windows XP
Boot from the installation CD or bootable USB stick and install Windows XP on the prepared partition. Be extremely careful when choosing a section. Be guided by its size.
Select a section and click Enter:

Select item Format partition in NTFS system (fast):

The subsequent steps for installing Windows XP do not differ from the usual installation of it as the only operating system.
After the installation is complete, download XP and install any required device drivers. Set up your network and internet (if needed).
Step 3 Restore the bootloader of the first operating system and add an entry for the second system of the previous generation to it
A. Preparatory stage. Downloading auxiliary software
Click on Register at the bottom of the page:

To download, just like it on behalf of your Facebook account or subscribe by email:

The program requires Microsoft .NET 2.0 SP2 Framework. You can download it from the Microsoft website http://www.microsoft.com/ru-RU/download/details.aspx?id=1639:
- Install Microsoft .Net 2.0 SP2 Framework.
- Install the EasyBCD program.
B. Repairing the Windows 7/8/10 Boot Loader
During the XP installation, the Windows 7/8/10 bootloader got stuck. Therefore, the first thing we need to do is restore it.
Start the EasyBCD program.
- Go to section Installing BCD.
- Select the partition where the Windows 7 \ 8 boot loader was located before the XP installation.
In most cases, this is the very first partition, 100MB for Windows 7 or 350MB if your first system was Windows 8 \ 8.1. - Select the bootloader type - Windows Vista / 7/8 to MBR
- Click the button Rewrite MBR

After that, the Windows XP bootloader will be overwritten, and a new type of bootloader will be installed instead.
Reboot your computer. Now, instead of XP, you should boot your copy of Windows 7/10 again.
Now our task is to add a second entry to the bootloader - for loading XP.
B. Adding an XP Boot Record to the Windows 7/8/10 Boot Loader
Install EasyBCD again in the same way - now in Windows 7/8/10.
Start the EasyBCD program.
- Click on Add a note
- Select OS type Windows NT / 2k / XP / 2k3
- Select a system name.
This is the name that will be displayed in the menu when loading. We recommend removing the word Microsoft. - Click the button Add:

Now go to the section Current settings and check that the second boot record is added:

After that you can press the button Edit boot menu, select the display time of the menu with the choice of operating systems at boot time and rename the OS names. If you make changes, do not forget to click on the button at the end. Save:

METHOD 2. Installing Windows XP with a disconnected hard drive with Windows 7 / 8.1 / 10
This method, as we wrote above, is more suitable for stationary computers and only some laptops where it is possible to connect multiple data drives. Advantages of this method:
- You do not risk accidentally erasing already installed Windows 7 / 8.1 / 10 during XP installation.
- If you disconnect any of the physical disks, you will be able to boot from the remaining disk, since in this method the boot loaders are located on different physical disks. You may only need to configure the boot order in the BIOS.
Step 1 Turn off your computer. Disconnect the data cable from the hard drive where Windows 7 / 8.1 / 10 is installed
Step 2 Turn on your computer and install XP on the remaining hard drive in the most in the usual way- as if this Windows will be the only one. Install all required drivers.
Step 3 Shut down your computer and plug the Windows 7 / 8.1 / 10 hard drive back into the old SATA port.
Step 4 Boot Windows 7/8/10.
If you haven't changed the boot priority in BIOS, by default you should boot from the same disk into your old Windows 7/8 / 8.1.
A. Installing Bootloader Editing Software
Install Microsoft program.Net Framework 2.0 SP2 and EasyBCD (described in Method 1).
Now the only thing we need to do is add an entry about XP installed on another disk to the Windows 7/8 / 8.1 bootloader.
B. Add Windows XP Boot Record to Windows 7 / 8.1 / 10 Boot Loader
Follow these steps:
- go to tab Add a note;
- select OS Windows;
- select type Windows XP;
- specify the desired system name in the OS selection menu;
- press the button Add for adding.
After that, restart your computer, select Windows XP from the menu and make sure that it boots from your hard drive.
This section describes in more detail all steps to install Windows XP Professional. Windows XP installation procedure Home Edition is a process similar to the procedure for performing tasks - Professional Edition. Starting with Windows XP Pro, it is a more advanced operating system, looking at it, we can demonstrate the installation procedure, but in a different way.
The most optimal and correct solution for installing Windows XP will be when the previous operating system is completely "removed" and all files and folders are deleted. It is not difficult to accomplish clean install, some recommendations should be followed. Namely, you have to check the Windows XP compatibility list to make sure your hardware is supported by XP. It is possible to check network compatibility to download drivers for Windows XP. Be sure to save any required drivers to floppy disks or CD before starting the installation.
Windows xp can also be installed from a usb drive (flash drive). To do this, you need to prepare the usb itself (flash drive). How to do this was described here:. This is necessary when you have a netbook or a broken floppy drive. The installation procedure itself is the same as installing from disk. Except for setting the boot priority in the BIOS. In our case, we will install from disk.
So, all versions of Windows XP are saved from the bootable CD. To boot from CD / DVD-ROM you need to set boot sequences. Look for the boot sequence in the BOOT tab, according to your BIOS settings, and check that the device comes first - from the CD / DVD-ROM. Only now, you can proceed to the following lists in order:
Guide how to install Windows XP on a netbook and computer
Step 1- Start your computer and place the Windows XP CD in your CD / DVD-ROM drive. The computer will automatically detect the CD and you will receive the following message: Press any key to boot from CD. This is fine. Now, as soon as the computer starts booting from your disk, the following window will be displayed:
Step 2- Now you have to press F6 in order to install further drivers: SCSI or Raid. If you are using an IDE hard drive, then you do not need to press the F6 key. If you are using SCSI or SATA Hard drive, then you must press the F6 key, otherwise Windows does not recognize the hard drive during installation. Be sure to check that the Raid drivers are on the floppy disk. Drivers are usually supplied on a CD that you can copy to a floppy disk ready for installation.
Step 3- Click "S" to indicate that you want to install an additional device.
Step 4- You will be asked to insert a Raid diskette or SCSI drivers. You need to continue to follow the instructions displayed by the installation system. Click the enter key after inserting the disc.
Step 5- Here is a list of Raid drivers for your HDD. Now you should select the desired and correct driver for your device, and click the enter key.
Step 6- After that, you will get Windows XP Professional installation on the screen. You have the option to install new components of your PC, repair a previous installation, or choose - quit (to complete the process). Since we decided to perform a new and complete installation, just click enter (Enter) to continue.

Step 7- A window will open for you to accept the licensed version and your consent. Press the "F8" button to accept the terms and proceed with the installation:

Step 8 —This action perform carefully! This is where the partition will be created, and this is where the Windows OS will be installed. If you have a new unformatted disk that you received before this procedure, similar to the one shown below. In our case, the size of the disk is 10237MB. Here you can make a choice to install Windows on the disk without creating a partition, that is, the entire disk space will be used. If this step seems right to you, just go ahead and hit enter, Windows will automatically create partitions and format the drive as one large disk space.
However, for this demo, I will be creating two sections. The size of the first partition can be 6001MB (drive C :) and the second partition will be slightly smaller - 4228MB (drive E :). We can create two sections, having one that stores Windows applications and another that stores our data. So in the future, if something goes wrong with our Windows installations, such as a virus or spyware, we can reinstall Windows on the C: drive and our data on the E: drive will not be affected. Please note that you have the opportunity to choose any size of the section as it suits you. Let's say if you have a 320GB hard drive that you can divide it into 2 160GB partitions.
Click "C" to create a section.

Step 8- Windows will display information about the total size of the hard drive, and ask you how much you want to allocate for the partition you are about to create. I will choose 6001MB. The screen shown below will appear. Notice this shows "C:" is partition 1 and then the size is 6001 MB. This means the section has been created. We still have 4236MB of unallocated space. Now select the unallocated space by clicking the arrow key. Press "C:" to create a new partition. You will see the shared space available for the new partition. Just choose, in our case 4236MB.

Step 9- Now you will see that both sections are listed. Partition 1 (Drive C :) 6001MB and Partition 2 (Drive E :) 4228MB. You will also have 8MB of unallocated space. Do not worry about it. Just leave it. Typically, Windows has some unallocated space. You might wonder what happened to the D: drive. Windows is automatically allocated to the D: drive, on the CD / DVD-ROM.
Select Partition 1 (Drive C :), and press Enter.

Step 10- Choose to format the partition using the NTFS file - for this procedure it is recommended to use file system... If the hard drive was formatted before starting work, then you can choose the fast NTFS formatting... We chose NTFS because it offers many security features, handles large disk sizes, and has a lot of secure formatting features.

Now, Windows will start formatting the "C:" drive and copy the installer files, as shown in the two photos below:
Step 11- When the installation is complete, copy all required files on your PC, there will be a warning about restarting your PC. Never remove the CD from XP. After turning on the PC, a label will be displayed, but this time DO NOT press any key when the message "Press any key to boot from CD" etc. appears. After a few seconds, the installation program will continue. The Windows XP Setup wizard walks through the installation process to collect information about your computer.
Step 12- Choose your region and language.

Step 13- Enter the desired name and the name of the organization.

Step 14... Enter your product key.
Step 15- Computer name and enter the Administrator password (it is possible without it, if only you are the user of this PC). Remember to write down the Administrator password.

Step 16- Introduce correct date, time and choose your time zone.

Step 17- To configure the network, select normal and click "next"

Step 18- Select a workgroup or domain name. If you are not a member of the domain, then leave the default settings and click "next". Windows will restart again and the display will now be configured

Step 19- As a result, Windows will start and display a welcome screen. Press the "Next" key to continue.

Step 20- Select "help protect my computer, enable automatic updates and click" next ".

Step 21- Next, you need to choose how you will connect to the Internet. If you are connected to a router or local network, then select: “Yes, this computer will be connected to the Internet via local area network or home network". If you have a dial-up modem choose: "No, this computer will connect directly to the Internet." Then click the "Next" button.

Step 22- Done, now what do you need to activate Windows? We choose "yes" if you want to activate Windows over the Internet. We choose "no", if you want, leave the activation at a later time.

Step 23- Add users who will be subscribed to this computer and click "continue".

Step 24-You PC system will display a window similar to "Thank you", you should confirm the end of the installation. Click the "Finish" button.

Step 25... Now it follows, forcibly restarting the computer and entering, let's say, "a clean OS system" again.

Step 26- You should now check in Device Manager and make sure all drivers have been loaded or if there are any conflicts. From the Start menu select Start -> Settings -> Control Panel. Click on the System icon, and then from the System Properties window, select the Hardware tab, then click on the Device Manager.

You will see yellow Exclamation point"!" opposite any of the listed devices, this means that you have not found any drivers or not correctly loaded drivers. In our case, we have a Video Controller (VGA-compatible) with no drivers installed.
To install the driver manually, use the following procedure:
(a) From device manager, double-click on the device containing the exclamation mark.
(b) This will open the device properties window.
(c) Click on the Driver tab.
(d) Click the "Update Driver" button.
You now get several solutions. The first solution provides automatic search desired driver... The second parameter allows you to specify the location of the driver. If you do not know the location of the driver choose automatic search, which can find the required driver from the manufacturer on the supplied CD-ROM or Floppy disk. Windows will install the necessary drivers and may ask you to restart your computer for the changes to take effect. Use this procedure to install drivers for all devices that contain an exclamation mark. Windows will be fully installed and ready to go when there are no more exclamation marks in Device Manager.
 Management and functions of the Not Enough Items mod
 Troubleshooting TLauncher
 Why isn't Instagram looking for location: the main reasons?
 How to clear cache in vk app
 Basic operations on matrices (addition, multiplication, transposition) and their properties
 Lithium polymer batteries
 Identical conversions of logical expressions