How to open a flash drive with windows in bios. There is no boot from a USB flash drive in the BIOS - how to set it up? Assign a USB mass storage device as the main bootloader in AMI BIOS
CD/DVD discs are obsolete today. They were replaced by USB drives.
The need to boot from a USB flash drive may arise when solving many problems:
- installing a new operating system;
- launch in Live CD mode;
- to cure computer from viruses and malware;
- to correct errors that occur when loading the operating system;
- pre-installation of additional drivers;
- scanning hard drive for the presence of problem sectors;
- launching the operating system installed on the USB flash drive.
On many systems, the default is to boot from USB drive disabled. Because of this, a user who wants to use a bootable flash drive may have problems changing the settings.
Features of booting from a USB flash drive
The order in which devices are selected for launch is determined by the Bios settings, a built-in firmware designed to provide the operating system with access to the device APIs.
To boot the system from a flash drive, you need to go into Bios and change the startup order, or use a special boot menu. But this is not always easy to do, since firmware versions and types may differ on different motherboards.
If you need to boot from USB or any other storage device, you need to follow these steps:
- insert a disk or flash drive;
- turn on the computer or restart it;
- enter Bios or Boot menu and select USB device;
- if there are several connected devices, the system will automatically offer you a list to select the one you need.
Most modern motherboards work through a technology called UEFI. This is not just a more convenient graphical shell for the Bios firmware, but a new software, which has more wide opportunities and flexible settings.
Motherboards that work with uefi have received many new features, for example:
- exercise temperature control different devices and in connection with this, increase or decrease the speed of the fans;
- adjust the acceleration frequency of the central and GPU on those motherboards where it is provided by the developer;
- work with many Bios settings from special software running the Windows operating system.
Video: select boot device in BIOS
Motherboard Asrock H77M-ITX
The easiest way to boot the system from a USB flash drive is to use boot menu(boot menu). For every modern motherboard there is such a possibility. To find out which combination or key you can do this, most often it is enough to read the system messages. In extreme cases, you need to refer to the documentation of the board.
Asrock H77M-ITX allows you to select the startup option using the "F11" button. On the first try, you may not be able to get into the menu, so you need to press the key several times. If unsuccessful, just restart your computer and try again.
As a result, you should see a blue-blue background with the inscription Asrock UEFI setup utility. In the menu "Please select boot device" you need to select the required device to boot.

To configure the startup order of devices in the BIOS of the Asrock H77M-ITX motherboard, you must perform the following steps:

After restarting the computer, you should see the start of the launch from the USB flash drive.
Motherboard ASUS P8H77-I
Get into the BIOS on computers with a motherboard ASUS board P8H77-I can be done in exactly the same way as described in the previous section, using the keys Del or F2. The menu for selecting devices to boot can be accessed using the "F8" button.
The firmware interface is very different from previous version. But the names of the various settings menus are almost identical.
To simplify operations, a mode is provided initial setup and additional. In the primary settings function, that is, in the main window that you enter when loading Bios, you can select the startup priority. In the USB picture, it is labeled as with uefi.

If, after restarting the system, the boot from the USB flash drive did not start, you need to switch to the "Advanced Mode". This can be done using the "Advanced" button or by pressing the "F7" key.

Photo: advanced setting mode UEFI Bios on ASUS P8H77-I
To set the priority, do the following:

Photo: enabling full initialization support for USB devices


Photo: HDD boot order menu

Photo: rechecking priority after changes in hard drive boot lists
The computer will reboot, after which it should start from USB. If this does not happen, try changing the port and repeat the operation.
How to boot from a bootable USB flash drive in Award Bios
New motherboards that work with uefi are much easier to set up. However, the need to boot from a flash drive may also arise on older systems. Settings to use bootable USB drives may differ slightly, although the principle of operation discussed earlier is the same.
One of the most famous versions of Bios is Award. There is no way to call the menu to select the launch priority. Therefore, we immediately proceed to setting up the BIOS.
In order to boot the system from a USB flash drive on a computer with motherboard running Award, you need to do the following:

If you did not start from the required drive, you need to check one more parameter: the USB controller must be enabled in the "Integrated Peripherals" menu.

Photo: checking the activation of the controller
AMI BIOS
This firmware management system is more modern, so there is already a menu for selecting the launch order. It is activated with the "F11" button. You can get into the BIOS settings using the "Del" or "F2" buttons.
To select a download priority, you must:

Phoenix Award Bios
Phoenix- Award Bios is quite rare, and its firmware is a bit unusual. There is support for displaying the menu quick select boot drive, it is called by the "F11" key.
Interestingly, you will not find a USB-HDD in the Phoenix-Award menu. But other gadgets connected in this way are provided for selection, for example Zip, CDROM and Floppy. To start from a flash drive, you need to select Hard Disk, and then the required USB-HDD will appear in the list.

As for priority management through Bios, this is done almost identically to AMI.
The difference is that in the "Boot" menu, you must select the following options:
- use the "+" and "-" keys to change the order. Removable Device should be the first one;
- by activating the Removable Device and pressing the "Enter" button, select the flash drive from the drop-down list.

Photo: We make Removable Device the first in the launch sequence list
The ability to boot the system from a USB flash drive is provided by almost any Bios microsystems. Knowing the key combinations and the necessary menu items, you can quickly change the launch priorities.
More modern motherboards with uefi give you a lot more control over your system. If necessary, you can run different operating systems from different flash drives to manage any software.
To solve many computer maintenance tasks, it becomes necessary to create bootable flash drive. This may be necessary, for example, to flash an updated BIOS version or install an operating system.
There are many ways and various utilities to create a bootable USB flash drive. But often these methods are complicated and not convenient for a novice user (or require several different utilities).
However, there are also very simple ways. One of them is to use rufus utility to create a bootable flash drive.
Rufus is tiny but very fast and functional program. With its help, you can very quickly make a bootable USB flash drive with the necessary operating system for installation or maintenance.
Creating a bootable DOS flash drive using the RUFUS program
Let's consider the option of creating a bootable USB flash drive with a DOS system - to flash any BIOS version on the computer motherboard.
To do this, you need to download the program itself.
and insert the USB-drive (flash drive) that you want to make bootable. It is advisable to disable all other USB media for the duration of the firmware.Then run it with Administrator rights (because the utility will perform formatting, it needs extended rights)
The program settings must be set as follows:
- on the "Device" tab, select the required USB drive from the drop-down list.
- "Partition scheme and system interface type" must be set to "MBR for computers with BIOS and UEFI"
- "File system" must be set to "FAT32"
- on the "New volume label" tab, you can set your own name for the bootable USB flash drive (to make it easier to recognize it among other media in the future)
- checkboxes must be checked in front of the values " Quick Format" and "Create boot disk"
- next to the item "Create a boot disk" tediously select the FreeDOS value from the drop-down list
To complete formatting, press the "Start" button.
Have you already burned a bootable USB flash drive, but do not know how to boot from a flash drive? There is nothing complicated here. Windows boot from a flash drive is very simple, and for this you just need to go into the BIOS and change one setting.
If you have not yet recorded a licensed digital copy of Windows, I recommend reading -?
How to set up boot from a flash drive?
If you simply plug a USB stick into your PC or laptop and reboot it, Windows installation won't start. After all, for this you need to enable boot from a USB flash drive in BIOS.
This is done easily. But there is one nuance here. The fact is that Windows download from a flash drive on PCs and laptops is carried out in different ways. First, it depends on the BIOS manufacturers. And, secondly, from the brand of the laptop (Asus, Acer, Samsung, Lenovo, HP, etc.).
Yes, the BIOS menu will always be different, and this can cause difficulties. But below we will look at a few examples so that you understand and can navigate the BIOS menu on your own (in case you have another option).
So, let's begin. To enter the BIOS, you must immediately press a certain button on the keyboard when you turn on your computer or laptop. Which one? This can be found out when loading on the screen.
You can find out that you have entered the BIOS by seeing the corresponding menu in front of you. Usually there are the following options:


If loading the BIOS failed, then wait until the PC or laptop turns on, reboot it and try again by pressing another key.

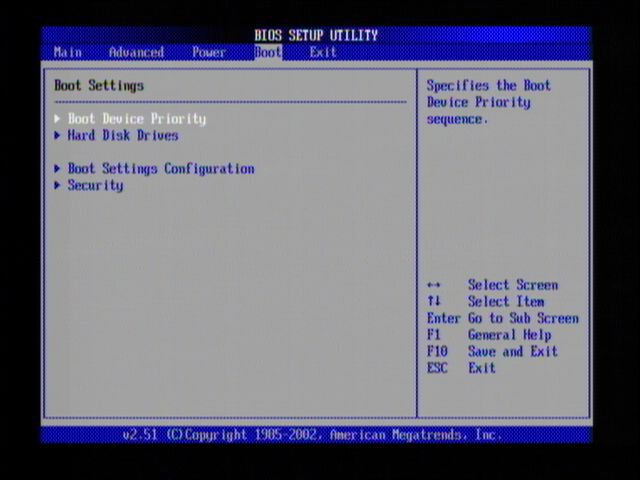
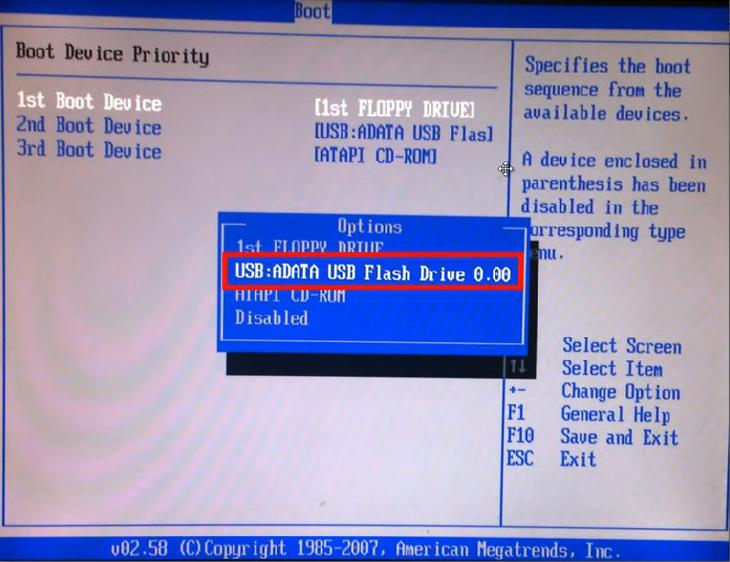
In this case, the item "Boot" was selected, and then " boot device Priority” (i.e. device startup priority). As a result, a menu like this will open:


As you can see, they are different, but in each case there are lines we need - First (1st), Second (2nd) and Third (3rd) Boot Device. It indicates which device boots first, which one second and third in turn. As a rule, the first is always HDD(HDD), and then the drive (CR-ROM).
When you connect the USB flash drive, the USB-HDD item will also appear. It is necessary in the First Boot Device item to select the option - USB-HDD. Example:

Next, be sure to save the changes, otherwise you will have to repeat everything from the beginning. Which save button? This information is written at the bottom of the screen. For example, in the screenshot above: F10 - "Save", ESC - "Exit". Save the changes and exit the BIOS. Congratulations, the BIOS setup for booting from a USB flash drive is complete.
The computer (or laptop) will automatically reboot, after which the following line will appear:

Press any button - and the installation of Windows will begin.
If you have a UEFI BIOS then everything is as easy as shelling pears
Go into BIOS and you will see something like this menu:

To configure booting a flash drive in UEFI, we are interested in the “Boot Priority” item. Drag the USB device icon to the top of the list (so that it is the first one) and exit (the exit button in the right upper corner). When you exit, the system will ask you if you want to save the changes. You agree, after which the PC or laptop will reboot.
By the way: it doesn’t matter at all what kind of image you have on a USB flash drive - Windows 7, 8, 10 or XP. It doesn't affect anything. Booting the OS from the flash drive will start anyway (of course, provided that it is written correctly).
And finally, one more important point. When unboxing Windows files completed, the computer will restart.

After that, you need to go back into the BIOS and return the previous device startup priority. That is, put the hard disk (HDD) in the first place, and the USB flash drive in the last place. There shouldn't be any problems with this.
Basically, you don't have to. In this case, when a black screen appears, NOTHING don't press.
Otherwise, the Windows installation will load again and you will install operating system again.
But when Windows is installed, you still need to go into the BIOS and return the previous device startup priority. Otherwise, the computer (or laptop) will always load data from a USB flash drive first (provided that it is connected).
In order for the computer to start not from a hard drive, but from a USB drive, it is necessary. Such a flash drive is used for system recovery, password reset and other "rescue" missions. But how to choose a carrier if it is not displayed in the BIOS settings? You can solve the problem yourself. Provided that the drive is working and data is being read from it.
How to fix the problem: BIOS does not "see" the USB flash drive?
Check if USB device support is enabled. How to do this depends on the motherboard model. After turning on the computer, the message “Press [key] to enter Setup” will appear at the bottom of the screen. Click it to enter the BIOS. And look for a menu that has "USB" in its name.
New BIOS versions
You can work with new BIOS versions using the keyboard and mouse. Also "comes across" support for the Russian language. You will quickly understand the parameters. But even if it is not there, you will be able to configure the boot order and run through a USB flash drive.

Award-BIOS
After starting the BIOS, do you see two lists on a blue background? Then you have the Award version. Navigating the menu by clicking the mouse will not work. It can only be configured using the keyboard. Below or on the side there will be instructions on which buttons to press for this.


Now let's take a look at boot priority.

When you're done with the drive, return the previous BIOS settings.
AMI-BIOS
The BIOS AMI interface has a gray screen, blue font and a number of tabs at the top. The information block is on the right. Mouse control is also not available.

Now you can change bootloader options:

Phoenix-Award BIOS
The Phoenix-Award BIOS also has a gray screen. Information about which keys to press is located at the bottom and highlighted in green. If the computer does not boot from the drive:

UEFI
you turned on USB support, but for some reason the flash drive is not in the BIOS? The problem could appear due to UEFI - a mode that "protects" the bootloader from malware and foreign code. This module will start the operating system even if you have configured the BIOS correctly. What to do? Disable UEFI.
The settings depend on the motherboard manufacturer. First way:

Second way:

After working with the media, re-enable "boot protection".
Need a "correct" flash drive
Maybe it's the flash drive itself. More precisely, in the way it is written. If you copy information directly to it, nothing will work. But why is it necessary to create a "bootable" drive? To run it, you need some "software script". Without it, the system will not understand what, in general, to do with the carrier.
To create a bootable USB flash drive from the LiveUSB utility:
- Insert the drive into the slot.
- Run the installer.
- Select your Flash media from the list.
- Confirm the installation.
- Now through this drive you can "reanimate" the system.
To install a third-party OS, you need a ready-made ISO image and a burning program. For example, UltraISO or Rufus. Consider the second one:
- Insert the drive into the USB port.
- Run the program.
- Check the box "Create boot disk".
- Click on the button in the form of a disk.
- Specify the path to the image.
- Click on "Start".

You can create a bootable USB drive using Windows tools.

If the BIOS does not "see" the bootable USB flash drive, the problem may not be in it, but in the settings. You don't have to throw it away early. Try changing the BIOS configuration first.
There are many types of BIOS: Ami, Award, Phoenix Award, UEFI. Let's figure out which buttons to press when loading a computer or laptop in order to go to BIOS and put the boot from the USB flash drive to install windows. I want to note that the traditional key delete, F2 to enter bios. Below are button combinations on how to enter BIOS to boot from a USB flash drive.
Buttons for entering bios from laptop and computer manufacturers.

Buttons from BIOS manufacturers

How to boot from a USB flash drive in BIOS to install Windows
To begin with, it is not always necessary to go into BIOS to swap the bootloader for installing windows. For this, there is a so-called launch menu. To go there, you need to turn on the computer, sometimes a key is written. In this case F12. Press the key that is written in the word boot menu.

What will we start the computer with: USB flash drive or other devices. The next step is to install windows.


How to boot from a USB flash drive in Ami Bios
- Click device priority.
In line 1st Devise set priority from the flash drive. This is usually all, but many have come across why I did everything right, but the computer does not start from a USB flash drive. It is just necessary to indicate sometimes, in addition to priority, forced loading in the line Hard Disk Drives.

- IN Hard Disk Drives we set a forced launch from a flash drive.
- IN 1st drive choose a carrier.
- Press F10 to save.
It turned out that in the settings of 1st Devise and Hard Disk Drives there is a bootloader with USB Flash those. we put a priority option, tried and failed. Then we set a forced launch and everything worked out for us. And so in all versions of the BIOS, if the priority boot did not work.


How to boot from a USB flash drive in Award Bios
- Go to advanced features.


- Click First Device, in the context menu we set from which bootloader we will start the computer. We have selected the primary devices to launch.

- Hard Disk Priority put the flash drive in 1st place. (If in First Device chose to start from the drive, then you need to put a USB flash drive in Hard Disk Priority).
- Award is ready, press F10 to save.


How to boot from a USB flash drive in Phoenix Award Bios
- Setting Advanced, in line First boot device put a flash drive or other device.
- Click F10 to save.


New UEFI BIOS in which you can control the mouse.
- Line Boot Priority, change places by dragging with the mouse. Can be done through advanced settings > Exit/Advanced mode and choose advanced mode.

- presses Boot and choose in Boot Option #1 loader.


Go into BIOS and boot from flash drive Windows installation It turned out to be quite simple, you just need to change just the type of download. And remember about the priority and forced bootloader.
 Consider each of the requirements for metal detectors
 Metal detector in an educational institution
 How to wipe the TV screen at home
 Senaki mikha tskhakaya. Mikha tskhakaya. Notable residents of the city
 International Journal of Applied and Basic Research Volgo-Caspian Shipping Canal Main Bank
 How to deal with sunburn if you are burned
 Hagen, Germany: why go, what to do, where to eat, travel tips Where and what to eat and drink in Hagen