How to select Download from USB in BIOS. How to put in BIOS download from a disk or USB flash drive? Old Variety Award BIOS
The use of a flash drive for such a target is convenient. Consider how to start a computer or laptop from a flash drive.
You need to start with the selection of one of the alternative actions:
- Change in the BIOS of the order of loading devices;
- Select the boot device to Boot Menu.
In the configuration of Bios Utility you need to get first. DELETE keys fall into them (most often) or F2 (the most common cases).
The BIOS challenge must be taken before the OS boot - with the first black screen or reflection of the manufacturer's logo.
Sometimes what is required to click - you can have time to consider on the picture of the initial screen:

Changing download in UEFI
UEFI software is graphic and changing boot devices available at the intuition level:

Most options, as a rule, assume changing the boot order by simply dragging the disk images with the mouse.
AMI BIOS Actions
Before visiting the BIOS, the flash drive is connected in advance to the PC.
To start a computer or laptop from a flash drive is performed operating order Actions:
- From above, the "BOOT" item is selected from the top menu;
- By clicking "Hard Disk Drives", "ENTER" is pressed on the "1st Drive" item that opened menu;
- The list is the name of the flash drive - the cursor is installed on it;
- Alternately presses ENTER and ESC;
- Then in "Boot Device Priority" fows against "Enter" by "First Boot Device";
- The flash drive is again indicated:

We work in bios award
Selecting the boot device in Award BIOS is carried out in the menu settings. Need to "Advanced Bios Features" Choose the cursor "First Boot Device."And repel" input ":
In the list that appears in order to download a computer or laptop from a flash drive, "USB-HDD" ("USB-Flash") is installed.
After that, you need the ESC button to move to the level to select the item "Save / Exit":
Customizable in H2O BIOS
You can download the USB flash drive in InsyDeh20 BIOS like this:
- The "Right" key to open "boot" in the main menu;
- "EXTERNAL DEVICE BOOT" must be "inclusive";
- Control keys F5 and F6 to put "External Device" in the first position in the "Boot Priority" section;
- Exit ("Exit") from the menu while saving settings.
A reboot of the computer will be carried out from the desired drive.
Without visiting BIOS (for Windows 8, 8.1 and 10 with UEFI)
For such devices, you need to open the "Update and Recovery" tab to the right panel, call "Reload". And in the panel " Special options»On the" Select action "screen, select" Use a USB device ". There will be another choice network connection, DVD.
The next screen will provide a list of devices, among which the flash drive is selected.
With its absence in the list - click "View Other".
The choice will make the computer reboot from the selected drive.
Loading through Boot Menu
Download menu (Boot Menu, English) is called when the overwhelming number of laptop / computers models is turned on. Being one of the BIOS or UEFI tools, allows you to select a drive to start the computer in this particular case.
This method is convenient to use for a single selection of the boot device before starting the OS with Live CD, use a USB flash drive and not only.
After all, the computer from the flash drive starts far from often - why change the BIOS settings?
IMPORTANT. Through the BOOT menu in some laptops, it is possible to restore the system.
Path in Boot Menu

Just as BOOT MENU BOOT (or UEFI) is called defined keys. More often than others are F12, F11 or ESC. Other options are possible. Sometimes (not always) is visible according to the information appearing on the monitor screen when the computer is turned on.
Finding into this section, you can see a list of connected devices from which it is possible to start loading ( hDD, flash drive, discs, other). You can select a computer network download or start the OS recovery using the backup section.
Entry features in Windows 8, 8.1 and 10
Turning off the PC with Windows 8, 8.1 and Windows 10 is not "shutting down" in a simple sense (hibernation). Therefore, the input in the download menu may not be performed on the above keys.
In this case, one of the actions must be made:
- If you hold "SHIFT" when you select the "Turning off" option, then the PC will turn off "full" and when the key turns on the key will work;
- Use the desired keys when rebooting (and not when pre-shutdown);
- In the "Control Panel" (View - Icons) / "Power Supply" / "Actions of the Power Buttons" - disable the switching on the quick launch (sometimes you need to "change now inaccessible parameters"):

One way will definitely work.
Login to ASUS.
Desktop Computers with Maternity Asus allow you to go to the boot menu by pressing the F8 key (at the same time, when Del or F9 is climbing to enter the BIOS).
With laptops - complete confusion:
In most modern ESC;
You need to try all options!
We enter Lenovo.
With the Lenovo brand - almost easier everyone - we enter the cherished menu by the F12 key for almost all models of laptops / monoblocks.
There is another button with an arrow next to meals - there are available other download options:
Find on Acer
For laptops / monoblocks, ACER works the F12 key. But for some, the entrance to the menu has earned - it needs to be turned on.
To do this, first enter the BIOS by the F2 key, and then switch the "F12 Boot Menu" parameter so that it takes the value "Enabled" (default is "disabled").
Then the settings are saved before leaving the BIOS.

Other models
List of keys to log in to boot menu for other branded models:
- HP - key F9 or ESC, and then - F9;
- Dell - F12;
- Samsung - esc;
- TOSHIBA - F12.
For motherboards:
- Gigabyte - F12;
- Intel - ESC;
- ASUS - F8;
- MSI - F11;
- ASRock - F11.
After familiarization with this publication, you are guaranteed to start running from a flash drive of your computer or laptop.
Leave your comments, share your experience.
BIOS is system programwhich is built into the computer chip. It provides a normal start of a PC and system. In this article, I will tell you how to configure the BIOS to install Windows. This instruction is suitable for any operating systems.
Here I will tell only about how to install Windows from the BIOS of two types - AMI and Award (Phoenix). These versions are the most common, but there are others. If you need to configure the version of the BIOS, which I did not tell you, write me, and I will create a separate article with the instruction or supplement this for you.
But, enough words, it's time to move on to business.
In order to configure the BIOS to install Windows, it is necessary to get into it. As a rule, the BIOS input is performed the same method regardless of version. To do this, restart the computer and click on the desired button on time the download.
In order to find out what exactly the button should be pressed to enter the BIOS, you need to pay attention to the inscription, which occurs after the PC is turned on - Press "key" to enter Setup (where "key" is the same button that enters the BIOS ).
The following keys can usually use the following keys to enter Bios: ESC, DEL, CTR + ALT + ESC, F1, F2, F3, F10. I repeat - what exactly is pressed, it will be written in the message when the computer is turned on. Press the key should be pressed during this message, it is recommended to press periodically each 3-5 seconds.
If you immediately get into the BIOS did not work, then do not despair. Restart once again and try again. Be sure to succeed.
If we install Windows from under the BIOS, then before setting it is necessary that a disk with a distribution disk is connected in the drive or a loading flash drive was connected.
Installing Windows with AMI BIOS
C AMI BIOS Installing Windows begins with a transition to the "BOOT" tab. To do this, you need to move the cursor using the arrow keys on the keyboard. The mouse in the BIOS does not work.
Here you need to select the device from which the installation will be made: "CD-ROM DRIVE" If with a CD or any USB deviceIf Windows installation occurs through a USB flash drive. It should be displayed in the list when the boot flash drive is connected.
When the device is selected, it must be transferred to the first place. This is done with the "+" key on the keyboard.
Now you need to save AMI BIOS settings to install Windows. To do this, press the F10 key, agree with the message by pressing the "Y" key, and then give "ENTER". The computer will restart, and download from the specified device will begin.
Installing Windows with AWARD BIOS
Award, he is a Phoenix BIOS, also controlled by the keyboard arrows. In order to configure Bios Phoenix. To install Windows, you must select the Advanced Bios Features item.
Then in the FIRST Boot Device string you need to select the CDROM item if a CD or USB device is used to download if Windows is installed through blood flash drive.
To Award BIOS installation Windows made from the selected device, you need to be preserved. For this, click F10, then "Y" for consent, and "ENTER". The computer will be released from the BIOS and starts loading from the desired device.
How to put a BIOS by default
If suddenly you did something in the options, and the computer began to work worse or not working at all, then set the default BIOS settings. There is such a button in any version.
Good everyone!
One of the most frequent questions of users when windows installation: "Why doesn't computer (BIOS) sees my flash drive?". Naturally, I have repeatedly answered him, and more than once on the blog brought my recommendations. Now I decided to collect all of them together in this one article.
I will immediately say that the computer (laptop) "saw" your boot flash drive (on how to create it correctly ) - You must configure the BIOS (UEFI) accordingly. If this is not done - how much would you fight, nothing will come out ...
In the article I will show on the example of several versions of BIOS (UEFI) how to do it right. I think the note will be quite by the way for those who do not often reinstall the system.
Perhaps the article needs to start not with the BIOS setting, but from how it is in it ... it is also not so obvious and just for not a sophisticated user.
In general, everything comes down (usually) to ensure that immediately after turning on the computer / laptop, while only the first logo appears when loading, press the special. key (better several times). If you press the right key - you will see the covenant window bIOS settings.
Self Common buttons for entering BIOS: F2, ESC, DEL. If you have a laptop, it is possible that you need to press them together with the Fn button (i.e., for example, Fn + F2). It depends on the keyboard settings in the same BIOS ...
The main complexity is that there is no single keys to enter the BIOS! Each manufacturer can have their own specials. keys (Sometimes, these are whole combinations of 3-4 buttons!).
Below I will give several options, how can you go to BIOS and give references to articles where you can learn these cherished keys.
Option number 1
If you have Windows 8/10 installed on your computer - you can not guess with the buttons at all, and enter the BIOS from the OS interface. It is done simply enough, see the instruction, the reference to which is shown below.
To help!
How to enter the UEFI (BIOS) from windows interface 8, 10 (without the use of specials. Keys F2, Del, etc.) -
Option number 2.
To find out the key to enter BIOS - you can use the documentation (which went along with your device when buying), or special. Tables and specifications (koi in the Internet abound).
I also have several tables and instructions on my blog, you can learn something there.
Instructions!
1) how to enter Bios or UEFI (instruction) -
2) Tables with buttons for entering Bios / Boot Menu for different PC manufacturers -
Option number 3.
Pay attention to the first screen that appears immediately after rebooting the computer (To see the first screen - it is to restart the computer, and not turn on ...).
If you do not have time to see the "first" screen (or read the information on it) - press the key Pause (Break).
If you have time to do it - the screen will "hang" and will wait for your next press (i.e. you can read everything and inspect).
The screenshot below shows the Greeting Screen AMI BIOS: F2 or DEL - These are the buttons to enter the BIOS settings (in English: to Run Setup).

AMI BIOS: F2 key - input to the BIOS settings.
Option 4.
On some laptops there are specials. Buttons to enter the BIOS (they are usually small, and are located either next to the power button or next to the power socket).

You need to press them with a handle (or pencil) when the laptop is turned off. After clicking on it, the device will turn on and you will be presented a boot menu (from which you can go to the BIOS).

Boot menu / Lenovo (as an example)
Basics of work
Note: For those who have already a little familiar with control in the BIOS - this section of the article can miss.
Control keys, settings changes
BIOS will have to manage and set the settings without mouse (many novice users scares it. By the way, the UEFI has supported the support of the Russian language and mouse).
In fact, even in Windows (where the mouse works) - many actions are much faster to do with the keyboard!
Control buttons, for the most part, everywhere the same (the difference though there is, but usually not significant). Another detail: on the right or bottom in the BIOS there is a hint: it specifies all the main control keys (see the photo below).

Control keys (AMI BIOS)
Main keys:
- F1 - Call a certificate (Help);
- Arrows ← and → - Select the settings section (for example, boot, advanced, etc.);
- Arrows ↓ and - select a specific parameter in the desired section;
- + and - - change setting (increase / decrease);
- F10 - Save BIOS settings and exit (you can click, being in any section BIOS);
- ESC - output;
- ENTER - Set (approve) The selected parameter / or open a parameter or partition for further configuration (in general, one of the most basic keys).
In general, knowing this tent of the buttons - you can easily change all BIOS settings.
Saving settings
You can change any settings in the BIOS, but they will enter into force only after you save And restart the device (by the way, the computer / laptop is restarted automatically, after exiting BIOS).
- Press the key F10 - in most versions of the BIOS, it means save the settings and restart the device;
- Go to section EXIT And click on Save Changes and Exit (Save settings and exit, an example is shown in the screenshot below - arrows 1 and 2).

By the way, you can exit from BIOS and without saving the settings - to do this in the section EXIT Option Discard Changes and Exit (discard settings and exit / not save settings, exit).
You can also leave the BIOS simply restarting the computer (although, once again, it is not recommended ...).
Reset settings to optimal
If you changed any settings in the BIOS and the computer stopped downloading (or, for example, sounded sound) - Well, or you just decided to return everything as it was - I know that there is a BIOS special function on resetting settings. Those. This feature will return all settings in default (i.e. will do everything by default, as it was when buying).
You can reset the settings in two ways:
- press the button F9. (however, it works not in all versions of the BIOS);
- go to section EXIT then click on Load Bios Defaults. (See Screenshot below).

Reset Settings in Default - AMI BIOS
By the way, after loading default settings - you need to save them by clicking on F10 (about it - see a little higher in the article).
In a variety of BIOS versions, the name of the point for resetting the settings may differ slightly. For example, the screen below shows the section EXIT W. laptop dell. - Here you need to click on Restore Defaults. and then save the tincture - Save Changes and Reset. After restarting the device, it will work with default settings.

Reset settings for the default version // Dell Laptop // Restore Defaults
BIOS setup for download from flash drive / disk
Go to the most important thing. I will consider the BIOS settings on the example of some of the most popular versions of BIOS - Ami Bios. and Award Bios. (In principle, the main thing is to understand the meaning - everything is done everywhere in the same way, there is a slight difference in the menu designation).
Ami Bios.
First you need to go to the section Advanced (Extended, see Arrow 1 on the screen below), then you need to open the section USB Configuration. . Then check that all USB ports are turned on (i.e. in front of them the inscription Enabled.)!

Verification of USB ports - is it included?
- 1st boot device - CD / DVD ... (So the first boot device from which the PC will try to boot is a CD / DVD drive. If it does not have a boot / installation disk, the computer will try to boot from 2nd Boot Device);
- 2nd Boot Device - SATA: 5m-WDC WD5000 (Hard disk of a computer. It has Windows installed on it, therefore, it is it that it will boot if the CD / DVD drive is a disk).
Naturally, with such a queue of loading - the computer will not be loaded from the flash drive!

How was it and how it should be for download from the flash drive // \u200b\u200bAMI BIOS
To allow the BIOS to see your USB flash drive, you need to change the download queue to the following:
- USB: Generic USB SD;
- CD / DVD: 6M-TSST;
- SATA: 5M-WDC WD5000.
In this case, the BIOS will check the USB flash drive inserted into the USB port, then the CD / DVD drive, and then boots with hard disk. In most cases, the most optimal option.
Award Bios.
In principle, it is configured in the same way, a small difference in the menu designation. And so, after entering the BIOS, I recommend immediately open the section Standard Cmos Features.

In this section, specify whether USB ports are enabled (devices). Just check that in front of the lines where "USB" - everywhere was (an example on the screenshot below).

USB ports: Do you work? Work!
- First Boot Device (first boot unit) - USB-HDD (The best choice for downloading from the flash drive is USB-HDD. In exceptional cases, if the BIOS suddenly does not see your USB flash drive, try usb-fdd) ;
- Second Boot Device (second boot unit) - Hard Disk (hard disk).

Setting up BIOS laptop
Performed in the same way as for a computer. True, there may be some "serious" differences in separate-made models, but in general everything is identical.
In laptops to customize the boot - there is a separate BOOT section. Opening it - all download parameters are available to you.
I will give a universal option of parameters, which is most often used (on the example of a laptop Dell Inspiron. 3000 SERIES):
- Secure Boot - (Disabled loading mode is disabled. It is supported by only new windows version 8, 10, and many have several OS, or use 7-ku ...);
- - (Fast loading - in most cases, not much, it accelerates ...)
- 1st Boot Priority is the first boot device (USB carrier);
- 2nd Boot Priority is the second boot device (hard disk).

In many other laptop models, the BIOS setting is done in the same way, the menu and settings are similar or coincided.
A few words about UEFI
On the modern computers And the laptops instead of BIOS use UEFI. It represents a more advanced and advanced version of the BIOS: for example, it can be operated in it, often there is a menu Russification, etc. As part of this article, I will say that in terms of editing the BOOT section - here everything is similar ...
For example, in the photo below shows the main UEFI window on laptop asuswhich is displayed immediately after entering it. In order to open the extended menu and find the Boot section - pay attention to the lower part of the window: you need to press the key F7. (or click at all F8. - And immediately proceed to download from the flash drive).

In the advanced settings in the Boot section, everything is performed in the same way as in the "ordinary" BIOS: need a USB flash drive (In my case "JetFlashtranscend 16 GB") Just move to first place, and then save the settings (key F10) .

Loading from a flash drive / disk with Boot Menu
Why set up and change the download queue in the BIOS when you can boot from the flash drive by pressing one button?
We are talking about Boot Menu - boot menu, translated into Russian. If you call this menu - then you can choose from which to boot the computer / laptop: from the hard disk, from the CD / DVD disk, from the flash drive, from the SD card, etc.
Button to call Boot Menu, usually specified on the first screen you see, after switching on. An example in the photo below:
- F2 or DEL - input to the BIOS settings;
- F11 - Boot Menu Call.

Calling Boot Menu, you will appear all devices from which you can boot. An example in the photo below: You can boot from hard disk, flash drives and CD / DVD drive.

Why the BIOS is not loaded from the flash drive / disk
1) A USB controller is disabled to BIOS
In almost all versions of the BIOS there is an option to disconnect USB ports. Of course, if they are turned off - then you will not be able to boot from the USB media. Check whether they are enabled (or reset the default settings) - just above the article, I led how it is done.
2) The loading flash drive is not recorded incorrectly.
Often she can be recorded incorrectly due to incorrect settings programs (in which you recorded it)or "broken" ISO image with the system. I recommend to get acquainted with this article:
3) After rebooting the computer, the installation begins first
Quite often the next situation. You inserted a flash drive, with her computer booted and the installation began, then it rebooted, and the installation began again. And so in a circle ...
In this case, just remove the USB flash drive and restart the computer. He boot from the hard disk (where were already copied setup files from flash drives) - And the installation to continue (and will not begin again).
4) USB 3.0 and USB 2.0
Now there are several types of USB ports on modern PCs / laptops: USB 3.0 (USB 3.1) and USB 2.0 (USB 3.0 - marked blue). Windows OS does not support USB 3.0, so in cases of "invisibility" flash drives, I recommend trying to install the OS with uSB ports 2.0.

Example example: USB 2.0 and USB3.0
5) USB-HDD, USB-FDD, etc.
In BIOS, when setting up the download sequence, usually, you need to choose a USB-HDD, but in some cases the BIOS does not see the flash drive. Try in this case to change the USB-HDD to USB-FDD.
6) Error "Reboot and Select Proper Boot Device OR Insert Boot Media in Selected Boot Device and press A Key »
It often occurs if you are connected, for example, disk (diskette) to a computer on which there is no boot records. Just remove and disconnect all the media, in addition, from which the installation is assumed (for example, USB flash drives).
Instructions! Error Solution "Reboot and Select Proper ..." -
7) Disable all add from the computer. equipment
It is also recommended to disable the second monitor, printers, scanners, etc. from the computer. The fact is that when installing Windows, it can create additional problems. For example, I had the case that Windows incorrectly determined the default monitor and "sent" an image to another monitor that was turned off (and I watched the "black" screen ...).
8) Turn on the Legacy mode
In the boot section, you need to change the download mode from EFI (UEFI) to Legacy (if any). On this occasion gave recommendation above. The fact is that not all Windows is supported by a "new" chip (besides you need to record a flash drive for this setting mode).
9) Turn off the Secure Boot
In the BIOS in the Boot section, there is a Secure Boot option - just disconnect it, move it to Disable / off (if it is).
10) Turn on Launch CSM (if available (BOOT usually))
In the BIOS in the BOOT section, change the Launch CSM mode to the Enable / enabled state (if any).
, as well as any other download parameters, configured in base system I / O - BIOS. Every motherboard without exception (and it is she who is equipped chip BIOS.) It has the ability to set up both loading and operating modes of almost all devices installed on it. The BIOS produces the so-called computer overclocking due to the increase in the total processor, tires and random access memory With parallel increasing voltage. In the basic I / O system, you can even configure the time to automatically turn on your computer. However B. this moment We are only interested in one - setting the BIOS, namely the computer load from the flash drive.In the article "As in the BIOS, configure the computer download from the disk", I have already mentioned that today there are several basic varieties of BIOS - "blue", "gray" (of this color background of the window of this system) and UEFI. Running all BIOS versions is performed on the same scheme. When the computer is booting, a message like "Press Del to Run Bios Setup" is usually appeared. As soon as you saw it, press the "DEL" button on the keyboard. A little less than the control button for bIOS launch It is "F2". 
For 1-2 seconds, the I / O system will start. I will start with the "blue" system. After it starts, a window represents a table consisting of two columns. In the left column arrows on the keyboard (in this version of the BIOS, as well as in the "gray", the change in the parameters is made only under the keyboard control), select the menu item called "Advanced Bios Features" and press "ENTER". 
As we are interested installing Windows 7 from the boot flash driveYou must make sure that in the "First Boot Device" menu item (which in English means "first bootable device") stood the "Hard Disk" parameter (translated as "Hard disk"). Because the flash drive is though removable, but still a hard disk. 
If another parameter is installed here, send this menu item and press "ENTER". In the small window that appears, select "Hard Disk" or "HDD-0" (depending on the BIOS version) and press "ENTER". The little window will disappear. 
Next, you must select the Hard Disk Boot Priority menu item and click "Enter" 
If your flash drive has been determined by the computer, in the list that appears all hard disksinstalled in your system blockThe flash drive will appear. It can be called differently. Most often, she is called the company that produced it. For example, Kingston 2 GB, TRANSCEND and so on. Its you need to move it to the first position of the entire list. To do this, highlight it with the keys on the keyboard "+" and "-" to move the flash drive to the first position, that is, to the very top. As soon as you did, boldly press the "F10" key and agree with the preservation of new parameters by pressing the "Y" button on the keyboard, and then "ENTER". The computer after that will immediately "go" to reboot, and it will now be loaded from the boot flash drive. 
For a BIOS with a gray window, the setup window will be slightly different. After starting the I / O system, a window appears in which the arrows to the right or left, you must select the "BOOT" menu item. 
From the list that appears, we are interested in the "Boot Device Priority" menu (translated as "priority of boot devices"). Select it and click "ENTER". 
In the 1st Boot Device menu item, you must select "HDD:" Name ". The name is the name of your hard drive, for example, Hitachi, Samsung or WD. 
Now we return to the previous menu item. To do this, press the "ESC" key once. Select "Hard Disk Drives" arrows and press "ENTER". Here we install a USB flash drive as the main boot hard disk. 
From the proposed hard drives, which also belongs to your flash drive, as I have already spoken about this, the "+" and "-" keys install the flash drive opposite the 1st Drive item. In some versions of the BIOS instead of the "+" and "-" keys, the "F5" and "F6" keys are used. 
To save the parameters, click "F10", select "OK" and press "ENTER". 
At the end, consider setting the computer download from the flash drive in the BIOS UEFI (An example motherboard from ASUS). A little about this version of the I / O system, I told in the article "How to configure a computer download from the disk in the BIOS." Therefore, I propose to start setting up. Running the BIOS, the window opens, as in the picture below. Setting up the system interface language is performed in the upper right corner. I have "Russian". Let me remind you that in this version of BIOS, all manipulations can be made both keyboard and mouse. So, press the left mouse button on the output / optional button. 
From the list that appears, select "Additional Mode". 
Advanced BIOS settings will open. Here, select the Download menu item. 
When installing Windows from the boot flash drive, you must go to the menu item "Opels of loading hard drives". 
Now click on the menu item Parameter # 1 menu. 
From the entire list of hard drives, select your flash card. My flash drive is called "Ocz Rally 2". Returning to the previous menu item by pressing the "ESC" button or the "Back" button on the keyboard. 
Now in the menu item "Download # 1" menu, select a USB flash drive. 
To save the settings, click "Exit". And in the appeared window, select "Save Changes and Run Reset". 
A reboot of the computer with the parameters you have installed. Operating installation immediately starts windows systems 7, which you can learn from the article "
 Error appearance during program launch
 FRIGATE plugin for Firefox
 How to show hidden folders and files in Windows
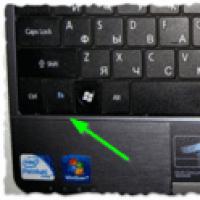 Ways how to make a screen on a laptop brighter or darker
 How to format a flash drive, disk protection
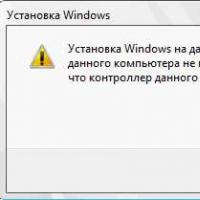 If installing Windows to this disc is not possible
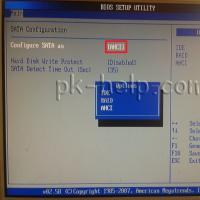 During installation of Windows "Make sure that the controller of this disc is included in the computer's BIOS menu.