How to create a system recovery. Creating a system recovery point to manual. Creating a new system recovery point
It is used to cancel our erroneous actions when working on a computer that led to its unstable work. To our maintenance service, come for help people who use the Windows operating system 7 for many years and only one of ten knows about recovery points And one of the fifty about previous versions of files, but does not know how to use them correctly. With the apparent ease of application of recovery points, this feature has many features that you need to know. This article describes the information based on the personal experience of the author, for example, we will learn why when the system is turned on, the recovery points disappear or are not created at all. How to use the recovery point when there is no launch of Windows 7 and much more, I hope we will help you avoid many mistakes.
Windows 7 recovery point
If you select and apply the recovery point, you need to know that the changes usually concern only system and software settings of Windows 7. All programs installed by us after creating the recovery point selected by us are deleted.
- For example, if you have created a recovery point on January 8, and on January 12, you want to roll back to the state of January 8, then, accordingly, select the recovery point on January 8. All programs installed by you in the period of time from January 8 until January 12 will be deleted.
As for your personal data, no changes should happen to them. On this virginity, you can see that the protection of the system and the creation of recovery points is enabled by default only for a disk C: \\. Check for Start-\u003e Control Panel-\u003e System and Security-\u003e System-\u003e System Protection.
You also need to know that the point windows 7 recoverywill not help recover previously deleted files, but in this case you can use the function Previous file versionsonly if the system was turned on for this disk and in Settings for recovery parameters Paragraph is marked Restore system parameters and previous file versions. In this case, Windows 7 protection archives personal user data with shadow copies. Also, you see that if you press the configure button, (upper illustration) window protection window, for a local disk (C :), a window will appear in which it can be seen that 10% disk space is selected for the disk recovery points (C :). Know what is better to highlight 15%. The larger the place on the hard disk for the recovery points, the longer they are stored. If Windows 7 needs to create a new recovery point, and the place to create it is not enough, the old point will be returned and the new one will be created instead.

Note: If the System Protection is enabled for any volume in the Windows 7 operating system, then user data is archived by creating shadow copies and become available in previous versions of files. Shadow copies, do not exist forever, the space is allocated for storage on the hard disk, which is adjusted in the system protection settings, as soon as it ends, with the consciousness of new copies the old are removed.
For example, we have the protection of the system for the disk C: \\, respectively, we can use the previous version of files with you, click on the C: \\ Program Files folder with the right mouse button and choose Restore the former version,

a dialog box opens Previous versionswhere all available versions of previous files will be listed. Files can be restored or simply copied by saving the previous and current version.
Read the article fully previous versions of files.

When setting up the system protection for volumes stored only your files, you need to choose in Recovery parameters paragraph Restore only previous file versionsSince no system parameters are not on them.
If you are worried about saving only personal data, then you better take advantage of the function Archiving computer data, This is a separate serious topic, just read it separately.
Windows 7 recovery point It is planned and created once a week, after the same time interval, such points are also called control.
Also, the recovery points of Windows 7 creates before installing any programs, well, and finally you yourself can create a point of restoration by hand before installing some application in the system protection dialog box.
Let's first consider a simple example of creating and applying the recovery point, and then we will analyze the examples more comprehensive.
Created Windows 7 recovery point Thus,\u003e Start-\u003e Control Panel-\u003e System and Security-\u003e System-\u003e System Protection. This dialog box is configured and creating recovery points. For example, we want to independently install a serious program, but we are experiencing, suddenly we will do something wrong, let's reinsure and create a manual recovery point for a disk from: \\, to which we will install our program.
Start-\u003e Control Panel-\u003e System and Security-\u003e System-\u003e System Protection-\u003e Create, then give the name of our point, for example 13.


Next, set any program, but something went wrong, for example, the application does not start and we decided to roll back with the recovery point at the time when the problem program has not yet been established on our computer. We go to the protection of the system and choose not to create, but restoration, further


the restoration of system files is launched, click further and select our recovery point 13, pay attention to the item Show other recovery pointsIf there is a tick, you will open other earlier recovery points.


Warning that the recovery process will not be possible to interrupt before its end, agree, then reboot.

The computer is loaded and the program we installed, as it did not happen. This is how the recovery points work.
Windows 7 recovery pointYou can use if your computer is not loaded by resorting to a secure mode, it is impossible to create a recovery point here, but you can roll back to the stable state of the computer. To get into a safe mode, you need to press the F-8 key on the keyboard immediately after the computer is started. The Advanced Download Options menu opens in front of you: Troubleshooting a computer, then a secure mode. In safe mode, use the Windows 7 recovery point, click Start-\u003e Control Panel-\u003e Recovery, then the system restore and start recovery will be loaded, select your recovery point and forward.


Windows 7 recovery points It is used by default about 10% -15% (as I said above), disk space, adjust the disk volume allocated for recovery points in the Configure window - System Protection. If there is a lot of places on the hard disk for recovery points, they will be stored for a long time. To remove all recovery points, you need to press the Delete button in this window and all recovery points are deleted.
How to remove all recovery points other than the last? Start-\u003e In the search field, enter the disc cleaning, then select the disk to be cleaned, then go to the Advanced tab,\u003e Restore System and Shadow Copy-\u003e Clear.


Why are Windows 7 recovery points are not created?
The Windows 10 recovery point is a very important built-in tool that allows you to return your system to the previous workable state in case of failures.
The Windows component that is responsible for restoring the system uses a system protection function that regularly stores information about your programs, drivers, registry, settings and system files in the so-called points of recovery.
The operating system automatically creates recovery points before meaningful changes in the system, for example:
- installation of programs;
- installation (update) drivers;
- installing Windows Updates.
Another recovery point can be automatically created if the last point was created more than 7 days ago. It is also possible to carry out this process at any time manually.
To create a recovery point, you must have computer administrator rights. It should also be borne in mind that the recovery point will be created only for those discs on which the system protection function is enabled.
Creating a Windows 10 recovery point
1. First you need to start the component " System protection" To do this, in the menu " Start»Start typing the word" point "And on the displayed list, run the item" Creating a recovery point».
This is the easiest way to start the component. System protection" Also, it can be done by opening the system properties window (keyboard shortcut Windows + Pause.By selecting the desired item in the left menu.

You can still open the system protection through the control panel, but we will not be immersed in additional methods for starting this component and continue to create a recovery point.
2. Next you will enter the tab " System protection" window " Properties of the system" If the buttons " Restore"And" Create»Inactive, it means you have disabled protection of the system on all discs. You can make sure that you view the list of available disks and the protection status: " Disabled" or " Included" Click the " Tune».

3. If necessary, enable the system protection by selecting the appropriate item. In this window, you can also configure the use of disk space and remove all recovery points for the current disk. Click the " OK».

4. Now press the " Create", Which should be active.
5. Enter the name of the created point and click " Create" Date and time here can not write, because They will add automatically.


See where Windows 10 recovery points are as follows. At the contribution " System protection"You need to click" Restore", Then the button" Further».

What you should know when using recovery points
- You should not use the recovery points of the system as the main tool for resuscitation of the system. They should be taken as an additional way to restore Windows along with backup and creating a system image.
- You can not create a recovery point while in safe mode.
- Recovery points are stored as long as it allows the amount of disk space allocated to protect the system. If the place ends when creating new points, the old are automatically deleted.
- All Windows 10 recovery points are automatically deleted if you disable the system protection.
- When restoring the system and drivers installed after creating a recovery point will be deleted. In turn, programs and drivers, deleted after creating a recovery point, will be restored.
The proper functioning of Windows 7 depends on the contents of registry files and information. Subject to removing or damage, the computer will be accompanied by failures. You should also expect such problems as the incorrect work of the right programs or the lack of way to download them, the slow work of the PC. Eliminate such a problem is possible by returning the system to the previous state. The system recovery procedure requires the use of so-called recovery points. This is the cast of the most important for the functioning of the computer file system.
Restoring the operating system to the previous state allows you to return the computer to that state when it functioned normally. Provice violations can delete individual system files that are necessary for the operation of a program or a solution to specific tasks. The reasons for this can serve:
Subject to the computer to work with accounting or playing computer games, the full procedure for reinstalling the OS is unacceptable. The situation can more complicate the fact that a particular PC is the only source of data and any backup copies are absent. Then the recovery will be the best solution, besides, this can be done independently.

In essence, the procedure is protective, since it allows you to save important information. There are several types of OS return to the usual mode of operation:
- in automatic mode ("System Protection");
- by downloading the latest favorable settings;
- preliminary handbacap.
As a rule, Windows operating system on a weekly basis creates recovery points. It is also done at the time of installing or updating OS. The seventh version provides the "System Protection" function, which works by default. However, its use is regulated by the settings and is necessary only for local system disks. Otherwise, the user makes the setting on its own.
Note! To restore the operation of the operating system, a special is created, which is the engine of the return procedure.
It acts as a carrier of registry parameters and other information used by Windows 7. The functioning of the point is similar to the game checkpoint, subject to the operation of OS, provokes a restart of the PC operation.
Video - How to create a Windows 7 recovery point
Automatic recovery point
The Windows operating system 7 automatically saves the working state. In most cases, this occurs before installing critical updates, large-scale changes in the registry, driver updates, complex software updates or other operations that significantly affect the operation of OS.
There are two methods of automatic type:
- full automatic - created without user notifications;
- semi-automatic - the user independently enters the name of the point each time the system starts.

Such a computer activity allows you to use ready-made recovery points at any time, which are already stored in memory of some time. But if the OS is damaged, when there are no comparatively recent savers, it may be difficult, since the long-standing saving require the restoration of the entire system and reinstall all programs. It takes too much time and does not justify the strengths spent. If the default is to disable OS updates, which is done by users with a specific purpose, you will need to apply the manual setting option.
Manual mode of creating recovery points: Method 1
Users are given the opportunity to create their recovery points, for which the standard Windows tools apply. To make such an operation, you need to perform a few simple steps:
- Go to the Start menu on your computer and select "Control Panel".

- Among the listed icons to select "System".

- After the transition, you will find information about the operating system of the computer. On the left in the panel, select "System Protection".

- We are interested in the category "Parameters", where you need to choose a disk that requires recovery. Next, go to the settings.

- Select the desired option of recovery options. They can be disabled at all if necessary. Click "Apply" to preserve the changes.

- Once the parameters are configured, you can proceed to creating a point for this in the "System Protection" window you need to click on the button located below the right.

- Before the user, a window will pop up, allowing you to independently create a recovery point. It is required to introduce name for identification.

- When the name is entered, click on the "Create" button. Next, the user will need to wait for a while you need to create a new point.

Manual creation, method 2
The procedure is also performed by a different methodology. Suitable for those users who have not turned off the automatic creation of recovery points. It provides for even less action.

Note! If there were not previously created recovery points, the procedure will not be performed.
The computer will make an action on the points that were created automatically. It also provides for the possibility of selecting the point that is suitable for the user. As a rule, this is the last saved version.
In this article, I told about three methods of restoring the system: - usual, using the command line and using the installation disk. Also, I told about creating an OS recovery point.
In addition, in another article, I wrote about creating and in what ways you can create it. On this occasion to me on El. The address came many letters. In these letters, people ask to tell how to create a recovery point automatically?
Let me remind you to those who first went to my site. OS recovery point is needed to restore the system with unexpected failures. You seem to transfer the system from the past when she worked perfectly. You can believe me, it is much easier than to look for the causes of failure and correct them.
In general, if the system works fine, the recovery point should be created automatically - when deleting any program or other changes in the system. But sometimes it happens that this function does not work. Therefore, in the article we will look at: - how to create a recovery point automatically in two ways. But, before that, let's consider the method of manual creation of such a point.
How to create a 10 windows recovery point manually
Make it, quite simple. To do this, you just need to enter "Creating ..." search "Start" and select File:

We have a recovery point file. Open it. Select the "System Protection" menu. We translate the look at the bottom of the window and select the "Create" button. Press it. On top of this window, we have a window for creating this point. We introduce the title of the point, I usually put the number of this day and a month, it is more convenient, and click OK.


We started to create a recovery point.

Then, we see a message that the point is created.


For our point you need a place on the S. disk. Therefore, we select "configure" (above the "Create" button). We will open the "Recovery Settings" window, where we will see how much space is given to the restoration of the system.


Be sure to place the Chicbox over the line "Enable System Protection". Next, check the disk space. I advise you to be 7 percent, but you can do more or less. It all depends on the volume of your disk S. The more space you give to the restoration of the system, the more points you can create.
Now let's see, our point has been created, or not. To do this, click "Restore":


How to create a recovery point Automatic job scheduler method
We now turn to the automatic method of creating this point. To do this, in the "Start" introduce Taskschd.msc or just write the "job scheduler".


Open the file and go on the next way - Planner Library \\ Microsoft \\ Windows \\ SystemRestore


In the file "File" click on the SR right button of the mouse and select "Properties". In a new window, choose the "Triggers" menu. At the bottom of the windows click on the "Create" button.
A new window opens, where we can choose the frequency of creating such points. I advise you to create data points 2 - 3 times a week. Therefore, choose "Weekly".


Then, I put a tick over Monday and Friday and click OK. Additional parameters can not be touched, because In the next step, select the "Conditions" menu (although you can experiment).
In the "Conditions" menu, we put a tick above the item "Run with a simple computer" and select 10 minutes. This means that the computer will start creating a recovery point, only after it has been idle 10 minutes. In other words, if you watch the movie, or work with a specific program, the computer will not start unexpectedly creating a reducing point.


For laptops, you can choose to "run when powered by power supply". Click OK. For various reasons, this program may not work, in this case, I prepared you a special script that will make that your computer will create restorative points at each start, ate it suits it.
How to create a recovery point automatically script
Now I offer you a script that will help create such points automatically:
If wscript.arguments.count \u003d 0 THEN
Set Objshell \u003d CreateObject ("shell.application")
Objshell.Shellexecute "WScript.exe", CHR (34) & WScript.scriptFullName & CHR (34) & "Run", "Runas", 1
ELSE.
GetObject ("WinMgmts: \\\\. \\ Root \\ default: SystemRestore"). CreateRestorePoint "Current Recovery Point", 0, 100
End if
To make the script, you need to do the following conditions:
- You need to copy the script into a notebook or another text editor;
- Select the "File" menu, then "Save As" and save it with any name (Latin) by selecting the extension.vbs. For example, script.vbs.
- Select the type of file - "All Files" (All Types) and save the script. Next, create a file shortcut by clicking on it with right mouse button and choose - send, then - work desk.
- Then, press Alt, and, holding this button, drag and drag the file to the "Start" button "Start". Not immediately, but you will succeed. Now your computer will start creating such points with each inclusion.
If you have Windows 10, then we do everything as in the article, only after creating a shortcut, send it to the "Startup" folder. To do this, press Win + R. Inserting the window inserted shell: startup:

We have a window that we will add our fi from the desktop.

Personally, this method does not like this way, and I chose, creating a recovery point twice a week. Successes!
Output: - Windows 10 How to create a system recovery point becomes clear, after reading the article. I advise you to create a similar point at least 2 times a week. And better than 3, on every fireman! Successes!
About Windows is so multifaceted that all administration operations (installation of drivers, a hard disk structure markup, data redundancy) can be performed, even without using third-party software products. The same applies to the creation of recovery points. What is the very concept of "recovery point"? This is a protective mechanism of the system that allows you to prevent software malfunctions and incompatibility when installing new applications, launching scripts, changing registry settings, - the word of all those steps that can lead to the fatal error of the system, as a result of which it will no longer stop loading or will appear possible critical errors. After saving the point before making changes, you can restore the previous status of the computer, and avoid the inoperability of the OS. By default, immediately after installing the OS, this mechanism is in the off state. How to turn it on how to work with him how to create a recovery point And how to upload the last workable condition, today we will threaten in detail and in detail all these moments.
How to check, on which disks the protection is already included?
The process of automatically saving recovery points and downloads from them received the name of the system protection. Check whether this mechanism is activated for any partition of the hard disk on your computer, and if activated, then for which it is. To do this, open the "System" form, where the main information about the computer is displayed. We go into the control panel and select the "System and Security" section. (Categories View Mode)

Alternative way to open the same form - select the option "View the volume of RAM and the processor speed".

When working in the Win10 of the same result, it is much easier to achieve by clicking the right mouse button on the "Start" button in the lower left corner of the screen and selecting the "System" item in the menu.

The form "System" opens. Go to the subcategory "System Protection".

So, here is the form that we need. Let's see what disks the protection is on, and on what - no. This can be done by viewing the list of logical disks in the "Protection Settings" section. As you can see on the screenshot, on the test computer, protection on the disks C: and D: is enabled, and on the disk E: - not active.

It is advisable to activate protection on all system disks (i.e., on those where the operating system is installed). For those discs that are used as file storage (music, movies, programs, games), protection will only take an extra place, while software errors on such disks are quite rare.
How to enable / disable protection on the selected disk?
Select a logic device from the list and click on the "Configure" button.

As you can see, in the form of the settings form at the top, you can switch the trigger on / off protection on the disk, and slightly lower by dragging the slider on the "Usage of disk space" line, you can specify as the amount of free disk space will be used to store recovery points . Here you need to set the value of at least 1GB or 1%.

By default, after installing the new operating system on the hard disk, the protection is in the off state. Optionally, if you have a big hard drive, and you do not have to save every megabytes of free space, you can turn it on. This can be done on this form.
How to create a manual recovery point?
Also, by default, before installing a new major update, the launch of batch files or system scripts, the recovery point is created automatically, without any intervention from the user. However, the recovery point can be created at any time and manually using the standard interface. To do this, on the previous form of "System Properties", select a Disk disk in the list and click the "Create" button below.

Well, now a little more detailed on how to create a system recovery point. This procedure is incredibly simple, it is enough just to enter the name of the save step and click the "Create" button in the dialog box.

After (approximately) the minute wait for you, a message appears that everything went correctly, and the point has been successfully created.

How to upload the previous hard disk state?
If you want to download the earlier state status, open the system of the system properties (how to open it, read in the first half of the article presented) Select the desired active disk and click the Restore button.

After that, a dialog box appears in which you need to confirm your intention to download such an object as Windows Recovery Point. Click the Next button.

Now you need to choose which point you want to restore. Make a choice on the form. If you want to get detailed information, which applications are affected when recovering, click the "Search for Touching Programs". If you are oriented on the date, just make a choice and click Next.

So, all the preliminary settings are specified. All we have left is to download the selected recovery point. To start the download procedure, in the next final form, click the "Finish" button.

Immediately before the start of the download process, a warning appears that after starting the procedure, it will not be possible to interrupt it, you will have to wait for the very end. We agree with this by clicking the "Yes" button.

Windows recovery is started. The computer will be rebooted with early settings, installed programs, registry parameters. The whole process will take about 10-15 minutes.
It is important to note that the recovery procedure will in no way affect any user files, documents, multimedia and other objects belonging to the category of custom.
An alternative way to start the recovery procedure - via the command line. Press the Win + R keys combination. The mini form of the application startup via the "Run" command will appear. In it, enter the name of the RSTRUI.EXE executable file (if you wish, the extension .exe can be skipped and limited to the main name). The same dialog box appears.

Restoring WIN 10 system when booting from disk
Another important property of this feature is the ability to boot from any recovery point using a CD. This method will have to be quite by the way if, due to certain circumstances, your system completely stopped loading, and it is necessary to find effective and efficient ways to restore the operating system. One of these methods is the use of a safe regime, but we will talk about it next time. So how to create a recovery point to return the operating status of the OS? To do this, you must first download the system from the disk using the download menu.
Upload a computer from a distribution DVD with Windows. Insert the disk into the drive and turn on the computer. When the following message appears on the screen, press any key on the keyboard.

The computer will be downloaded from the disk. The following menu appears. Leaving the interface language and keyboard layout selected, click the "Next" button.

Now we have the main starting window of the OS from the disk. We do not need installation, so we choose the "Restore system" item below left.

In the system menu that opens, select the second item - "Diagnostics".

Next, go to the selection of the recovery method. As you see, Microsoft developers offer us several ways to restore. All of them differ in both the time of execution and the degree of efficiency. We are also interested in recovery with the help of a previously created point (Seitpohythint). Select the item "Advanced Parameters".

In the optional parameters menu, select the first item "Restore System".

After that, select the operating system from the list, the restoration of which you want to implement.

Now, if you have created at least one seitor, the recovery dialog box appears. In the rest of the restoration, the recovery procedure repeats the previously described, in the section "How to upload the previous hard disk state".
This method is very convenient and practical, so its use we can recommend those who are experiencing critical problems with the OS load.
RESULTS
Today we have described a detailed procedure to create a recovery point in the most relevant current system of the Windows line (dozen) and its return to workable status. In Windows 7 and Windows 8, it is still a similar way, so on the restoration of these versions of the OS, we will not stop separately. We hope that the routine described above you will not have to be resorted, and if you have, then everything will succeed, and the operability of the OS will be quickly and successfully returned to the appropriate mind.
 Error appearance during program launch
 FRIGATE plugin for Firefox
 How to show hidden folders and files in Windows
 Ways how to make a screen on a laptop brighter or darker
 How to format a flash drive, disk protection
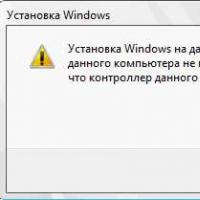 If installing Windows to this disc is not possible
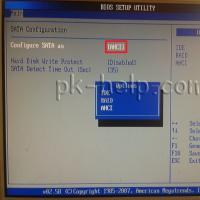 During installation of Windows "Make sure that the controller of this disc is included in the computer's BIOS menu.