There is no boot from a USB flash drive in the BIOS - how to set it up? Video - how to install a boot from a USB flash drive in BIOS. Creating a bootable distribution
Installation, reinstallation and recovery operating system, as well as carrying out some types of diagnostic work, as a rule, requires mandatory use special bootable disks or flash drives. But so that the computer can boot from external media, in the settings basic system I / O or otherwise BIOSa should set the appropriate priority, that is, literally indicate from which source the system should boot.
The procedure for configuring boot from external media is quite simple, however, it raises many questions for many novice users. And this is quite understandable. Firstly, you rarely have to face the need for such a boot, and secondly, in different models of computers, the procedure for entering the BIOS and changing boot priorities may differ in detail. Let's consider everything in more detail.
On this moment There are two types of basic I / O system: the classic BIOS and its enhanced UEFI. They both represent special programs, written on the motherboard microcircuit and designed to configure and check the readiness of hardware components, and transfer control of the PC to the operating system. Unlike BIOS, UEFI is more autonomous, it has a convenient graphical interface with mouse support, allows you to integrate drivers, run executable files in EFI format, work with GPT disks... In addition, computers with UEFI start up an order of magnitude faster than PCs with a regular BIOS.
How to get into BIOS or UEFI
To get into the BIOS or UEFI, immediately after turning on the computer, press and hold the Del, F2, or Esc button. Which button should be used to enter BIOS / UEFI on your desktop or laptop model should be indicated in the supplied user manual. However, on newer Windows 8.1 computers, this can be problematic. If the technology is activated in the system fast loading, you just won't have time to press Del or F2 in time. In this case, you need to do the following:
Open up Settings -> Change computer settings -> Update and recovery -> Recovery -> Special options downloads, and then click Restart Now. After rebooting, you will be taken to the "Select Action" window. Click on Diagnostics -> Extra options-> UEFI Firmware Options... The computer will reboot and you will be taken directly to the UEFI interface.

Note
Determining which interface your computer is using is very easy. To do this, you need to press Win + R and in the window that opens, execute the msinfo32 command, and then in the system information window, find the item "BIOS mode". Old version the I / O system will be marked “Deprecated”, the new one will be “UEFI”.

Configuring boot from CD / DVD / flash drive in BIOS
In most BIOS versions, the Boot section is responsible for configuring boot options.
It is he who contains a list of all devices connected to the computer. Because HDD and CD-ROM are built-in components, they will be on the list anyway, but if you want a flash drive there, you need to insert it into the USB port in advance, even before entering the BIOS. The first in the list is the device from which the system is currently booting. Using the arrow keys, you can change the boot priority, and by pressing the F10 key, apply the new settings.
In some BIOS versions, the Boot section may have additional options, in particular Boot Device Priority, Hard Disk Drives and so on.
If booting from a CD / DVD or a regular flash drive, it will be enough to move this device to the top of the list in Boot Device Priority and save the settings. If the flash drive is formatted as HDD, you will first need to go to Hard Disk Drives, select the first device (1st Drive) in the list, press Enter and specify the flash drive in the menu that appears. Then the same will need to be done in the Boot Device Priority subsection. We save the settings with the F10 key. This is for AMI BIOSes.


The procedure for configuring boot from DVD / flash drive in BIOS AWARD or Phoenix is slightly different. Here in the main BIOS menu you need to find the section Advanced BIOS Features, and in it find the First Boot Device item, which is responsible for prioritizing boot devices. Being on the First Boot Device, press Enter and in the menu that opens (list of devices) select CD-ROM or, if available, a USB flash drive. If there is no flash drive in the list, switch to the first item Hard Disk Boot Priority, press Enter, select our flash drive in the list, move it up the list. To save the settings, press Esc twice, and then Save and Exit Setup and confirm the saving of the parameters with the Y key.


Configuring boot from CD / DVD / USB stick to UEFI
Setting boot priority in UEFI is easier, and not just because you can use a mouse. Most UEFI interfaces have a Boot Priority panel at the bottom of the window, which displays all devices connected to the computer, including flash drives and removable HDD drives... To install a boot from a particular device, just drag it with the mouse to the beginning of the panel, and then save the new settings when exiting UEFI.

You can also click the "Exit / Advanced mode" button, go to the Boot tab in the window that opens, select "Boot Option # 1" in the Boot Option Priorities list and set a USB flash drive, hard drive, CD-ROM or other connected to computer device.

New settings are saved when exiting UEFI or by pressing the F10 key.
Have a great day!
Operating systems accumulate over time unnecessary files, parts remote programs... There is a need to reinstall Windows or another OS. Most modern laptops (and sometimes stationary computers) no longer have a CD-rom, so you need to know how to start a bootable USB flash drive through BIOS, set the startup priority.
Configuring BIOS to boot from a USB flash drive
Every modern PC user should know how to install a boot from a USB flash drive in BIOS. This is due to the phasing out of disks and the ease of use of removable drives. It is much easier to copy the distribution kit (installer) of the system to the media and install from it. The only difficulty faced by everyone who decided to install an OS from a drive is correct setting BIOS. In it, you should change the boot priority, which will force the computer to first read data from removable media, and only then run files from hard disk.
Some PC owners are faced with the problem that Bios does not see the bootable USB flash drive. To avoid this situation, you should follow these recommendations:
- The drive must be in USB before starting the PC.
- Please connect the media to the 2.0 connector, because the 7th version of the OS does not have drivers for the 3.0 input.
- Sometimes there is no boot from a USB flash drive in BIOS just because the USB controller is turned off (Award version). It must be enabled from the Integrated Peripherals / Advanced Chipset Features section. Make sure that the word Enabled is next to this line.
Booting from USB to Award Bios
World laptop manufacturers (Lenovo, Asus, Sony, HP) can install different BIOS versions on their devices. Below is an example of how to load the Award version from a USB flash drive in BIOS:
- Restart your computer, press Del or F2 until you see blue screen.
- Go to Advanced BIOS Features.
- If the option called First Boot Device is immediately present, then you should click on it and switch to removable media with the OS.
- In new versions of the system firmware, there is an additional menu section called Boot Seq & Floppy Setup. Within it, set the drive back as First Boot Device.
- It is advisable to set your hard drive as the second device. This will be needed during the installation process so that it does not start in a circle.
- Use the Esc key to go to the main menu, go to Save & Exit Setup. Confirm saving changes.
How to boot from a USB flash drive into AMI BIOS

Do not forget that the bootable media must be inserted into the slot beforehand. Below is an instruction on how to install a boot from a USB flash drive in AMI BIOS:
- go to settings using the Del button (press during the initial splash screen until BIOS appears);
- using the arrows, you need to select the Boot section;
- go to the Hard Disk Drives menu, then press enter on the 1st Drive line;
- select the name of your drive with OS from the list, press Enter.
- go to the Boot device priority section;
- enter the First boot device menu by pressing Enter;
- expose removable media again;
- go to the top menu, select Exit saving changes or Save changes and exit, confirm consent to make changes.
How to install a boot from a USB flash drive in Phoenix-Award Bios
There is another version of the global settings. Below is an option on how to install a boot from a USB flash drive in Phoenix BIOS. This option is much less common, but the principle remains the same: you must assign a boot priority so that the program launches the OS installer. To go to the settings, press Del or F2, then:
- Check if included USB port... Go to Peripherals and the word “Enabled” must be in front of the “USB 2.0 Controller” line.
- After that, go to the Advanced tab, there, opposite the “First Boot Device” line, set the USB-HDD value.
- Exit the settings with saving via Save & Exit Setup.
How to boot Windows from a USB flash drive to EFI (UEFI) Bios
The last Windows versions offer the simplest and most intuitive option on how to boot from a USB flash drive in BIOS. If in previous firmware The menu looked like a regular list, in which it was necessary to use the arrows on the keyboard for manipulation, the new UEFI interface includes graphic elements, supports the use of a mouse. For different models for laptops, the transition occurs using special buttons, for example:
- HP - ESC first, then F10;
- Asus - Del, then F2.

Some Windows users 8 note they are having trouble navigating to BIOS UEFI versions... To solve this problem, use one of the following options:
- Go to PC settings through the control panel, select the section with power settings. Here you need to turn off Fast Boot Mode.
- Restart your computer and press the buttons indicated on start screen.
- Press Shift + Restart to restart Win 8. In the menu after reboot, select the Troubleshoot section. Go to “Advanced options”. Here you need to click UEFI Firmware Settings: you will be redirected to UEFI immediately after restarting your PC.
To start from a drive via new BIOS there are two ways. Do not forget that after reinstalling the OS, the boot priority settings will need to be reset to their original form (so that the hard drive boots first). Graphic global settings are very clear, any user can navigate the sections. There are two options for prioritizing the drive. simple options:
- Go to the Boot Priority menu, it is located at the bottom of the screen. Drag the image of the removable storage device to the first position instead of the hard disk and release.
- Click on the Exit / Advanced mode button, confirm your consent to go to advanced settings. Here everything is done according to the same scheme: you need to click in the Boot section on the Boot Option Priorities item. In the Boot Option # 1 line, select your removable drive. Save and exit settings.
Video: how to set up BIOS on an Asus laptop
Each System Administrator should know how boot computer from USB stick... Most often, this skill is required when installing an operating system. After all, the Windows distribution does not have to be located on a CD-ROM. And, for example, you won't even be able to install Windows on a netbook in a different way. it usually does not have a floppy drive.
Today I will tell you how to set the boot from a flash drive to the BIOS of various manufacturers. Regardless of which version you have, the procedure will be as follows:
1. We insert our bootable USB stick into the usb connector of the computer. It is advisable to insert it into a port located directly on motherboard, i.e. from the back of the system unit.
2. Turn on the computer and press the key Delete(or F2) to get into the BIOS. Depending on the manufacturer and BIOS version, other keys (Esc, F1, Tab) can also be used, so you need to carefully look at the prompts on the screen.
In BIOS, we can navigate through tabs and lines only using the keyboard.
Next, I will describe in detail this process using the example of different BIOS versions.
Customization Award Bios to boot from a USB stick
Award Bios: First, let's check if the USB controller is turned on. Go to “Integrated Peripherals”. We go down with the arrow on the keyboard to the item “USB Controller”. Press the “Enter” key and select “Enable” in the window that appears (also using “Enter”). Opposite “USB Controller 2.0” should also be “Enable”.
  We leave this tab by pressing "Esc".
Then go to “Advanced BIOS Features” - “Hard Disk Boot Priority”. Now in my example, the hard drive is in the first place, and the flash drive should be.  We stand on the line with the name of our flash drive (Patriot Memory) and raise it to the very top using the “+” key on the keyboard.
  We leave from here by pressing "Esc".
Now on the line “First Boot Device” press “Enter”. We selected “CD-ROM”, but it is necessary to set “USB-HDD” (if suddenly booting from a flash drive does not work, return here and try to set “USB-FDD”). Let the second device be “Hard Disk”.  Exit this tab by pressing Esc.
Now we exit the BIOS, saving the changes. To do this, press “Save & Exit Setup” - press the key “Y” - “Enter”. 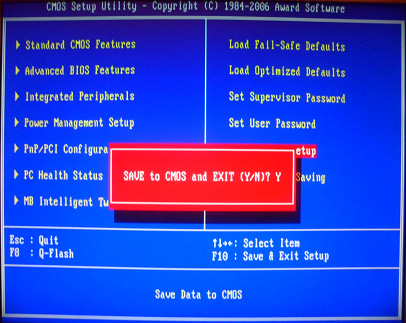
Customization AMI Bios to boot from a USB stick
If, upon entering Bios, you see such a screen, then you have AMI Bios: First, let's check if the USB controller is turned on. Go to the “Advanced” - “USB Configuration” tab.
  Opposite the items “USB Function” and “USB 2.0 Controller” should be “Enabled”.
  If this is not the case, we stand on this line and press the “Enter” key. From the list that appears, select “Enabled” (also using “Enter”).
Then we exit this tab by pressing “Esc”.
Go to the "Boot" tab - "Hard Disk Drives".  Now my hard drive is in the first place, but I need to put a USB flash drive here. We stand on the first line, press “Enter” and in the window that appears, select our Patriot Memory flash drive.
  It should be like this:
  We leave from here through "Esc".
Choose “Boot Device Priority”. Here, the first boot device must be a USB flash drive.  Press Esc.
Then we exit BIOS, saving all the settings made. To do this, go to “Exit” - “Exit & Save Changes” - “OK”. 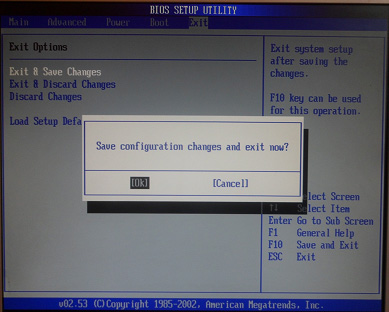
Configuring Phoenix-Award Bios to Boot from a USB Flash Drive
If, upon entering Bios, you see such a screen, then you have Phoenix-Award BIOS: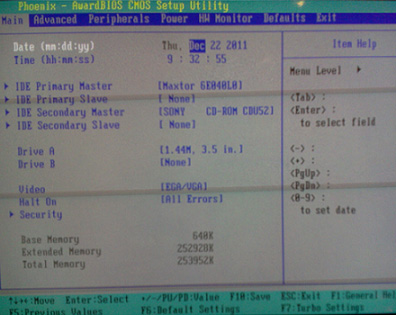 First, let's check if the USB controller is turned on. We go to the “Peripherals” tab - opposite the “USB Controller” and “USB 2.0 Controller” items there should be “Enabled”.
  Then go to the “Advanced” tab and set “USB-HDD” opposite the “First Boot Device”.
  After that, we exit Bios, saving the changes. To do this, go to “Exit” - “Save & Exit Setup” - press the “Y” key - “Enter”
  This is practically everything you need to know in order to boot from a USB flash drive. In my article, I described the process of configuring BIOS for the most popular versions: Award and AMI... The third example presents Phoenix-Award Bios, which is much less common.
V different versions BIOS, the described procedure may differ slightly. But the main thing is that you understand the very principle of setting.
By the way, I would also like to add: in order to choose which device your computer will boot from, it is not necessary to change the settings in the BIOS. You can immediately call up a special menu after turning on the computer to select boot devices (this can be done with the F8, F10, F11, F12 or Esc key). In order not to guess with the keys - we look closely at the monitor immediately after switching on. We need to have time to see an inscription like this: “Press Esc to selest boot device”. In my case, it was necessary to press "Esc".  If your computer BIOS UEFI, and you need to boot from a flash drive - you can familiarize yourself with.
If you need throw off forgotten password user by using bootable flash drive- , how to do it.
Hello, friends! Today we'll talk again about creating a bootable USB flash drive.
How do I create a bootable USB device? For what purposes to use it and what program to write?
A brief overview of the five most popular and free software to create a bootable USB drive.
Modern developments do not stand still, and yesterday's technologies are slowly but surely losing their relevance. And once popular CDs and DVDs do not seem to be such an unambiguous solution for storing, transferring information and working with it. High speed of data reading, versatility and reusability are only a small part of all the advantages of a flash drive in quality bootable media in front of the disks. Already today, almost all personal computers and laptops, if they are less than ten years old, support the ability to boot from USB devices. And in some cases (for example, a netbook), a USB flash drive may be the only device to boot from an external drive.
By the way, the new operating system Windows 10 will be the first axis, the distribution of which will be officially distributed on a USB drive. And if you suddenly need to recover files from a USB flash drive, read about it. I also recommend that you pay attention to, which will help you escape from workdays and cheer you up.
With the help of additional software, the flash drive can be used not only as a boot device for installing, reinstalling and restoring the operating system, but also to create an emergency device (Multiboot). This is a kind of reanimator, a tool from which you can boot at any time and cure your computer from viruses, restore system files or save important data. I described how to create such a reanimator flash drive in the article "Creating a bootable Live CD / DVD / USB device and using it". You can read this article.
Despite all the obvious advantages and the growing popularity of a USB flash drive as a boot device, there are not so many programs for creating it. Nevertheless, they are, and today I will introduce you to them in more detail, but first, a few words about the preparatory stage.
Preparing a flash drive
We need the flash drive itself, plus the knowledge of some important aspects... First, you need to make sure your computer supports booting from USB devices. There is a misconception that if there is no option to boot from usb in bios (boot partition) (only floppi, hdd and dvd-rom parameters are present), then booting from usb is not supported. This is not true!
More precisely, this is not always the case. The only correct solution is to refer to the manual (user manual) of your motherboard or using specialized software(as an option - AIDA64) get a detailed report on the used hardware.
The second point is the size of the flash drive. Everything here will depend on what we write to it. For example, to create a Live USB, installation disk Linux or Windows 7, a 4 GB flash drive is enough. To create a boot device with latest versions Windows, it is advisable to have at hand a flash drive with at least 8 GB.
The third point is transferring files from a flash drive. As a rule, the process of creating a boot device implies it full formatting... If the flash drive has important files, transfer them to another device in advance. To create a bootable USB flash drive and then work with it as a bootable device, use the USB-2.0 port (Windows 7 does not support USB 3.0).
How to create a bootable USB flash drive
Let's take a look at five different ways using five free Windows programs.
A small but quite functional utility with a self-explanatory name WinSetupFromUSB. Equally well suited for recording a bootable and / or multiboot flash drive (up to 10 operating systems) and creating Live devices. Official site .
Among the shortcomings is the lack of support for the Russian language. Among the advantages, as I said, is its versatility. The utility can work not only with Windows distribution, but also suitable for burning a Linux installation disc.
The usual option for creating a bootable USB flash drive, for example, with a Windows distribution kit, provides for the selection in the corresponding columns of the flash drive itself, the option to automatically format the media and the ISO image of the operating system. The recording process starts after pressing the "Go" button. You can read more about the work of this program.
To create a multiboot flash drive (multiple OS), you need to specify the path to the ISO images of the operating systems. At the time of this writing, the Windows 10 selection item is absent by default, but in reality everything is written and works, you just need to select the appropriate column with the available versions - Vista, 7, 8.
2. Rufus
Probably the easiest solution to create bootable USB drives. Everything is simple and intuitive. Suitable for work on systems that do not have an installed OS. Official site rufus.akeo.ie.
The main advantages are speed of work, simple interface, Russian language. An excellent solution if there is a need to create a bootable USB flash drive 10 with UEFI support. By the way, I wrote in detail on how to do this in.
It is distributed in the format of a regular installer and portable version... To create a bootable flash drive in the utility window, you must specify the path to the burned ISO image and click the "Start" button.
On newer systems that use UEFI instead of BIOS, set the Partition Layout and System Interface Type menu to GPT for UEFI Computers.
Otherwise, the default settings will suffice. The option to format the flash drive is assigned by default.
3. Windows 7 USB / DVD Download Tool
This utility is official app from Microsoft... The interface is minimalistic, simple and straightforward, and easy to work with. Downloading from the official site wudt.codeplex.com.
Perhaps the name of the utility (Windows 7 USB) will mislead many that it can only be used to write the Windows 7 distribution kit to removable media. However, this is not the case. In addition to the seventh version, you can write distributions of Windows 8.1 and 10 to a USB flash drive.
Of the minuses - the utility is not Russified, however, a simple and intuitive interface is designed to neutralize this drawback.
All that is required of the user is to insert a USB drive in advance, select an ISO image with an operating system and specify the path to the media (flash drive) to which this image should be deployed.
The operating principle of this program is based on standard operating room tools. Windows systems- this is "diskpart", "bootsect / nt60", unpacking the ISO to a USB flash drive. The program acts only as a graphical interface.
UltraISO is one of the best and most functional programs to work with disk images. A universal "combine" that supports work with almost any known format. It is able to work in tandem with Nero Burning Rom and integrates with virtual emulators. Will help if the image boot disk not in ISO format.
The program can convert other image formats to ISO files - NRG, MDF, MDS, IMG, CCD, etc. with UltraISO you can edit ISO files without unpacking them. The UltraISO interface is translated into many languages, including Russian. For download, you can choose from several editions of UltraISO, adapted for individual versions of Windows, as well as a portable version of the program. Download link www.ezbsystems.com.
By and large, the program does not care what boot devices will be created with its help, with what operating system, what software and from what manufacturer. The burned ISO image must be opened in the program window either using the Open command in the File menu, or using the browse button on the toolbar. You can also do this using the keyboard shortcut Ctrl + O.
Then, in the window that appears, if the program automatically selects the desired flash drive, you should click the "Write" button.
Daemon tools Ultra is a professional imaging tool. The program itself is familiar to many users by free version Lite, which allows you to mount virtual drives to read disk images. Its more functional version - Daemon Tools Ultra - offers, among other features, the creation of boot devices.
Of the shortcomings, it is worth noting that it is paid, but to create a bootable USB drive on the official website of the program, you can download a free 20-day trial version. The official website of the program.
Go to the official website and download the program. During installation (installation), you need to select a trial license type.
The program works with a huge number of disk image formats and can be used both to create a bootable device with the subsequent installation of the operating system, and to restore it (Live-disk).
To create a bootable flash drive in the main window of Daemon Tools Ultra, select the "Tools" menu item, and among its commands - "Burn boot image to USB ". Or the keyboard shortcut Ctrl + B.
In the recording parameters window, specify the path to the image, make the MBR overwrite option active and click "Start".
When the flash drive is ready, all that remains is to boot from it. The easiest way is to use the boot menu keys. The table below shows an illustrative example of such keys.
Of course, this is not the whole list of programs designed to create boot devices, but the vast majority of users will find the capabilities and functionality of the listed software sufficient.
For example, Rufus program can be used as the simplest and fastest tool for creating bootable USB disk with one Windows distribution or for BIOS firmware from under DOS.
In this article we will talk about how how to boot from USB disk, and some of the problems associated with it.
Attention! For settings Computer BIOS to boot from a USB flash drive, the USB flash drive must be connected to the computer. Connect the USB flash drive to the USB port, restart the computer, and only then enter the BIOS or call the Boot menu.
When you need it
In most cases, booting from USB is required for:
- operating system installation;
- diagnosing problems;
- hardware testing;
- removal of viruses on the computer.
In order to boot from a USB flash drive, you do not need to go to BIOS settings, change the parameters and save them. It is often enough to bring up the Boot menu while the POST screen is displayed and select Boot from USB.
One-time boot from a USB stick
Depending on the manufacturer of the laptop or the motherboard of the desktop computer, different keys may be responsible for invoking the boot menu. Most often it is F8, F10, F11, F12 or Esc... Look for a hint on the screen when you boot your computer. It usually sounds like Boot Menu or Press .. to select boot device:
V Boot Menu, select USB-HDD:

If you cannot boot from a USB flash drive, enter the BIOS settings and set the following parameter values:
USB-HDD: Enabled
USB-Floppy: Enabled
Legacy support: Enabled
External device Boot: Enabled
Secure Boot: Disabled
In different bios, different manufacturers have different parameters... Do not think that all these parameters will necessarily be found on the same computer. We have just listed the names of all possible parameters that can affect loading from USB flash.
Configuring boot from a flash drive in BIOS settings
This method is useful if:
- you frequently boot from USB or constantly work in an OS booted from USB:
- you don't want to bring up the Boot menu every time you need to boot from USB.
1. When the computer boots up, press the key to enter BIOS setup. Most often it is Del, F2 or F10... If you cannot enter the BIOS using these keys, read the manual for your computer or your motherboard and find out which key allows you to enter the settings.
2. If you have AMI BIOS, go to the section Boot => Boot Device Priority and select the USB flash drive as the first boot device.
If you have AWARD BIOS, enter the section Advanced BIOS Features and in setting First Boot Device choose USB-HDD.
Save the settings.
 How to update iPad: instructions
 How Do Not Disturb mode works on iPhone
 Nokia 3310 when it came out. How they find us
 History of computer graphics in Russia 1 history of development of computer graphics
 Complete order: How to organize icons on a smartphone Complete order: How to organize icons on a smartphone
 Xiaomi Huami Amazfit Bip is the best smartwatch without any but even if
 What is Jailbreak and what is it for?