Installing Windows 7 on a clean computer. Installing Windows on an empty hard drive. Backup and search for product key
This article stresses step by step, how to perform a clean installation of Windows 7. This method is suitable if the operating system (OS) has not yet been established, you want to replace the existing OS or install Windows 7 second system in addition to the system of another bit or another manufacturer.
On this page:
Minimum system requirements
First of all, make sure your computer meets the minimum requirements:
- Processor: 1 GHz, 32-bit or 64-bit
- RAM: 1 GB (32-bit) / 2 GB (64-bit)
- Free disk space: 16 GB (32-bit) / 20 GB (64-bit)
- Video adapter: DirectX 9 graphics support, 128 MB memory (to turn on AERO theme)
- DVD reading and writing device / USB Flash.
- Internet connection (to download updates)
Preparation of carrier
If you have a disk with Windows 7 - go to.
In case you downloaded the OS image - read on.
Installation can be made:
- with USB Flash (flash drive)
- from DVD disk
Record the image on the USB Flash (USB) or DVD
There are many ways to write, I propose several of them to your choice:
Preparation of a hard disk section (HDD) in which the installation will be made
It is advisable to transfer all the whole important information and format (in the installation process).
In order not to get confused, you can install in advance Tom Tag:
Exhibit download in bios
I guess you know how to upload from the disk or flash drive. If not, following the link, you will learn how this is done:
Installation
Insert the DVD or USB flash drive (if you prepared it).
If the DVD is recorded correctly and the download priority is set correctly, this prompt will appear (you need to press any key while on the screen):
This is done only 1 time, before installation, during the installation process, we simply wait 5 seconds and the installation will continue automatically.

Starting:

Select language settings:

Press the button "Install":

We read the license agreement if we agree - place the checkbox and press "Further":

Choose "Full installation":

Choose need section and click "Disc Setup":

Click "Format" (preferably, but not necessarily).
ATTENTION, all data on the selected section will be deleted!:

Continuation of installation:

The car will restart and the installation will continue:


For security reasons, install the password (preferably, but not necessary).
So, I think the first article of the site should begin with this.
For those who are first faced with this problem, this article will be useful instructions By installing Windows and using these materials, you will be able to install an absolutely working and ready-to-work operation system without much efforts.
Installation Instructions: suitable as for Personal computersand for laptops.
You already have to have an installation disk with Windows 7 that you can buy, download, take from friends.
Step 1 Install the boot from the disk in the BIOS
If you already have a download from the disk in the BIOS settings, you can immediately cross the step 2
To install Windows you need to install in BIOS booting from CD / DVD drive. To do this, we turn on our PC and at the loading moments (when white letters appear on the black screen) 3 keys simultaneously appear: F2, F4 and Delete (Because what is your version of the BIOS).
If everything happened, then we get into one of the windows
this is
then do this:
Next you need to go to the Boot tab


Choose 1st Boot Device.
And press ENTER.
A window appears in which you will need to choose your drive, usually it is indicated as: CD / DVD: drive firm, and press ENTER.
Now in the 1st Boot Device field your drive must be.
After that click F10. And in the window that appears, click Enter.
If you have a view

Then make it
Go to B. Advanced Bios. Features. Where you have the following menu:

Here you need to press ENTER on First Boot Device. And in the dropping window to mark CDROM.
After that click ENTER
Click F10 and press Y and ENTER in the window that appears.
There may be other windows depending on the versions of the BIOS, but the point remains the same - you need to find and choose to load the drive.
Step 2. Installing Windows 7
Being in the BIOS or simply when you turn on the PC, you open the drive and insert the disk with the operating system and reboot the computer.
If you did everything right, then after rebooting you should have an inscription: Press Any Key for Load From CD ... At this point you need to press ENTER or any other key, in some cases this inscription may not be (it depends on what installation disk you have), then you will immediately see the start of the installation process:

We are waiting for the installation program to copy the necessary data for installation, you will not need any action from you.
After this window, another window will appear. windows startup Starting Windows , we are also waiting. Usually takes about 15 minutes

After that, the first window will appear in which you need to set the language, time format and monetary units, as well as the keyboard layout. Usually everything is already in Russian, make sure that if you need to change and press the Next button:

After that, the window opens in which you just need to click Set:

Then there will be an inscription Start of installation:

A window will open in which the terms of the license agreement must be adopted. If you agree with everyone, then we celebrate the item I accept license terms and click further:

Select the installation type. Since we first install the operating windows system 7, then we will only suit the second option Full setting:

Select the section (Sections are local discs C, D, E etc.) to install Windows. If you install on a new computer, you first need to create partitions. To do this, highlight one mouse click Unnoticed on disk 0 And press the disk setting:

Allocate Unnoticed on disk 0 Once again and click Create:

If you have a hard drive size ( hard disk) more than 250GB, then you'd better create two local disk, one specially under Windows, at least 50 GB (I recommend 100), and the other under the rest of the information (how much xxx GB).
Note: If you create two or more local disks, then make sure that all sections you create had the name of the disc0 section 1,2,3 ..., and not unoccupied disk space !!! Otherwise, sections with such names will not be seen by the operating system and you will not be able to use the disk space on these sections.
Create a section (s) and click Apply:

After the sections are ready, note the one we created specifically under installation of Windows (~ 50GB). Select the section and click Next:

You will open the Windows Installation window in which there will be 5 Windows 7 installation cycles:
1. Copy Windows files
2. Unpacking Windows files
3. Installation of components
4. Installing updates
5. Completing installation
At this stage, no action is required from the user, the installation process will take some time from 20 to 50 minutes, depending on the power of the computer.

PC reboot, window opens Setting up windows. Here you will need to set the username and the name of the computer:

Install the password on your account. If you need it, we enter the password and remember it if you do not need it, then we simply leave these fields empty and press the Next button:

We enter the key windows products. The key is usually located on the back of the box from under the license disk with the operating system. If you downloaded demonstration Windows 7 from the official site microsoft., then press the button Skip:

Select item Use recommended parameters:

In this article, I will tell you how to independently install the Windows 7 operating system from the disk to my computer or laptop.
I offer a detailed I. step-by-step instructions With a visual demonstration of installation screenshots operating system Windows.
If you think that the installation of the operating system is something complicated and incomprehensible, only a specialist can cope with, then I will disappoint you: it is not true. Now you will see for yourself.
All you need to install Windows 7 (or Windows 8) is a computer or laptop, a disk with the operating system (since in this article we will install Windows from the disk), detailed instructionswhich I will give you now, and perhaps attentiveness! I hope that after installation you will not look like. 🙂
After installation, I recommend immediately install. You understand yourself - in our time of electronic payments it is very relevant. Also now (yet) Nowhere without Adobe Flash Player. . Like it rightset read. Perhaps you will also be interested in quite nice . If you store on a computer private Information, create for it.
Important: Most of all possible problemsArriving when installing Windows 7 is associated with an incorrectly prepared installation disc and (or) the quality of the "Assembly OS" recorded on it. How to record the image of the operating system on the disk, you can read in the article.
Remember: If this drive is not out of the box, that is, bought in the store, then you need to use only original images from Microsoft MSDN. It is the original image that is also available on the network, like different assemblies - is a pledge successful installation Windows and its normal functioning.
Do not use the assembly of unknown origin. All third-party fixes, corrections, homemade assemblies you put on your own risk. The consequences may be irreversible.
Before installing Windows 7:
Remember the two main points that you need to execute before installing Windows.
First - It is to decide in advance, on which partition of the hard disk system will be installed. As a rule, in most cases it is a C: \\ disc. To remember (or create) the volume label and its size.
Remember, your desktop is entirely on a C: \\ disk, or rather, here: C: \\ Documents and Settings \\ Username \\ Desktop. Think in advance about the integrity and safety of archiving files for you, copy them from the desktop, that is, from the disk with, to another disk or flash drive.
All programs installed on the C: \\ disk will also be deleted, but this is not a reason to drag the entire folder with the programs to other disks. It is much easier to re-establish these programs on the clean system. Do not be lazy, not every day you reinstall Windows.
Second The moment is the drivers to your computer or laptop. They need to take care in advance. To most laptops, they come in the kit, but if there are no (or update), we are looking for the manufacturer's official website and download them in advance.
All you need to know about the installation of drivers, I recommend reading in the article "Installing Drivers or Five Iron Rules", which is located.
If you skip this important momentthen after installing Windows, you can stay without the Internet, because it is not a fact that windows Distribution will initially comprise your drivers network card.
Installing Windows 7 from the disk:
Insert the disk with the Windows operating system into the drive and restart the computer. By the way, if you do not have a drive, you can install the Windows operating system using usual.
We will continue. Our task is to configure the computer download from the DVD. This can be done in 2 ways:
- 1. Select the device (DVD) in a special boot menu;
- 2. Change the boot priority to the BIOS (with HDD to DVD).
The first way, select the device in the boot menu, easier and more convenient. After installing Windows, it disappears the need to return the load from the HDD (hard disk). However, on old computers, this function is missing and in this case you have to go to the BIOS and change the priority of the download.
Start - reboot, waiting when the screen is worshiped and at the first signs of the awakening system (the appearance of the logo), press and hold the Delete key on the keyboard. Why DELETE KEY? These can be keys F1, F2, F3 + F2, F10, Ctrl + Alt + Esc, Ctrl + Alt + S, ESC.
Some universal button to enter the boot menu or to enter the BIOS does not exist, and it all depends on the manufacturer of the computer ( motherboard). The surest way is to read the instructions from the computer or from the motherboard. The table below shows a visual example of such keys.
The boot menu looks like this:
Press F10, agree and confirm the output with saving (Save and Exit) by the choice of "OK".
Phoenix-Award
Consider the second interface version. To load from the disk, you need to change the priorities so that the first device is the DVD drive. We find the "Advanced Bios Features" and the arrows switch to the first device (First Boot Device), change on CDROM.
Click F10 and confirm the output with saving (Save and EXIT).
If problems arose at this stage, then I recommend to watch this video.
We will continue. If everyone has done correctly, we will see the following window with the inscription: "Press Any Key to Boot from CD or DVD".
Here you need to press any key, for example, space. It is done only 1 time And only at this stage of installation. We see the next window with the inscription "Windows IS Loading Files".
File extraction occurs, after which we will see the inscription "Starting Windows" And the Windows 7 installation window itself. The installation of Windows !!
Choose need Language And click "Set".
Next, we need to choose windows editorial office 7. Choose the one to which you have a key or which are going to activate. On laptops, it usually indicates a piece of paper with a key located on the bottom of the laptop. Entering the serial number will be a little later, it is transferred to the end of the installation.
A few words about the possibility of installing 32-bit (x86) or 64-bit windows version. If you have more than 4 GB random access memory (She is RAM, RAM, MEMORY), then we put the 64-bit, if not, then 32-bit (x86).
We will get acquainted and agree with the terms of the license. Next, we need to choose the type of installation - select "Full Installation".
Now you need to choose a section to which Windows will be installed.
If you have this section reserved by the system (note, it is still in megabytes (MB), and not gigabytes), for example, as in the next screenshot, then select the disc 0 section 2.
So that it is not so painfully painful when choosing a section, in advance before installing Windows, look at how many gigabytes takes your disc C.
If you have one partition on your hard disk and it is more than 250 GB, it will correctly create two local disks. One section is specifically for Windows (about 50-100 GB are usually removed), and the other is under the storage of your personal information (how much will remain, XXX GB).
Note: The sections you created must be referred to as disc 0 section 1, 2, 3 ..., and not "unoccupied disk space". Otherwise, the sections with such names the operating system simply will not see.
If necessary, create a section or partitions and click "Apply":
Attention: At this stage, problems may occur - when Windows 7 asks the driver for further installation or when the system does not see your hard disk to continue the installation.
Or install (if prepared) the hard disk controller driver. If you already have two or more partition on your hard disk, then the item above can be skipped. So, we chose the System section, and now we need to run formatting.
The installer warns that all of our data will be deleted. We need it, because we are interested in a clean installation of Windows. We agree and wait. Usually the entire process takes a few seconds. After formatting, we see that the free space has become more, quietly press "Next".
And here is the beginning of the installation, the process is running. You can already exhale).
We are waiting ... It usually takes 15-25 minutes. When our system is installed, it will offer to enter the username and the name of the computer. We enter.
If there is a desire, you can enter a password and a prompt. Next, Windows will suggest to enter serial number. We enter (if any). If not, we skip this step and remove the checkbox "Automatically activate when connected to the Internet".

In this article, we will look at how to install the Windows 7 operating system from the disk. The instruction was prepared as visualized and affordable even for beginners.
The entire process of installing the "seven" will consist of the following steps:
BIOS setup To download the computer from the boot disk;
Recommendations on the division of a hard disk;
Definition system partition;
Installing Windows 7 and initial setting.
Step 1. Setting up the BIOS to load a computer from the boot disk
If you do not know how to upload from the disk, following the link, you will learn how this is done:
Step 2. Starting installation
Coming out of the BIOS after saving the settings made, the computer will be rebooted and if any operating system has already been installed on it, after some time the message "Press Any Key to Boot from CD or DVD" appears on the screen (press any key for Downloads from CD / DVD disc) What you should do.

Be careful, as you will have only five seconds to enter the installation of the system. If the current operating system is loaded, it means that the ability to start the installation was missed and reload the computer to the next attempt.
If you install the system for a new computer or clean hDD, then you will not see the previous window installing Windows 7. Start automatically.
So, if the computer started loaded with installation diskYou will appear on the screen to start installing the system in which you can see the download process initially file required.

If this window does not appear, and the loading of the old operating system began (if it was installed) or there were reports that boot disk Not found (in the case of installation on a new computer or hard disk), then this means that your computer failed to boot from the disk and it is worth returning to the previous step on setting the BIOS.
After downloading the basic files, you must appear the settings of language parameters, date and time format, as well as the keyboard layouts, in which the default parameters for Russia will be installed.


The recovery item may be useful to you in the future, in case of problems with the installed system, for example, due to damage, delete or unauthorized changes in its system files. As a rule, this leads to the unstable work of Windows 7 or the failure to load at all. In this case, you can restore the initial system files From the installation disk with the cover of the aforementioned item.
In general, the "Restore System" section in Windows 7, a fairly powerful tool for correcting various kinds of problems arising during its operation, and we will defy the individual publication to him, and within the framework of this article, we click the "Set" button to start directly to Installation.
After a few minutes, you will appear in front of you with a license agreement, the condition of which must be taken by installing a tick in the proper item and clicking the "Next" button.

In the next window you have to make a choice of installation type:

As you can see, here we can choose two options: update and full setting. If you can use the update item, if you want to update your old operating system on Windows 7, while saving all installed programs and settings. True for this, the installation of "seven" must be launched directly from your already installed OS. It should also be remembered that this is possible only from WindowsVista, and to the operating systems of older generations, including Windows XP, the update is not applicable. In general, this type of installation is not the most successful solution. The fact is that in new Windows It is shown not only the settings of the previous system, but also all its problems, brakes and glitches. Yes, and in general stable work Systems and earlier installed programs In this case, not guaranteed. therefore preferred type It is a complete setting, which should be selected.
At the next stage of installation, we have to choose a partition on the hard disk to install Windows 7. Here, I would like to make a slight digression and bring some useful recommendations on splitting the hard disk to system sections:
Do not assign all the hard disk space for one single section. This may take a lot of trouble in the future.
Modern hard drives have sufficiently large containers for storing data and therefore it is advisable to split them into several thematic sections.
Recommended for the installation of the operating system and the necessary software Distribute a separate section and do not score it with your personal data.
Choose the size of the system partition follows with a margin, given that for correct windows work15% of the place of this section should remain free.
Do not create too many sections. This will complicate navigation and reduce the efficiency of the distribution of files and large folders
Step 4. Definition of the system partition
Now, let's go back to the installation. From this point on, the installation of the installation can go in two ways:
Option 1: You have a new computer and a hard drive has never been distributed. In this case, the following window will appear in front of you:

To split the hard disk to partitions, select the item: "Disc Setup". In the above options, select "Create" and enter the required section in the window next to the window. It should be remembered that the size you must point in megabytes. Calculate it based on the fact that 1 gigabyte \u003d 1024 megabytes. As a rule, for Windows7 and related software, it is enough to 60 - 100 GB, but you have the right to do it and more if necessary.

When specifying the desired size of the future system partition, click the Apply button. Next, to use all your capabilities, Windows to create an additional section for it. Do not be scared, it will take only 100 MB of free disk space and will be invisible for you.

By clicking "OK", we will return to the section selection screen for installing Windows.

As you can see, there have been changed here. Now we have a section, reserved system For their own needs, the newly created section and the remaining unintended area. From an unoccupied disk space, in the same window you can create additional partitions in the same way that we used above, and you can postpone this action for later and finally place your drive already in Windows.
Having received the right solution, we allocate that part of the disk to which we plan to install the operating system and click "Next".
Option 2 - If the operating system is already installed on your computer. Then your hard disk is already distributed to the logical areas, and you will see the window with the listing of all the sections found on it, for example:

Attention! All further manipulations with the found partitions can lead to the loss of your data, so be very accurate in your actions.
If the current partitioning of the hard disk does not suit you, you can delete the existing partitions in whole or in part by selecting the appropriate part of the disk, and then the "Delete" option. After this, the unintended place on the disk formed after this, you are entitled to break down at its discretion to the above method, discussed in Embodiment 1.
If the current disk markup is completely satisfied, then you need to make a decision which of the existing partitions you will install Windows 7 and whether you want to save the information there. In this case, before moving on, let's first get acquainted with possible options Installations, after which you can already take a thoughtful decision, not a finger in the sky.
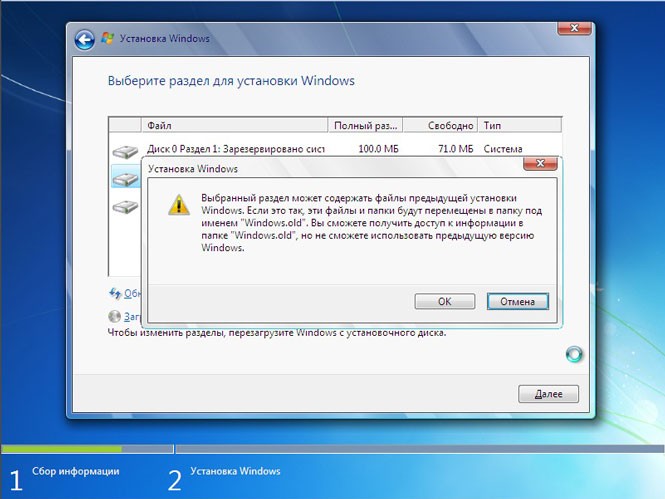
You chose the section on which this moment Your old operating system is installed, and the data stored on it is planning to save. In this case, after pressing the "Next" button, before installation, you will see a window with a warning that previous copy of Windows. With all its files and folders, will be moved to the "Windows.old" folder. The rest of the information will be untouched. By clicking "OK", in the warning window, you will run the installation process.
There is one significant disadvantage in such an installation. As a rule, after long-term operation of the operating system, the section on which it was installed is very mild and contains quite a lot. unnecessary files. Enhancements to all of this also a new operating system with related software, you will come across at least with an irrational use of a hard disk space, file defragmentation and even possible overflow, which will undoubtedly reduce the speed of the system.
If you chose a segment of a hard disk system as a future system partition, and you want to save all the stored information on it, the setting will start immediately after pressing the Next button.
If you plan to install Windows 7 to a clean partition (preferred option from all) and you have already saved information on it elsewhere else, or you do not need it, then before installing it should be formatted. To do this, select "Format". The installer will display a warning that this section may contain important data for you and they will be destroyed.

After pressing the "OK" button, the selected part of the disk will be fully cleaned from the information stored there and to start the installation only to select the "Next" item.
Step 5. Installation and Initial Setup Windows 7
So, after selecting the system partition, the system installation process will begin directly, during which the files will be copied and unpacking, installing components and updates.

During installation, your computer will be automatically rebooted several times, and the whole procedure can take from 10 to 30 minutes, depending on its power.


Finally, after completing the installation and the next reboot of the computer, the first startup window appears before you. windows settingsin which you will have to enter the username (your name account In the system) and computer (name under which it will be visible on the network to other users).

On the next screen, you can create a password for your account or postpone this action, leaving the fields empty and pressing the "Next" button.

The next step will be the ability to select automatic parameters windows updatesintended to regularly check over the Internet Availability of all kinds of security fixes of the system, critical updates and service packs on the official website technical support. Turning on automatic update It is desirable, but at this stage is optional, since you can perform a more flexible setting of this parameter after installation from the control panel.

After selecting security settings, program initial setting Windows will offer to check the date and time setting. If everything is true, click "Next".

If the network card drivers were installed during the installation, you will see the window. network settingsin which you will need to select the location of your computer.

After you choose, a network connection window will appear and apply the parameters.

This initial system setup can be considered complete. After the final application of the parameters, the welcome window will appear before you, then the system will prepare the desktop, the appearance of which marks the completion of the Windows 7 installation.


Immediately after the installation is completed, you should install everything required drivers Connected devices.
Remember! After installing Windows 7, you need to log into the BIOS again and return the load from the hard disk.
![]()
In contact with
Very often, new computers are sold without a pre-installed operating system. And if you are the happy owner of such a computer, then you are worth the task of independent windows 7 settings. This task is more complicated by the fact that on a new computer it is worth new hard The disc, which, as a rule, is not divided into sections.
On a new hard disk, you need to create at least one partition to establish an operating system on it. I always create at least two sections on a hard disk ( c. C. and disc D.). In creating too large number Sections I mean I do not see: two or three times.
Why do you need to break the hard drive into several logical disks?
- First, under the installation of the operating system and the necessary software, it is recommended to divert a separate section and do not store personal data on it. Plus on system disk There must always be free space for Windows correct operation.
- Secondly, in the case of reinstalling the disk system and formatting C. - All information on it will be destroyed. And all that is on others sections hard disk - not suffer.
So, proceed to installing Windows 7., during which we share our new hard drive into several sections. To install, we need a boot disk or boot flash drive with the operating system.
Turning on the computer, first go in Bios. And tighten the boot from the disk, or from the flash drive (how to do it in detail described and). We insert our media into the computer, save all the necessary settings in the BIOS and reboot.
The Windows Installer Sheath will appear on the screen. It will start loading the required installation files:
After some time, a window will appear in which you need to select the system language and click "Next":
To start the installation, click the "Set" button:
In the next window, we accept the terms of the license agreement, putting the appropriate checkbox, and press "Next":
Then choose the installation type " Full setting”:
Because We install Windows 7 on perfectly new hard driveThe following window should appear before us:
In order to break the hard disk to the sections, press the button " Disc Setup". In the emerging options, choose " Create"And enter the desired section size next to the window. It should be remembered that the size is indicated in megabytes. In my example introduced 81920 MB. Specifying the desired size of the future logical disk, click " Apply”:
After that, Windows will ask for an additional partition for it. Do not be afraid, it will take only 100 MB of free space on the disk and in installed system It will be invisible. Click "OK":
After that, we will return to the section selection screen for installing Windows.
As you can see, there have been changes here. Now we have: 1) section reserved by the system for their own needs; 2) just we created the section; 3) the remaining unoccupied place:
From an unoccupied disk space, in the same window you can create additional sections. This is done in the same way that we used above. I highlighted this line - I pressed the button " Create"- And without changing the size, pressed" Apply". That's what happened:
After that, we allocate the partition of the disk on which we are going to install the operating system and press "Next".
The process of installing the system will begin directly during which the files will be copied and unpacking, installing components and updates:
During installation, your computer will reboot several times - at this moment do not press anything, just watch the installation under the installation.
After the installation is completed, several Windows 7 initial setup windows appear in front of you. Pass them and you will see a worker windows table 7:
That's all: on this, the installation of the operating system is completed.
A source ---
 Causes of why Flash Player does not work, and troubleshooting
 The laptop itself turns off, what to do?
 HP Pavilion DV6: Characteristics and Reviews
 Format representation of a floating point numbers How negative numbers are stored in the computer's memory
 Computer fries and does not turn on what to do?
 Why does not work mouse on a laptop or mouse?
 How to increase or decrease the scale of the page (font) in classmates?