Installing Windows 7 on HP. Tips How to reinstall Windows on your own HP laptop. Conversion in MBR without data loss
Good hour to everyone!
I don't know much or accidentally so it turns out, but installed Windows on laptops, often happens terribly brake (with unnecessary additions, programs). Plus to this, the disk is not very convenient - one single partition with Windows OS (not counting another "small" backup).
So, in fact, it was not so long ago to "understand" and reinstall Windows on the HP 15-AC686UR laptop (a very simple budget laptop without frills. By the way, it was on it that was installed extremely "buggy" Windows - because of this I was asked to help me. . Some points took a picture, so, in fact, this article was born :)) ...
Setting up HP BIOS Laptop for download from flash drive
REMARK! Since on this HP laptop there is no CD / DVD drive, then installing Windows was performed from USB flash drives (because it is the easiest and fast option).
The question of creating a boot flash drive in this article I do not consider. If you do not have such a flash drive, I recommend to get acquainted with the following articles:
- Creating a bootable flash drive Windows XP, 7, 8, 10 - (In the article, I consider installing Windows 10 from a flash drive created by this article :));
- Creating a boot UEFI flash drive -
Buttons for logging in BIOS settings
REMARK! My blog has an article with a large number of buttons to enter BIOS on various devices -
In this laptop (I liked it), there are several buttons for entering a variety of settings (and some of them duplicate each other). So, here they are (they will also be duplicated in photo 4):
- F1 - system information about a laptop (not in all laptops is there, and here in such a budget built :));
- F2 - laptop diagnostics, viewing information about devices (by the way, the tab supports Russian, see photo 1);
- F9 - selection of the boot device (i.e. our flash drive, but about it below);
- F10 - BIOS settings (the most important button :));
- ENTER - continue loading;
- ESC - See the menu with all these laptop download options, choose any of them (see photo 4).
Important! Those. If you do not remember the button to enter the BIOS (or something else ...), then on a similar model range of laptops - you can safely press the ESC button after the laptop is turned on! Moreover, click better several times until the menu appears.
Photo 1. F2 - HP laptop diagnostics.
Note! You can install Windows, for example, in UEFI mode (for this you need to record a USB flash drive and configure the BIOS. More details about it here :). In your example, I will consider the "universal" method (because it will also be suitable for installing Windows 7).
So, to enter the BIOS on the HP laptop ( approx. HP15-AC686 laptop) You need to press the F10 button several times after you have turned on the device. Next, in the BIOS settings, you need to open the System Configuration section and go to the Boot Options tab (see photo 2).
Photo 2. F10 button - BIOS BOOT OPTIONS
- Make sure that the USB Boot is enabled (there must be enabled mode);
- Legacy Support Enable (must be Enabled mode);
- In the LEGACY BOOT ORDER list, move the strings with USB to the first places (using the F5, F6 buttons).
Photo 3. Boot Option - Legacy Enabled
Actually, you can now start installing Windows. To do this, insert, pre-prepared, bootable flash drive in USB port and reload (turn on) laptop.
Photo 4. Boot Device Option (Selecting the HP Laptop Download option)
A window should appear in which you can select the boot device. Because Windows installation We carry from a flash drive - you need to select a string with "USB Hard Drive ..." (see photo 5). If everything is done correctly - then after a while you should see the Windows Installation Welcome window (as in photo 6).
Photo 5. Selecting a flash drive to start installing Windows (Boot Manager).
On this, the BIOS setting for installing the OS is completed ...
Reinstalling Windows 10.
In its example below, reinstalling Windows will be conducted on the same disk (though, on a completely formatted and broken somewhat different).
If you configured the BIOS correctly and recorded the USB flash drive, then after selecting the boot device (button F9 (photo 5)) - You must see the Welcome and Offer window to install Windows (as in photo 6).
We agree with the installation - click the "Install" button.
Photo 6. Welcome window for installing Windows 10.
Next, reaching the installation type, you must select " Selective: only to install Windows (for experienced users)". In this case, you can format the disk, as needed, and completely delete all old files and OS.
Photo 7. Selective: Only installing Windows (for experienced users)
The next window will open a manager (a kind of) disc. If the laptop is new (and no one has "commanded" in it), then most likely you will have several sections (among which there are backup, for backups that will be needed to restore OS).
Personally, my opinion is in most cases, these sections are not needed (and even the OS, which goes with a laptop, is not the most successful, I would say "trimmed"). It is not always possible to restore with their help using Windows, remove some types of viruses are impossible, etc. Yes, and backup on the same disk as your documents are the same not the best option.
In my case, I just allocated them and deleted (everything is united. How to delete - see photo 8).
Important! In some cases, the removal of the software running with the device is the reason for failure in warranty service. Although, usually, it never applies to warranty, and yet, if there are doubts, specify this moment (before removing everything and everything) ...
Photo 8. Removing old partitions on the disk (which were on it when buying a device).
Photo 9. Everything was removed - one not marked disk remained.
Then it will also be left to select this section (97.2GB), click the "Next" button and make it installing Windows.
REMARK! By the way, the rest of the hard disk is still not formatted. After Windows is installed, go to "Disk Management" (through the Windows Control Panel, for example) and format the remaining space on the disk. Usually, they make just another section (with all free space) under media files.
Photo 10. A single section of ~ 100GB is created to install Windows in it.
Photo 11. Installation process (you just need to wait :)).
If you laptop owner HP Envy M6.operating on the basis of a new operating system Windows 8. - You will definitely look for the answer to the question: how can reinstall more familiar and stable Windows 7. instead of very raw and incomprehensible Windows 8. ? And if you went to a dead end in search of a worthy answer to this question - they got to the site you need!
Consider the highlights on the example of my laptop HP Envy M6 1151SR .
First we must properly install the Windows 7 operating system. Laptops of the latest models, as you might notice, are equipped with a fundamentally new intermediary interface between the equipment and the system called UEFI . What it is you can read on the Internet. I will dwell only at some moments. New interface - overcomes restrictionsSuperfined system Bios. By the amount of memory (both physical and operational), processor power, etc. One of the new features - support for hard drives with a volume of more than 2 TB . This is achieved using a new format for placing the partitions on the disk: to change the main boot record MBR It comes the so-called GPT.. GPT allows the creation system protected, isolated from the rest of the section to contain windows bootloader.
Usually when installing the system creates local disc 100 MB Especially for the bootloader. In the case of GPT, two partitions will be created - the loader with a size of 100 MB and a kind of "restrictive trait" - a disk separating the boot partition from other local drives. All this is supported by Windows 7, but problems may occur after installation. If you are the owner licensed Windows 7. - nothing to worry about. Just install it on the disk and spend activation. In the reverse case activation existing methods will not be possible due to the fact that the boot section is blocked. And as a result, after the expiration of the 3-day activation period, you will receive non-working system .
To avoid such a problem best - convert disc in MBR With the help of an external bootable flash drive of Windows 7. This operation Delete all files on the disk! Do not forget to make a backup. Load from the flash drive and click on the Start button. Enter the search field "Computer Management" and open the appropriate program. Next - go to the "Disk Management" section. Right-click on the hard disk icon and select the menu item. "Convert to MBR disk". Follow the steps on the screenshot below, however, I already have a disk in the MBR and the menu item logs how to "convert to the GPT disk".
Thereafter delete all partitions from the disk - you will create them after installation.
Read more Important Step - Properly boot from the Installation Disc without UEFI. The fact is that in the default UEFI for the hard disk, the GPT mode is turned on, and we need a MBR. Therefore, when you turn on the computer, click F9 and choose "BOOT FROM INTERNAL CD / DVD-ROM" or something like this. In no case, do not choose "Boot from CD / DVD (UEFI)", as the disk when installing the system will be converted again to GPT.
What system to install - choose you, but my advice is use original Windows 7 disk images. As laptops HP Envy M6. Work on the basis of processors Intel Core i3, i5, i7 with 64-bit architecture, as well as the number of RAM exceeds 4 GB- accordingly, we must install Windows 7 x64. , I advise SP1 - It is more stable. Another advice - when installing, do not assign a lot of space under the system disk. Limit volume 50-60 GB.
So, we have successfully coped with the installation. The second problem with which you will come across, is drivers for devices . The fact is that on the official website HP. The manufacturer has provided the laptop drivers only under Windows 8. . And if you, like me, hate "Painted" drivers and drivers "all in one" drivers, then I will try to tell how to find native drivers under Windows 7 on the Internet.
First of all, open Windows Device Manager: Computer (right-click) -\u003e Properties -\u003e Device Manager . In the window that opens, some devices will be determined, some will have a yellow question mark. They need them.

In the picture, only one unidentified device, but you will have more. The first thing we have to do is - create a text file with equipment identifiers. We carry out the following action for all devices with a yellow question mark: right-click -\u003e Properties -\u003e Information and choose property from the list - ID equipment. Copy the first line in the list below and insert into the text file:

After the list is compiled, we pay attention to those strings containing Ven_8086. - This is the manufacturer identifier Intel. Processor, motherboard, controllers in laptops HP Envy M6. - production of the company Intel.
Procedure Next:
1. In the search for the site DRP.SU, we drive the equipment identifier string;

2. Copy the device name from the search results;
3. We are looking for a device driver in the Google.com search engine, specifying a search query in such a format:
Device name Windows 7 x64 HP.com

4. Find in the search results page driver on the official HP website and go to this page;

5. Download the driver.
Next we are looking for drivers for all other devices. I'll say right away - drivers WiFi, Bluetooth, Audio Cards, Fingerprint Remover, Card Reader and Touchpad Suitable from the driver package for Windows 8. Just go to the HP website to the Support section -\u003e download drivers, select your laptop from the list and download the specified drivers for Windows 8.
Drivers switchable graphics adapters can be found in this way:
1. Go to the driver download page for your laptop on the official HP website;
2. In the "Graphics" section, copy the driver name, for example: "AMD High-Definition (HD) graphics driver";
3. Find in Google Driver to the above method.

Here is a link to the driver that is suitable for a laptop HP Envy M6 1151SR: http://h10025.www1.hp.com/ewfrf/wc/softwaredownLoadIndex?cc\u003dru&lc\u003dru&dlc\u003dru&softwareitem\u003dob-98292-1.
Concerning other devices- If the results of the search for any driver in Google, no results from the official HP site displays, then you should use the search for the site driver.ru.. In the search string you need to specify the name of the device, but it identifierwhich we copied earlier.
I have done all this work earlier for a laptop HP Envy M6 1151SR. Download drivers for this model can be in. And before performing all the above steps to search for drivers, check them out among my drivers.
After all the drivers are downloaded, install them one with Mandatory reboot After installation, in the following order:
1. Chipset (motherboard drivers)
2. Intel Mei.
3. Intel USB 3.0
4. Intel Rapid Storage
5. HP 3D DRIVE GUARD
6. Schedule drivers (switchable graphics);
7. Touchpad.
8. Network
9. All other drivers.
Only in this way you can get a fully running Windows 7. Thank you for your attention!
Hi Admin! How to install on a new HP Envy laptop, with pre-installed Windows 8.1 and the UEFI BIOS, the second Windows 7 operating system on the GPT disk?
I bought a new HP laptop, on a hard disk there is one disk (C :) with a Windows 8.1 pre-installed. Separated from the disk C: 100 GB, an unallocated space appeared and I want to install Windows 7 on it.
By connecting the Windows 7 installation flash drive to a laptop, turn it on, in the laptop boot menu, and there is simply not my flash drive. When using the installation disk, the same thing.
Knowing people advised to disable the Secure Boot option in the BIOS. Disabled, then loaded into the Windows 7 installation program, selected the installation partition, and an error has been released: the order of partitions on the disk selected for installation differs from the recommended one. For more information about installing the GPT discs, go to the Microsoft website (http://go.microsoft.com/fwlink/?LinkId\u003d154898) and search by the criterion "GPT". Continue installation? OK or Cancel.
How to install on a new HP Envy laptop with pre-installed Windows 8.1 and the BIOS UEFI second operating system Windows 7 on the GPT disk


Of course, the data of our reader will not be deleted and after clicking OK will occur to install Windows 7 second system on the specified section of the hard disk, but in today's article I want to offer you something else.
If you purchased a new laptop with a pre-installed Windows 8.1 and a UEFI bios, but you want to install another Windows 7 operating system to the previously created section, then it is quite feasible for some laptop models (unfortunately not for everyone)Interestingly, you will not even need to create a boot UEFI flash drive Win 7. In this article, I will show the easiest way to install Windows 7 second system on your laptop.
- Note: Friends, this method is verified and works on all simple computers and old laptops without BIOS UEFI. You can also apply it on the new laptops asus, HP Pavilion and HP Envy, with UEFI BIOS, but there is one but! With new laptops not so simple. Due to the fact that computer equipment manufacturers may at any time change the UEFI BIOS functionality on the laptop, I advise you to back up the BCD boot storage. If Windows 7 install the second system to your laptop, you cannot deploy the BCD download storage backup and return the status to our experiments. In my article, I will tell everything step by step, so do not worry, you will succeed.
For the article, take the same HP Envy laptop.Before starting work, we will make some cooking. First, create a BCD download backup, as after installing Windows 7, the laptop boot menu will be changed and the selection of operating systems will appear: Windows 7 or Windows 8.1, if after a while you want to get rid of Windows 7 and format the section with its files The system selection menu when loading a laptop will still remain, it will be possible to remove it by simply restoring the BCD from the backup.
Creating a backup BCD
Create on a disk (C :) Folder BACUP,

then open the command prompt on behalf of the administrator and enter the command:
bCDEDIT / EXPORT C: \\ BACUP \\ BCD

and the BACUP folder appears a backup of the BCD file download. The BACUP folder on the disk (C :) Do not delete, at the end of the article, I will show how to restore the BCD download repository from the backup.
Disc management
Create a section to install Windows 7. We enter the disk management and see three service partitions and disk (C :) with a volume of 680 GB with installed Windows 8.1, we click on it with the right mouse and choose to compress the volume ...

50 GB for me will be enough if you are aimed to work seriously in Windows 7 choose a larger volume.

From the emerging unattown area, create a simple volume (F:), to which we will launch Win 7.


ISO image of Windows 7
To install the system we will need , You can in our article. I download it right on the desktop and click on it twice the left mouse connecting to the virtual drive (J :).


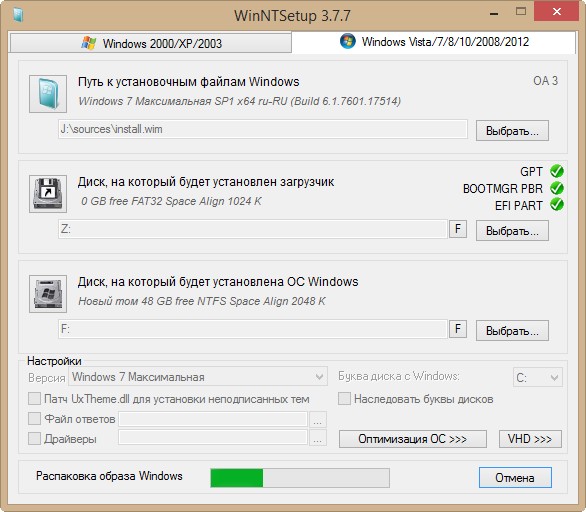
WinNTSetup.
This program (familiar to you by) will help deploy Windows 7 of the ISO image to the section created by us (F:) without boot flash drive or installation disk system.
Download WinNTSetup. can I have on Yandex.Diskhttps://yadi.sk/d/xlgkpaozhxcpc.or on the official website
http://www.winntsetup.com/?page_id\u003d5

Remove the utility from the archive and run the executable file WinNTSetup_x64.exe.
Click on the Select button

and specify the path to the installation files of Windows 7. We need only an Install.wim file from the Sources distribution folder. We go to the virtual disk (J: ) In the Sources folder, select the left mouse file Install.wim and click open.

The path to the Windows 7 installation files is specified.
The disk to which Windows 7 bootloader will be installed automatically - z: (The section is reserved by the system, 350 MB).
Select the disk to which Windows 7 will be installed. Click choose

Indicate the new volume (f :) and click the folder selection.

Installation


Windows 7 installation process begins

We reboot and enter BIOS, set the Legacy Support option to Enabled, and the Secure Boot option to the Disabled position (sometimes it is not enough), save the settings and reboot.

Operating system selection menu opens: Windows 7 or Windows 8.1, choose the first

and immediately enter the completing phase of installation of Windows 7.

Enter the username and computer name


We accept license terms

Your choice


Windows 7 is loaded.
If you want to boot in Windows 8.1 and you will not be released, then turn on the UEFI interface in the BIOS and boot in Win 8.1.

In disk management it is clear that the letter of the system disk (C :).

In the properties of the hard disk, the GUID (GPT) partitions are specified.

Computer window

How to remove windows 7 without a trace
We used the "seven" and decided to remove it. To do this, load in Windows 8.1.

Open the command prompt on behalf of the administrator and enter the command:
bCDedit / Import C: \\ Bacup \\ BCD,

we restore the Windows 8.1 download repository to the original state, that is, when you turn on the menu laptop, it will not appear with the choice of operating systems.
We chose this beech with the client.
Screen 14 "(1366x768) LED, glossy / Intel Core i5-3317U (1.7 GHz) / RAM 8 GB / HDD 500 GB + SSD 32 GB / Intel HD Graphics 4000 / without OD / LAN / Wi-Fi / Bluetooth / Web Camera / Windows 8 64bit / 1.8 kg / black
But Windows 8 is preinstalled on it. And we are still not morally ready for it. It is necessary to put 7-ku. BIOS - UEFI. Immediately boot from the boot disk from 7-ki - it will not work. The first thing in the bios included Legacy Boot. Now, the 7-ka is already considered a Legacy system. Associations of support for Legacy USB - Klava and a mouse for DOS come to mind immediately. Anyway. Updated BIOS. Included Legacy Boot, now through F9 I can choose devices from which you can load. I have an external USB DVD-RW, so it's easier. He is in this list on F9. Loading immediately from the 7-ki boot disk. Press Any Key, etc. SMID. I went to install. It comes to selecting the section to install. But sections do not see. Those. Does not see that there is a hard on the computer! As before xp, the firewood on F6 was loaded! So here will have to. He began to look for a driver. On a page with firewood on the site found the driver Intel Rapid Storage Technology and it contains Intel 7 Series Chipset Family SATA AHCI Controller and Intel Mobile Express Chipset Sata Raid Controller. So they came up with me. Uploaded to a flash drive in a unpacked form, poked the installation to the nose and the hard disk was found. Now I would break it. And then there is a bunch of partitions of any. Well, the hell did I drank them. And then SHIFT + F10 - the command line and there diskpart. First, the Cconvertil drive in the MBR. Then he created the Primary section on 50GB. The residue is in Extended - Logical. Formatted Quick, prescribed disc labels. And it seems to go the installation. Previously, in the 8-ke on a flash drive, wrote a dad with SWSetup firewood. Maybe something from there stand on the 7th.
Upon work with diskpart, the instructions C Rutracker has helped.
I installed Windows 7 Enterprise SP 1 x64 EN on a new desktop with MP ASUS P8H77-V and HDD
Seagate 750 GB with UEFI BIOS.
First of all I downloaded and updated the BIOS to the latest version.
All Bios settings left default.
Boot from Windows 7 Enterprise SP 1 x64 EN disk. After copying files and appearance
Press the first window
Further.
After entering each command to click
Call the DiskPart utility:
diskpart.
Call the disk list:
lIST DISK.
And since it is only one, then the list will be disc 0.
Install the focus on the disk:
sELECT DISK 0.
Create a system section:
cREATE PARTITION PRIMARY SIZE \u003d N
where n - indicates the size of the section in megabytes (MB). If the size is not specified, the section takes
All free space in the current area. For 60 GB of the section, specify: Size \u003d 60000.
format FS \u003d NTFS Label \u003d "System"
We make the section Active:
active.
We assign a section letter "C":
assign Letter \u003d C
System section (C: System, Main, NTFS, Active) Created.
Now, on the remaining non-placed space, create an additional logical section.
Under the data (file): D: - DATA (letter and label in preference).
create Partition Extended.
The section will take all the remaining space.
In the Additional section, create a logical:
create Partition Logical.
The section will take all the remaining space. If you need a few logical partitions,
Indicate the dimensions in the Size \u003d N parameter.
We format the section and assign a label:
format FS \u003d NTFS Label \u003d "Data"
We assign the letter "D" section:
assign Letter \u003d D
On the disk created 2 partitions: under the system C: System and logical D: DATA.
Next, we leave from the program of working with disks:
eXIT
And come out from the command line:
eXIT
Installation continues as usual. To install the system, choose the S: section.
When you first detected, new discs are considered to be discs MBR. All the above leads to
Creating a MBR disk and rightly for disks no more than 2.2 TB. More capacious are placed in GPT.
Convert one disc to another can be commands
convert GPT.
or
convert MBR
After selecting the required disk.
A warning.
The conversion affects the entire disk and destroys all the data on it.
The disc can be transformed only if it is empty. Create a disc before converting a disk
A backup of the data, and then delete all sections and volumes.
7-ku I put. Most of the firewood came from SWSetup. Something had to swing separately. But in principle, I found everything. Is that indication of volume levels, brightness does not appear. But the adjustment itself occurs. Those. Quick Launch Buttons work out but no indication. The driver on 3D DRIVE GUARD tried to put an "eight" from SWSetup. Started installation. Winda warned that the driver was not signed. But I clicked "put it all." Put. And after the next reboot, it began to go to BSOD. Round. Safe mode did not work. Even the Intel Raid window popped up - the system type completed the work incorrectly, try to turn off the RAID discs from it. Help "Download the latest successful configuration". After I already put the old driver for 3D DRIVE GUARD. And everything became fine.
I learned something new and still questions remained. For example, technologies inherent in ultrabooks are used here. For example, Intel® Rapid Start - Computer with Intel® Rapid Start technology returns to work from deep sleep state almost instantly. Apparently, for this, you can see a disk without a letter to 8GB. It is used to sleep most likely. Well, this is if the driver (or utility) is installed. And Intel® Smart Connect - Intel® Smart Connect technology allows you to continuously and automatically update the contents of your email box, tapes of social networks and selected applications, even when the computer is in sleep mode. And in the characteristics it is written that 32GB SSD-cache. If 8 of them are for sleep. There is still 24GB. But where to see them? Only once when the Intel Raid window popped there there flashed something like that. But after I have not seen any mention of the 24GB of solid-state hard. And the Intel Raid window I could no longer call. Although it should be called with a combination of Ctrl + I when enabling the computer. No, there was a way. To do this, it was necessary to disassemble the laptop, pull out hard and try to turn it on without hard. But I was in Padl. Especially this is a ultrabook. And he is no longer disassembled as usual. He is like Apple. Large lid large below. Without a UPGRADE compartment for RAM. It was necessary to remove it all. In short, like this.
And here is another interesting nuance. After installation and settings, everything was done, as usual an image of Acronis. He saw tough, here without problems. And in the list of hard also showed me 2: 500 ka + 8GB. Well, I noted that I need to make a disk image with: from 500-ki. And save it to the D: disk. Specified all settings. Embedded. The operation was successful. No errors jumped out. Restart a laptop. I go to the folder on the disk D: where there should be a backup. And there is empty. And this folder does not take place. Loading again from acronis - I look, in this folder there is an image. I reboot in Windows - there is no image. I turn on the display of hidden files and protected too. Did not help. Nothing appeared. And in the acronis, everything is shown. So I thought: somehow this image lay down on those remaining 24GB SSD cache, maybe? There is no other explanation yet.
Everything. Tired of writing :)
Greetings, my dear readers. The other day I brought an interesting laptop: HP 255 G2 with pre-installed Windows 8.1 (as it should be)However, his owner did not want to rebuild and tearfully asked to put the familiar seven. As the saying goes: the owner - Barin, and it was decided to deal with Windows 8.1, which was included and installing Windows 7. However, everything turned out to be as simple as I thought at first glance!
How to install Windows 7 on HP laptop in pictures
Since installing Windows 7 on HP 255 G2 laptop, even if standard Delete or F2 do not give us to get into the usual BIOS laptop? (that I am not weak so puzzled). Then I remembered the smart phrase: if nothing helps, then you finally read the instructions!
The instruction in the kit was very scant: it is shown as a battery insert and what to click to turn on ... well, and a couple of pages about how to use Windows 8.1. As you understand such a story, I have little benefit brought and I had to go to the official site for the answers, and I found them!

Here is such information ... to get to the BIOS! To make a boot device, we need to click on the launch of the laptop first and thenAfter that, you will fall into the BIOS, where you can conduct settings.
How to install Windows 7 on HP Laptop
Since in the new HP laptops (almost in all), instead of the usual BIOS is a UEFI (Such a modern BIOS alternative) then there are its subtleties (UEFI is the topic of a separate article, so we will not consider this here, we will simply understand how to pour a seven on a laptop)... By the way, quality control checked my loyal cat, which did not leave the laptop for a minute. 🙂

If it were not for a cat, I don't even know: I would figure it out or not
So, if you briefly tell about the innovations of the UEFI, then the main kostle In the installation of any other OS other than the eight - the Secure Boot mode, which increase the secure system. The main problem is that in addition to Windows 8, no one supports this feature. (from desktop OS of course), so to install Windows 7 to our HP 255 G2 laptop or similar, you only need turn off Secure Boot and instead of him activate Legacy Support After these manipulations may simply be installed any other operating system ... at least 😉
As soon as you turned on the laptop, you press and then do not fall into the BIOS. Here go to the tab SYSTEM CONFIGURATION. And choose paragraph Boot Options. on the menu…

As you can see, the settings are quite a bit here, so there should be no difficulties here ... In order for us to install Windows 7 - you need to disable Secure Boot (Select


However, this is not all, since changing the boot method will not allow you to boot the eight, then we need to enter the confirmation code and click. I warn you right away that the buttons on the digital block in this case are not active ... We type code (in my case 9993) And click Enter.

Actually, all ... Now when you start press + And I get into the boot options - where we need to choose from where to boot, on this all, the HP laptop is ready for installation of Windows 7.
Instead of seals: If you, as I solved, carefully look at USB ports in a laptop ... There are ports of USB 3.0, which are not entirely running without installing drivers for them. For example, I have a Windows 7 installation was impossible due to the lack of drivers on an optical drive, which sounds a bit of nonsense - I put it with a USB drive ... but have this in mind if you have the same error, just insert the USB flash drive in another USB port of the laptop and Repeat the download. Now you will definitely not have a question: how to install Windows 7 on HP laptop! In my opinion, we looked at all possible options;)
In contact with
 Cellular - what it is on the iPad and what's the difference
 Go to digital television: What to do and how to prepare?
 Social polls work on the Internet
 Savin recorded a video message to the Tyuments
 Menu of Soviet tables What was the name of Thursday in Soviet canteens
 How to make in the "Word" list alphabetically: useful tips
 How to see classmates who retired from friends?