How to set the launch from the flash drive or from the disk? How to download the download from the flash drive? Detailed guide! BIOS REV 5.0 How to Open All Settings
Today I will tell you how to turn on the boot from the flash drive in the BIOS of various manufacturers. It does not matter what version you have, the procedure for gestures will be as follows:
1. Insert our bootable flash drive into the USB connector of your computer. I recommend inserting it to the port, located directly on the motherboard, i.e. On the back of the system unit.
2. Turn on the computer and click the key Delete.(or F2.) to get to the BIOS. Depending on the manufacturer and the BIOS version, other keys (ESC, F1, TAB) can be applied, so you need to carefully read the tips on the screen.
In BIOS, we can move on tabs only with the keyboard.
Below I will describe in detail this process On the example of the most applied versions of the BIOS.
Attention!Remember that if you install the operating system from a flash drive or CD and selected the boot device in the BIOS, and not in the loading menu, then after the first automatic reboot Windows must be logged in to the BIOS and return the download from hard disk. If this is not done, it will start the startup from the flash drive or the CD, and Windows will again begin the first stage of the procedure installations.
Setting up Award BIOS to download from a flash drive
Award Bios.:
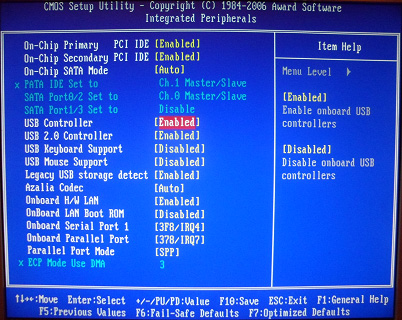
First check whether the USB controller is enabled. We go to "Integrated Peripherals". Let's go down the arrow on the keyboard to the "USB Controller" item. Click the "Enter" key and in the window that appears, select "Enable" (also using "Enter"). Opposite "USB Controller 2.0" should also stand "Enable".
 We leave this tab by clicking "ESC".
Then go B. “Advanced Bios. Features "-" Hard Disk Boot Priority.Now in my example in the first place is Winchester, but should stand flash drive.
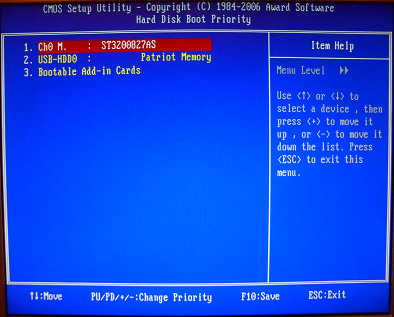 We become on the line with the name of our flash drive (Patriot Memory) and raise it at the very top with the "+" key on the keyboard.
 Let's go out from here by pressing "ESC".
Setting Ami Bios. To download from a flash drive
If, entering the bios, you see such a screen, then you have Ami Bios.:
 First check whether the USB controller is enabled. We go to the "Advanced" tab - "USB Configuration".
 Opposite the points "USB FUNCTION" and "USB 2.0 Controller" must be "enabled".
 If this is not the case, we become on this line and click the "Enter" key. From the list that appears, select "Enabled" (also using "Enter").
Then we leave this tab by clicking "ESC".
We go to the tab "Boot" - "Hard Disk Drives".
 Now I am in the first place is Winchester, and you need to put a flash drive here. We become on the first line, click "Enter" and in the appeared window, choose our USB flash drive Patriot Memory.
 It should be like this:
 We leave here through "ESC".
Choose " Boot Device. Priority. Here, the first boot device must be a flash drive.
 Click ESC.
Then we leave bios, keeping all the settings made. To do this, go to "EXIT" - "EXIT & SAVE CHANGES" - "OK".

Setting up Phoenix-Award BIOS to download from a flash drive
If, entering the bios, you see such a screen, then you have Phoenix- Award Bios. :
 First check whether the USB controller is enabled. We go to the "Peripherals" tab - opposite the "USB Controller" and "USB 2.0 Controller" items should be "enabled".
 Then go to the "Advanced" tab and opposite the "First Boot Device" exhibit "USB-HDD".
 After that, we leave bios by saving the changes. To do this, go to "EXIT" - "SAVE & EXIT SETUP" - I press the "Y" key - "ENTER"
 Almost all that you need to know in order to boot from the flash drive. In my article, I described the process of configuring the bios of the most popular versions: Awardand AMI. In the third example, presented PHOENIX-AWARD BIOSWalking much less often.
IN different versions BIOS The described procedure may differ slightly. But the main thing is that you understand the principle of configuration.
By the way, I would still like to add: in order to choose from which device to boot your computer, it is not necessary to change the settings in the BIOS. You can immediately after turning on the computer, call a special menu to select boot devices (this can be made by the F8, F10, F11, F12, F12, F10, F10, F11, F12 or ESC). In order not to guess with the keys - we look carefully on the monitor immediately after switching on. We need to have time to see the inscription like this: "Press Esc to Selest Boot Device". In my case it was necessary to click "ESC".
Nowadays, manufacturers of laptops, nettops, monoblocks and stationary PCs have increasingly began to produce them as part of systems that do not have them optical drive. It is not surprising, because the digital industry has almost displaced the spread of various content on optical drives.
Due to the fact that there is no optical drive on the computer, users began to occur with the installation of the operating system on it. Often when installing OS through DVD drive The user did not conduct any settings in the BIOS, since the first boot device is default in it and is a DVD-ROM. The only option for systems that do not have a DVD-ROM is to install from a flash drive.
To put the OS with a flash drive or with a portable USB HDD, you need set options for boot USB devices in bios. In order for our readers to be independently loaded with USB driveWe have prepared the material in which the examples describe the process of setting the BIOS to load from the flash drive for different systems.
Prepare our USB drive
First of all to load a flash drive with using bios., it needs to be done boot. For example, take a license disk with Windows 7 and make an ISO image from it. The image can be done using Daemon Tools or Alcohol 120%. Also, the original disk image with a licensed seven can be downloaded from the official site. microsoft.With this license key.
After receiving the image file, proceed to the second step. This step includes creating a boot USB flash drive using a utility. Rufus.. This utility has been chosen for no accident. A distinctive feature of the utility Rufus. is that it knows how to record boot USB flash drives for both ordinary BIOS and for UEFI BIOS.. Download the utility Rufus. From her official page and immediately launch it, as it does not require installation.
In the program window that opens, it is clear that in the first combined list " Devices»The flash drive is displayed on 16 GB. After uSB selection devices must specify the program Rufus. Path to ISO. image of windows 7. To do this, press the button with the laser disk icon and select the image. After that, press the start button and wait for the completion of our creation uSB boot drive
In the same way, bootable flash drives are created for Windows 8, 10 and XP, as well as for other operating systems. Especially convenient to create with Rufus. Booting USB flash drive with Windows XP. This is due to the fact that most of the ways to create a bootable flash drive from Windows XP are very complex for a regular PC user. FROM Rufus. However, on the contrary, the Windows XP drive is created simply and quickly.
After the loading flash drive is created, you can start setting or reinstalling the seven with it. Therefore, in the following example, we will describe the process of downloading the flash drives we create on a computer with UEFI BIOS.
We load with USB drive on a computer with UEFI BIOS
In computers with support for UEFI BIOS, you can use Windows, both with support for the new BIOS, and without it. For example, we take a computer that has no optical drive and is assembled on the basis of the motherboard MSI A58M-E33 with the support UEFI BIOS.. Now we need to put a flash drive created earlier in this computer. For quick download from a specific drive in motherboardsah under the control of UEFI BIOS there is a special Boot Menu.. This menu allows you to select a specific drive without loading the BIOS main menu. On the different computers Boot Menu. can be called via F12 and F11 . In our case on MSI A58M-E33 motherboard Boot Menu. Called through the F11 key.

From this menu it is seen item " UEFI: Kingstondatatraveler 2.0pmam"And" Kingstondatatraveler 2.0pmam" If we choose the first item, the Windows 7 operating system will be installed with support UEFI BIOS., and if the second, then with the support of the usual bios. After selecting the first or second item, the installation files will begin.
Note if we created a boot USB drive using a branded program from Microsoft Windows. USB / DVD Download Tool, we would not be able to put an OS that supports UEFI BIOS, as it creates a bootable flash drive, which does not have UEFI support.
Moving on. Now try to configure the download from USB devices from BIOS Maternal mSI cards A58M-E33. To do this, when you start the computer, press the DEL key. This action will load the BIOS motherboard.
In the main window, BIOS will move to the " Settings", After that, the settings menu opens. In this menu, we need to choose the item "". After its selection, download settings will open.

In these settings, it can be seen that the first boot device is hDD.
 So that our flash drive loaded at the start of the system, we will exhibit the item " UEFI USB HARD DISK»The first in the list.

After these actions, you need to save the BIOS configuration and restart the computer. Now, when starting the system, a USB will be loaded with a UEFI BIOS support drive. To select a USB flash drive without UEFI BIOS support, you need to set item " USB Hard Disk."To the very top of the list in the BIOS download settings.
From the example you can see how easily configured Boot Menu. And the boot configuration of the MSI A58M-E33 motherboard BIOS. A similar way looks like a BIOS setting on new motherboards from other manufacturers.
Configure Download from USB drive on the old computer with Phoenix BIOS
Phoenix Bios. Created by Phoenix Technologies. This Bios was quite popular on already outdated computers. Via Phoenix Bios. You can also boot from the flash drive. For example, take sAMSUNG laptop R60, who has support Phoenix Bios.. As well as on most computers, press the DEL button and go to the settings Phoenix Bios..
For our task, we need to go to the tab " Boot" On this tab, choose the item " Boot Device Priority.", After that, we will fall in the settings menu of boot devices.
 In these settings, we need to choose a USB flash drive in the list, as shown below.

Having done these actions, our boot flash drive will be loaded first at the start of the system. In the same way, you can put and launch a flash drive on most PCs under the control of Phoenix BIOS.
Configure boot with USB drive on the old AMIBIOS computer
Consider the launch of the flash drive on the PC running AMI BIOS. Developed by the American company American Megatrends Incorporated, which should reduce in its name AMI. This BIOS is known to many PC users due to the starting logo when starting the system.

We will turn on the computer and proceed to the settings using the DEL key. In the Bios window, we need to go to the settings item.

 After actions made, settings will open that allow you to set the priority of drives when starting the system, including flash drives.

In the same way, you can put and launch a flash drive on most computers running AMIBIOS.
Problems when solving the task of AMIBIOS and PHOENIX BIOS
Users of very ancient laptops and stationary computers can encounter a problem with the start of the boot USB device.
This problem is related to the fact that in very old computers running AMIBIOS and PHOENIX BIOS no support for the launch of USB devices when starting the system. Therefore, the only boot device in this case will be an optical drive.
Another nuance in solving our task can be various versions of Amibios and Phoenix BIOS, which differ from those discussed above. The main difference can be an interface and other settings. In this case, it is not necessary to get upset, since the download configuration configuration settings are far from hiding and can always be found and configured by analogy with the examples described above.
Configure download from USB drive to mini pc
New Mini PC Compute Stick. Intel quickly gained popularity from users, as it is a computer with Windows OS on board, which is just a few times the usual flash drive in the dimensions. Because of such dimensions there are no majority interfaces in it as in stationary PCs and laptops. For example, no RJ45 interface and no interface for DISPLAYPORT digital monitors.

Since Intel Compute Stick. comes with pre-installed operating windows system 8 or 10, most users have no problems with installing OS. But how to be with the situation when the OS suffered as a result of viruses or deleting system files.
In this situation will help the loading flash drive and Boot Menu. Bios. For example, take an analogue of Intel Compute Stick. called MeeGopad T02. To reinstall on this windows ComputerYou need to download the OS image on the official website of the manufacturer Meegopad T02 www.x86pad.com. After downloading and creating boot flash drive, Put it in Meegopad T02. Then turn on meegopad t02, after downloading in Boot Menu. BIOS using the F10 key.

IN Boot Menu. You can select a USB flash drive and install Windows using it. To constantly load the flash drive when starting the system, you can open the BIOS, and customize the priority of the download different USB drives.
Summarize
After reading the examples described above, the PC private user can easily set priority loading flash drives In systems with various versions of bios. Having learned to set a flash drive first when loading, you will understand how quickly and conveniently install various operating systems on your PC.
We hope our article will help you boot from the flash drive and put the operating system, and will also help install it on computers that do not have an optical drive.
Video on the topic
You have a boot flash drive with the distribution of the operating system, and you want to make the installation yourself, but inserting a USB drive into a computer, detect that it does not load. This indicates the need to make the appropriate settings in the BIOS, because the hardware setup of the computer begins with it. It makes sense to figure out how to properly configure the OS on the download from this information drive.
First we will understand how to enter the BIOS generally. As you know, BIOS is on the motherboard, and on each computer is characterized by a version and manufacturer. Therefore, there is no single key to enter the input. Most often used Delete., F2., F8. or F1.. Read more about this in our article.
After switching to the menu, it remains only to perform the appropriate settings. In different versions, its design is different, so let's consider more than a few examples from popular manufacturers.
Award
In the setting to download from the flash drive in Award Bios there is nothing complicated. You need to carefully follow a simple instruction and everything will turn out:

AMI
In ami. BIOS Process The settings are slightly different, but still running simply and does not require additional knowledge or skills. You need to do the following from you:

Other veras
The algorithm of working with BIOS for other versions of motherboards is similar:
- Start the BIOS.
- Then locate the menu with devices.
- After that, turn on the point on the USB controller "Enable";
- Select the first item name of your flash drive in order to start the devices.
If the settings are made, and the loading from the carrier does not work, then the following reasons are possible:
- The loading flash drive is incorrectly recorded. When you turn on the computer, access to the drive (the cursor flashes in the upper left side of the screen) or an error appears "NTLDR IS Missing".
- Problems with USB connector. In this case, connect your USB flash drive to another socket.
- Incorrectly executed bIOS settings. And the main reason is disabled USB controller. In addition, in old versions, the BIOS does not provide for loading from flash drives. In such a situation, you should update the firmware (version) of your BIOS.
In more detail about what to do if the BIOS refuses to see removable media, read in our lesson on this topic.
You may have incorrectly configured the USB drive itself to install the operating system. Just in case, check all your actions on our instructions.
And these instructions will use you if you write an image not with Windows, but on the other OS.
And do not forget to return the settings to initial state After the entry from the boot flash drive you will not need.
If it is impossible to configure the BIOS, it will be enough for the system to start the system "Boot Menu". Almost all devices for this are answering different keys, so read the footnote at the bottom of the screen, usually it is indicated. After opening the window, select the desired download device. In our case, this is a USB with a specific name.

We hope that our article helped you understand all the subtleties of the BIOS setup to download from the flash drive. Today, we considered the fulfillment of all the necessary actions on the bios of the two most popular manufacturers, and also left instructions for users who use computers with other BIOS versions installed on them.
Not S. DVD DiscHow many usually do it, but from a USB device, then the first thing you need to go to the BIOS and set the download from the flash drive. Otherwise you will not have anything. Since loading, the computer will contact or to a hard disk, or to a DVD.
In this article, I will try to describe how more in more detail for different versions of the BIOS.
Loading from flash drive in bios
I will not be mistaken if I say that laser disks Slowly go to the background. More and more release personal computers without DVD-ROM s. The distribution of the operating system also does not necessarily be on the DVD, it can easily fit on the flash drive. Will not be surprised if soon and yielded, yielding cloud storage. One way or another, but so far the technology exists, it needs to be able to use it.
How to get to the BIOS
Each manufacturer of computers and laptops for hitting BIOS exists their own buttons, such as, "F1" "F2", "Tab", etc.
But the most common option is of course "Delete".
Being directly in Bios, we are interested in the "boot" section - it is there that the parameters are changed that we need.
Phoenix-Award
Now rare. I remember him for old computers with operating system Windows 98. Just I had such.
The first thing we do in this and later, is check whether the USB controller is activated. To do this, we will need to go to the "Peripherals" section.
And opposite the "USB CONTROLLER" inscription, the "Enable" parameter must be set. If it is missing, it should be turned on. This is done using top and down, - go to the desired string, press ENTER and choose.
Now press "ESC" (this is output from the previous menu) and go to "Advanced". Here we are interested in the "First Boot Device" string, where the method described above is set to "USB-HDD", as shown in the screenshot below.


Award
Again the very first thing we look at whether the controller is connected. Go to "Integrated Peripherals".

We find "USB Controller". Use ENTER to select the "Enable" value.

Return to the main ESC ESPT window, heading to Advanced Bios Features and then "Hard Disk Boot Priority".

In the picture above, unfortunately, downloading from the hard disk is set. And there must be "Patriot Memory". You can change using "+" on the keyboard, going to the desired string.

The next step must be pushing input on the "First Boot Device" string. We now have a "CD-ROM" there, and we need to put the already familiar "USB-HDD" or "USB-FDD".

And save the settings by clicking on Save & Exit Setup.

AMI
Again, at the very beginning, we check the USB controller on the performance. To do this, go to "Advanced" and then "USB Configuration".

Please note that in front of "USB 2.0 Controller" and "USB FUNCTION" exhibited "Enable".


As can be seen in the picture below, on this moment A hard disk is set. With ENTER, change the position to "Patriot Memory".

It should look like this.

Then we go to Boot Device Priority.

Bios UEFI
For example, I will use Lenovo laptop.
After switching on, simultaneously press the combination of hot keys EN + F2. So we move to InsyDeh20 Setup Utility. More often you can watch in the laptops of Toshiba and Acer. Top and down buttons go to "Security" and, on the contrary, " Secure Boot"Expose" Disabled ". Attention, I did not in vain allocated this word!

Now we go to "boot" and look. There must be a UEFI opposite Boot Mode.

 Magnetometry in the simplest version The ferrozond consists of a ferromagnetic core and two coils on it
 Effective job search course search
 The main characteristics and parameters of the photodiode
 How to edit PDF (five applications to change PDF files) How to delete individual pages from PDF
 Why the fired program window is long unfolded?
 DXF2TXT - export and translation of the text from AutoCAD to display a dwg traffic point in TXT
 What to do if the mouse cursor disappears