How to install Windows 10 without a disk. What to do if there is no flash drive or dvd drive
Operating system Microsoft Windows. 10 You can install on a computer (laptop) from a DVD or installation flash drive. Carefully read S. detailed instructionsAbout the clean installation of Windows 10 via BIOS. To install, we need a Windows 10 distribution on a DVD, or on a USB flash drive.
Attention! Before installing any editor, Windows 10, you must take care of the acquisition of license keys, and there should also not be problems with license activation. All klyats, activators and hacking programs, you apply violating license rules. Microsoft products are protected by copyright law.
This means that the right holder retains the exclusive rights to software. To purchase the product, you must agree to the terms of the license (which results in a number of limited rights of the person acquiring the product) that governs the software ( "buy a license")
Step-by-step manual for installing the operating system from Microsoft Windows 10 from a disk or flash drive.
- 1 - Before installing on a computer / laptop, any operating system, it is important to know the basic rules -.
- 2 - Insert into a DVD drive a disk with a Windows 10 distribution or a prepared loading flash drive to USB port.
- 3 - We go to BIOS. We read the instructions.
- 4 - our task so that after rebooting, the computer does not boot with hard disk As usual, and from the boot device you are in this moment Use.
- 5 - First window after downloading windows Installer 10 (Fig. 1). You will need to select the installation language and system and click the button. Further.
- 6 - Press the button Set To start installing Windows (Fig.2)
 Fig.2
Fig.2 - 7 - installation process (Fig.3)
 Fig. 3.
 - 8 - We introduce the license windows key 10 for activation (Fig. 4)
 Fig.4.
 - 9 - We read and accept the terms of the license agreement. Put a tick. (Fig. 5)
 Fig.5
Fig.5 - 10 Selective: only installing Windows (for experienced users). (Fig.6)
 Fig.6.
 - 11 - Next stage - . To install as on our example, you should delete all your sections, one by one. Whenever Non-disk space (Fig. 7). It is necessary to do this, if you do not have the hard disk of the necessary information, or you worried about it in advance, and copied all necessary information (Photo, documents, programs, etc.), for example, on the USB flash drive. And you can certainly delete all sections, except for the D disc, where you have all your information, here are already focusing in size, disc D.is usually always more. In order not to make a mistake, you need to remember the size of all disks before the system is permutive.
 Fig.7.
 - 12 - Let us dwell on our example. We celebrate the unoccupied space on the disk (Fig. 8)
 Fig.8.
 - 13 - On our example, the entire volume of the hard disk we have 100 gigabytes with kopecks (Fig. 9), celebrate in the area The size, Approximately 60 gigabytes (Fig. 9). This is quite enough Windows 10, for a hard disk of this size as we have. You may have hDD other size, but do not assign under section C, less than 50-60 GB. If you have an HDD size of 500 and more gigabytes, the best option will be withdrawn under c section - 90-100 GB., No longer needed, this is not necessary, but it is not necessary to do exactly 25 GB. This size is needed only for the system itself, and after all, in addition to the system, you can install on the disk with in the future and other programs you need, such as an office. Therefore, do not skimp, and take the same small 60 GB under the C-disk. And the remaining gigabytes are assigned to Disc D.
Another option is if you have already stood the system, simply delete the first and second partition to remain a 3-partition, which is a disk-d. Remote 1 and 2 sections are converted into an unoccupied space, then we allocate, and without changing the values \u200b\u200bin the area - size, click Create.
 Fig.9.
 - 14 - Next, click OK (Fig.10)
 Fig.10.
 - 15 - As we can see (fig.11), we have created 1 and 2 section. Section 1 - Reserved by the System, and the second section is our C drive C, where and install Windows 10.
 Fig.11
 - 16 - also visible remaining unmounted spacewhich we highlight (Fig.12).
 Fig.12.
 - 17 - without changing the values \u200b\u200bin the area "Size", click Create (Fig.13).
 Fig.13.
 - 18 - Section 3 created (Fig.14). In the future, this is the section of our disc-d. You can immediately format it, allocate it.
 Fig.14.
 - 19 - Press Format (Fig.15).
 Fig.15
 - 20 - Next, click OK (Fig.16)
 Fig.16.
 - 21 - Section 3 - formatted (Fig.17)
 Fig.17
 - 22 - Select Section 2 (Fig. 18), where we have an operating system.
 Fig.18.
 - 23 - Zhmm - Further (Fig.19).
 Fig.19
 - 24 - Installing Windows 10 started (Fig. 20), you can remove for 10-15 minutes until the process occurs. Installation time depends on the power of your computer.
 Fig.20
 - 25 - occurs automatic reset Systems (Fig.21).
 Fig.21
 - 26 - continued installation. The process of preparing devices to work (Fig.22, 23)
 Fig.22
  Fig.23
 - 27 - The next step is "Parameters" (Fig.24). If you use this instruction for installing the OS, then for you, without any problems, select the item - ". Item "Set up" for more experienced users. You can always return to these settings after installing the system.
 Fig.24
 - 28 - In the next step, select the mode of using the computer on the network. If this home computer, Select option (paragraph 2) - (Fig.25).
 Fig.25
 - 29
- Create an account (Fig.26)
Login to Microsoft account: Enter the email address and account password microsoft records. Here you can create a new Microsoft account if you still have it. You can skip this step, and create a regular local account.
 Fig.26.
 - 30 - Windows 10 operating system welcomes us, we wait a little while the computer is preparing to the first launch (Fig.27-31)
 Fig.27
  Fig.28.
  Fig.29
  Fig.30
  Fig.31
 - 31 -The installation of our Windows 10 operating system (Fig. 32) was successful. On the desktop we have one "Basket" label. How to set up the rest of the labels (icons) read
Net installation Windows 10 - the best way Start your computer when problems with performance arise. Simple installation It will help to quickly get rid of errors in Windows 10. Eliminate problems associated with viruses and other types of malicious programs.
This guide addressed steps to prepare and implement clean installation Windows 10 from the loading flash drive and installation disk on a PC or laptop.
Before proceeding to perform these instructions, you need to perform several actions, including a full backup of your computer, if something suddenly goes wrong, and you will need to restore the OS.
In addition, it will not hurt to make a backup copy of your personal files, since the installation process will delete everything on your computer.
Installing Windows 10 from a DVD and USB flash drives are very similar, and the only reason why preference gives USB - flash drives in comparison with traditional dVD method - is speed. In case you have never done the installation of Windows 10, you can follow the instructions.
What you need to know
- If you install for the first time, it is highly recommended to check whether your computer or laptop is compatible with the operating system. Optimal Lie disk space and RAM.
- Create backup All of your personal data that is stored in the disk C because during installation, you will lose all the data lying in C. disk
Windows 10 Equipment Requirements
If you are trying to go to Windows 10 with more old version, for example Windows 8.1, Windows 7, Vista or Windows XP, you must be sure that your machine meets the minimum equipment requirements.
Windows 10 has the following minimum requirements Equipment:
- Processor: 1 GHz or SOC (system on chip).
- Memory: 1 GB for 32-bit or 2 GB for 64-bit.
- Hard disk capacity: 16 GB for 32-bit or 20 GB for 64 bits.
- Graphics card: DirectX 9 or later with WDDM 1.0 driver.
- Display: 800x600.
What is needed
- You need an ISO file. Download the official website with Microsoft.
- Booting flash drive if you want to install Windows 10 using a USB drive (read this guide to create Windows 10 USB drives)
- Boot DVD drive if you want to use DVD drive. (Follow this manual to create Windows 10 DVDs)
Installing Windows 10 from USB flash drive
Windows 10 installation process from a flash drive, requires running your computer using boot media, which means that you need to access the firmware in the BIOS on your motherboard to change the load order.
This process usually requires pressing one of function keys (F1, F2, F3, F10 or F12), ESC or Delete keys, as soon as you run your device. However, these settings depend on the manufacturer and model. Therefore, do not forget to check the site for supporting the manufacturer of your PC for more specific instructions.
Having access to the BIOS interface, locate the download menu and change the load order, after which, save the settings using the F10 key.
Once you get the download menu, select Media and press ENTER. After successfully downloading the system from the Windows 10 installation media, you will see various options for compliance with your requirements. Stop them and click "Next".

To continue the process. Click the Set Now button.

If you install Windows 10 for the first time or update the previous version, enter the genuine product key.

If there is no product key, you can click on the Skip button and enter the product key later.
Note: If you enter the product key, you will not see an optional window where you can select the installation option on your computer.


Select two types. To make a clean installation of Windows 10, select the second option: for experienced users.

In the next window, you must select a disc on which you plan to install a copy of Windows 10. If Windows is already standing on the disk, and you want to remove it, then you need to format system Disk with OS. In addition, this will allow you to free up the space on the disk.
To format a system disk, you must select the disk and click on the "Format" option at the bottom of the window.
Note: After formatting the disk, all data on the disk and system settings will be lost, which include applications: games and any personal data, on the desktop, music, video, photos and appropriate folders.
Select the disk where you want to install and click on the Next button. At this stage, installation of Windows 10 from the flash drive will begin. It will take about 20-25 minutes. In the process, your system can overload two or three times.

After completion, click on the "Use Standard Settings" button if you want to select the default settings. You can also click the "Configure" button if you want to configure the parameters.

Hold on the instructions following instructions As on the screen and after a few steps, a home screen will appear.
For hand loading October 2 and will start automatically deployed through the center windows updates - November 13, 2018.
If you want to avoid potential problems, it is best to perform a clean system of the system.
Despite the fact that the update using the Windows Update Center is the most simple way To install version 1809, there is a chance that you will encounter problems and errors that are due to incompatibility software and driver configuration problems and others. A clean installation of the system minimizes the risk to run into problems, because in this case, the hard disk will delete all data and installs a new copy of Windows 10 October 2018 Update.
In addition, if you use one installation for a long timeThe net installation of Windows 10 can improve performance, download time, memory consumption and correct many existing problems.

After creating a bootable USB drive, you can proceed with the clean installation of Windows 10:
- Insert boot drive Windows 10 and run PC.
- Press any key to start the installation process.

- Click "Next".
- Click the Install button.
- On the "Activation of Windows" screen, click the link "I do not have a product key" if you reinstall the system (after installing Windows 10 will automatically re-activate).
- Select the operating system you want to install and click the Next button.
- Check the "I accept license terms", reading the license agreement. And click the Next button.
- Select the installation type "Selective: Only installing Windows (for experienced users)."
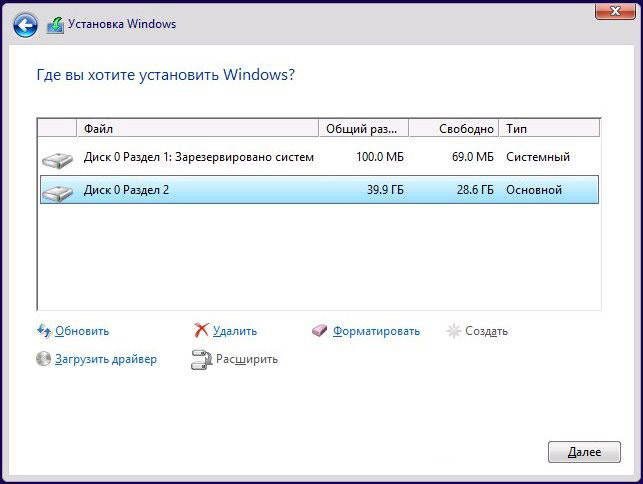
- On the screen "Where do you want to install Windows?" Select a section on your hard disk or SSD, where you want to install Windows 10, and click the Delete button. Typically, the installation is performed on "Disc 0".
- Select "Unproed Disk 0" to install Windows 10 and click the Next button.
- Wait for the installation of Windows 10.

- Select your region on the first page of the preset wizard after the installation procedure is completed and click Yes.
- Select the keyboard layout and click Yes.
- If you do not need to tune the second layout, click the Skip button.
- If your device uses a wired Ethernet connection, Your computer is automatically connected to the network. If you are using wireless connectionYou will have to configure it manually by specifying the Wi-Fi network data.
- On the "Select Setup Fashion" screen, select the "Configure For Personal Use" option and click the Next button.
- Enter email / Phone Microsoft account or Skype account. You can also select a "Autonomous Account" if you do not want to create a Microsoft account.
- Configure your account - Set the password and configure extra options security.
- Select privacy options that you best suggest and click the "Accept" button.
- Wait for the account setting. It may take a few minutes.
- After installation, check for the latest cumulative updates through the Windows Update Center. To check and install, go to the Settings\u003e Update and Security menu and click Check for updates.

Council. To quickly find the number windows version 10, enter in the Winver search string, press ENTER, and you will see a dialog box with information about the current version of the OS.
Found a typo? Highlight and press Ctrl + Enter
The installation of each new Windows release is performed easier than the previous one and requires less effort from the user. With Windows 10 output, this task has simplified nowhere: now to install an operating system on a computer, no special knowledge and ingenious applications need. I don't even need the "Windows" distribution - the installation program "I learned" to download it myself. She itself creates an installation media - a DVD or flash drive. The user remains only to respond to requests and execute instructions that are understandable even to those who do this for the first time.
Today we will tell how the net installation of Windows 10 is held on any laptop and stationary PC. Under clean installation, the installation of the OS on the carrier, where there is no operating system (for example, on new computer or formatted hard drive). Or where it is, but is subject to complete overwriting without saving the installed software, accounts and settings. By the way, do not worry about the license: if you put the system in return for legally activated, it can be saved. And we will not hide from you what to do for this.
What you need
- Recording loading media windows Distribution 10. They may be a USB flash drive on 3 or more GB, DVD, portable or internal hard disk. Since the absolute majority of users prefers to install Windows from a flash drive, consider this method as the main one.
- or file set.
- Utility for transfer system files on the installation carrier. If you are going to install Windows 10 on a PC with UEFI (advanced "BIOS"), without it you can do - the files and distribution folders are enough to copy to the USB flash drive. By the way, in Windows 8 and 10 iSO image You can open in the Explorer as a regular folder, but in earlier systems it will be necessary for this. special application, for example, any program-archiver.
- The computer on which you will prepare the loading flash drive.
Cooking a flash drive
If you do not have a pre-prepared distribution of "dozens", easier and more convenient to charge it to download Microsoft Media Creation Tools utility and write to the USB flash drive or DVD.

The utility does not require installation on a PC, just run it with administrator rights.
After launch Media Creation Tools:
- In the License Conditions window, click "Accept".

- To the question "What do you want to do?" Reply: "Create a media for another computer."

- In the "Select Parameters" section, we define the language of the system, the release ("home for one PC" or "Windows 10") and the architecture (bit rate) - 64 or 32. If the selection options are inactive, the "Use recommended parameters" checkbox should be removed.

- Further select Drive: USB - to create boot flash drive, or ISO file - to download the image that you will later record on the DVD.

- By selecting a USB device, press "Next" and we are waiting for 30-50 minutes, while the program downloads the distribution and creates an installation media. At this time, the computer is available for use.

- It's time to go to the installation, you will be informed by the message: "USB flash memory device is ready."

If you downloaded a distribution in advance or you have no stable Internet access, use other tools to create installation media. For example:
- RUFUS. Works without installing. To write the operating system on the USB flash drive, it is enough to specify the location of the distribution, as well as determine the scheme of the partition and the type of system interface: MBR for computers with BIOS (old), GPT for computers with UEFI (new, released later than 2013) or MBR for computers with UEFI ( If there are disks marked according to the MBR) on the PC with UEFI).

- . This utility is as simple as RUFUS. In the section «Add to USB disk» is enough to note the item «Windows Vista / 7/8/10 and so on. D.", Specify the path to the Vinodovs 10 and click the button «Go».

- Windows 7 USB / DVD DOWNLOAD TOOL. This Microsoft branded utility is capable of transferring all versions of Windows to USB flash drives and DVDs, starting with "seven", just 4 steps.

In addition to these there are plenty of other free utilities To create installation media. You can use any - the result will be the same.
We start setting
Installation options
Running windows installations 10 is possible in two ways:
- From under the operating system. It can be used if you plan to reinstall or display the "dozen" from scratch to another disk section.
- When loading from the installation media (via BIOS). A universal version that is suitable for installing the system to a new computer, and to reinstall the old copy of Windows.
When choosing the first option, open boot disk or flash drive in the explorer and run the setup.exe file.

When selecting the second - download the computer from the installation media.
How to upload a pc or laptop from a flash drive
BIOS SETUP utility on different computers It has a different interface. To enter it, it is necessary immediately after turning on the machine and appears on the manufacturer screensaver screen, press a specific key. What kind of screen saver window is usually indicated. Most often it is delete, F2 and Escape, sometimes F1, F3, F10, F12 or a combination of several keys.
Opening the utility, go to the "BOOT" section. IN bIOS version Setup Utilityshown in the screenshot, this is a separate tab in the top menu.

In other versions, it is not like that, and need settings Collected in the "Advanced Bios Features" section. In order not to confuse anything in the most responsible moment, study the BIOS interface of your computer in advance and disperse that and where is located.
In the "BOOT" section you will see a list of devices from which the machine can be loaded. In the first place is usually a hard drive. You need to make it so that in the first place the computer checked the boot files is not on it, but on the flash drive. To do this, using the arrow keys, as well as F5, F6, plus and minus (the tip is located in the right half of the BIOS window), raise the USB device to the top of the list. To save the setting and exit the utility, press F10.
In the graphic versions of the UEFI, the order of devices is not needed, just click on the USB device. After that, the PC will restart and check the load from the selected media.

Main part installation
Most of the Windows 10 installation process takes place without active user participation. We'll have to work only at the beginning and a little at the end.
So, the first thing you have to do is choose the operating system language, time formats, monetary units, and key keyboard layout. If you downloaded the Russian-speaking version of Windows, the default here will be Russian.

After defining language parameters, click the Install button.

Take the license terms. To go to the next task now and later click the Next button.

Now it is necessary to determine the type of installation - as an update or "selective" (in previous versions, it was called "clean"). We, accordingly, need a second type.

Go to the selection of the place where "settles" new Windows. If the hard disk is not divided into partitions or you want to change their proportions, select the desired area of \u200b\u200bthe disk and click "Create".

In the "Size" field, specify the number of megabytes that you assigned for the system partition. 64-bit Windows 10 requires no less than 32 GB. Click "Apply". If necessary, create other sections in the same way, then format them.
Attention! If you want to install a system while saving a license, do not format the disk, and install the installation in the same section where the previous one is activated copy of Windows. The second important factor in conservation of activation - new system There must be the same version as old. If you install Windows 10 Ultimate instead of HOME, it will not work without losing a license!

After the end of working with a disk can relax - the next 40-60 minutes process will go without your participation. If you want, just watch it.
Approximately 1/4 of the time will take copy files.

Following the computer will reboot and continue the installation. The main part of the time on the screen will hang windows logo and rotate the "wheel". At what stage is the process, you can understand the bottom of the screen.

It's time to move to active actions again, because the installation is nearing. When you see the offer to increase the speed of work, click the "Use Standard Parameters" button. If you wish, you can change them later.


After upgrading you have to create a first user account. By default, administrative rights will be appointed. Here everything is simple - specify the username and enter if you need, password.


Finally - the long-awaited desktop. Everything is ready, the installation of Windows 10 is finished. We hope that she is not tired of you too much, because now you have to set up the network, design of the desktop, installation of applications and other pleasant troubles on the "coherent" of the new OS.

If Windows did not require input during installation licensed keyCheck if the place is activated. Open the Start button context menu and go to the system parameters.

Activation Information is at the bottom of the basic information about the computer. In our example, it was not fulfilled, since the "dozen" was established in virtual Machine with full zero.

If you managed to reinstall with the license saving, you can delete the C: \\ Windows.old folder in which the files of the previous copy of the system are located. They no longer need - the activation information was successfully transferred to the new one.
How to install a system from a hard disk
There are situations when neither flash drives or DVDs do not refuse. In short, nothing but a hard disk of the same computer to install Windows 10.
To install "dozens" from a hard disk, you must comply with 3 conditions:
- Have a distribution. More convenient - in the form of a set of files and folders. If you have only an ISO image, you will have to unpack it, for example, using the archiver application (WinRAR, 7-Zip and analogs) or windows Explorer (Only in the "eight" and "dozen").
- Have an additional partition on a hard disk with a capacity of 3 GB. Preferably free.
- The computer should be downloaded from the same disk. If not, then you will need a media C Live CD / Live USB (portable operating system), like Bartpe, Alkid Live CD, etc. Their images you can easily find on the network.
The installation file carrier will serve a hard disk, more precisely, its additional partition. The operating system will need to copy the distribution and creating its bootloader.
Installation order
- Load a computer from a hard disk or carrier with a portable OS.
- Copy Windows 10 distribution files and folders to the root of an additional partition (which is not in which the system will be installed).

- Rename the download file (BootMGR), for example, in "Win10". The length of his name should not exceed 5 characters.

Now you have to create a distribution loader using the Bootice utility. Instead, you can use other download management tools, but we have chosen Bootice, as we consider it the easiest and most convenient tool.
- Run the utility (installation it does not require). In the "Physical Disc" section, select the "DESTINATION DISC) list of a computer. Click the MBR control button (Process MBR).

- Mark the "Grub4dos" item and click Install / Config (Install / Config).

- In the "Rename GRLDR" section, write a new file name loading windows 10 (as you remember, we called it "Win10") and click "Save to Disk). Click OK in the message about the successful bootloader and close the utility.

It remains to restart the computer. The next time you start, the control will receive the Windows 10 installation program, and then it will be the same as when installing the system from the flash drive.
 Cellular - what it is on the iPad and what's the difference
 Go to digital television: What to do and how to prepare?
 Social polls work on the Internet
 Savin recorded a video message to the Tyuments
 Menu of Soviet tables What was the name of Thursday in Soviet canteens
 How to make in the "Word" list alphabetically: useful tips
 How to see classmates who retired from friends?