How to create an image of an installed Windows. How to create an ISO image of your Windows system. Starting the operating system installation from the installation disk and entering audit mode
Preventive maintenance of your computer is time consuming. Either you need to configure the operation of applications, then remove useless "garbage" in temporary folders, then restore the normal operation of the flown drivers. And even the most tidy user, who is used to constantly maintaining order in the system, periodically has to be distracted by such actions. There is no getting away from this, so the only way to somehow deal with this problem is to reasonably approach its solution. For example, to take a "snapshot" of the most important files - to save a backup copy of the data.
A curious personal observation: many users are very conservative in their preferences. From year to year, they use approximately the same set of software, choose the same system configuration parameters, and even almost never change the color scheme of the interface of working applications. For such people, there is a simple and effective solution to the problem of information loss and system failure - recovery using a backup copy of the system partition. This method is familiar to any more or less experienced user. In this case, reinstalling the system with all its settings is reduced to a single operation of copying the file with the partition image.
The tools with which you can perform the operation of data cloning and recovery are not very diverse. Almost the sole leader in this area is the Acronis True Image software suite. It is this tool that is most often mentioned when discussing the problem of taking an image of an entire disk. There is also the Symantec Ghost Solution Suite. Among Russian-speaking users, this program is not as popular as the Acronis product, but it can just as well be used for system migration and deployment. Both of these products are certainly very user-friendly and have tons of advantages, but they are not free. And the full set of capabilities of these applications will be superfluous for many. Let's try to figure out which of the free programs for removing images of disk partitions can replace these popular tools.
⇡ Testing boot images using a virtual machine
Bootable media images can be tested directly from under Windows using a virtual machine such as VirtualBox. In this program, you just need to create a new virtual PC configuration and specify the disk image as the boot source.
It is very convenient to keep such images on multiboot media. In addition to tools for removing and restoring images from disk partitions, such a bootable disk may also contain a number of additional options - a Windows installer, a couple of Linux distributions, and so on. If you decide to burn such a bootable USB stick, you can also test it in VirtualBox. True, the product of Oracle Corporation does not support booting from removable media, so you will have to perform a number of steps to force VirtualBox to boot from a USB flash drive.
To do this, open the standard disk management utility diskmgmt.msc. By the contents of the window of this utility, determine under which number in the system the recordable USB drive is identified. Then start the command line mode (cmd.exe) as administrator and navigate to the VirtualBox folder using the command cd% programfiles% \ oracle \ virtualbox. At the command line, type VBoxManage internalcommands createrawvmdk -filename "% USERPROFILE%" \. VirtualBox \ usb.vmdk -rawdisk \\. \ PhysicalDrive #, substituting the previously remembered disk number for the # character. Now you can create a new virtual machine. At the stage of configuring the disk used, select the external disk (use existing hard disk) and specify the location of the usb.vmdk file. Go!
⇡ Redo Backup
The main trump card of Redo Backup is that the program is as simple as possible, devoid of numerous options and works confidently. The shell starts almost instantly, after which the most simplified Linux environment (Ubuntu 12.04 LTS) and a utility window for creating a backup copy of partitions appear on the screen.
|
|
|


In addition to the basic tool for cloning disks, the distribution includes a small set of essential utilities. In the shell of the Redo Backup boot image, you will find a fast file manager PCManFM, a simple Leafpad text editor, a GPicView graphic viewer, a Chromium browser and a terminal launch utility. Among the tools for working with disks there is a small but useful program for resetting all media parameters to their original state. True, you can use it only at your own peril and risk - the data is deleted, and no one gives guarantees that the hard disk or some other medium will function properly. With the Gparted Partition Editor, you will be able to partition disks and configure them in Disk Utilities media manager.

The ridiculously named baobab will show you a chart of the fullness of the disk. The distribution kit also includes the PhotoRec utility, the main purpose of which is to recover deleted files.
The created images of the specified partitions can be saved to one of the available partitions of the local machine or written to a folder on a remote PC that is accessible over the network. The data can also be uploaded to an FTP server.
The boot image of this utility is so small that it will fit even on a good old CD. Of course, today this medium is hopelessly outdated and is living out its last days. On the other hand, if you still have a laser drive and a stack of unused CD-R discs, why not get rid of one of the extra blanks and make yourself a copy of the life-saving tool?
⇡ AOMEI Backupper
In addition to a bootable disk image (AOMEI Backupper Linux Bootable Disk Image) with a proprietary utility, the developers of AOMEI Tech offer users several products at once for launching an application from under Windows - two free editions of the program and one paid edition.
I must say that the developer introduced some confusion by releasing two free versions, because the differences between them are not immediately clear. One is called AOMEI Backupper Standard, the other is AOMEI Backupper Standard Win7. The size of the first one is several times larger, but there are few real differences. Don't be fooled by the words For Win7 - both versions work fine on Windows 7. The one For Win7 does not work on outdated versions of Microsoft's operating system - Windows Vista and Windows XP, while AOMEI Backupper Standard officially supports them ... In addition, AOMEI Backupper Standard For Win7 lacks the option to create bootable media.

In our opinion, the paid edition of the AOMEI Backupper Professional program has nothing to attract the attention of an ordinary user. Its main advantage is the ability to combine partition images with support for incremental data copying (that is, copying only changed files, which greatly speeds up the process). In addition, the advanced version supports command line startup of the backup process and allows full use of the PXE Boot Tool (application for network boot) with an unlimited number of clients on the local network.
According to the developers, the free versions copy slower than the Pro version. It may be so, but if we compare the speed of creating a partition image using the boot images of Redo Backup and AOMEI Backupper, then the difference is not noticeable: the process takes about the same time in both cases.

But compared to Redo Backup, AOMEI Backupper offers many more options. Here you can copy in several ways: clone a partition, transfer content from disk to disk, make a backup copy of the system disk, individual directories or specific files. To save space in AOMEI Backupper, you can enable the maximum compression mode, but if you need to speed up the process of recording a backup, you can disable file compression in the settings altogether. In addition to this, you can also configure the task scheduler, which will write a backup copy of the data at a specified time.

There are many ways to write a bootable image to a USB flash drive. For example, you can use the Sardu utility, which will do this automatically, and even help you make a multiboot media with a rich arsenal of Linux distributions. But it's best to write everything to a USB flash drive directly in the AOMEI Backupper program itself, in this case you will receive a guaranteed working bootable media with the current version of the AOMEI Backupper engine. The boot image can be compiled with Linux or Windows PE.

It is preferable to use the second option, because if you create bootable media on Linux, only the basic functions of the program will be active in the AOMEI Backupper shell. The desktop application AOMEI Backupper Standard has even more options - for example, there is the ability to automatically split the image into files of a specified size, there is an option for smart data reading (in this case, the contents of only those sectors that are used by the file system are copied), you can control file compression, and so on. ...
⇡ Clonezilla
Clonezilla is completely free and open source software developed by Taiwanese programmer Stephen Shiau.

This program is aimed at experienced users rather than beginners. It is made according to the principle of a step-by-step wizard and works almost in text mode, without an interface as such.

The situation is a little saved by the fact that Clonezilla supports the Russian language and many operations, as well as comments to them are correctly translated. The choice of language occurs at the very beginning of the start of the data backup wizard.

The program is universal - it supports all popular file systems, including ext2, ext3, ext4, reiserfs, xfs, jfs (GNU / Linux), FAT, NTFS7, HFS + (Mac OS).
There are a few steps you need to take to create a bootable USB drive. First, download the ZIP boot image from the Clonezilla website. Note that the type of Live image you download depends on the architecture you are using. It is also worth paying attention to whether your computer has Secure Boot enabled. It is one of the UEFI options and is designed to protect your computer from malicious code that modifies the MBR boot sector. When using the uEFI secure boot enabled option, you need to download a separate boot image built on Ubuntu - links to it are also available on the download page of the Clonezilla official website.
After downloading the required file, unpack the contents of the ZIP archive to a USB drive. Run the makeboot.bat file directly from the flash drive, which is located in the utils \ win32 directory (or makeboot64.bat at the drive: \ utils \ win64).
A backup copy of data can be written "as is", that is, in the form of files and folders, or can be saved into a single image file. Of course, the image file can be used to restore information on the media. The backup can be saved to a local disk, written to the SAMBA Network Neighborhood server, SSH server, or using the NFS protocol. Clonezilla supports AES-256 encryption. The program is completely undemanding to PC system resources and can run on the oldest "toasters".
The program does not support differential and incremental copying of files, and a prerequisite for the normal completion of the process of writing a backup copy of a disk is that the volume of the medium to which the recording is carried out must not be less than the volume of the disk (partition) from which the data is read.
Along with the regular version of the Clonezilla boot disk, users are offered the Clonezilla Server Edition. This application is a tool for running simultaneous cloning on a whole array of computers (more than forty PCs).
⇡ Paragon Backup & Recovery 14 Free Edition
Paragon's products are well known to many, but for some reason not everyone knows that among the programs of this developer there is also free software, for example, the version of the Paragon Backup & Recovery 14 Free Edition application for creating a backup copy of data.

The only condition that Paragon sets for users is that Backup & Recovery 14 Free Edition should be used only for non-commercial purposes (for personal use). And although the company has been selling a newer version of this program for a long time, the fourteenth version is still relevant. It even officially supports Windows 8, which is reflected in the interface of Backup & Recovery 14. The tiled Express-interface that appears on first launch can be disabled, then the application will take on a more familiar look.

The set of free tools for working with disks offered by Paragon's program is not large. Most of the options are not available, and the developer himself offers to upgrade to activate all the utility's features.

However, those functions that are available are quite enough to solve the main problem - creating a backup copy. In addition, the user has tools for managing disk partitions. With their help, you can create, format, delete partitions, hide or open them, assign a letter and change the volume label, check the integrity of the file system.

In the program menu you will find the Recovery Media Builder wizard. This wizard is designed to burn a bootable disk image to ISO format or prepare a bootable USB flash drive. In the process of creating a bootable media for data recovery, you can choose settings convenient for yourself - specify BIOS or EFI, select an environment (Linux or Windows PE), use WIM images of the current operating system for recovery, and so on. If you burn a bootable disc in expert mode, you can manually add drivers for drives and network devices to the media, and specify network-specific parameters.
The engine for creating a backup copy of disk partitions provides the ability to perform a copy operation in one of two ways: using the standard method, creating images of cloned partitions, or placing all the backup data on a Paragon virtual disk (for example, this way you can collect several images in one place at once). The backup copy can be written to a mounted partition or to an unmounted partition, which is not assigned a letter.

Particular attention in the program is paid to data security. One of the options of Paragon Backup & Recovery 14 Free Edition is that data can be backed up to a so-called capsule, that is, to a hidden partition that cannot be mounted and seen in the operating system.
We would like to draw your attention to one more very important point. While testing the option to write bootable media, we found an error in the program. Capturing an image with the Microsoft Windows PE environment from the "classic" interface of Paragon Backup & Recovery 14 Free Edition may be accompanied by a crash and a message stating that there is no access to the partition.

The solution to the problem was found on the official Paragon support forum - media recording must be started from the Express interface, then the error will not appear.
Paragon Backup & Recovery 14 works well with all types of hard drives. The contents of a hard disk image with a cluster size of 512 bytes is restored to another medium with a cluster size of 4 kilobytes without additional user action.
⇡ DriveImage XML
If you have ever lost data as a result of erroneous formatting or some kind of failure in the file system, the name of the Runtime Software company should be known to you. The GetDataBack utility made by this developer has been helping to rescue data and recover information from problem media for many years. In addition to GetDataBack and other great utilities, Runtime Software also includes DriveImage XML, a free disk backup tool.

The program can be installed as a standalone application, or it can be launched using a boot image based on the Knoppix 7 Linux distribution. Of all the boot images reviewed in this round-up, the Runtime Software disk can be considered the "most salutary" drive. In addition to DriveImage XML Private Edition (free version for home use only), Knoppix contains the entire range of programs from Runtime Software for data recovery and working with disks: GetDataBack NTFS, GetDataBack FAT, GetDataBack Simle, RAID Reconstructor, RAID recovery for Windows, DiskExplorer for FAT , DiskExplorer for Linux, Captain Nemo Pro, and so on. Please note that commercial utilities require registration.

Knoppix is a versatile build that includes a browser, video player, and text editor. For completeness, the only thing missing is the free office suite, which was obviously excluded from the build to save space on the media.
The launch of Windows versions in the system is realized through Wine (software for an alternative implementation of WindowsAPI).

Using the Microsoft Volume Shadow Service (VSS), the program can take a disk image, including system and locked data that is currently being processed. The procedure for creating a backup copy in DriveImage XML will result in the output two files. The first, written in * .XML format, will contain a description of the disk. The second file will be saved as * .DAT - it stores the binary data of the captured image. Program options that are bound to standard Windows services may not work, so developers It is recommended to burn bootable disks with Windows PE environment or alternative BartPE environment on your own. For the second option, plug-ins are available on the official Runtime Software website that simplify the connection of the main utilities of this developer.
⇡ Conclusion
Programs for creating copies of discs can be used for more than a quick reinstallation of the system. They can also be used as a regular backup tool for important data. Take photographs, for example. Paper photo albums are practically a thing of the past, and with them the persistent tradition of taking out of the closet and showing guests family history in pictures has sunk into oblivion. It is scary to think how many children today will be deprived of pleasant memories when they grow up. The phrase “I don’t have pictures of children because my parents somehow got a disk on their computer” has every chance of becoming very popular in the next few years. Don't want this to happen in your family? All you need to do is take care of the backup. It's very simple and, as you can see, it's free.
System imagingWindows 7. You have no idea how many times this image helped me out in case of serious system crashes and various troubles, and how much time it saved me. I hope that you will be able to successfully apply this information in practice.
Note: Friends, this article was written two years ago, read our more complete article on this topic - using a standard backup tool on DVD-disks, or on a portable USB hard drive and how to recover from these images, you will also learn how to connect a SATA, IDE drive or an old hard drive to your laptop, netbook and store your backups on it.We also have an article - or another hard drive using the tools built into the operating system.
System imaging
Sometimes, due to our own erroneous actions on the computer or a virus attack, it is not possible to boot Windows 7 in any way. Or the operating system can be loaded, but it can be simply unbearable to work in it, due to serious problems and malfunctions, and if you imagine that the computer is not one, but ten. There are also many friends who, unfortunately, also have computers and in the evenings you have to solve their problems, such a life would truly seem like a nightmare if such a means as System imaging.
This image can come in handy if none of the tools helped you, and therefore all of our previous articles too. In the beginning I will describe how create a system image Windows 7 using the Computer Backup tool, then we will restore our Windows 7 from the image. Below are examples of restoring individual data files from an image.
- It is important to know that when restoring Windows 7 from a system image, all information from the hard disk partition to which you are deploying the image will be deleted and replaced by the contents of the image. By the way, this operation can be performed using the program.
Create an image of the system
Start-> Control Panel-> Archiving computer data-> Creating an image of the system.
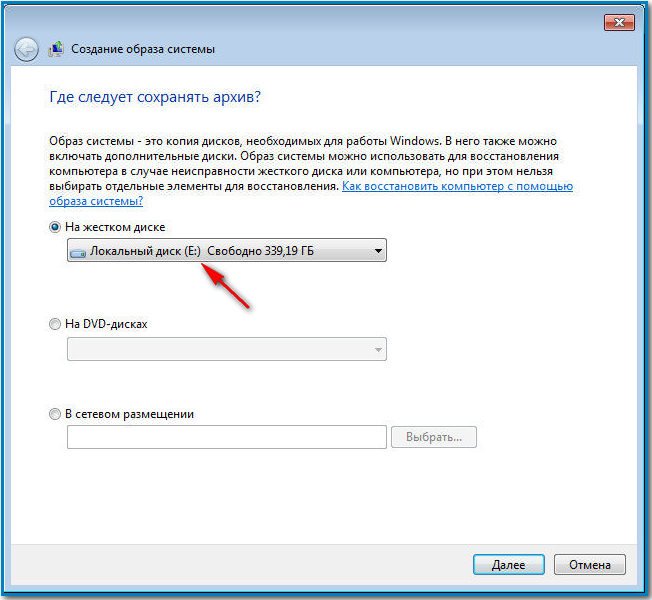
In the dialog box that appears before us - Where should you save the archive? The operating system will give us a hint, for example, in my case, Windows 7 chose Local Disk (E :), 339.19 GB in volume, located on the second hard disk (I have two hard drives), one contains the system itself, and the second contains System Images Windows 7 made with our Computer Backup tool. If you have one hard drive, then the system image needs to be created on a free partition.
Just in case, I am attaching a screenshot of the Disk Management window of my computer.

Important note: Ideal for storing system images - a portable USB hard drive or a specially purchased SATA hard drive. If you choose DVD - disks, then you will need a lot of them, this option is the most inconvenient in my opinion, you can still store images on the network, but this method deserves a separate article. You also need to know that, unlike our data archives, the system image can only be saved on a disk with the NTFS file system.
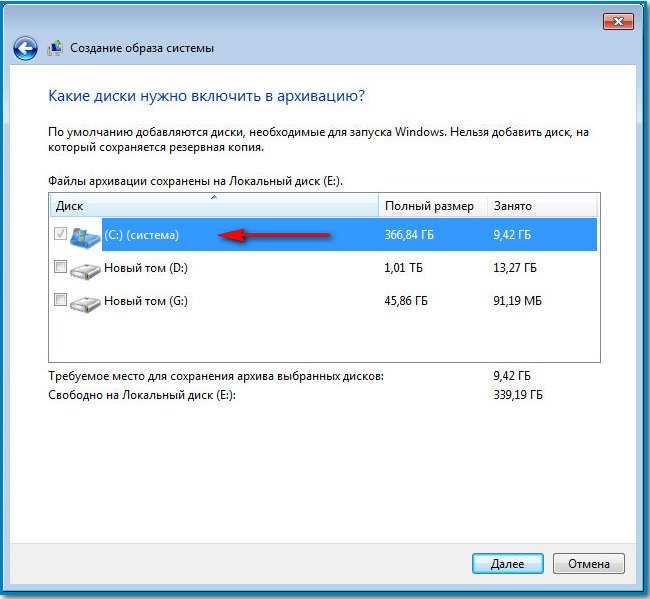
Which partitions of your hard disk should be included in the backup? By default, the Local disk with the Windows 7 operating system will always be selected, in our case (C :). You can additionally choose any disk with your personal data or all disks to be included in the system image, which means that the system image you create will contain all the information stored on your computer, if only there is enough space on the media where you create the image. Click further.
We confirm the archiving parameters, we see a warning that to create a system image in my case, 9.42 GB will be needed, your requested space may be more. We press archive, the process of creating a system image will begin, which can immediately end with an error if we do not have enough space to store the image.


At the end of the process, it is proposed to create
If you previously created an image of the main partition of the hard disk, then at any time in the event of critical failures in the operation of Windows 7, it can be deployed. None of the data recorded in this section will be saved after the copy is deployed, but on the other hand, you will not have to waste time searching and installing drivers and some necessary programs installed on the system immediately after its installation.
Recovering Windows 7 from a running system
You can back up the necessary partitions of the disk on any available media - DVD-disks, an additional hard drive or an external hard disk with a USB interface. A separate partition on the same HDD will do, but in this case data security is not guaranteed. If the device is damaged, part or all of the data on it may be lost, which fully applies to the created backup.
If the OS, albeit with errors, is slow, but boots and works, no recovery methods improve the situation, then you can deploy the archive image directly from under the loaded system. For this:
All old information will be lost from the disk to which the save will be deployed. If it has value, then in the next window of the wizard, you can archive user files by clicking on the corresponding button below. 
To go directly to archiving Windows, click "Skip", after which a new window will open, offering to continue the action after restarting the computer.
Working with the recovery tool
After rebooting, a couple of dialog boxes will appear sequentially in which you will be prompted to select a language and enter user credentials. Next, you have to work with the main parameters window:

Recovering the image if the system cannot be booted
If after turning on the computer, it does not boot and it is not possible to boot into Windows in normal mode, try pressing F8 and open the Advanced Boot Options window. From here you can get into the recovery options module if you select the very first troubleshooting point. 
Further steps have already been described in the section describing how to work with this tool. But in case of critical failures, often pressing F8 and trying to go to the boot options do not bring any result. In this case, you cannot do without the Windows 7 installation or boot disk and the recovery environment on it.
How to extract individual files from an image
Sometimes the system archive can be useful not only for deploying Windows 7 if it is impossible to disinfect it, but also for extracting accidentally deleted important files that were saved in the archive. To do this, it must be connected as a virtual hard disk:

All that remains is to reopen the computer icon on the desktop and make sure that a new virtual disk has appeared here. You can work with it in the same way as with any section, restoring any necessary information from there.
Features of creating and storing a backup
Before creating a copy of the system, you should decide on which or which drives you will store it on. Users often use DVDs for these purposes, but you need to understand that Windows 7 can then be restored only by booting from a USB flash drive or other drive, if the OS is no longer able to start on its own. You will have to act this way because this disk is not bootable.
Another problem often arises unexpectedly.... If, after creating a complete HDD image using standard Windows tools, you changed its partitions, then when you try to restore the copy, an error window may appear. It will inform the user about the need to format the disk from which the recovery environment was loaded. Even returning the HDD partitions to the state before their resizing will not fix the situation. 
ISO is a standard designed to harmonize the structure of compact discs. The ISO image in the general sense has now turned into a virtual version of a real media with an operating system on board. The OS on it can be in a state ready for installation, or run directly from it - the so-called Live version.
One of the popular operating systems is Windows 7. Therefore, for installation, very often use the method of creating an image for subsequent installation. It can then be burned to a CD or USB flash drive. How to create an ISO image of Windows 7 will be discussed in this article.
What is the ISO image of the operating system for?
The first images appeared in the era of the global development of compact discs. And many wanted to have a copy of a game or operating system in order to be able to use it in the future. For this, special grabers and programs were used that completely copy the structure and data of the CD. This data could be written to another CD-carrier or expanded on a USB flash drive, thus making it bootable.
The image can also be used as an installation disk for a virtual machine, in which the operating system will be tested.
How to create an ISO image of Windows 7 from Windows itself
In order to create an image, you need some source, for example, a folder with Windows files or a real CD. The original Windows 7 ISO image can be downloaded from the official Microsoft website. True, you need an activation key to help you use it in a legal way. But on the Web you can find a lot of different assemblies that are downloaded for free.
So, there are two types of sources - a real CD and a folder with files on your computer's hard drive. It is worth listing several options with which you can create an image.
UltraISO is the most popular imaging software
The program is shareware, that is, in the Free version, all functionality will be unavailable.
The main UltraISO window is divided into several small zones. The top left window shows the structure of the current image. The right window contains its contents. The lower left reflects the structure of the contents of the computer on which the program is running. And on the right is what's inside the selected folder on the left.

By default, the image is created with the date in the name. We need to fix this and rename it as it will be more convenient, because this is the entry that will be displayed when loading it.
To add files to a project, you need to select a folder or medium in the lower left window, and in the right - which files you are interested in. They can simply be dragged with the mouse into the upper window.
When the required set of files is typed, you need to go to the file and select "Save as". A dialog box will open asking you to specify the file name, future location and format. "ISO file" is selected from the list of available file types. By clicking the "Save" button, a progress window will appear, at the end of which the Windows 7 ISO image file will be ready.
Moving on to other options.
How to create an ISO image of Windows 7 on Linux
This operation in a Linux operating system is slightly different from this procedure in Windows. On Windows, you had to install the program and create an ISO image, but on Linux everything was ready-made out of the box. You just need to insert the existing media into your CD-ROM drive and enter a few lines in the terminal:
dd if = / dev / cdrom of = ~ / image_name.iso
This command will read the data from the disk inserted into the reader and create a complete copy of it on the hard disk with the specified name.

List of programs with the function of creating images
Ashampoo Burning Studio Free. A free program with a good set of settings and functions. Nice and simple interface. Can both create images and write them to disk
CDBurnerXP is a compact application that comes with embedded ads. But if you look a little on the developer's website, you can find the Portable version. Able to record, erase, create copies of discs.
ImgBurn - is distributed free of charge and has quite powerful functionality. Writes, erases and creates images.
PowerISO is a powerful harvester capable of handling almost any imaging and disk task. The only drawback is that you have to pay for the full version, and the free version has limited features.
IsoDisk is a small utility that can quickly create a disk image from media in a CD drive. It weighs little, is supplied free of charge and performs only its task, without overloading the user with various settings and settings.

Conclusion
In this article, we briefly reviewed a couple of ways to create an ISO image of Windows 7. This can be useful for those who are doing it for the first time or have forgotten a few simple steps.
More complex operations, such as creating a bootable flash drive, are described in a much larger volume and are beyond the scope of this article. In addition, you need to have at least basic computer skills. It is worth noting that manual creation of a bootable image makes it possible to launch several systems for installation, or even from a disk in the Live version.
Those who have been working at the computer for a long time. know that the operating system eventually deteriorates and needs to be reinstalled periodically.
Usually they reinstall it from the boot disk, and each time you have to reinstall all the programs with which they work. This knocks out the work rhythm, and sometimes you have to spend a whole day, or even more, on such an installation.
Naturally, the question arises: is it possible to save the state of the operating system we need, along with all the installed programs, in order to then reinstall everything in one fell swoop?
There is such an opportunity! Can create a Windows 7 disk image along with all programs that are currently working for you. And you don't need to install them one at a time. The entire reinstallation operation takes half an hour or an hour at most.
The ability to create a Windows disk image, and subsequent operating system recovery from this image appeared, starting with version Windows Vista- predecessors Windows 7... Before that, it was necessary to use third-party programs.
In principle, they are still used now, but the best of these programs, for example, Acronis, paid.
In fact, there is no difference. than making a disk image. Windows built-in tools they work no worse, and work in them is even easier than in the same Acronis.
But if you have Windows XP, then you still have to use some third-party program. For example, Acronis, or a free program COMODO BackUp.
You can store a Windows disk image on one of the logical drives on your computer. In this case, you will be able to reinstall the operating system in a timely manner if you see that Windows starts to deteriorate thoroughly: glitch, slow down, freeze, and so on. But then, if the hard disk fails, which, however, happens extremely rarely, you will not be able to use the image for recovery.
It is better to store the disk image on an external hard drive, or on a USB flash drive with a large amount of memory. In this case, restoring the operating system from the image is possible even when the hard drive is completely out of order.
Create a Windows 7 disk image
So, let's begin. Go to Control Panel, and do a preview by category to make it easier to navigate. View is selected in the upper right corner.
In a group of teams system and safety choose a team.
After that, on the left in the menu, select System imaging .
Next, select the hard drive where you will save the disk image. If you select a logical disk, and the physical disk is the same as Windows, you will see a warning that if the hard disk fails, the image will be lost. This is what I mentioned above in the article.
Windows 7 with installed programs takes up a lot of space. When archiving, an image will be created the entire disk where Windows is located... For example, if you have Windows on the C drive, then the image will be created for the entire C drive - with everything that is on it.
If you press the button Further, you will see how much is to be backed up. So I recommend to free the disk from everything unnecessary before this operation. Remove unnecessary, and the files with which you directly work: books. movies, documents, transfer to another logical drive.
After clicking the Next button, click the button Archive and the process will start. At the end of the archiving process, you will be prompted to create system recovery disc... Do it either right away or later by going back to Control Panel, to point Archiving computer data, and in the left menu choosing Create a system recovery disc .
To create a system recovery disc, insert a blank DVD into your drive, and press Create disc... The disc will be created. This disk will help you restore the operating system if Windows stops starting at all.
To restore Windows, in this case, you need to insert a system recovery disc, and then work through the BIOS. Be sure to find out how to do this. There is no single instruction for working with BIOS - each brand of computer has its own technology. Study the instructions specifically for your computer by finding it through search engines. Sometimes instructions for use are included with the computer.
In less advanced cases, when the operating system is working, to reinstall Windows, just go to Control Panel, to point Archiving computer data, and there to start working in the section Recovery .
If you learn how to reinstall the operating system yourself, you will no longer depend on computer scientists. And you won't pay money either. So it's worth learning. I wish you success!
More detailed information can be found in the sections "All courses" and "Usefulness", which can be accessed through the top menu of the site. In these sections, articles are grouped by topic into blocks containing the most detailed (as far as possible) information on various topics.
How to Create a Windows 7 ISO Image: Options
A disk image is a file that contains the most complete information about the file structure and data of any medium (hard drives, optical disks, USB drives, etc.). It can be used for completely different purposes (installation or system recovery, data backup). The following will show you how to create an ISO image. Let's take Windows 7 for the platform used. But consideration of this issue is inextricably linked with what kind of result should be obtained.
How to create an ISO disc image in Windows 7: options
Despite the fact that today you can find quite a lot of image formats, let us dwell on the consideration of all procedures based on the most popular and supported by all programs and systems ISO format.

So how do you create an ISO image? Windows 7 is a platform that is great for this. For further use, images can be divided into several categories:
- installation distribution image;
- to boot and restore the system;
- Windows backup image, programs and user information.
Most popular programs
There are many applications in the imaging software market today. The most popular are the following:
- UltraISO.
- Daemon Tools.
- Nero.
- Alcohol 120%.
- ISO Worckshop.
- Acronis True Image, etc.

With a wide variety of all kinds of software, it should also be borne in mind that Windows systems themselves have good tools for working with images. In particular, this applies to backup and recovery. Like most of the aforementioned programs, such tools allow you to create images in a matter of minutes. However, if you copy the contents of a hard drive or a virtual partition, it may even take several hours. It all depends on the amount of information.
Creating a disk image using a Microsoft resource
Few people know that recently developers from Microsoft have provided users of licensed Windows 7 operating systems with the ability to create a system image for recovery in case of unforeseen failures directly on the official web resource. How do I create a Windows 7 ISO in such a situation? As it turns out, it's as easy as shelling pears. To do this, you need to go to the Microsoft website in the Software section, scroll down the page and see if the product license key is actually listed there (nothing will work without it).

If there is a key, then through the "Control Panel" you need to go to the system and security section, where the "System" subsection is selected, and activate the security key check (you can also do this through the PCM menu on the computer icon, where the property line is selected). If the key is valid, an image will be created in the browser directly on the site, with the help of which you can subsequently restore.
How to create a bootable Windows 7 ISO
If the key is not available, another tool can be used. The question of how to create an ISO image of Windows 7 using the system tools is solved through the backup and recovery section. Here, in the menu on the left, you need to use the item to create an image, and after scanning, the system will offer you to select the option to save data (hard disk, optical media, network location). If it is only about creating a disc from which you can then boot and fix some malfunctions or failures, you can choose DVD-ROM. However, in the case of backing up an entire disk partition, it is better to save a copy on the hard drive (there may be too many optical disks).

Additionally, you can use the creation of a recovery disk from which the boot will be made in case of saving a backup copy on the hard drive. In principle, you can use third-party utilities, but when creating an image, you should pay attention to one point. The image being created must have boot records. For example, UltraISO offers to create an ISO image of Windows 7 through the boot menu (Make Disk Image). In this case, we mean a copy of a hard disk with a working system. From it, in the future, it will be possible to restore not only the OS itself, but also all installed programs in a few minutes.
Creating an installation image
Finally, one more aspect. Let's say you want to create an ISO image of Windows 7 as an installation distribution that you could save on your hard drive or burn to optical media. This requires a real DVD with the distribution and one of the above programs. For convenience, again, let's take UltraISO.

We insert the original DVD into the drive, and in the running program we use the tools menu, where the image creation line is selected (for a quick call to the procedure, you can press the F8 key). Next, select the disk drive with the distribution, specify the location and name of the saved image file, and set the output format (in our case, ISO). After that we press the button "Do" and wait for the end of the process. The file will be saved in the selected directory. Then it can be burned to an optical disc.
Instead of an afterword
Finally, it remains to add that when creating images, you should initially pay attention to what kind of data such a file should contain. Depending on the purpose and sequence, the actions will be different. In terms of the programs used, the user himself decides what to give preference to. In general, all means are good. However, as it is believed, backups can be created using the system tools and using third-party programs, but making copies of optical media using Windows tools is a troublesome business. You will only have to copy the files to the hard drive, displaying hidden objects, then write them to disk, etc. Moreover, such a copy will not be exactly the image. To simplify all these procedures for yourself, we can speak with absolute certainty about the advantage of third-party utilities.
Creating a Windows 7 System Image

Users often make mistakes or infect their computers with viruses. After that, the system malfunctions or does not boot at all. In this case, it is necessary to prepare in advance for such errors or virus attacks. This can be done by creating a system image. In this article, we will walk you through the process of creating it in detail.
Create an image of the Windows 7 system
The system image is needed in order, if necessary, to roll back the system exactly to the state in which it was at the time of the image creation. This process is carried out using standard Windows tools, in slightly different two ways, let's look at them.
Method 1: One-time creation
If you need a one-time copy creation, without subsequent automatic backups, then this method is ideal. The process is very simple, for this you need:
- Click on "Start" and go to "Control Panel".

Enter the section "Archiving and restoring".

Press "Create a system image".


Check the box next to the drives to back up and click "Further".

Make sure the data is entered correctly and confirm the archiving.

Now all that remains is to wait for the end of the backup, and this completes the process of creating a copy of the system. It will be stored in the specified location in the folder under the name "WindowsImageBackup".
Method 2: Automatic creation
If you need the system to create an image of Windows 7 in a certain period of time, we recommend using this method, it is also carried out using the standard system tools.
- Follow steps 1-2 from the previous instructions.
- Please select "Configure backup".

Specify the location where the archives will be stored. If there is no connected drive, try refreshing the list.

Now you need to specify what should be archived. By default, Windows selects the files itself, but you can choose what you want.

Check all the required objects and click "Further".
In the next window, you can change the schedule. Press "Change schedule" to go to date indication.

This is where you specify the days of the week or daily imaging and the exact start time for archiving. It remains only to make sure that the settings are correct and save the schedule. This concludes the whole process.

In this article, we have analyzed two simple standard ways to create an image of a Windows 7 system. Before starting a schedule or creating a single image, we recommend that you make sure you have the necessary free space on the drive where the archive will be placed.
Hello Anonymous. There are a number of directories and individual system files that need to be saved for future system recovery. Firstly, some of them are hidden, so you will have to enable the display of hidden folders and files, and secondly, user files that are not needed for system recovery are also saved in the system partition of the hard disk, so you cannot give an unequivocal answer, it is better to save the entire partition by excluding manually installed programs and saved data. As for the individual system directories, pay attention to the following names:
1.Documents and Settings - user profiles and data are saved. There are many necessary files for the correct operation of the administrator account.
2.Program Files - folder with installed programs. Some of them are added at the stage of OS installation.
3. RECYCLER - basket.
4. System Volume Information - copies of the registry are stored here, which are created by the recovery tool.
5. Windows - the entire operating system is stored here. This folder must be saved for further recovery. There are many more directories in it, I see no point in talking about each of them, since it is the root (Windows folder) that needs to be saved.
there are cases when the system image is not created on disk. what is the reason and how to configure the disk to be visible.
Ask a question or leave your opinion Cancel comment
How to create an iso disk image in Windows 7 using various programs?
Good day, blog visitors.
Many users are faced with a situation where they need to use the same plastic disk all the time. Or there is a need to save files on CD / DVD exactly as they are. Previously, this tool was often used in relation to games, because the constant work of the plastic quickly disabled it. Today I will tell you how to create an iso disk image in Windows 7. There are several main methods, which will be discussed in the article.
Immediately it is necessary to clarify that in Windows 7 there are no standard utilities that can convert CD / DVD to the format * .iso.
application UltraISO considered one of the most popular among computer users. It's easy to create a disk image or even make one from a set of files. We perform a number of actions:
Insert the disc into the appropriate slot.
Select the desired drive in it, and then press the button " Create * .iso».
If you want to make a set of documents without a disk, do the following:
Selecting individual files. Call the context menu, click " Add to».
After that, go to the menu, " File", and then " Save". We choose the required format.
Daemon tools(to contents)
Another equally popular program can be safely called DAEMON Tools... The application is considered one of the very first in this area. To interact, you need to perform a number of actions:
Download the installation files for the Lite version. We unpack them.
We launch. A window will appear. At the bottom, click " Create a».
In addition, the format of the desired file is also indicated - * .iso or * .mds.
We leave the rest as it is.
Click " Start»And wait for the end of the process.
This program is great for playing games. Especially the paid professional version, because it allows you to cope with different types of protection installed by developers.
Alcohol 120(to contents)
On a par with the first two, you can safely call Alcohol 120%... This application allows you to create, and later and use virtual images of the most popular formats, including the above, as well as * .ccd, * .bin and many others.
The main disadvantage of the application is the license. Another version can be found by contacting torrent trackers.
So, we do the following:
Download the installation files. We launch them, and using the prompts, we place the software on our device.
Open, and then in the main menu select " Creature…».
Click " Start»And wait for the end.
It is worth noting that the processing time for various tasks can vary greatly depending on the medium. It can be five minutes, and sometimes half an hour.
If you do not remember where the image you need is located, go to “ Conductor", And then in the top search bar, enter" * .iso". The built-in tools will find all files with this extension.
ImgBurn(to contents)
Another convenient solution is ImgBurn... You can download the installer from the official page. The application will delight you with its wide functionality and at the same time clear to use. Even any beginner can figure it out.
In addition, it is worth noting that even the official Microsoft support recommends this particular application for creating a download disc for their products.
It is just as convenient to use as the other tools described above.
If something suddenly becomes unclear, you always have the opportunity to watch a video on this topic:
Image recording(to contents)
It is interesting that all of the above applications only allow you to create virtual media, as well as interact with them in every possible way. The main thing that these programs are deprived of is recording to another portable device.
There are a lot of other solutions for this. So, one of the first and most popular earlier is considered Nero... The application has a ton of features. However, it will only help when using CD / DVD.
But in order to put an image on a USB flash drive, you need to turn to other solutions. This is useful when creating a bootable portable device.
Personally, I like several programs more than others. In general, they have the same set of functions, but each one I use to process certain kinds of files. So, personally I would advise Rufus and Windows USB / DVD Tools.
Both apps are easy to use. You need to install a portable device, run a solution. After that, we simply select the desired memory and the image that needs to be recorded. Click " Start»And wait for the end. The processing time directly depends on the amount of information. It can be 15 minutes, and sometimes a whole hour.
Well, I hope you find a handy tool to help you deal with these questions.
 Making money for a car How to make money if not 18
 Earning money on traffic on the Internet: step by step instructions
 Yandex Direct doesn't sell?
 Delivery. Yandex.Delivery Yandex.Delivery
 Practical lessons: registration with Wildberries, working with a personal account and other important tasks Supply of wildberries
 How to enter the personal account of tiu ru
 How "black" and "white" promotion on Instagram works: interviews with developers of the delayed posting service Parasite service