How to distribute Wi-Fi from the phone: on a laptop, computer and other devices: detailed settings. Ran Wi-Fi from a laptop
Today to imagine life without the Internet is almost impossible - it knows every user global Network. If earlier, many were just enough to go into a worldwide web, and it doesn't matter how and from where - from the phone or even from the popular Internet cafe, then today everyone wants all big and large amenities. Distribution of all sorts of gadgets in the face of smartphones and tablets, as well as wireless routers WiFi. solved this problem. Now everyone can include their communication device, sitting on the sofa, and walk through the Internet without need to go somewhere else.
Unfortunately, a router that supports WiFi, is not at home. Or maybe even eat, but failed. Fortunately, manufacturers of network wifi adapters took care that users can run their own wireless network without using a router - right from a stationary computer or laptop. And today we will look at a few simple and effective waysHow to enable Wi-Fi distribution (i.e., create an access point for a wireless network) through your equipment available.
We hope, and so it is clear that the creation of a virtual router on a computer is possible only if there is any access to the Internet (through the cable, 4G modem, etc.).
Starting with Windows 7, the Virtual WiFi technology will be included in this family of operating systems, which allows you to configure virtual wifi. Those. If you have data installed on your computer windows DistributionYou can half confident that you have to distribute Wi-Fi. Why half? And because this is not enough. That everything happens, you also need a wireless network adapter in your computer, which supports SoftAP technology (or Software Access Point).
Fortunately, the lion's share of modern network wireless cards have such support. So, if you bought a new laptop, then you will manage to make a full Wi-Fi router from it. If you are not sure that your equipment supports such technology, and would like to check it, then this can be done as follows:

If you all sorted out here, you can go to the next part. Let's talk about the ways to create a WiFay distributor.
The first method is the use of programs
Now on the Internet in free access you can find dozens of paid and devices paid programswho are able to open Wi-Fi in automatic mode. One of these - Virtual Router Plus..
The program is completely free and intellectually easy to use. After installing it, you should set up only a few simple parameters similar to those available in private wireless routerAnd rejoice in the appearance of a Wi-Fi network.
And so, after launching Virtual Router Plus, you will see such a window: 
Explain what all these parameters mean and what can be done with them:

To launch the Internet distributor, it remains only one thing - click on the "Run Virtual Router Plus" button.
Now it remains to check whether everything was possible to configure everything and turn on the distribution. Below in the picture is an example of working Wi-Fi on a computer under windows control 7.
Here, as you can see, our network is displayed - "V_TRAVE_SIDEL_KUZNECHIK" and we were able to connect to it. I am glad and the rest of the information is "access to the Internet" (it means it works) and "signal level: excellent" (it means there should be no failure).
Via Virtual Router Plus is not always and not all can be configured wiFi Network. No matter how it was there, you can always install other programs - for example, it can also be done using MypublicWiFi or Connectify Hotspot.
All similar applications have practically same settings, so you should not have difficulties with them. If it still happened, then feel free to go to the next part of the article. Consider how to configure the distribution of the network without using any third-party programs at all - using the standard Windows command line.
Method Second - Using Command Line
Through command lineIn addition to checking a network board for compatibility with SoftAP technology, you can do a lot. There is, of course, the ability to create a completely running point access WiFi.. This, of course, has a more comprehensive method, but no less efficient.
In order for your laptop to start working as a wireless router, first must be allowed to allow another network equipment (i.e., telephone, tablet, etc.) use the Internet through a custom-made computer. For this:

netsh WLAN. Set HostedNetwork Mode \u003d ALLOW SSID \u003d "Your value" Key \u003d "Own value"
Please note that instead of the phrase "your value" you need to enter the required parameters, as it was before in the case of configuring the Virtual Router Plus program. Those. After "ssid \u003d" enter the desired name of the network, and after "key \u003d" the password from Wi-Fi (after the equal sign, we do not put a space).
For example, as an example, we use the previously used network name settings (V_TRAVE_SIDEL_KUZNECHIK) and password (QWE123QWE456). In this case, the team will have the following form: 
After entering the command and the desired parameters, click "ENTER". Subject to the correct input and availability, you have a network adapter on a laptop that supports the distribution of Wi-Fi network, the following information will be displayed on the command prompt: 
Those. Access to the wireless network through your laptop was allowed, the SSID network name and password are specified.
Now it remains to run your virtual router. To do this, write everything in the same command line:
netsh Wlan Start HostedNetwork
After that, a message will be displayed that the Wi-Fi network is running.
Now on your phone or other device you can try to connect to the created network and check its performance. To verify statistics and the number of connected in this moment To wifi devices, use the command.
Modern technologies wireless communication Significantly simplify the lives of people. At the moment, with the help of the Internet, you can find any information, the answer to any question and much more. However, not even despite widespread wireless technology WiFi is not in every house there is a wireless network. But there is a laptop and cable connection to the Internet. In this regard, many ask a question as with distributing Wi-Fi from a laptop in Windows 7?
How to establish a distribution of wifi from a laptop
Nowadays there are several ways to distribute WiFi from a laptop:
- Configure distribution by creating a computer-computer connection;
- Organize distribution using the command line;
- Distribute wifi with a laptop with a third-party software.
It is worth noting that different methods Distribution opens different features. You will learn about it later, when we consider all the methods in more detail. The first two options use the built-in OS funds, for example, Windows 7. This means that you do not need to download anything and install. So, consider all options in more detail.
Also additionally about these methods you can read by software.
How to distribute WiFi from a laptop on Windows 7: Video
How to organize a computer-computer home network
To do this, in the so-called tray (the bottom right angle, where the clock and date are located, as well as other icons) you need to find the "Internet connection" icon (as in the picture).
Click on the icon, and in the window that appears from the bottom you need to click "Network and Shared Access Center". If you can not find the icon, then in the "Start" menu in the search bar, we prescribe the specified phrase and run the service.
In the window that appears, click "Setting up a new connection". Next, you should select "Setting up a computer-computer wireless network and click" Next ".
A window appears in which you need to fill in only three columns:
- Network name - can be any, as you please;
- Security type - It is recommended to choose "WPA2-PTRSONAL;
- The security key is a password that will be needed to connect other devices. You are also inventy it yourself, but it needs to be remembered.
After filling, you need to check the "Remember network settings" and click "Next". The system will configure the distribution of the Internet through WiFi and in the window that appears should be press "Enable general access To connecting to the Internet. "
Now go to the "Network and Shared Access Center" and go to the "Changing additional General Access Parameters section. Here in all items it is necessary to check the box on "Enable". This will provide other participants with access to files and other computer resources.
This is completed on this system. If everything is done correctly, the PC will distribute the Internet via WiFi. As you can see, distribution of the Internet via WiFi from a laptop with Windows 7 or PC is quite possible. Moreover, organize a private group is easy and simple. But this is not the easiest method. The second option is most consistent - the network organization using the command line. At the same time, the group setting is simpler and fast.
How to set up WiFi distribution using command line
It is worth noting that in addition to well-known advantages this method Allows you to use wireless connection Laptop for obtaining and distributing the Internet at the same time. That is, a laptop, not only creates a network, but is an amplifier of the signal from an existing router or access point. At the same time, the PC can act as the main point of access.
It should be warned that this method It works only if the wireless adapter driver supports the Virtual Router function. But do not worry, any laptop that works on the operating room windows system 7, has such a function. And even if the device is quite old, you can simply update the driver.
So how to configure to distribute the Internet from a laptop via WiFi with Windows 7? Everything is simple. First, you should run the command line. This is done using the key combination "Win" + "R". In the window that appears, you prescribe CMD and press "ENTER".
All, the command line is running. Now you need to register the command that will install the driver of the virtual access point and create virtual Network WiFi. It is prescribed as follows: Netsh WLAN Set HostedNetwork Mode \u003d ALLOW SSID \u003d My_Virtual_Wifi Key \u003d 12345678 Keyusage \u003d Persistent, where my_virtual_wifi is the name of the network, you can change it to any other, and Key is a password, instead of numbers 12345678 you can come up with any Another key.
After you prescribed the command to click "ENTER". After that, if the string is registered correctly, new equipment "Mini port adapter should appear in the task manager virtual WiFi. Microsoft.
Now you need to configure the connection in Windows 7. To do this, enter the "Changing Adapter Parameters" section of the Network and Common Access Center. Here you will see a new connection called "Wireless network connection 2, as in the picture.
In order to distribute WiFi from a laptop with Windows 7, go to the connection properties, with which the computer gets access to the Internet. Here in the "Access" tab in the "Connection" home network"Select the connection you created" and set the checkboxes as in the picture.
Press "OK" and close all windows. Now you need to go to "Changing additional shared parameters" and enable network detection. If necessary, here you can enable access to files and other resources.
Save the settings and close all windows. Now, to distribute WiFi from a laptop with Windows 7, you just need to start the created network. To do this, in the command line it should be prescribed not a complex command: Netsh Wlan Start HostedNetwork. Press "ENTER".
Remember that the distribution will be executed only while the laptop works, and even the output of the device in "Sleep" stops distribution. After each reboot, you will need to prescribe the launch command of the Netsh Wlan Start HostedNetwork again.
How to create a WiFi access point in Windows from the command line: Video
Using third-party programs
With Windows 7 with special Program? Everything is extremely simple. All programs work according to one principle, therefore, the configuration of them comes down to three common parameters:
- Select the name of the group;
- Key to connect to a virtual group;
- The choice of connection through which the laptop gets access to the global "web";
- Selecting a network type.
There are actually quite such programs, and many of them are absolutely free. For example, one of these programs is mhotspot. It is easier in the settings. However, it should be noted that for distribution of the Internet WiFi laptop must be connected to cable Internet. The fact is that, in contrast to the previous method, the MhotSpot program is not able to use one wireless adapter for accessing the Internet and its distribution at the same time.
It is often a situation when the Internet is connected to one computer, or a laptop, and there is a need to distribute this Internet to other devices. Smartphone, tablet, or other computer. If you entered this page, you most likely know that you can distribute Wi-Fi from a computer without a router. It is better, of course, to buy an inexpensive router, connect the Internet to it, and it will already distribute it to all devices. But there is no such possibility. It is in such cases that a laptop can be used as a router, or a computer with a Wi-Fi adapter.
Run the virtual Wi-Fi network and make your computer can be distributed in several ways. I would allocate three ways: teams via the command line, through a mobile hot spot, and using third-party programs. Now we will consider any way every way. You can choose a more appropriate option for yourself and go to the setup according to the instructions that you find in this article, or by links that I will leave in the writing process.
How to distribute the Internet on Wi-Fi from a computer:
- Through the command line. This is the most popular way that works in Windows 7, Windows 8 (8.1) and Windows 10. You need to run the command line, execute several commands, and open the access to the Internet. After that, the computer will start broadcasting the wireless network to which you can connect your devices and use the Internet. I have already prepared two detailed instructions:, and. The instructions are practically the same, simply written on the example of different operating systems.
- Using the "Mobile Hot Spot" function. it standard functionwhich appeared in Windows 10. There's everything much easier. Enough to set the name Wi-Fi network, password, select connection for shared access, and start the access point. Instructions for setting up :. If you have a "dozen" installed, I advise you to first try this method. There are our nuances that I wrote in the article on the link above.
- Using third-party programs. There are many both free and paid programs with which you can run the virtual Wi-Fi network on your computer. In fact, these programs also launch distribution through the command line, just a little more convenient. You do not need to copy commands, etc., just press the button. But these programs do not always work stably and correctly. I also wrote about them in a separate article :.
Instructions, links to which I gave above is enough to configure everything. But since I decided to make one big and general article on this topic, then for each way I will write detailed guide. Of course with pictures.
Note! If you want to distribute Wi-Fi without a router using a stationary computer (PC), then you must have a Wi-Fi adapter. Internal, or external, which is connected via USB. I wrote about such adapters. In laptops, this adapter is built-in.
No matter, you have a PC, or a laptop - Wi-Fi should work. The driver for the wireless adapter must be installed, and in the list of connections there must be a "Wireless Network" adapter, or "Wireless Network Connection". To check the ability to start the Wi-Fi distribution, run the command prompt on the administrator name and execute the command. nETSH WLAN SHOW DRIVERS. Opposite the "Support of the Placed Network" row should be "yes."
Go to the setting.
How to distribute Wi-Fi through the command line?
Let me remind you that this method is like for Windows 10, Windows 8 and Windows 7.
You need to run the command prompt on behalf of the administrator. In Windows 7, open the "Start", then "All Programs" - "Standard". Right-click on the "Command Line" and select "Run on the administrator". In Windows 10 and 8, you can simply click on the Start menu and select "Command Line (Administrator)".
Copy and execute (the Enter key) such a command:
netsh WLAN Set HostedNetwork Mode \u003d ALLOW SSID \u003d "MY_WI-FI_NETWORK" KEY \u003d "12345678" KEYUSAGE \u003d Persistent
This command sets the name ssid \u003d "my_wi-fi_network" and password key \u003d "12345678" For a Wi-Fi network, which will hand out a PC, or a laptop. You can change the name and password.
To start the access point itself, you must execute the following command:
This is the result should be after the first and second command:

The devices can already be connected to the running Wi-Fi network, but only the Internet will not work until it works. Need to open access to the Internet.
To do this, go to "Network Connections" (Network and Shared Access Control Center - Change Adapter Parameters). Right-click on the connection through which you are connected to the Internet and select "Properties".
Further on the "Access" tab you need to put a check mark near "Allow other network users use the Internet connection this computer"And choose a new connection in the list. In the connection name there will be a digit (not necessarily as I have in the screenshot), and below the network name, which is indicated in the first team.

netsh WLAN Stop HostedNetwork
And again run the team:
netsh Wlan Start HostedNetwork

After these actions, you can connect to the Wi-Fi network with the name "My_Wi-FI_NETWORK" (if you did not change it), and use the Internet. As you can see, without Wi-Fi Routerbut.
If you encountered a problem when devices cannot connect to the access point, or connected but the Internet does not work, then the first to turn off the antivirus and firewall. See also the articles, links to which I will give below.
Perhaps it will be useful:
- - When there is no access tab, dropping out the list, etc.
- - solutions from different problems. Including errors "failed to start the posted network. A group or resource is not in the desired state to execute the required operation."
It should be noted that the computer does not always be eagerly turns into the router. Sometimes it is necessary to dance with the tambourine 🙂
Setting the "Mobile Hot Spot" function (Windows 10 only)
In this case, everything is much easier. Open "Parameters" (Button with the gear icon in the Start menu) And go to the "Network and Internet" section.
On the Mobile Hot Spot tab, there are all settings for this feature. There will immediately be spelled out the network name and network password. If you want to change them, then click on the "Edit" button. Specify new and save.


If you occur any problems, turn off the antivirus and firewall.
In this article you will find all necessary information By setting the access point on Windows 8. and Windows 8.1.. We will configure the distribution of the Internet from a laptop that runs on Windows 8 and connect to this laptop on Wi-Fi our phone, tablet, other computer, TV, etc. Our computer will perform the role of Wi-Fi router.
I have been going to prepare this article for a very long time, as this is a very popular topic at the moment. The article has collected a lot of views and comments. And even even popular.
Briefly about what we will do, and for what to run the access point at the laptop.
For example, you have a laptop (possibly personal Computer with Wi-Fi adapter), there is wired Internet (or Internet through 3G / 4G modem), and devices that can be connected to the Internet via Wi-Fi. Modern smartphones, tablets, laptops, televisions, almost everyone has such an opportunity. And you have the Internet on the cable, or from a USB modem.
We connect the Internet to a computer on which there is Wi-Fi and run access point on it. In this article we will do it on example Windows 8. That's all, our laptop receives the Internet on the cable, and distributes the device you need to Wi-Fi. That's the whole scheme 🙂. If you do not want to spend money on buying a Wi-Fi router, or you just don't need you (for example, very rarely need Wi-Fi), then this way, what you need.
Configuring Internet distribution on Windows 8 is almost no different from the setting on Windows 7 (reference to the instruction is at the beginning of this article). But, I understand that much easier to do everything according to the instructions that is written specifically for operating systemwhich is installed on your laptop. And since Windows 8 (8.1) is actively gaining momentum, this article will be useful.
What needs to be done before adjusting the access point?
- You need to connect the Internet to your laptop. Via cable, or via USB modem. With a USB modem, there may be nuances, see the article if the Internet is through the modem. There is an article for Windows 7, but it is not scary. If the Internet is connected via the network cable, there should be no problems. The Internet should work, sites in the browser must open.
- Ensure that your laptop has Wi-Fi and the driver is installed on it. If you have previously connected from this laptop to wireless networks, then everything is fine, then the driver is installed. If you do not know whether the driver is installed on the wireless adapter, then go to Control Panel - Network and Internet - Network Connectionsand see if there is there Wireless network. If there is, everything is fine. If not, download from the manufacturer of your laptop (adapter) driver for your model and operating system and install. Driver for wireless Wireless. LAN adapter.
That's all, you can start setting up.
Setting up a Wi-Fi access point on windows 8 using the command line
This is the first way in which we will not use third-party programsAnd all make the standard features of the operating system. This method is a bit more complicated than the second that you find below. But, sometimes you configure everything through the command line is even easier. Yes, and through third-party programs may arise.
Right-click on the left right corner (or keyboard key + x)and select Command Line (Administrator).
In the command line window, enter the command (you can simply copy and paste):
Where "F1comp" is the name of the network, it can be any. English letters.
A "12345678" is a password to the network. It will need to enter on the device that you will connect to Wi-Fi. Specify the password at least 8 characters. You can digits and English letters.
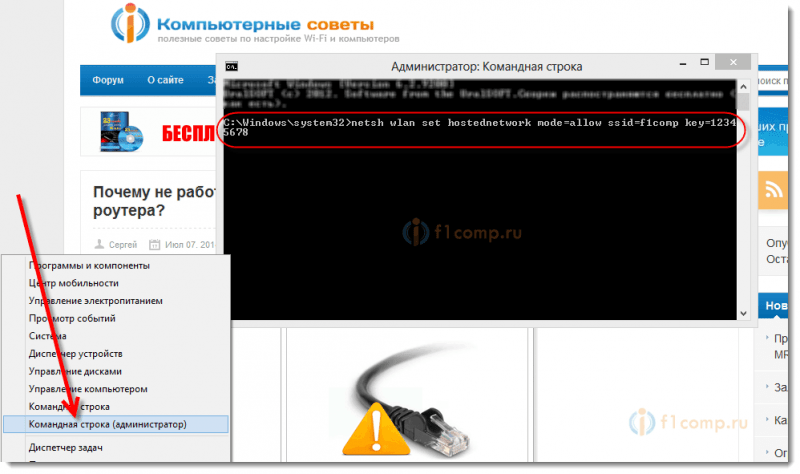 Click ENTER.
A run-up result will appear with information that the network name and password are successfully changed.
We enter another command:
This is a command to start the access point. Press ENTERAnd we see such a result:
 It should be written that the hosted network is running. If you have the same result as in my screenshot above, you can continue. Command Line window can be closed.
If you saw a mistake Failed to run the posted network, then follow the two commands in turn:
netsh WLAN Set HostedNetwork Mode \u003d Disallow
Netsh WLAN Set HostedNetwork Mode \u003d AllowGo to Device Manager, open in the list Network adapters , Right-click on Virtual adapter posted network and select Enable.
We perform two commands on the launch of the network, which I wrote above:
netsh WLAN Set HostedNetwork Mode \u003d ALLOW SSID \u003d F1comp Key \u003d 12345678
netsh Wlan Start HostedNetwork
Let me use the use of shared Internet access
Right-click on the connection icon, in the lower right corner. Select Network and Shared Access Control Center.
In a new window, on the left, click on the item Change adapter settings. Further attention! Right-click on the connection through which you receive the Internet ( i have this Ethernet, since just network cable Connected to a laptop)and select Properties.
In a new window, go to the tab Access. Install a tick near the item Allow other user users use the Internet connection of this computer..
Below in the list, select the network that appeared after starting the access point. Most likely, it will look something like the screenshot below.
Click OK.
You can take your device and connect it to the Internet by Wi-Fi, which already gives our laptop.
You can see the Instructions for connecting to Wi-Fi: ,.
The most popular problem is when the device connects to the access point created on Windows 8, but the Internet does not work. Sites do not open. Or, when problems with obtaining an IP address arise.
Decision: Fully disconnect the antivirus, antivirus utilities, firewalls. Most likely, they are blocking the connection. If after turning off the antivirus everything will work, then you need to add a connection to the exclusion of antivirus.
Also, check the internet access settings as in the screenshot above.
How to start the network after restarting a laptop?
You probably have a question, but how to restore the work of the wireless network after restarting the laptop.
Just need to execute the command:
netsh Wlan Start HostedNetwork
As we did it higher in the article. You do not need to enter the network name and password. Only run the network.
We distribute the Internet in Windows 8 using MyPublicWiFi
This is a simpler way. We will start the network via the command line, but using the program MYPUBLICWIFI. This is a free, small program, with understandable interface, though without Russian. Instead of MyPublicWiFi, you can use Virtual Router Plus, Connectify programs and them like. The principle of work is the same.
Download and install MypublicWiFi. Version 5.1 can download the link (I took the file from the official site http://www.mypublicwifi.com).
Installation standard. After installation, restart the laptop and run MYPUBLICWIFI. If an error appears when starting, click on the MyPublicWiFi shortcut right-click and select Run on behalf of the administrator.
Highlight item Automatic Hotspot Configuration..
In field Network Name (SSID) Specify the name of the network being created.
In field Network Key. Specify the password to be specified on the connection device.
We put a tick near Enable Internet Sharing And select the connection in the list by which your laptop is connected to the Internet.
Click on the button Set Up and Start Hotspot.
You can already connect devices to the created network. If it is, there is no connection to the network, and the Internet does not work, then check the internet access settings (I wrote about this above in the article) And turn off the antivirus, firewall and other programs that can block the connection.
In the MyPublicWiFi program, on the tab Clients. You can see devices that are currently connected to your network.
And on the tab Management You can additionally configure the program. For example, by installing a tick near the item Enable Firewall ... We will disable devices that connect to your network to use to download and distribute files through clients as torrent and those like.
And if you install a tick near MYPUBLICWIFI WILL BE LAUNCHED ON EVERY SYSTEM STARTThe program will run automatically when the computer is turned on.
All is ready! You can use the Internet.
If you have any problems, errors and other difficulties in the configuration process, then you can ask a question in the comments. Describe the problem as much as possible, and we will try to figure out together. Good luck!
More online:
We configure the distribution of the Internet on Wi-Fi from a laptop on Windows 8 and Windows 8.1. Adjust access point Updated: February 6, 2018 by the author: admin.
He arrived in the village, and there the Internet only on ADSL is heard. I tried to connect your own Android smartphone through USB cableBut is not the simplest procedure. More precisely, the Internet has not been available for all applications. But since there was a laptop with Windows (Windows) 7/8, then for distribution of the Internet via Wi-Fi (Wi-Fi) it was enough to run simple team. Although Wi-Fi distribution from a laptop can be used and free programs.
If there is no router, then distribute the Internet through Wi-Fi (Wai Fi) is very simple. Windows (Windows) 7, 8, 8.1 support this feature, although convenient to control it by the means of the operating room wINDOVS systems not. Virtual Router, Virtual Router 2, Connectify, Marify can help.
I tried all the above programs when it was necessary to share the ADSL Internet from Rostelecom (DISEL). Unfortunately, the protocol has arisen with PPPoE:
- Virtual Router refused to work with such a compound.
- Connectify demanded money for solving such Wi-Fi connections.
- Marify issued an error with change network settings, offered to install Microsoft Virtual Router.
How to distribute the Internet on Wi-Fi (Wi-Fi) from Windows Laptop (Windows) 7, 8, 8.1 standard means The operating system itself
The decision is certainly not perfect. If you restart your computer or even send it to sleep, then the wireless Wi-Fi (Wi-Fi) connection is turned off. It is quite simple to turn it on, running the same batch file with administrator rights. This free solution can help you out when there is no Wi-Fi router at hand, but there is a laptop with Windows (Windows) 7, 8, 8.1. After all, setting unnecessary programs Only slows down the system, especially if they are constantly working in the background.
How to distribute the Internet on Wi-Fi (Wi-Fi) from a Windows laptop (Windows) 7 using the operating system using a new connection or network configuration wizard
In Windows 7, everything was much easier. You could distribute Wi-Fi from a laptop with a wizard that is much easier for many users. Everything will work if your wireless Wi-Fi The laptop adapter supports Microsoft Virtual Wi-Fi technology. For everyone modern computers There should be no problems.
- Go to "Network and Shared Access Center": Click on icon icon network connection Next to the clock and click the right mouse button. In the context menu, select "Network and Common Access Center".
- Click on the "Configure New Connection" link in the "Changing Network Settings" section. The "Connection Wizard or Network" will start.
- Select "Setting the Wireless Computer Wireless Network" and click on the Next button.
- The "Configuring Wireless Computer Wire Metage" dialog box appears.
- In the security settings, enter your Wi-Fi network name (SSID identifier), as well as a Wi-Fi password (security key). Safety type is better to choose WPA2-PERSONAL if it is supported by your wireless devices. Put the "Save the settings of this network" checkbox and click on the "Next" button.
- A window will appear with the message that wi-Fi network ready for use, it will be displayed in the list wireless networks And remain active until all users do off.
- To share the Internet from a computer, you need to click in this dialog box to "Enable access to Internet connection". After configuration, the message "Sharing Internet Connection is enabled" will appear. Now you can close the dialog box by clicking on the Close button.
- If you want to be seen from the network network folders and printers, but you need to go to the "Network and Shared Access Center", choose "Change extra options Shared Access ". In the window that appears, you need to select" Enable Network Detection "and" Enable Sharing Files and Printers ". Next you need to click on the" Save Changes "button.
- All, you can enjoy the Internet from a laptop on any Wi-Fi device (smartphone, tablet, media player, TV, e-book, ...)
 How to reflash iPhone with PC and iTunes
 Best Bitcoin Wallets for iOS Download application wallet on iPhone
 Lenovo Vibe X2 Description, Features, User Reviews
 The computer does not see the flash drive: causes and solving the problem
 About Windows Update From Wannacry Encrypter Virus
 Hot browser keys
 New Mac Mini turned out to be five times more powerful than the predecessor