How to configure a wireless network connection. How to fix the "Wireless Network Connection" icon. Connect to Wi-Fi on a laptop
Since now in each apartment there are several computers and mobile devices with Wi-Fi, often simple users have a question about how the wireless network is configured. In this article, we and the light on this slippery question. As an example, you will configure the wireless network in Windows 7.
First you need to configure the main computer of our future network. They can be like a laptop, and for this, activate the Wi-Fi adapter on our computer. Then you open the menu and right-click the manipulator click on the computer, where in the context menu, click on the properties. After that, we all go to the additional parameters of the system and click on the name of the computer, and in the column "description" we give your description, for example, "Computer Vladimir Ilyich". Further choose "Change" and give the name to this device that should not be duplicated by others on the network. In the column "Working Group" indicate the name of this group, which should be the same on all devices of our network, and reboot.
When the computer restarts, the wireless network setting continues. Select the wired connection icon and go to the "Network Management", where you click on the "Wireless Network". In the menu that appears, select "Add" and next is the configuration of the wireless here you must also come up with a name for your network, what you want. Then choose the "Security WPA2 Personal". If there are devices on the Windows XP platform, then choose "WEP".
After that, install the password, press "Next" and in the new dialog that appears allow you to share the Internet for network computers, after which you close the window.
But on this wireless network setting is now our task is to configure other computers in this network. Turn on the wireless adapter, open the "Start" button menu. We continue by clicking the right button on the manipulator on the computer icon, where you select "Properties and Advanced System Parameters". Now click the "Computer Name" section and give him your individual name. Next, specify the name of the group that must match the name of the group on the main computer.

We go again to the network management, where we go to the "Changes of Adapter Parameters" section and select "Properties", after which I jump over the protocol line version 4. Here, we mark the IP Address Setup Stage. In the column "IP address" we assign your computer to this, and this must be done, pushing out from the IP of the main PC. For example, if the IP of the main device is 192.168.0.1, then the IP of all computers will be the same, with the exception of the last digit. It is very important that the network does not have the same IP. In the graph printing 255.255.255.0, and the IP address of the main computer will be in the line. In the "Preferred DNS server" and "Alternative DNS server" specify the address of the provider.
After all these manipulations, we make changes. And only now go into network connections, select your network, enter the password, and that's it. If there is no longer in the network of computers, this configuration of the wireless network is completed. If there are still some computers or laptops, then in this case you need to repeat the procedure for setting up the last computer.

I would like to add recommendations on the protection of the network. Recently, cases of invasion of unauthorized users have become more frequent. Be sure to install an antivirus program on the main computer. Also come up with a long and sophisticated password with large and small letters interspersed with numbers. This will increase security and minimizes the risk of interference with unauthorized persons, and also prevent theft of valuable information and loading outsiders.
When all components for the connection from the Internet are already purchased, you can start connecting. So, configuring the Wi-Fi wireless network depends on the main device represented by a personal computer, a laptop. Setting up the worldwide Internet directly depends on the operating system of the personal computer.
Any Wi-Fi camera for Windows is also running, after taking into account the features of the equipment provided. The user-chosen system necessarily contains a window that displays a special network connection management item.
If you need to install a wireless connection to Windows XP, you should consider the difference between the current product of computer companies and previous versions.
Configuring Wi-Fi Wireless Network in Windows XP is considered more complicated than in Windows 7.
Windows XP. Initially, the user must select the "Network Connections" in the Start menu. Then find the "wireless connection" and click on it. After enabling this command, the connection is adjusted, but you should view the available wireless networks by selecting the appropriate item.
For the main device to work in a specified direction, it is required to "change the order of network preference". When a new window appears, you can already put a marker near "Using Windows to customize the network" and click on "Optional". Next, it will be necessary to return to "Change the procedure for network preferences" and remove the marker with the "key is automatic". Then the network data is entered, and "OK" is pressed to confirm.
Wireless network access for Windows 7
Configuring Wi-Fi Wireless Network in Windows 7 starts with the "Control Panel", in which "Advanced System Settings" are selected.
Then the transition to the "Computer Name" tab and clicks the Edit option.
After that, the action on the monitor appears window with the names of the computer or domain. The personal working device itself must have a unique name. If this name had to be changed, then the computer is restarted.

Setting the parameters for connecting the Internet in Windows 7
Next click on the wired connections icon, which is located in the lower right of the monitor. Here a "network management center and shared access" appears. It must be selected by pressing the confirmation key. From the list that appears, you allocate the "Add" option and create a computer-computer network. To continue clicking "Next".
In the fields with the names and network parameters, the data is addicted to the need. Then confirm the actions and include access to the Internet. Wireless Wi-Fi Windows 7 will start working immediately after clicking Close.
Connecting Windows 8 to Wi-Fi
Initially installed settings on personal computers or laptops do not always allow you to connect to a wireless network without any problems. After all, the Windows 8 operating system may not see the wireless adapter, although it is necessarily present.
Configuring Wi-Fi Wireless Network in Windows 8 usually begins with pressed icon with an asterisk. After that, a list of proposed wireless networks appears on the monitor. One of them should be selected by typing the required security code. The above action is confirmed by the "Next" button.
When it comes to a home network, it is better to choose a common access. With a normal connection, the asterisk near the division icon disappears, and the signal acceptance level begins.
Conducting wireless communications with tenth versions
Windows 10 operating system It differs from previous versions with additional settings that provide for the use of touch screens. The necessary drivers are also automatically updated here. Because of this additional feature, configuring Wi-Fi wireless network in Windows 10 does not cause special difficulties. The user can simply click on the icon in the lower right corner of the monitor and decide on the available network.

Connect Wi-Fi on Windows 10
It is also possible to automatically select the connection, putting a tick near the corresponding item. If the Wi-Fi adapter is not connected, then a cross is depicted on a marker with divisions instead of an asterisk. It is easy to fix by pressing a specific button.
Most often, the wireless network is protected by a password that you want to enter into the window that appears when connected, and confirm.
On modern computers and laptops there is already a built-in special radio receiving for sending and receiving information at a distance without using wires. For this reason, the Wi-Fi connection configuration occurs without much difficulty.
Often, Windows WINTOVS are faced with a problem when there is no wireless connection in the laptop network connections, and the "cross" appears on the conference status icon.
In this case, the WiFi access point operates and distributes the Internet to other gadgets and devices.
If you bring the mouse to such an icon, the notification "No available connections" is displayed. The situation is unpleasant, but you should not hurry to carry a PC to the service center.
After all, even if there is no Waifa icon in the launched window of the "network management center", it is possible that the hardware filling of the PC is quite proper and does not need repair.
In most cases, this problem can be diagnosed and solved on your own. To do this, you just need to know the causes of its occurrence and how to competently make the wireless connection. 
A brief list of possible sources of problem and solutions
Among the most common reasons, due to which there is no wireless network connection in the computer, the following can be distinguished:

 Often in Laptop models for this, the "Fn" buttons and one of the function keys, for example, "F2" are provided for this. On the desired button, the conscientious manufacturer always affects the appropriate drawing, symbolizing the wireless communication.
Sometimes a separate switch with such a pattern is placed on the ends of the laptop:
- Infection of malicious applications. The actions are obvious, it is necessary to make a full analysis of the PC for the presence of viruses and when detecting them;
- It often happens that the network is not available due to blocking some functions by anti-virus utility or firewall. Recommended for a while try to deactivate them.
How to make sure the WiFay adapter?
In the absence of this module there is no Waifa icon in the tray. And in the event that it is, but a message is displayed about the absence of a connection, then the device model is usually the manufacturer indicates a sticker that can be found on the laptop housing.
The owner of a stationary PC can accurately make sure in the presence of a wireless receiver simply inspected the system unit. When the external antenna is detected, it can be concluded that, most likely, it belongs to the WiFi adapter.
 The adapter model is very easy to determine using Windows tools. To this end, you must implement only a few consecutive actions:

Software
The "Windows" provides automatic loading of drivers, but it happens that the software of some devices is not installed or incorrectly works.
In such cases, it is necessary to independently install software. To do this, just a few steps should be made:

 If the above did not lead to a successful result, you will need to execute the following steps:
- Log in to the "Actions" tab;
- Click the line "Install an old device";
- In the displayed window, click "Next";
- Specify the "automatic search" or "manual";
- Then highlight "network adapters";
- Find a device model in the list;
- Wait for the complete completion of the installation and restart the PC.
If you need to update the drivers, the algorithm will consist of the following steps:
- Guided by paragraphs 1 - 5 from the first instructions, run "Device Manager";
- Then from problem equipment to call the context menu;
- Click "Update Driver";
- It is recommended to specify the "automatic search", and the OS will independently find and install software;
- Either, if the user downloaded the software in advance and retained it to the PC, click "Search on a computer" and show the location of downloaded drivers.
To manually find and download the appropriate software, you must perform the following items:
- Open the device developer resource;
- In the search box, print the equipment model and click "Enter";
- Enter the section "Devices";
- Save drivers for a device in PC memory.
In the event of difficulties with manual task, you can apply programs that are specifically designed to install software. One of these applications is "Driver Booster".
The advantage of its use is mainly in the automatic definition of the device model and loading the latest modifications of software. 
Network configuration
To the laptop correctly connected to Wi-Fi, you need to diagnose.
Diagnostics:

Data transfer without the use of cables literally not yet so long ago, it seemed something from the fiction area, and today the WiFi WiFi WiFi network is not surprising at work or in the near cafe. But with such a connection, some problems may be observed. Connection error - a phenomenon that occurs quite often. Consider the most characteristic problems and the simplest methods of their elimination.
Wireless Network Connection: No Connection. What is the reason?
As for the most common causes, they can be divided into two main types: problems at the hardware level (non-working equipment) and software errors.
In the first case, as it is already clear, you need to carry out complete diagnostics of the equipment, after which it is necessary to make a decision on its repair or replacement (this also applies to network cards, and routers, mobile devices, and external or internal Wi-Fi modules). In the second case, you can call several situations where there is no wireless network connection (no connection). Among the mains are the following:
- disabled module or;
- incorrectly entered password;
- router problems;
- incorrect connection settings;
- missing, incorrectly installed or outdated network devices drivers;
- lack of installed network;
- impact of viruses.
Problems with viruses will not be considered for obvious reasons, since any user must take care of the protection of its system on their own. Partially affect the absence of the network, if for some reason it was installed in the system, but then it disappeared (this, unfortunately, is also there). Finally, we will not stop on the fact that the user could forget or incorrectly enter a wifi-network password, and problems from providers. These situations in our case are not so significant.
Wireless Network Connection: No Connection. What to do in the most simple case?
To begin with, consider the simplest situation. Suppose, a wireless network connection is lost at a certain point. Perhaps the reason is a short-term programmatic program. What is usually in such cases makes most users? They just reboot the system (after all, before that everything worked).

If this does not help, and the time to lose the signal is known at least approximately one of the options to solve the problem that when you try to connect to an existing network, the connection error pops up may become a regular system rollback to the previous state through the corresponding section "Control Panel". But, as practice shows, the problem is usually much deeper.
Diagnostics Connection by means of the system
If for some reason the Wi-Fi wireless network connection disappears, it is possible to find out the reason using Windows. If you call the menu through the right click on the network icon in the system tray, you can use the troubleshooting tool.

The system will independently analyze, after which it will give the relevant result. Please note: this tool does not fix anything, but only helps to determine the essence of the problem.
Wi-Fi Module Activity Check
One of the most common causes of the lack of communication, many experts call inattention or negligence of users.

For the most part, this refers to the owners of laptops, on which there is no special switch to activate the built-in Wi-Fi module, and its inclusion or shutdown is made by using a combination of some key with a special FN button. It is clear that even when the text set using the so-called hot keys, it was possible to easily turn off the adapter. Therefore, first you need to make sure that it is in active mode.
Reset router settings
Sometimes the reason that there is no wireless network connection (no connection), it may become a short-term failure of the router. Most often, this situation is observed with low-cost routers of the TP-LINK series.

And in the case it is recommended to use the simplest reset technique, you can do a two way: either completely disconnect the power to about 10 seconds, or press a special reset button on the back of the device and hold it for 30 seconds.
Network settings identification
Now, if not defined, look at the main network settings. To view them, enter the network management and shared access control panel or from the Click menu on the network connection icon and use the parameter change section.

Here you need to find TCP / IPv4 protocol (if IPv6 is not used) and press the properties button. As a rule, most providers represent automatic parameter definition services, which must be fixed in the settings. It is worth paying attention to the fact that the use of a proxy server for local addresses should be deactivated (if otherwise provided). Otherwise, you just need to enter all the parameter values \u200b\u200baccording to the settings provided by the provider when connected.
Correction of connection parameters on the router
If, after that, the connection problem remains, perhaps it consists in the settings of the router itself.

Just in case, you should enter the router parameters menu through any web browser by entering the corresponding address (192.168.0.1 or 1.1), after which in the Wireless Connection section (usually Wireless) make sure that it is active (enabled).
Troubleshooting Drivers
Another network problem may be that there are no network card drivers installed or outdated or outdated. Make sure that the device does not work, you can in the Device Manager, which is called at least from the "Control Panel", at least from the Computer Administration section, at least from the "Run" menu by the devmgmt.msc command.
The non-working device will be marked with a yellow marker. This is a direct indication that something is wrong with the driver. But it happens that among problematic devices is not displayed. This is only due to the fact that the system sets the most appropriate driver for it, considering it optimal.

In any case, it will have to reinstall or update. Make it can be directly from several menus. It is recommended that you first completely remove the old driver, but only then install the new, but do not choose from what will offer the system, and in advance to find the most fresher for this device on the Internet.
So as not to engage in such things, it is better to establish a program like a Driver Booster, which will find and install the newest drivers absolutely for all devices. It is clear that for this, with a laptop you have to go to the same cafe, where there is a connection, and there is no WiFi password for entering the network (there is no connection at home). The update process will take a maximum of 10-15 minutes, followed by a reboot.
Reset the settings from the command line
If the network is still determined, you can try to still make the following actions. We call the command line with the admin rights (CMD in the "Run" console), after which we prescribe the proxyCFG -D command, and after pressing the input key, two more - Net Stop Wuauserv and Net Start Wuauserv (after each - also "input"). Such simple actions can also help.
If the network is not determined at all ...
Finally, the last problem when it is absent is quite possible that due to some reasons, among which the influence of viruses is not excluded, the previously created network was simply removed.

In this case, you need to go to the Network Management section with shared access and make sure that the wireless network is displayed in the list of available connections. If there is no one, it will have to be reinstalled by selecting the appropriate item. Time will be required at least.
If the network is, but all of the above solutions of the problem do not help, you can try to simply delete it entirely and completely, after which it is to create a new and make the appropriate TCP / IP protocol settings.
Conclusion
Finally, it remains to add that these are only the main, most common problems and methods for solving them that any user can use to eliminate failures. Here, there were no different kind of teams specially considered, allowing you to fully test IP connections or assigned MAC addresses, pinging, etc., since they may seem sufficiently difficult for understanding by ordinary users. In other cases, even the simplest means will help. However, this in no way concerns the cases when the equipment fails. There are no software methods here, no matter how trying.
In this article, I will tell you how to configure Wi-Fi from scratch. At first, you need to configure the wireless network on the router, and then on the laptop. With the help of simple step-by-step instructions, even newcomer will be able to configure the Internet on TP-Link and D-Link routers, which are most common in the CIS.
Wi-Fi Routher Setup
Step 1. Connect the router to the network using the power supply. Turn on the power to the on, if there is such a button on the router.
Step 2. Connect the router to a laptop or computer using an Ethernet cable (patch cord), which comes with a router. You need to connect the cable to the computer's network card port and to the LAN1 port of the router. (In no way in the WAN port - it will not work out through it)
Step 3. We check that on the computer in the network card properties, we have selected automatic receipt of the IP address. To do this, we go here: "Start" -\u003e " Control Panel» -> « Network and Shared Access Control Center» -> «» -> « LAN connection»
Attention! In chapter " Changing adapter parameters»You can have multiple connections. For example, "Local Main Connection", "Local Network 2", "Wireless Network Connection", "Bluetooth 2 Network Connection" etc. How among these connections find the right one?
Firstly, By default, the wired connection in Windows 7 and 8 is called "LAN Connection". If no one has time to rename him manually, it will be called that way. Is that at the end may be present - most often "2". This is if several network boards are installed on the computer (relevant for stationary computers, for in a laptop in 99% of cases from the factory, only one wired network adapter)
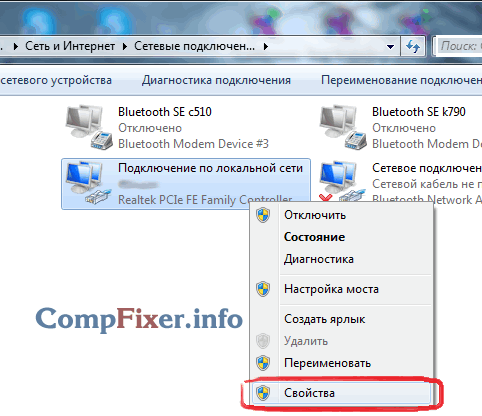
Secondly, The connection you need must be active as you joined the computer and the included router using a cable: the connection icon should shone with bright color (usually, blue, if your Windows uses a standard package of icons), i.e. The icon should not be shaded. See Figure:

Here, we found the desired active wired network connection.
Step 3.1. Press the right mouse button on the active wired connection you need and select "Properties":
Step 3.2. In the window that opens, click the "Properties" button:

Step 3.3. Select the left mouse button " Internet Protocol version 4 (TCP / IPv4) " And click the next "Properties" button below:

Step 3.4. Install both switches in the upper positions to be " ... ... ... automatically»:

Step 3.5. Press the "OK" button to save the settings.
Step 4.Open the connection window again:
Step 4.1. Press the "Details" button:

Step 4.2 . In the window that opens, learn the default IP address of the default gateway:

In most cases, it is equal to 192.168.1.1
Step 5. . Open the browser to go to the router web interface.
Step 5.1 . In the address bar, enter the address of the gateway and click Enter:
Step 5.2 . Enter login and password:

Attention! You can find the details for logging in instructions for your device. Included with the router may be present as an instruction on paper and in the PDF document format on the attached disk.
If the instruction is lost, you can try to download it on the manufacturer's website. For example, http://dlink.ru, http://asus.com, http://tplink.com.
Often in a new default device login \u003d admin and password \u003d admin. It also happens that login \u003d admin, and the password is empty.
Step 5.3. After you have entered the web interface of the router, open the Wireless Settings (Wi-Fi):
(illustrated by the example of TP-Link TL-WR841ND and D-LINK DIR-300 NRU)

Step 6. Actually configure the wireless connection.
Step 6.1 . Turn off Wi-Fi Protected Setup, because This feature is a serious hole safe and can allow an attacker to hack your Wi-Fi network and access your information.
Step 6.2 . We check that the Wi-Fi network is enabled: The "Enable Wireless" canken is installed if it is D-Link.
Step 6.3. . We specify a name for our wireless network.
If the default is DLink or HOME, it is recommended to specify some original name to avoid confusion with the eponymous networks of neighbors.
Step 6.4. . We specify security settings. We strongly recommend using the following parameters:
- security mode WPA2. ;
- encryption type AES.;
- type of key PSK. (He, Personal Key).
After specifying all the parameters, do not forget to click the Save button!
On the TP-LINK router:
 In D-Link:

Wi-Fi Setup on Computer (Laptop)
In this section we will show how to configure Wi-Fi on a laptop with Windows 7.
Step 1 . Find in the taskbar near the clock network connections icon And click on it with the left mouse button once. A list of available wireless networks opens:

Step 2.. Find your wireless network in the list (it will have the name you specified in the previous paragraph) and click on this network with the left mouse button.
Step 3.. Leave the checkbox "Connect automatically" marked and click the "Connection" button:

Step 4. . Enter the security key Wi-Fi network. This is a set of characters that you specified in the Network Key field. After entering the key, click "OK":

After clicking "OK", connecting to your wireless network.

After a few seconds, the previous window will disappear, and the network connections icon near the clock will change its appearance.
Now, when you click on the network connections icon, you will see that the computer is connected to your Wi-Fi network, but the inscription " Without access to the Internet", Because We have not yet configured the Internet on the router:

Internet configuration on the router
We configured the Wi-Fi network on the router and connected to it from the computer. We can only help the router to see the Internet so that the router can distribute the Internet to any devices that connect to it on Wi-Fi or cable.
Step 1 . In order for the Internet to appear on the computers, you need to configure the connection to the provider on the router. Show on the example of the same D-Link
Step 1.1. We recruit the IP address of the router in the address bar
Step 1.2 . We enter a login, password and click "Log In":
Step 2. . We go to the Internet Settings section. From different router manufacturers, it can be called differently: Wan Setup, Internet Settings, etc. In our D-Link, this section is called "Internet Setup":

Step 3. We fall into the WAN-Port Settings section.
Step 3.1 . Remove the Jackka "Enable Access Point Mode".
Attention! In other manufacturers, this parameter may be called "Disable Nat". The point is that the "Access Point" mode disables NAT and turns the router to the access point. This option will be useful if this router is not connected to the provider, but to another your router.

Step 3.2. Select the type of connection with the provider.
To find out which settings you need to select to connect specifically to your provider, you can:
- in the contract;
- on the website of the provider;
- calling the hotline provider
Nowadays, the type of Dynamic IP is most often used.
Step 3.3. . If your provider allows you to connect only from a registered MAC address, you have 2 ways to solve the issue.
- Go to the office of the provider with a passport and register a new MAC address;
- Specify in the Mac Address field MAC address of the device of that device from which you have successfully published on the Internet before buying a router. Usually, this is the MAC address of the wired network card of the computer.
Step 3.4. . Indicate the DNS server if this is required in the instructions from the provider.
Step 3.5 . Select the MTU value. If the provider does not require changing this value, we advise you to leave it as it is: 1500.
Step 3.6. . Save settings
Attention! If you have lost a document of the contract with the provider, in which the details are indicated, in extreme cases you can always drive up into your office of your provider with a passport and learn all the comprehensive information: connection type, MAC address, login, password, MTU, etc.
 Cellular - what it is on the iPad and what's the difference
 Go to digital television: What to do and how to prepare?
 Social polls work on the Internet
 Savin recorded a video message to the Tyuments
 Menu of Soviet tables What was the name of Thursday in Soviet canteens
 How to make in the "Word" list alphabetically: useful tips
 How to see classmates who retired from friends?