As in VirtualBox install the system from a flash drive. Installing Airslax on a virtual machine. Work with WiFi. Installation in VirtualBox * .vmdk file as a boot disk
Working in system administration, I often have to use virtual type machines Oracle WM VirtualBox. and WMWare Workstation.. VirtualBox \\ "Ohm I use it more often due to the fact that it is easier for single launches and easier. There was a need to load a virtual machine with a real USB flash drive, in this case, to check the freshly plane loading flash drive. But there is one trouble - through the primary interface of the VirtualBox program You can not load a virtual machine from a physical disk USB, however, there is a way to solve such a task. Here is the method and will be discussed in the article.
To download VirtualBox virtual machine from an external USB disk, you need to create uSB clone disk as * .vmdk fileThrough which the VirtualBox host will be communicated with the physical external USB disk. Such a file will occupy a few kilobytes, because It contains only data for communication with a USB disk.
1. Create a file that serves as a bridge between VirtualBox and USB disk.
To create a * .vmdk file, there is a VBoxManage.exe utility, which is included in the standard VirtualBox composition, so it is not necessary to download it separately.
So, to create such a file, you must execute the following command in the command line window, applying the path to the VirtualBox directory to your:
"C: \\\\ Program Files \\\\ Oracle \\\\ VirtualBox \\\\ vboxManage.exe" INTERNALCOMMANDS CREATERAWVMDK -FILENAME C: \\\\ TEMP \\\\ USB.VMDK -REWDisk \\\\\\\\. \\\\ PhysicalDrive2 -Register
Here you should pay attention to two parameters:
To find out the number of the external USB disk with which you should connect the file (usually external USB HDD under the number 1 if only one hard disk is installed), you can be brutally high in "Control Panel → Administration → Computer Management → Disks Management".

Now it remains to configure the VirtualBox host to download from the newly created virtual disk.
2. Installation in VirtualBox * .vmdk file as a boot disk.
First you need to add the created USB.VMDK to the list of hard drives in VirtualBox virtual media manager.

Next, go to the "Properties" of the virtual machine (which must be downloaded from the USB external disk) and in the "Media" section to install the added virtual hard drive USB.VMDK in Slot "Primary master IDE", as in the screenshot.

Ready, you can now download a virtual machine from an external USB disk.
All popular hypervisors for Windows - Hyper-V.
, VirtualBox.
, Vmware. - Provide the launch of virtual machines (VM) With loading ISO. - Drains and flash drives. Running Vm Since the latter, not in each case will be a process without problems: without dancing with a tambourine with flash drives UEFI Run only Vm on the base BY EFI in programs VirtualBox. and Vmware.. How to simplify the launch of VM from flash drives in other cases?
To do this, you can create the so-called virtual flash drive - all the contents of the real USB transfers to transfer to a virtual hard disk and, accordingly, run Vm from him. But the contents must be transferred along with the structure of the physical flash drive - so that the virtual disk inherit all sections if there are several (for example, in the case of Mac OS or Chrome OS) , as well as the attributes of the boot device (If this is not a UEFI carrier) . You can do this at least two ways described below.
All actions in our case will be held with. In other virtualization programs, it is necessary to act by analogy.
1. R-DRIVE Image program
The first way to create a virtual flash drive is to transfer the structure and content of the real USB -Conitor to a virtual disk using the program bacpee. Open the parameters of existing Vm and click.
Add another disk.

The controller type is left by default.

Create a new disk. We indicate its size: let it be about the same as the size of the flash drive, but let few even be different. It is necessary to not confuse the device when cloning. Save in the form of one file.

Indicate the placement path. Click

Run Vm, We connect a real flash drive to it. In the guest OS install trial.-Eversion program . In its window choose "Copy disk disc".

In graf "A source" Choose a real flash drive. In graf "Receiver" - just created virtual disk.


And - "To begin".

Upon completion of cloning, we leave the program.

Now in the guest's guide OS. We have two identical devices.

We can turn off the real flash drive from Vm. As well as we can disable the virtual disk from the current Vm and use it to launch others Vm.
2. RUFUS program
The second way to create a virtual flash drive is to use the program features RUFUS 3.1.. In the updated version 3.x. This program, in the appendage to the existing functions of creating boot USB -dunches, learned to clone real flash drives to files VHD. . BUT VHD. Compatible and S. Hyper-V., and S. VirtualBox., I. Vmware.. Run RUFUS 3.1. in the host system. We choose the desired USB -Oneer if they are somewhat connected, in the column "Device". Next, click the button in the form of a diskette.

Specify the file storage path VHD. .

We are waiting for the completion of the operation and close Rufus..

3. Connecting a virtual flash drive and starting with it
So, the virtual flash drive is created, how to connect it to VM and, accordingly, run?
In parameters Vm Click hDD.


Choose an existing one.

In the conductor window, specify the path to the file storage folder VHD. . In the file display column set. And click our virtual VHD. -The cover.


On the EFI - Machines enter B. Bios. - either use the button on the hypervisor toolbar or when starting Vm Click F2.

In the bootloader window, choose Hard Drive. With the number under which it is listed in the overall list of connected virtual disks, but in calculating from zero. In our case, the virtual flash drive is the second disk Vmbecause B. EFI -Scheck it is as well as Hard Drive 1.0.

On ordinary Vmcreated on the basis of emulation Bios. Legacy. to boot from the virtual flash drive, you need in parameters Vm Specify it with the first hard disk. You need to remove all existing drives of the machine and add them again by specifying the virtual USB flash drive.

In this note, I will tell you how to connect a USB disk into a virtual machine so that the guest system perceives it as an ordinary hard drive.
This trick will allow not only to load from the installation USB - which, in my opinion, it is rather pointless, because the flash drive is recorded .iso image that is much easier to connect to a virtual computer in VirtualBox. If you connect a USB disk or flash drive to a guest system as a regular disk, you can make such interesting things like:
- loading from physical SATA disk via USB adapter
- installing Windows to USB disk or flash drive
If you do not have the ability to connect the SATA disk directly to the computer - for example, to the laptop - but you really need to boot in the operating system, which is deployed on it, the trick described here will help it: Connect the SATA disk to the computer through a USB, and Then the USB disk connect to the virtual machine as a regular disk, as shown in this manual.
Regarding the second item - installing Windows to a USB media - if you want to install Linux on a USB flash drive (do not write a Live image, namely install a full-fledged system), then for installation it is not necessary to do the trick shown here - because Linux is perfectly installed on the portable media. But Windows has a ban to install on USB discs and flash drives.
I will show how to boot from USB in Windows and Linux. The principle is the same in both of these operating systems, but the teams are slightly distinguished due to the specifics of the OS.
As in VirtualBox, boot from USB in Windows
Connect the USB USB flash drive or disk to the computer. Then click Win + R. and execute diskmgmt.msc..
Find your USB flash drive and remember the number of the disk:
For example, on my screenshot, the flash drive has number 2.
Close all VirtualBox windows if they are open.
In the window that opens, enter:
Now go to the folder where you have the VirtualBox. If this program is installed in the default directory, then the command for the transition:
CD% PROGRAMFILES% \\ Oracle \\ VirtualBox
If you choose another location for VirtualBox, then edit the previous command accordingly.
Now in the command prompt, insert the following command in which replace # On the number of the disk, which we looked just above, then press ENTER:
VboxManage InternalCommands CreateRawvmdk -Filename C: \\ USB.VMDK -REWDisk \\\\. \\ PhysicalDrive #
For example, I have this second disk, then the team looks like this:
VboxManage InternalCommands CreateRawvmdk -Filename C: \\ USB.VMDK -REWDisk \\\\. \\ PhysicalDrive2
If everything went successfully, an inscription should appear:
Raw Host Disk Access Vmdk File C: \\ USB.Vmdk Created SuccessFully.

Note that you can replace C: \\ USB.VMDK For any location of the file at will.
This command creates a virtual machine disk file (VMDK) indicating the physical disk that you have chosen. When you download the VMDK file as a disk in VirtualBox, then VirtualBox will actually have access to the physical disk.
Now open the VirtualBox from the administrator is necessary, otherwise it will not work as it should. To do this, click Start, dial VirtualBox. and select " Run on the name of the administrator»:

VirtualBox can have access to raw disk devices only with administrator rights.
Now in VirtualBox, create a new virtual machine, select the appropriate operating system and when it comes to choosing a hard disk, instead of creating a new one, select Use an existing virtual hard drive:

Now open the file C: \\ USB.VMDK (or the other if you saved it else or under a different name):

Load your virtual machine, now your USB flash drive it should see as the most common hard disk. That is, if this is a correctly recorded boot disk or flash drive, then the system is booting from it.
Please note that the USB device must be the first hard disk in your VirtualBox virtual machine, otherwise the download does not happen. If you connect a new USB disk to an existing machine, then try changing the procedure of media in the settings of this machine, or select the appropriate disk at the beginning of the download.
How in VirtualBox boot from USB in Linux
To understand the principle, read the previous section about Windows. In Linux to find out the disk USB name, execute the command:
Sudo Fdisk -L.

In my case the disk name / dev / sdb.
To create a virtual disk file, indicating a real disk, execute the type command:
Sudo Vboxmanage InternalCommands CreateRawvmdk -FileName /root/USB.VMDK -ROOWDisk / Dev / SD
Where instead # Enter the letter of the corresponding disk. Example for my conditions:
Sudo VBoxManage InternalCommands CreateRawvmdk -Filename /root/USB.VMDK -ROOWDisk / Dev / SDB
In this team you can replace /root/usb.vmdk to another location at your discretion.
To start VirtualBox with administrator rights, run the command:
Sudo VirtualBox.
Everything else is to create a virtual machine and choosing an existing virtual disk as a hard disk - exactly as in Windows.
Usually, the installation of the operating system in VirtualBox occurs through an ISO file or CD / DVD disk. But you know that you can also boot and with a USB disk in VirtualBox? Many people do not know this simply because this feature is hidden and inaccessible through the graphical user interface. In fact, you will have to open the terminal (or command line) and use the VboxManage command to access this function. In this manual, it will be possible to download (or install OS) from the USB device in VirtualBox.
Note: This manual is carried out on the Windows machine. Steps may differ for Linux / Mac.
Note 2: This guide suggests that you already have a bootable USB disk with a kind of operating system (probably it is a Linux distribution) installed on it.
Loading from a USB drive in VirtualBox
Before doing something, run the Windows system, and connect the boot USB disk. Now we need the number of this boot disk USB.
Note: Do not confuse the disk number from the letter of the disk. They are not the same.
We can find out the disk number from the Disk Management utility or by any other programs of the third parties to drive disks. Currently we will use the Windows utility. Press the "Win + R" key combination, and use the command " diskmgmt.msc.", After that, click" OK ". About other useful commands "Run" dialog box read in the article.

Look at the USB disk and remember its number. In my case, the USB disk is displayed as "disk 7", so the number of the disk "7".

After you learned the disk number, run the "command line" with administrator rights. In Windows 8, this can be done by pressing the keyboard key "Win + X" and selecting the desired menu item.

Go to the VirtualBox Installation Folder using the following command. If you installed VirtualBox in any other directory or another disk, then change the command accordingly.
cD% PROGRAMFILES% \\ Oracle \\ VirtualBox

Enter the following command, replacing the "#" symbol by the actual number of the disk. This command is to create a VMDK file to a C disk that indicates the USB physical disk.
VBoxManage InternalCommands CreateRawvmdk -Filename C: \\ Extdisk.vmdk -ReWDisk \\\\. \\ PhysicalDrive #

After you run the command, you will receive a confirmation message, and you will also see a new file named "Extdisk.vmdk" 'in the root of the disk "C".

Now open VirtualBox with administrator rights. If you do not do this, then VirtualBox will not be loaded from a USB disk.
After opening VirtualBox, create a new virtual machine as usual. At the stage, when VirtualBox offers you add a hard disk, set the switch to the "Use an existing virtual hard drive" position. Click on this small folder icon and select the file that we have just created. Click on the Create button to complete the process.

You will see a new virtual machine in the list on the left part of the VirtualBox window. Simply select it and click on the "Run" button located in the top menu to boot from the disk USB. As you can see in the picture below, I successfully booted into my live dial Ubuntu.
That's all you need to do, and this is actually very simple. Hope my article was interesting to you. Write your chips to work with VirtualBox in the comments, subscribe to our news and stay with us.
 How to pay a domain name
 Domain zone of tokelau islands
 What is domain what problems may be
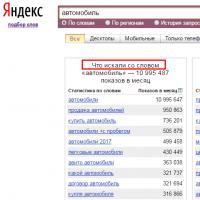 Yandex Wordstat: detailed instructions for using the service and grouping operators and a complicated request
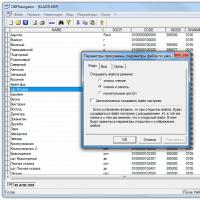 Editing DBF files
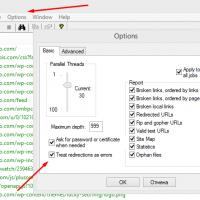 Xenu Link Sleuth - What is this program how to use the Xenu program
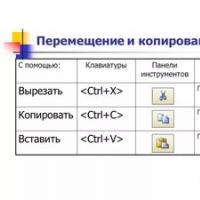 Methods Copy and insert text from keyboard without using mouse