Transferring Windows 8.1 to another hard disk. Transferring Windows to another Empty Hard Disk Program Aomei Partition Assistant. Apply a specialized product
To use the operating system, the space is needed on which it will store files to work. Thus, you can start as with hard diskand from the flash drive, from the disk. What to do when you need to transfer windows with all the desired files On the other carrier, without loss of performance? In this case, we consider the option with the transfer of the system on second tough disk.
Will the transfer takes place?
Of course, it's just that the system will not be transferred to be transferred, because it will not be able to copy / insert here. To make this operation, you will need special software that will be run from under DOS, i.e., not launching the system itself at all - working only on the preloading stage. Yes, you can take advantage of the large list of algorithms with DOS commands, but much better pay attention to programs with ready-made solutions.
Among them are Acronis, Seagate Discwizard, Samsung Data Migration and others. Each of them in its own way is simple, it has a different cost or can be conditionally free. We paid our attention to the program from Acronis - Acronis Disk Director.which can be downloaded from torrents with license keys. An excellent version of Windows will be version 11 HOME and above.
After loading the program, install it and connect the second hDD to a computer. PC must, of course, turn off, and after rebooting, run the application. No need to do anything with the disk. Further everything is performed right in Acronis DISK. Director 11 Home.
Step-by-step instructions on how to transfer Windows 7, 8, 8.1, 10
The instruction is suitable for all windows versionSupported acronis program Disk Director, i.e. Starting with Windows 7. All actions are performed similarly, no differences are present. We will proceed to transfer the system to another hard drive:
- Suppose there are two disks. The first is the main, the second - the additional to which the system must be transferred. In the program window, they have a disk 2 and disk 1;
- As shown on the screen, you need to right-click on the main disk and choose "Cloning a basic disk";
- In the next window, which will appear after clicking on the button "Clone…"You will be prompted to choose which drive you want to transfer Windows. In our case, we transfer to the disk 1, and choose it, and then click "Further";

- Do not forget that after clicking "Further"will need to put a tick or mark opposite item "One to one" in field "Cloning method"and then click "Complete";
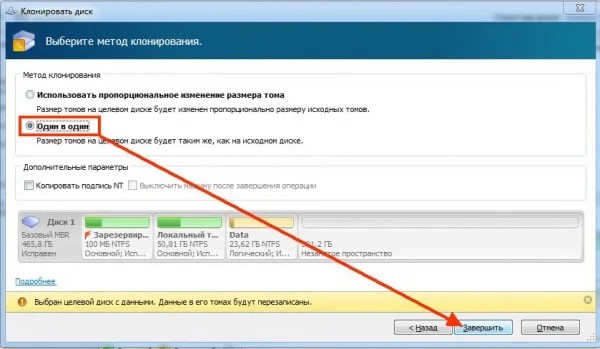
- When this task is accepted by the program, the above will be shown the checkbox with an option to apply waiting operations. It is necessary to click on the left mouse button, and then click "Proceed";

- Do not be scared, you will be prompted to confirm once again what you want to do. Press "OK";

- When the reboot starts, the program will automatically start in DOS mode and will make cloning from one disk to another. It may take a long time, but your computer should be in sight, just in case.


- When the entire operation is completed, a reboot will occur and you can run the application again. Now you will see that the system is transferred correctly:

- To make sure that everything works fine - turn off the computer, disconnect the old hard disk and start the computer again - everything should work, as before. We recommend formatting an old rigid disk and use it as an additional drive.
- An unbelievable area that the program left when cloning, you can place as you like to do this, read it.
About why it is worth transferred operating system With HDD on SSD, even novice users know. Nevertheless, such a computer optimization for many remains a unfulfilled dream. Why? Perhaps, simply because the methods offered by the Socialists are often described so foggy and vague that after reading them, I want to take a hammer and split your computer. But it is unlikely that the best decisionAgree! And you want to know how to transfer to SSD your favorite Windows 8 without any special difficulty? Then listen carefully!
Method number 1: Installing OS on SSD through Recovery Program
The most banal and at the same time an effective way Transfer all system data from HDD to SSD in Windows 8 - This is useful to the firmware. recovery utilities. It is very easy to run it: at the same time click on the keyboard and q, drive the program name and click twice with the left mouse button on the result found. As a result, such a window will appear before your glance: 
In it we are looking for a tab "Copying disk" and click on it after connecting our SSD to a computer using a SATA-USB cable. As a result, a new window will appear on the screen, where information about HDD (source) and SSD (target) will appear: 
What do we need? Find a section "Disk recovery point", select "Restoring the factory disk parameters" and click the button at the bottom of the Copying Disc window. After that, Windows 8 will restart automatically in system recovery mode.
Note that with the help of such a process and transfer, installation and breakdown of data from hDD disk on the SSD disk. A lot of time to take such a time process: from 45 minutes to 1.5 hours. Therefore, after the process has begun, you can safely go to the kitchen to have breakfast, dine or dinner (that you have ripe it). After the transfer of the data is successfully implemented, turn off your PC, we replace your old disk on a new one, start the computer again and work on Windows 8 already with SSD. What could be easier?
Method 2: Transferring SSD data with HDD AMEI
If the computer has not been installed and operating the Recovery utility, you can transfer data to Windows 8 to the SSD hard drive using the Aomei program. Note that this program is paid, however, developers are available for free to users with the opportunity to get acquainted with her work in trial period. What do you need? Nothing special. Just download and install it on your computer with Windows 8. It will take this heavy as blue whale, the process is already a few minutes, no more.
After the installation is completed, connect the SSD and open the Aomei program. This window will appear: 
In it we find a hard disk for us in the list, we bring the mouse cursor to it and click on it with right mouse button. In the list, search for "Deleting partitions" and click on it with the left mouse button: 
As a result, all data on the disk is deleted, and it will be ready for transferring Windows 8. After that, we find the "Transfer ..." tab in the window to the left and click on it with the left mouse button: 
A welcome window should appear, which will notify that the configuration and transfer of data from one disk to another. Without thinking (what to think about?), We click the "Next" button: 
After that, the installation wizard will propose to choose the disc to which the transfer will be performed windows information 8 with HDD: 
To select a disk, it is enough to bring the cursor on it and press the mouse with the left mouse button. After that, click the "Next" button and in the new window "Complete". As a result of such actions, the computer is sent to the reboot and automatically starts transferring information from the disk to the hard drive you selected: 
It lasts such a process a bit: Well, about 1 hour. What does a lot mean? For the sake of this case and 3 hours you can suffer, isn't it? In any case, after the transfer of materials from the disk to the disk, the computer will reboot, and we catch the moment and enter the BIOS. What we need here is to configure the launch of the computer with new hard disk. After that, your favorite PC with Windows 8 installed on it will reboot and will be ready to plow as an eye with a new SSD. Quite simple installation, right?
Method number 3: We carry out the transfer with HDD information using the Paragon Software Expert
Such a process as Windows 8 optimization by copying data to SSD can also be implemented through the Paragon program. She, like the Aomei program, on this moment Paid, however, registering on the official website, you can test it absolutely free for 30 days. During this time, you see, it is not that the transfer of data from Windows 8 to make, and the mountains will be turned on if desired.
What we need? Anyway nothing. Download this program from the official site, install it on your adorable PC under windows control 8 and proceed to work. However, for starters, take care to connect your SSD to the computer. After this is done, launch the Almighty Paragon and immediately (and what to wait?) We find among the tabs to the left of the one that is called "Copying and Migration": 
To copy our favorite Windows 8 to SSD, select the appropriate tab in the new window. For this, just click on it with the mouse: 
After that, wait for a welcome window from the Great Sensei, I mean migration wizards. Carefully read the information, so that the installation passed normally and the incidents then did not occur: 
Read? All right! Well then hold on setup! We are going! And for this, click the "Next" button and the master, so that there is a migration guru there will be a pre-connected SSD. You did not forget to connect it, right? In this case, we put a tick opposite the item "Use everything ..." and click the "Copy" button: 
With help such a program, data is copied very quickly, not more than 30 minutes, and besides without windows reboots 8:
At the moment when the operation of the operating system is completed, a new window will appear on the screen: 
We read everything that it is written in it very carefully, so that after the process described it can be repeated. System Setup Case Thin, Remember it! If you are briefly further we do this as: click the "Close" button, reboot the PC, we enter the BIOS and make our SSD disk first in the download list. Point.
Windows 8 default is configured in such a way that all Metro applications from the store Microsoft Store. (Windows 8 Apps) Install on the system disk, and set an alternative installation path for each individual apps applications, as in a situation with classical Windows applications, it is impossible. This means that sooner or later windows user 8 Apps may encounter exhaustion of free space on system disk. Especially critical this problem can be users for tablets with Windows 8 (in the Surface RT tablet, for example, the size of the system disk of a limited 32 GB and 64GB) and ordinary computers with SSD discs as a "fast" system disk (usually small capacity) and large external discs (for example, USB disks For data storage). Transfer catalog with Metro applications with system tom Windows 8 will help free an extra room on the disk.
As always, Microsoft did not provide simple way Changes to the installation directory of Windows 8 Metro Apps and transfer the installed applications from the system disk, this means that we will have to work a little later.
Transferring installed Windows 8 Apps to another drive
Suppose we need to postpone all installed Metro windows Apps 8 to the g: \\. Disk g: \\, and it can be separate section on the same disk, separate external disk, for example, SSD, USB flash drive or sd card or even network Diskmust be necessarily formatted in file System NTFS. Create on Disk G: \\ Catalog G: \\ windows8Apps.
Then try to find out where Windows8 Apps applications are stored. According to the tradition of Microsoft as the "default" application directory uses the C: \\ Program Files directory. For Metro Apps in Windows 8 Inside, Program Files has created a separate catalog named Windowsapps.which is hidden () and access to it is closed for all, except the system (when you try to openly, messages will appear You Don't Currently Have Permission To Access This Folder). 
To go to the WindowsApps directory, even if you work under, you will have to become the owner first this catalogAnd then set the necessary NTFS permissions on it. Make it possible with graphic interface Explorer (Folder Properties -\u003e Security-\u003e Advanced), but it is much more convenient and faster using the command line.
To become the owner of the C: \\ Program Files \\ WindowsApps directory, open and execute the command
TAKEOWN / F "C: \\ Program Files \\ WindowsApps" / A / R

After executing the command (may take several minutes, depending on the number of Metro Apps installed), it will be possible to view the contents of the WindowsApps directory.
Next need to provide your account (in this example This root) Full access rights (NTFS Full Control) on the contents of this directory. And again, it's easier and faster to do this through the command line:
ICACLS "C: \\ Program Files \\ WindowsApps" / Grant Root: (D, WDAC)

Copy (do not move!) The contents of the WindowsApps directory on new Disc In the g: \\ windows8apps catalog.
Robocopy "C: \\ Program Files \\ WindowsApps" E: \\ Windows8Apps / E / Copyall / DCOPY: DAT
Make sure that the file copy operation is completed successfully, and upon completion there are no error messages (in the final report there is no information about missed, skipped, or erroneous, failed, elements).

Delete the WindowsApps source directory.
RMDIR / S "C: \\ Program Files \\ WindowsApps"
After that, let's create a symbolic link (symlink), allowing transparent to forward requests to the C: \\ Program Files \\ WindowsApps folder to a new directory E: \\ Windows8Apps (thereby we solve the problem "lost" paths for installed Apps applications).
Mklink / d "C: \\ Program Files \\ WindowsApps" "E: \\ Windows8Apps"
Change the installation path for new Metro Apps applications in Windows 8
The next step is to redefine the path to the directory with Windows 8 Apps applications in the registry. Open the registry editor (regedit.exe) and go to the branch
HKEY_LOCAL_MACHINE \\ SOFTWARE \\ Microsoft \\ Windows \\ Currentversion \\ APPX 
By default, the system does not allow you to make changes to the registry bus. Therefore, first provide the necessary rights. Right-click on the Apps Coute and select the Permissions menu item. Then click Advanced.

In the advanced security properties window, click the Change link and specify your username (which you need to provide the owner's rights). In this example, this is root.

Click OK twice and provide your account (or group) Full rights to this registry branch (check box Full Control).

It remains to change the value of the parameter Packageroot.By specifying a new location folder with Metro applications. In this example is E: \\ windows8Apps.

Restart your computer and check the performance of installed Metro Apps transferred to a new disk. So everyone installed applications Windows 8 will be transferred to a new discovery disk, and in the future all Windows 8 applications from the Microsoft Store (which, by the way, can be completely) will be installed on it, and not on the system disk.
Cloning is definitely not new idea, and there are quite a few methods and different wayswhich can be used to move or cloning hard disk or even cloning the existing operating windows system on the new hard disk. Also, most of us have already updated our system to latest version Windows 8.1., Which is the last Microsoft operating system. Windows 8.1 has gained such great popularity in a short time due to its performance and speed. A few days ago we conceived to clone our Windows 8.1 to a new hard drive, just needed to do backup. Good habit by the way.
Cloning Windows 8.1 will ultimately helps save a lot of time and effort, since we do not need to install all applications and settings from scratch. We made some research on how to clone Windows 8.1 to a new hard drive and were completely shocked, seeing that no detailed manual. So, we wrote this article here to fill this gap. Therefore, if you are looking for a manual, how to move an existing installed operating system to a new hard disk, including Windows 8.1, or simply speaking, if you want to clone Windows 8.1 to a new Hard disk, the following textbook is written below.
Is it a cloning, you should try?
Some of you can ask why we do cloning Windows 8.1 on a new hard disk, and not chose a fresh or clean installation? Well, there are some technical advantages Cloning hard disks. However, let's be simple on simple land. Yes, fresh or clean installation takes much less time compared to the cloning process. But if you decide to clone Windows 8.1 on new hard drive on which applications and tools are already installed, you ultimately, in the case of clean installationYou will save your time to install each application. So, cloning is the only solution to make it quickly and productively.
In principle, in the new windows installation 8.1 We need to install all the main applications, such as MS Office, browsers, postal client applications, video players, PDF Reader and dozens of other applications, and if you combine the installation time of these applications, it will be about 1 hour. But if you are going to clone Windows 8.1, it only takes a few minutes to get a working system. After completing the cloning process, you will be ready to use the same applications and pre-configured parameters that you used on the source PC.
Can I use a disc image cloning as backup?
So, do you want to know if there is such a decision or not? After completing the cloning of Windows 8.1 to a new hard drive, you can use the same disk image to restore the system in case of disaster. You can use the Windows 8.1 disk image created in Image Utility, which performs the same actions with iSO fileAnd you have a key to restore your PC at any time. After all!
Method "Copy" and "insert" will work instead of cloning?
We know that many of you think the same. You may ask why not copy and paste the entire disk to a new disk and not cloning Windows 8.1, because it is really much simply method, is not it?. Yes, you can do it, but we strictly do not recommend this, as this is not the right way. It is possible that when copying some files are not copied, as they can be used by the OS at this particular time and as a result you will get an error about damaged OS on a new disk. In addition to Windows 8.1, it can be installed boot record without MBR Systems And it will not boot. When you clon any sections, cloning applications should clone the MBR from the original hard disk and once again from the target hard disk to exclude the error process.
How much space is required on the hard disk?
This is very important moment, Note that, because you must make sure that the target hard disk should have enough space to accept the cloning source. You can check the current OS into "My Computer" and select the hard disk target. As you can see in the image below, Hard windows disk 8.1, which we will clone consumes 27 GB of space of only 48.7 GB of a rigid disk. This means that you must have a minimum of 30 GB of space on the target disk where you are going to clone. It would be better to have more space 50 GB to avoid any problems in the future. You can use this feature to control disk and control. partitions hard Disk or even compress or expand the existing partition space.
What programs or applications, can we use for cloning Windows 8.1?
Finally, we are in the main topic of this article, how can we clone the Windows 8.1 operating system? As mentioned earlier, there are tools that can be used to cloning a hard disk. You can use Windows software or boot applications To completely clone Windows 8.1 to any other hard disk with the same equipment configuration.
Aomei Backupper.
Aomei Backupper is free toolwhich is ideal for cloning a hard disk. We chose this app, because this app is neatly, pure and very directly go forward, and it can be downloaded for free. With this tool, you can freely clone Windows 8.1 to a new hard disk within a few minutes. It comes with two wonderful features that are called cloning section and cloning a disc. If you are just looking for partition cloning, you can use the section cloning function or you can use the cloning disk option for cloning the entire hard disk to another. Unlike simple copying and insertion, cloning will allow you to start the work of your computer, as well as all programs, as a rule, without reinstalling the system and other applications. Cloning is just additional feature In the Aomei Backupper program, and you can use this tool for performing operations. reserve copy and windows restoration 8/8 .1.
How to use Aomei Backupper?
To make cloning Windows 8.1 We created several simple stepsYou can follow:
Note: Make sure you have connected the second hard drive to the computer to which you want to clone Windows 8.1.
1 . Let's start by S. section Windows 8.1, which you want to clone, To do this, download the Aomei Backupper Freeware software. After the installation is completed, open the cloning of the section of this application, and run the cloning process. Here we are just discussing the section of cloning, so click on the option Cloning section - Partition Clone.
2. In cloning the section - Partition Clone, select the source section you want to clone. We installed Windows 8.1 on our disk C:. So, we pressed on a C: disk. Click Next Button.
3 .IN latest Chair You have selected the original section and in this part you must select the target partition where you want to clone the original operating system. Click the Next button to go to the next step.
Note: Please delete all the important data from the destination section, because this operation will rub all the files.
4 Here you will see the last window in which information about the source and target section will be displayed. You can click on the "Close" icon to cancel the operation or click on Start Cloning - Start Clone To start the cloning process.
5 You can check the cloning course and click on the "Complete - Finish" button when 100% is shown.
In the Utilities section of this application, you can create a bootable medium, because it works better compared to cloning in the working system.
Driveclone
DriveClone is another tool that can be used to perform the same task as Aomei Backupper can do. You can also use this tool to copy the entire contents of the section to a new disk or SSD (Solid State Drive) into a few simple clicks. You can use a new disk to download the system and using your applications as if you used your usual hard drive. We conducted a series of research, the use and functionality of Aomei Backupper and DriveClone and found that DriveClone works better and easy to use compared to Aomei Backupper.
DriveClone is available for non-commercial use by users. Non-commercial versions for users are free for download and use. You can download it on the Internet!
Following step by step the method described above, you can clone Windows 8.1 to any other hard disk in minutes without creating bustlers to install each application and software, Again and again. So, it will be more productively cloning a hard disk.
Once at the very beginning, I wrote a couple of articles on this topic, these were articles about transferring "My Documents" folders, "Downloads", the AppData folder and even the user's profile entirely. It turned out of course not very beautiful (the first pancake is always com :)), so someday I completely rewrite these articles. And although all folders are transferred template, remembering about search engines, I will write a couple more articles: this, about transferring the desktop, and about moving the "Download" folder. Remembering conservation disk SSD.These actions will not only expect the place on the system disk, but also will extend the time of its performance. So, proceed to the operation. As well as with the rest system folders, There are two ways to transfer this folder:
I. Through the conductor Windows
II. Using the registry editor Windows
I. Transfer of the desktop through Windows Explorer
1) The first thing to do is to create a folder that will be used to store files and desktop labels:
2) Next, go to the user folder. If in Windows 7. It was quite simple (you just need to open a start and select the username in the right column), then starting with Windows 8. You must pass the way:
C: \\ Users \\ * Username *
We fall into the folder containing the following: 
3) click the right mouse button on the Desktop folder and open its properties: 
4) Go to the "Location" tab and click the "Move" button: 
5) We go to our folder created in the first paragraph and click the "Folder" key: 
6) Press the "OK" button to apply changes: 
And agree to the transfer of files and folders by clicking "Yes": 
7) Files and shortcuts are successfully displaced, and now everything that you save on the desktop is saved on another section. 
II. Transfer of the desktop, by making changes to the Windows registry
1) open the editor windows registry. To do this, click the key combination Win + R. And introduce regedit. :
2) We go along the way:
HKEY_CURRENT_USER \\ SOFTWARE \\ Microsoft \\ Windows \\ Currentversion \\ Explorer \\ Shell Folders
And we are looking for a parameter Desktop.:
 Cellular - what it is on the iPad and what's the difference
 Go to digital television: What to do and how to prepare?
 Social polls work on the Internet
 Savin recorded a video message to the Tyuments
 Menu of Soviet tables What was the name of Thursday in Soviet canteens
 How to make in the "Word" list alphabetically: useful tips
 How to see classmates who retired from friends?