How to make a flash drive Vinda plus apps. Create a universal bootable flash drive. Creating a bootable flash drive using Ultraiso
This installation method is suitable if you are the netbook owner or your CD / DVD drive failed and you need to install Windows 7. Also this method is good because the installation process of Windows 7 with flash card occurs several times faster than with CD or DVD disk.
Before starting to write Windows 7 on the USB flash drive, copy all the important data from the flash drive to other media (hard disk where Windows will not be installed, another flash card, disk, etc.), as in the formatting and recording process Image of Windows 7 on the USB flash drive all data on it will be destroyed.
First method
If you create a bootable flash drive while in the Windows 7 operating system, then you will need a program. Windows 7 USB / DVD DOWNLOAD TOOLwhich can be downloaded from office. Microsoft site link.
If you create a bootable USB flash drive under the Windows XP operating system, you will need to install Microsoft.net Framework 2.0. and Microsoft Image Mastering API 2.0. Of course, if they are already installed (more often than the first program), then it is not necessary to install.
1) Insert the USB flash drive in the laptop.
2) Run the program. Press the button Browse..
3) Select the ISO image of Windows 7 and click Open.

4) After you specify the ISO image of Windows 7, click Next.

5) Click the button USB Device..

6) Your flash drive should appear in this window. Press the button Begin Copying

7) Click on the button Erase USB Device.

8) click Yes.
9) Windows 7 image recording process will begin on the USB flash drive

10) Upon completion, the status will change on Backup Completed. Close the program

Second way
For the second way you will need a program Ultraiso..
1) Insert the USB flash drive in the laptop.
2) Run the program. In Windows 7 and Windows Vista, the program is recommended to run on behalf of the administrator.
Ultraiso is paid, but you can use a trial period, consider this option. Click the "Test Period ..." button

3) Select Menu item File ->Open...

4) Select the ISO image of Windows 7 and click Open.


6) in the field Recording method: Choose USB-HDD.. Press the button Format.

7) The formatting utility will start. Press the button To begin.

8) click OK..

9) After formatting, the window will appear about success. Click OK..

10) Close the program.

11) Click the button Record.

12) click Yes.

13) The process of recording the image of Windows 7 will begin on the USB flash drive.

14) at the end of the recording in the column HOW The message "Record is completed!". Close the program.

Third way
For the third way, we need a WinsetUpFromusB 1.0 Beta 7 program.
Note: According to reference, the version of Ponuhee, but the principle remains the same.
1) Insert the USB flash drive in the laptop.
2) Run the program. In Windows 7 and Windows Vista, the program must be launched on behalf of the administrator.

In field USB DISK SELECTION AND FORMAT Your flash drive must be met.
Note: If the flash drive is not determined, then format it with the Petousb or HPUSBFW utility.
Also, the flash drive may not be determined if it is inserted into the laptop after the WinsetupFromusB 1.0 Beta7 program has been launched and in order for it to determine enough to press the button Refresh..
3) Press the button Rmprepusb..

4) We celebrate such lines as: WINPEV2 / WINPEV3 / Vista / Win7 Bootable (CC4), NTFS. Put a tick on the contrary BOOT AS HDD (C: 2PTNS). Press the button 6 Prepare DRIVE..

5) Click the button OK..

6) Press the button OK..

7) after that it will appear. DOS.window.
A warning: Do not close this window. It should close automatically.

8) after DOS.click window Click EXIT..

9) Check the box opposite the field Vista / 7 / Server 2008 - Setup / PE / Recoveryiso. Click on the square on the right.

10) window will appear Field Overview In which you need to select a virtual drive into which the ISO image of Windows 7 is mounted.
After you did this press the button OK..

11) Click the button Go.. The Windows 7 writing process will begin on the USB flash drive.

12) At the end of the record, such a small window will appear. Click OK..

13) Close the program.

Fourth fashion
The installation method is quite simple, so you can perform it everyone! For this we will need:
1) image of Windows 7
2) Flash-drive volume of at least 4GB
3) Program for creating and editing ISO images, Ultraiso from the above-described method or free MagicDisk
You can take any media from the ordinary flash drive to an SD card, but not less than 4GB!
4) Run a command line (in Windows XP, this is standard-\u003e Command Line. In Windows Vista / Windows 7, open the start, at the bottom there is a search, enter cmd. And discover from administrator rights).
5) In the command line we enter diskpart.The disk control utility will open.

6) Next, in the DiskPart utility itself, we enter: lIST DISK.At the same time, all physical disks of the PC will be displayed, it is the wheels and not sections.
Among them are looking for our flash drive.

7) after which I perform the command sELECT DISK #where # This is the number of our flash drive.
In this case, the flash drive on the scree number 1, therefore s eLECT DISK 1.. All further manipulations will be carried out only with this disk.
8) We carry out the command clean., clean the drive, then the command cREATE PARTITION PRIMARY. - Create a new section on the disk.
9) After creating a new section, we prescribe sELECT PARTITION 1., choose this section for manipulations, introduce active.Thereby making the section active.
10) Now that the flash drive is visible in the BIOS, you need to format it in NTFS format that we make the team format FS \u003d NTFS.
11) Next, you need to activate the process of connecting the device and destination to it letters, make it a team assign..
All, the preparation process is completed.

Installing Windows 7.
Writing a distribution can be made by any file manager or free.
At the same time, it is necessary to somehow open the image of the installation disk from the OS, it can be done by any disk emulator, Alcohol or MagicDisk, create an image and copy it all file manager to our prepared USB flash drive.
All, the process of creating an installation flash drive is completed, now we try to install the OS pre-exhibit in the BIOS.
Well, that's the whole of which of the four ways to create a boot flash drive is to solve you.
Enable in BIOS download from a flash drive
Before you run the installation of Windows 7 from a flash drive, you need to go to the BIOS and turn on the boot from the flash drive.
To go to the BIOS you need to press a specific key when the computer is booting. On desktop computers, this is the DEL key. On laptops, the F2 key is most often used.
Usually, when the laptop is turned on, the screen appears on which there is a line in which it is written in the lowest key to click to go to the BIOS.
If you do not have such a line, then information about how to go to BIOS needs to be viewed in User manual Going with a laptop.
1) Insert a USB flash drive in a laptop if it is not inserted.
2) Turn on the laptop if it is turned on, then reboot.
3) go to the BIOS.
On the example, the whole process will look as shown below if you have a BIOS other, the principle will remain the same. If you have questions - write in the comments.

4) Go to the tab Boot.. In it, in order of download, you need to put our USB flash drive to the first place using the arrow keys and keys F5.and F6.. That is, the arrows keys choose our USB flash drive, and the key F6.we lead it to the very top.
To find out which keys you need to use for the download order, see the tips on the right.
The name of the flash drive must be in the line USB HDD..
Also, the flash drive may be in the line USB Key..
To save the changes and exit BIOS you need to press the key F10. (Depending on the manufacturer of the BIOS key, the key may be different. Grade Tips on the right or below).

5) A window will appear in which in English is asked to save changes and exit? You are taking Yes.

6) After that, a reboot will be rebooted and the Windows 7 installation process will start.
Installing Windows 7 from a flash drive
If the boot flash drive from Windows 7 was created using the WinsetupFromusB 1.0 Beta 7 program, then the green screen appears at first. Choose Start Vista / Win7 / Server 2008 Setup or PE / Recovery Iso From Partition 0.

Next launches the Windows 7 installation program.
Write in the comments that it is not clear and what questions arose.
Hello, friends! Today we will talk about creating a bootable flash drive.
How to create a boot USB device? In what purpose to use it and what program to write?
A brief overview of the five most popular and free software for creating a bootable flash drive.
Modern developments do not stand still, and yesterday's technologies slowly, but correctly lose their relevance. This is the once popular CD and DVDs no longer seem to be such a definitive solution for storing, transferring information and work with it. The high speed of reading data, the versatility and the ability to reusable is only a small part of all the benefits of the flash drive as the bootable media in front of the disks. Already today, almost all personal computers and laptops, if they are not more than ten years, support the possibility of downloading from USB devices. And in some cases (for example, a netbook), the flash drive may be the only loading device from the external drive.
By the way, the new Windows 10 operating system will be the first axis, which will be officially distributed to the USB drive. And if you suddenly need to restore files from the flash drive, read about it. I recommend also to pay attention to, which will help you to distract from labor everyday life and will raise the mood.
Using an additional software, the USB flash drive can not be used not only as a boot device for installation, reinstallation and restoring the operating system, but also to create an alarm device (MULTIBOOT). This is a kind of resuscator, the tool from which you can boot and cure a computer from viruses at any time, restore system files or save important data. How to create a USB flash drive, I described in the article "Creating a loading Live CD / DVD / USB device and its application." You can get acquainted with this article.
Despite all the obvious advantages and the growing popularity of the flash drive as a bootable device, programs for its creation are not so much. Nevertheless, they are, and today I will introduce you to detail with them, but at first a few words about the preparatory stage.
Preparation of flash drive
We need a flash drive itself, plus the knowledge of some important aspects. First you need to make sure that the computer supports download from USB devices. There is an erroneous view that if there is no possibility of selecting a USB loading with USB (only FLOPPI, HDD and DVD-ROM parameters are present, then the USB boot is not supported. This is not true!
More precisely, not always so. The only right solution is to contact the manual (user manual) of your motherboard or using specialized software (as an option - AIDA64) to get a detailed report on the hardware used.
The second point is the size of the flash drive. Here everything will depend on what we write to it. For example, to create a Live-USB, the Linux or Windows 7 installation disk is enough for a 4 GB flash drive. To create a boot device with the latest versions of Windows, it is desirable to have a flash drive at hand at least 8 GB.
The third time is the transfer of files from the flash drive. As a rule, the process of creating a boot device implies its full formatting. If there are important files on the flash drive, transfer them in advance to another device. To create a boot flash drive and subsequent work with it, as with a boot device, use the USB-2.0 port (Windows 7 does not support USB 3.0).
How to create a bootable flash drive
Consider five different ways on the example of five free Windows programs.
A small but fairly functional utility with the speaking name WinsetupFromusB. It is equally well suited for recording a boot and / or multi-load flash drive (up to 10 operating systems) and creating Live devices. Official site .
Of the disadvantages - the lack of support for the Russian language. Among the advantages, as I said, its versatility. The utility can work not only with the Windows distribution, but also suitable for recording the installation disk with Linux.
The usual option for creating a bootable flash drive, for example, with a Windows distribution, provides a choice in the corresponding columns of the flash drive itself, the options for automatic formatting of the media and ISO-image of the operating system. The recording process starts after pressing the "GO" button. You can read more detail about the operation of this program.
To create a multi-load flash drive (several OS), you need to specify the path to ISO images of operating systems. The Windows 10 selection item at the time of writing this article is missing by default, but in reality everything is written and works, just to select the corresponding graph with the available versions - Vista, 7, 8.
2. RUFUS.
Perhaps the easiest solution for creating boot USB disks. Everything is simple and intuitive. Suitable for working on systems that do not have an installed OS. Official site rUFUS.AKEO.IE.
From the main advantages - speed, simple interface, Russian. An excellent solution if you need to create a Windows 10 boot flash drive with UEFI support. By the way, about how to do it, I wrote in detail in.
It spreads in the format of the usual installer and portable version. To create a boot flash drive in the utility window, you must specify the path to the ISO image recorded and click the Start button.
On new systems where UEFI is used instead of BIOS, in the section "Section and System Interface Type" menu, set the value "GPT for computers with UEFI".
In other cases, the default settings will be enough. The formatting option is assigned by default.
3. Windows 7 USB / DVD DOWNLOAD TOOL
This utility is the official application from Microsoft. The interface is minimalist, simple and understandable, work easily with it. Download from the official site wudt.codeplex.com.
Perhaps the name of the utility (Windows 7 USB) of many will be misled that it is possible to write only the Windows 7 distribution to the removable medium. However, this is not the case. In addition to the seventh version, you can record Windows 8.1 and 10 distributions on the USB flash drive.
Of the minuses, the utility is not Russified, but the simple and intuitive interface is called up to level this flaw.
All that is required by the user is to insert a USB carrier in advance, select the ISO image with the operating system and specify the path to the carrier (flash drive) to which this image should be deployed.
The principle of operation of this program is based on the standard Windows operating system tools - this is "diskpart", "BootSect / NT60", Unpacking ISO on a USB flash drive. The program acts only as a graphical interface.
Ultraiso is one of the best and most functional programs to work with disk images. Universal "Combine", which supports work with almost any famous formats. Able to work in a pair with Nero Burning ROM and integrates with virtual emulators. It will help if the image of the boot disk is not in ISO format.
The program can convert other image formats to ISO files - NRG, MDF, MDS, IMG, CCD, etc. With Ultraiso, you can edit ISO files without unpacking them. Ultraiso interface is translated into many languages, including Russian. To download you, you can choose from several Ultraiso editions adapted to separate versions of Windows, as well as a portable version of the program. Download link www.ezbsystems.com.
By and large, the program is indifferent to which boot devices will be created with it, with which operating system, what software and from which manufacturer. The recordable ISO image must be opened in the program window or using the Open command in the File menu, or using the Review button on the toolbar. It can also be done using the Ctrl + O key combination.
Then in the appeared window, if the desired flash drive is automatically selected by the program, click the "Write" button.
Daemon Tools Ultra is a professional tool for working with images. The program itself is familiar to many users on the free version of Lite, which allows you to mount virtual drives for reading disk images. Its more functional version - Daemon Tools Ultra - Among other features offers creating boot devices.
It is worth noting from the disadvantages that it is paid, but to create a boot flash drive on the official website of the program you can download a free trial 20-day version. The official website of the program.
Go to the official website and download the program. During installation (installation) you need to select a trial type of license.
The program works with a huge number of disk image formats and can be used both to create a boot device with a subsequent installation of the operating system and to restore it (Live disk).
To create a boot flash drive in the main window of Daemon Tools Ultra, select the "Tools" menu item, and among its commands - "write a boot image to USB". Or a combination of hot keys Ctrl + B.
In the recording parameters window, specify the path to the image, we make an active MBR overwriting option and click "Start".
When the flash drive is ready, it remains only to boot from it. The easiest way is to use the boot menu call keys. The table below shows a visual example of such keys.
Of course, this is not the entire list of programs designed to create boot devices, but the overwhelming majority of users of the capabilities and the functional of the listed software will be enough.
For example, the RUFUS program can be used as the easiest and most quick tool for creating a USB disk with one Windows distribution or for the BIOS firmware from DOS.
Windows loading flash drive is very easy to do. The article will describe three simple quick methods for creating a loading flash drive from the finished ISO image. All methods are free and popular, even among them there are simpler and complex options, using different software. All utilities are also fully operating in Windows XP.
If you have a laptop or new computer, with bios UEFI, and the hard disk of which uses the GPT style of placing tables, then such a computer can also be installed Windows 7.Using another algorithm. Also, if the device, computer, laptop, netbook and so on has USB 2.0 port and USB 3, and you decided to install from the boot flash drive to such a Windows 7 device, then undoubtedly, you should connect a USB flash drive to USB 2.0 The port, since the Windows 7 system itself does not support the type of USB port 3, which are usually labeled in blue.

If the boot flash drive is connected via USB 3 port, then the attempt to install Windows 7 will be completed by the following error:
"The required optical disk drive driver has been detected. If there is a flash drive, a floppy disk, DVD or CD with such a driver, please insert this media. "
Creating a loading flash drive
Now the first thing that will definitely need is the image of the ISO operating system. The second is the need for care for the flash drive itself. Since this media is subjected to formatting, data from the flash drive must be moved to a safe reliable place. It is also important to note, the volume of the flash drive should be strictly at least 4 gigabytes.Be sure to check and make sure that the specific motherboard accurately supports the loading of such a plan (from the flash device).
- Creating a loading flash drive with means (recommended last time, because the method is not too effective);
- Creation due to;
- Utility;
Creating a boot flash drive using UnetBootin
You need to download the program, and run (the portable program, works without installation).
It is necessary to mark the item called the ISO image, and then select the letter of the USB drive.

The location of a particular image must be specified manually.

Next, click Open.

Now just click OK.

There is a short process of copying the system files to the USB flash drive.

After a short extraction of the necessary files, our boot flash drive is fully ready.

Creating a bootable flash drive using Ultraiso
A little difficult solution in contrast to the above is the use of the program. Ultraiso.. However, you can quickly understand the program, following the instructions. The functionality of the program is made in a clear Russian language, and a period of use is perfectly functional under license and is suitable for our purposes.
Next, you need to select Russian and download the program that is very simple. Run on behalf of the administrator, then select a trial period of use.

Before us is the usual window of the program.

The next step is to find our ISO image on the hard disk, which contains the operating system. It is worth reminding that such an image can be created by any other program, and then indicate here. In the main window Ultraiso, you must right-click on the file, and in the menu that opens, select the opening option.

Next, specify our image with the system, in our case, this image of Windows 8.1, which is in the installation folder. Find the image from you and click Opening.

You can also put a flash drive into a non-netbook connector or laptop. You must select the Self-loading menu in the main window of our program and click on the hard disk image recording. In this window there must be an inserted flash drive.

Next click to write down.

A hint will appear from the fact that your flash drive will be erased, agree.

Next, we are waiting for the recording process.

Now you can wear our operating system in your pocket.
As it is not sad for many, but the era of CD / DVD drives slowly, but right comes to an end ... Today, users are increasingly thinking about to have an emergency loading flash drive, if suddenly have to reinstall the system.
And the point here is not only to give the tribute to fashion. OS from the flash drive is installed faster than from the disk; Such a flash drive can be used on a computer where there is no CD / DVD drive (and the USB is on all modern computers), well, about the ease of transfer, too, do not forget: the flash drive will easily fit into any pocket in contrast to the disk.
1. What is needed to create a boot flash drive?
1) The most important thing is a flash drive. For Windows 7, 8, the flash drive will need at least 4 GB, it is better than 8 (some images may not fit in 4 GB).
2) Windows boot disk image representing, most often, ISO format file. If you have an installation disk - then such a file can be created and yourself. It is enough to use the program CLONE CD, Alcohol 120%, Ultraiso and others (how to do it - see B).
3) One of the programs for writing an image to a flash drive (they will be discussed below).
Important moment! If your PC (netbook, laptop) has in addition to USB 2.0 also USB 3.0 - connect the USB flash drive when installed to the USB 2.0 port. This applies primarily to Windows 7 (and below), because These OS does not support USB 3.0! The installation attempt will end the error OS on the impossibility of reading data from such a carrier. By the way, to recognize them quite easily, USB 3.0 is shown in blue, the connectors for it are the same color.
uSB 3.0 yna laptop
And more ... Make sure your BIOS supports download from USB media. If the PC is modern, then it should accurately have this function. For example, my old home computer bought back in 2003. Can be downloaded from USB. How set up bios. on download from flash drive -.
2. Utilities for recording ISO boot disk on a USB flash drive
2.1 WINTOFLASH.
On this utility, I would like to stop mainly due to the fact that it allows you to record the bootable flash drives with Windows 2000, XP, Vista, 7, 8. Probably the most universal! You can read about other features and opportunities on the official website. Here I also wanted to consider how you can create a USB flash drive to install the OS.
After starting the utility, by default, the Master starts (see Screenshot below). To go to create a boot flash drive, click on the green tick in the center.
The process of transferring Windows system files usually takes 5-10 minutes. At this time, it is better not to load the extra resource-capable PC processes.
If the record has been successful, then the master will notify you about it. To start the installation, you need to insert a USB flash drive and restart the computer.
One of the best programs for working with ISO format images. It is possible to compress these images, create, unpack, etc. There are also functions for recording boot disks and flash drives (hard drives).
This program was quite often mentioned on the pages of the site, so I will give here only a couple of references:
2.3 USB / DVD DOWNLOAD TOOL
Easy utility that allows you to record flash drives from Windows 7 and 8. The only minus is perhaps that when recording can give a 4 GB error. Flashke, allegedly, little space. Although other utilities, on the same flash drive, with the same way - there is enough space ...
By the way, the question of recording the boot flash drive in this utility for Windows 8 was considered.
2.4 WINTOBOOTIC
Site: http://www.wintobootic.com/
A very simple utility that will help you quickly and without worries to create a USB bootable medium with Windows Vista / 7/8 / 2008/2012. The program takes very little space - less than 1 MB.
When you first start, I needed the installed NET Framework 3.5, there is such a package not at all, but download and install it - it's not a quick ...
But the process of creating a bootable medium is very fast and pleasant. First insert a USB flash drive in USB, then you run the utility. Now click on the green arrow and specify the location of the image with the installation disk of Windows. The program directly can record the ISO.
2.5 Winsetupfromusb.
Simple and main free program. With it, you can quickly create a bootable media. By the way, it is interesting, on the flash drive, you can place not only Windows, but also gparted, Sislinux, built-in virtual machine, etc.
To start creating a boot flash drive, start the utility. By the way, note that for the X64 version - there is a special addition!
After starting, you need to specify only 2 things:
- First - specify a flash drive to which the record will be recorded. Usually, it is determined automatically. By the way, there is a pitch with a flash drive with a flash drive: "AUTO FORMAT" - it is recommended to put a tick and do not touch anything else.
- In the "Add usb dick" section, select the string with the OS and put a checkbox. Next, specify the place on the hard disk, where it is an image with this ISO OS.
- The last thing you do is click on the "GO" button.
 By the way! The program during recording can behave as if it hung. In fact, it most often works, just do not touch the PC within about 10 minutes. You can also pay attention to the lower part of the program window: Messages appear on the recording process and the green strip is visible ...
3. Conclusion
In this article, we reviewed several ways to create USB bootable flash drives. Several tips when recording such flash drives:
- First of all, copy all the files from the media, suddenly you come true after. During recording - all information from the flash drive will be deleted!
- Do not download the computer with other processes during the recording process.
- Wait for a successful information message from utilities with which you work with a flash drive.
- Disconnect antiviruses before creating a bootable media.
- Do not edit the installation files on the flash drive after it is recorded.
On this, everything is all successful installation OS!
Since in our time almost no one uses the CD and DVDs, it is quite logical that the Windows image for further installation is best written to a USB drive. This approach, indeed, much more comfortable, because the flash drive itself is much smaller and it is very convenient to store in your pocket. Therefore, we will analyze all the most efficient methods for creating a bootable medium for further installation of Windows.
For reference: Creating a bootable media implies that the image of the operating system is recorded on it. From this very drive, the OS installation on the computer is in the future. Previously, during the reinstallation of the system, we inserted into the computer disk and installed it from it. Now for this you can use the usual USB drive.
To do this, you can use Microsoft's branded software, the most installed operating system or other programs. In any case, the process of creating a completely simple. Even a novice user can cope with him.
All the methods described below suggest that you already have a downloaded ISO image of the operating system, which you will record on the USB flash drive. So, if you have not downloaded the OS, do it. Also, you must have a suitable removable medium. Its volume should be sufficient to fit the image downloaded by you. At the same time, some files can still be stored on the drive, it is optional to delete them. All the same in the recording process, all the information will be irrevocably erased.
Method 1: Using Ultraiso
On our site there is a detailed this program, so we will not paint how to use it. There is also a link in which you can download it. To create a bootable USB flash drive using ultra ISO, do the following:

If some problems arise in the recording, errors appear, most likely the problem in the damaged image. But if you downloaded the program from the official site, there should be no difficulties.
Method 2: RUFUS
Another very convenient prog that allows you to very quickly create a bootable media. To use it, follow these actions:

It is worth saying that in Rufus there are other settings and recording parameters, but they can be left as they are originally. If you wish, you can put a tick at the point "Check for bad blocks" And specify the number of passes. Due to this, after recording, the installation flash drive will be checked for damaged parts. If such will be detected, the system will automatically fix them.
If you understand what MBR and GPT are, you can also specify this feature of the future image under the inscription. "Section diagram and system interface type". But all this is completely optional.
Method 3: Windows USB / DVD Download Tool
After the release of Windows 7, Microsoft developers decided to create a special tool that allows you to make a loading flash drive with the image of this operating system. Thus was created a program called. Over time, management decided that this utility could well provide recording and other OS. To date, this utility allows you to record Windows 7, Vista and XP. Therefore, those who want to make a carrier with Linux or another system, except Windows, this means will not suit.
To use them, follow these actions:

Method 4: Windows Installation Media Creation Tool
Also, Microsoft specialists have created a special tool that allows you to install on a computer or create a bootable flash drive from Windows 7, 8 and 10. Windows Installation Media Creation Tool is most convenient for those who decided to write the image of one of these systems. To take advantage of the program, do the following:

In the same means, but for Windows 10 this process will look somewhat different. First check the inscription "Create an installation media for another computer". Click "Further".
And then everything is fine in the same way as in Windows Installation Media Creation Tool for version 8.1. As for the seventh version, there does not differ from that shown above for 8.1.
Method 5: UnetBootin
This tool is intended for those who need to create a Linux loading flash drive from under Windows. To use them, do this:

Method 6: Universal USB Installer
Universal USB Installer allows you to record Windows, Linux and other OS drives. But it is best to apply this tool for Ubuntu and other similar operating systems. To take advantage of this program, do the following:

 How to pay a domain name
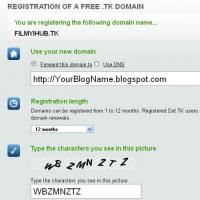 Domain zone of tokelau islands
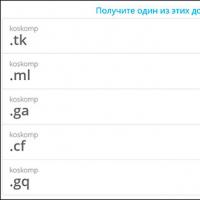 What is domain what problems may be
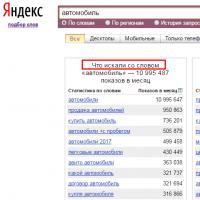 Yandex Wordstat: detailed instructions for using the service and grouping operators and a complicated request
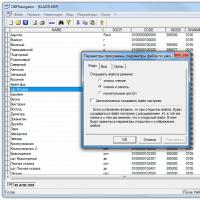 Editing DBF files
 Xenu Link Sleuth - What is this program how to use the Xenu program
 Methods Copy and insert text from keyboard without using mouse