Setting up and connecting ASUS RT-N12. Asus routers Asus rt n12 wireless router
ASUS has long earned worldwide recognition as a manufacturer of high-quality computer equipment. One of the areas of activity of the enterprise is the production network devices. The ASUS RT N12 VP router model occupies the first places in popularity among the routers of this brand. How to set up this device correctly? This review will help you find out!
The router can be configured for any provider
Very often, users install an ASUS router somewhere in the corner of the apartment, and only then think about how to properly configure the equipment to work via Wi-Fi. Experts recommend setting up by directly connecting to a PC, and only then transfer it somewhere. The connection process is no different from connecting other routers to a PC:
- provide ASUS RT-N12 VP with power (plug into a power outlet);
- insert the provider's cable into the port, which is different in color from the others;
- connect the computer and your router with a wire (included with the device) (we insert one end into the network card, the other into any of the ports of the N12 VP router).
Now everything is ready for further configuration of the router.
Reset
To set up your router, it's important to reset it to factory defaults first. Use a match or a toothpick - it will allow you to get to the reset button (a small key planted deep in the device). Hold down the button for ten seconds. All indicators on the ASUS RT N12 VP panel should light up. After that, the router should reboot itself.

Login to the interface
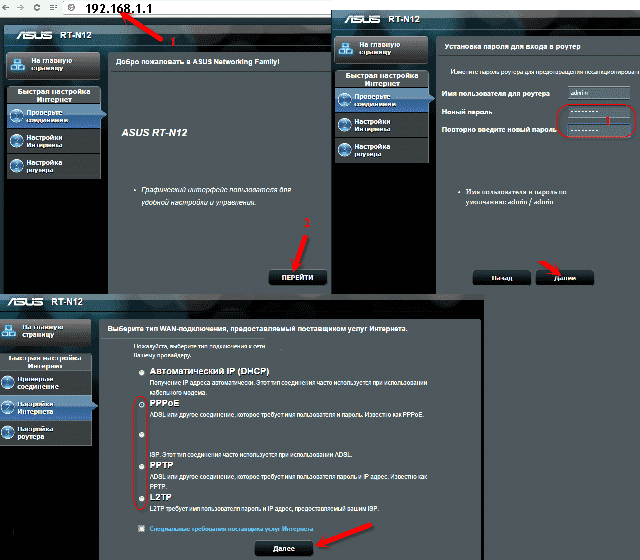
Configuration is carried out in the web interface. It is easy to get into it - in the address bar of any browser you like, write the line 192.168.1.1. After such manipulations, you will see a window with fields for the name and password. You need to enter the data standard for any router (admin / admin). Confirm your decision by pressing Enter.
Internet settings
An overview of the window that appears will help you understand the basic settings. It is desirable to perform all manipulations in order, so we will immediately discard the quick settings mode. Go to the home (main) page of the router menu. Depending on the specific firmware, you may need to press the "Next" key.

To be able to use the Internet, you need to properly configure the ASUS RT N12 VP connection. To do this, specify the type of connection, and also enter the information provided by the provider. The most useful data is indicated in the contract, which is issued by the operating company. If such document is lost, please contact technical support- they will help you.
The router settings look like this:
- incl. WAN - YES;
- type - WAN connection;
- incl. UPnP - YES;
- IP - automatic (or dynamic);
- incl. NAT - YES.
UPnP is needed for the normal functioning of the file sharing service through the ASUS RT N12 VP router. Some providers bind user computers to a specific MAC address. If such information is in the contract, it must also be entered in the field provided for this. Don't forget to fill in Username/Password in settings account. The decision to save the changed information is confirmed by pressing the "Accept" button, after which the Internet setup is considered completed.
Actions may vary (it all depends on the specific provider), but general principle remains the same. The only difference is the type of connection used (for Beeline - L2TP).
WiFi setup
Making ASUS RT N12 VP a router with which the Internet will be distributed to other devices is also not difficult. So, Wi-Fi on the n12vp router is configured in the "Wireless Network" section. Enter the following parameters in the "General" item:
- SSID - network name (you need to enter any name that will help distinguish your network from your neighbor's);
- WPA key - come up with strong password for your Wi-Fi;
- authentication method - WPA2-Personal;
- save your changes.

The RT N12 VP router will start distributing after the device is rebooted.
As you can see, setting up the ASUS RT N12 VP router is not difficult, you just need to familiarize yourself with the information presented here.
Step-by-step setup of RT-N12 C1 (B1, D1) for any provider: MTS, Beeline, Rostelecom and TTK, also Dom.ru. Shows how to properly install a VPN server. And the result of three tests is given.
ASUS routers with the name RT-N12 are represented by three models: B1, C1 and D1. The new firmware with black interface is installed on D1 router, and for C1 it is easy to update. Model B1, in turn, simply cannot be bought. That is, for C1 and D1, the setting looks the same, and there are also HP B1 and VP models that have the same black interface. It will be discussed further - it is interesting to configure ASUS RT N12 in the new version. Your firmware number must start with a 3.
Equipment and appearance
Appearance of the device
The ASUS website lists the package contents: a LAN power cord, a router, a power supply, two antennas and a warranty card. For models B1 and C1, there is also a CD-ROM, and their power supply produces 9 volts. And for D1, you need 12 volts! The current strength is 1 ampere in the first case and 0.5 in the second.
Specifications
Each of the three routers under consideration is built on the same processor. The amount of memory and ROM is also the same:
- Processor - BCM5357, 300 MHz;
- FLASH - 8 MB;
- RAM - 32 MB;
- Wi-Fi - 802.11n, 300 Mbps.
From what has been said, it does not follow that the firmware from routers of one revision is suitable for others. Whoever forgets about it will receive a "brick".
The hardware revision number is printed on the label in top line. Example: "H/W Ver. B1".
Options and functionality

3 modes, 4 networks
Each of the three devices, from B1 to D1, operates as a router, access point or wireless repeater. You can create not one, but four WiFi networks, given different names. And can be adjusted throughput each of the networks. In reality we are talking about one network, all subscribers will simply see four SSID names, and depending on their choice, they will receive different traffic. Well, the speed of "300 megabits" is, of course, a theory.
All characteristics are summarized in the table.
| Parameter | B1 | C1 | D1 |
|---|---|---|---|
| Housing dimensions, mm | 179x119x37 | 190x125x37 | 179x128x28 |
| Ports | 4LAN + WAN, 100 Mbps | Same | Same |
| Ability to configure LAN as WAN | + | + | + |
| VPN | IPSec, PPTP, L2TP, PPTP server* | IPSec, PPTP, L2TP, PPTP server | |
| WPS button | + | + | + |
| Mode selector (router, etc.) | toggle switch | toggle switch | Program |
Quick Setup Wizard
The asterisk means "only after updating the firmware to version 3.X". Further, LAN as WAN is normally configured in the third firmware, but not in "beta". And for B1 it still needs to be found. However, in the "old interface" they do this: they select the IPTV STB port, and use it as a WAN. This method has a flaw - the WAN indicator on the router will not light up.
Working in the "master"
When you first connect to a PC, the router turns on the "master", and it will be enough to go to the site "192.168.1.1". A password is not needed. Click "Go", set a password and click "Next". The router will then set up the WAN connection on its own. But reviews say that this option does not work for everyone.
Most likely, the connection type will have to be set manually. "Special Requirements" includes MAC cloning. The “master” will ask for parameters, and you need to fill in the fields correctly. “Router settings” is the third section where you set the password for the WiFi network.
Indicators and connectors
When designing their routers, ASUS did not invent anything. On the case of the RT-N12 router there are 7 LEDs showing the presence of voltage, as well as the activity of 5 ports and WiFi. A short press on the Restore button will cause the router to reboot, and when pressed for 5-7 seconds, the settings will be reset. This is how any ASUS router works!

Rear panel of the router
The yellow ports are home network, and the provider's cord is plugged into the WAN port.
If the WAN port on the router burns out, you can use the LAN port instead of the WAN. ASUS is kind, but needs some additional tweaking.
Video: setting up Internet, Wi-Fi networks on ASUS RT-N12
How to connect a Wi-Fi router ASUS RT - N12 to a computer
Preparation
On the computer, the network card is set to "automatic". The LAN port of the router is connected to a PC through a patch cord, and the provider's cord must be connected to WAN port. Then power is supplied to the router: in a minute it will boot up, and after 2 minutes the computer will update the address of its card. And it will be possible to open the site "192.168.1.1". In the "wizard" they press "Go", set a password, click "Next", "Next". The router will display the Network Map tab.

WAN setup
To set up an Internet connection, open the “Internet” –> “Connection” tab in the router interface. By default, the router is set to Auto IP mode. For subsequent logins, the admin login is suitable, and the password will be the one that was set. If something does not work out, the router settings are reset: a minute after turning on, they hold down Restore for 7 seconds.
Setting up an ASUS RT N12 router for Rostelecom
Rostelecom uses different cables - Ethernet, telephone or optical. In the latter cases, you need to know what the VPI and VCI parameters are. And the WAN port of the router must be connected to the modem, where the VPI / VCI numbers are already set. There are no these parameters inside the router interface.
PPPoE
Go to the tab for WAN settings. Choose a protocol.

PPPoE Rostelecom
You need to specify the parameters:
- NAT - "Yes";
- UPnP - "No" to start with. So the router works for everyone, and then you can fix it.
- IP address automatic - "Yes";
- DNS automatic - "Yes";
- Name and password - it is clear from the contract;
- Time is better than "0" so that the router does not turn off!
- MTU - 1450 is better, and if it works, try 1492;
- MRU - 1480, etc. (until 1492).
Let the rest be default. They press the "Apply" button, and a connection appears on the "Network Map".
The "VPN + DHCP" option can be turned off.
PPPoA
There is no PPPoA support on the RT-N12 router. Having opened the "master", you can make sure that this protocol is missing.

Internet setup
With most other routers, including non-ASUS, it will be the same. It is not clear why Rostelecom needs PPPoA.
PPPoA will be 1% more efficient than PPPoE. But it is easy to choose MTU - always 1500.
Setting up an ASUS RT N12 router for Beeline and MTS
The easiest way is to set up PPPoE. It is used by MTS. And the L2TP protocol "from Beeline" is now being digested by all ASUS routers. But with MTS the issue is open, although it has a PPTP protocol, with which there are no problems either. It must be remembered that in addition to PPPoE, MAC cloning on the router is performed for all protocols! A PC with which the Internet worked is connected to the router, and the “Clone MAC” button on the settings tab is easy to find.
PPPoE
On the tab "Internet" -\u003e "Connection" select the desired protocol.

Nothing needs to be changed - the router is almost configured:
- NAT - "Yes";
- UPnP - "Yes";
- IP address, DNS auto - "Yes";
- Name and password - see contract;
- Time - "0";
- MTU, MRU - 1492;
- "VPN + DHCP" - "Yes".
The new settings "apply", and in the right upper corner the network icon appears. That is, the router is connected to the Internet.
Most often, MTS uses the PPTP protocol (see below).
L2TP
The string vpn.internet.beeline.ru is the name of the server for Beeline subscribers. On the router for such names there is a “VPN server” field, which is located on the “Connection” tab. It selects the L2TP protocol.

Options:
- NAT - "Yes";
- UPnP - "Yes";
- IP address, DNS auto - "Yes";
- Name - starts with 089, see contract;
- Password - from the contract;
- VPN server - see the beginning of the chapter;
- "VPN + DHCP" - "Yes".
After cloning the MAC, click "Apply". The router will establish a connection in 30-40 seconds.
You can try to configure the router for MTS as well. The server name is l2tp.e66.ru or l2tp.local (depending on the region).
PPTP
We are talking about the MTS provider. On the router, set the server name or one of the addresses:
- 172.19.1.1;
- 172.19.1.27;
- 172.19.1.26;
- 172.19.1.21.
Figures may vary by region. And the name is vpn.local.
By setting the address in the settings, they make life easier for the router, but not for yourself. On the "Connection" tab, the setting is almost done - just set the protocol.

The main parameters for the router are the login and password, the name or address of the server, and nothing else. You need to clone the MAC, click "Apply" and wait 10 seconds.
Setting up a router for Dom.ru and TTK
The Dom.ru provider always checks the MAC address, even on the PPPoE protocol. And TTK does the same, but only on the PPTP protocol. This means that the WAN port of the router must receive a suitable MAC address. To do this, the "Clone" button is provided.
PPPoE
For TTK and Dom.ru, the setting is “cloning”.

PPPoE TTK and Dom.ru
Only login and password are required. All this is done on the "Connection" tab. The settings need to be "Apply", and the router connects to the Internet.
Before applying the settings, clone the MAC (for Dom.ru).
L2TP
On the "Connection" tab, select "L2TP".

- Fill in the field with a password and login (271XXXX);
- The router needs to know the server name (one);
- Other settings are default.
Press "Apply". After 30 seconds, the router will create a valid connection.
TTK server names depend on the region: l2tp.svg.ttkdv.ru, l2tp.kms.ttkdv.ru, etc.
PPTP
Both TTK and Dom.ru like to issue a static IP for the PPTP protocol.

Setting up a router will be difficult. On the "Connection" tab, select PPTP, then set:
- Own IP, mask and gateway (see contract). Example for TTK: 10.10.3.200, 255…0, 10.10.3.1.
- DNS (both);
- Login and password;
- Server IP address. Example: 10.10.3.1, 10.10.3.36 - only one.
Clone MAC, click "Apply".
There are 8 parameters in the contract! Or 7 if the server and gateway are the same.
Configuring ASUS RT-N12 D1 PPPoE Wireless Router
How to set up WiFi on ASUS RT N12 router?
You can make changes on the start tab. Change SSID, set password.

"Network Map"
The router also has a special tab with settings. Her name is "Wireless Network" -\u003e "General".
All data should be recorded.

WiFi, shared
The settings themselves are set like this:
- Name - any;
- Hide - "No";
- Mode - N;
- Width - "40" (300 Mbps) or "20" (150), but not "Auto";
- Router channels (I and II) - both "Auto";
- Method - WPA2 or WPA for older Android devices;
- Encryption - AES or TPIK for WPA;
- Key - 8 characters.
Press "Apply". The router will reboot.
ASUS RT N12 IPTV setup
All settings are contained on the tab "Local network" -\u003e "IPTV".

Select a name for the Internet connection. Then:
- For the set-top box, select the port (it does not work with the Internet via ADSL);
- For a PC or Smart TV, you need to "Enable" the last two options.
Press "Apply".
The router will not transmit traffic intended for the set-top box to the "local area".
ASUS RT - N12 VPN server setup
The router may be a server.

VPN server
To configure, open the "VPN" tab:
- "Server", "Enable" - "Yes";
- "More": "LAN to VPN", MPPE, IP pool;
- "Server": "+Add" and password with login.
Click "Apply" after each step. The router is designed for 10 subscribers.
When the router was a PPTP subscriber, it used MTU/MRU = 1450.
LAN and DHCP
On the tab "Local network" -\u003e "IP address" set the address of the router.

The DHCP Server tab contains other settings:
- The name of the router in the "local";
- Auto-issue address pool (for PlayStation set to X.9-X.254);
- Gateway address, by default equal to the router address.
It is better not to turn off the server. The main thing is to click "Apply".
IP values in LAN and WAN networks must not overlap!
How to reset the router settings?
Two equivalent methods:
- Turn on the router, wait a minute, hold Restore for 7 seconds;
- Select "Administration" -\u003e "Manage Settings", click "Restore".
The router will forget the settings. Then it behaves like new.

The photo shows method 2.
If you forgot your password, do as above.
Asus RT-N12 router settings protection
All settings are saved on the PC. You need a "Manage Settings" tab.

The latter is needed to download the settings to the router.
Update to the latest firmware
You can download the firmware on one page:
- B1: www.asus.com/ru/Networking/RTN12_ B1/HelpDesk_Download/;
- C1 and D1: change the letter B to C or D.
The ASUS manual does not contain this information. Next, on the router, go to the "Update ..." tab.

Firmware
Select a file, click Submit.
After pressing, you have to wait 5 minutes. And the router can not be turned off!
Tests
WAN-LAN transfer rate is almost 95 Mbps.

Testing
- WiFi 20 MHz - 21 and 16 (someone has 52);
- WiFi 40 MHz - 40 and 30 (90).
The router also handled L2TP. The result was slightly over 70 Mbps.
The main advantage of RT-N12 is its affordable price.
Video about ASUS RT-N12: connection and setup
In this step by step instructions Let's take a closer look at how to configure the Asus RT-N10 Wi-Fi router in its various versions:
- RT-N10P
- RT-N10+ D1
- RT-N10E B1
- RT-N10 B1
- RT-N10 C1
- RT-N10U B
And other modifications of the popular and cheap Asus wireless router. Basic setup WiFi router Asus RT-N10, regardless of its modification, is no different. That is, if you need to configure the router in such a way that it distributes wired Internet to wireless devices - it is not necessary to know which of these options for the Asus RT-N10 Wi-Fi router you have. The only possible difficulty is the new firmware 3.0.0.x on some models (black background) or 7.0.2.31 on other versions (although routers do not go on sale with this firmware), but in fact, this is not a difficulty - all actions, necessary for successful setup are completely identical. Nevertheless, we will include screenshots of this firmware here.
- Preparing for setup WiFi connection router Asus RT-N10
- How to enter Asus RT-N10 settings
- Setting up Beeline L2TP connection on firmware 2.0.x, 7.0.0.x (plus setting up Beeline television)
- PPPoE connection setup by Rostelecom and Dom.ru on Asus RT-N10 with firmware 2.0.x (plus IPTV setup by Rostelecom)
- Setting wireless network, setting a password on Wi-Fi on Asus
- Setting up Asus RT-N10 with new firmware
- Asus RT-N10 Firmware
For novice users who have never set up routers, I note: there is nothing complicated in this, the whole process will take no more than 15 minutes.
Preparing for setup and connecting the Asus RT-N10 router
Before setting up a Wi-Fi router, you should connect it correctly, and as experience shows, even with this there are problems. And besides that, pay attention to some network settings, which may be critical for a successful setup.
First of all, it is recommended to check the connection settings by local network, which is used to configure the Asus RT-N10. In particular, the TCP/IP protocol parameters must be set to “Obtain an IP address automatically”. How to do this is written in detail (opens in a new tab).
The next point to keep in mind: if your provider uses connections such as PPPoE, L2TP, PPTP and others, that is, in order to access the Internet, after turning on the computer, you start some kind of Beeline, Rostelecom, Dom.ru connection from the desktop or from the list of connections in the taskbar, terminate this connection. And do not connect again either while setting up the router, or after the wireless router has already been configured. Those. Asus RT-N10 itself will establish this connection in the future, you don’t need to start anything, otherwise you will get a result in which the Internet will be available only on the computer, but not via Wi-Fi.

And now about connecting Asus RT-N10. There are five network connectors on the back of the router. One of them stands out from the rest - connect the cable of your Internet provider to it. And connect one of the remaining ports to the corresponding port network card your computer, then turn on the power of the router. You can start setting up.
How to enter the settings of the Asus RT-N10 router

Go to router settings
In order to access the Asus router settings, launch a browser (it's already running if you are reading this, so better open a new tab) and enter the address 192.168.1.1 in the address bar, after which you should see a username and password request. The standard login and password for routers from this manufacturer are admin and admin, here and there. You may be asked to change your default login information, please do so. After that you will be on home page Asus RT-N10 settings, which looks like this:

On this page, all the operations for setting up connections, setting a password for Wi-Fi, and other actions that we will now deal with are done.
Setting up Asus RT-N10 for Beeline
In order to configure the Asus router for Beeline, on the main page of the router settings, click “WAN” in the menu on the left, and then fill in the Beeline L2TP Internet connection parameters, which look like this:

Beeline connection setup on Asus RT-N10 (beeline l2tp)
The main parameters to be set are:
- WAN connection type: L2TP
- IPTV port selection - if you use Beeline television, select the port to which you connect the Beeline TV set-top box.
- Obtain an IP address automatically - Yes
- Connect to DNS automatically - Yes
- Username, password - Your data for accessing the Internet from the Beeline provider
- PPTP/L2TP server (VPN) - tp.internet.beeline.ru
- Apply settings. On some firmware asus settings are not saved if nothing is entered in the Hostname field. Enter beeline.
If no errors were made, and the Beeline connection on the computer is broken, then after a short time the Internet connection will be established and the matter remains small - configure the settings wireless connection. You can make sure that the Internet is working by opening a new tab and trying to go to some site. About setting up Wi-Fi on Asus, see below, after information on setting up a router for Rostelecom and Dom.ru.
Setting up Asus RT-N10 Rostelecom and Dom.ru
In order to configure the Asus RT-N10 Wi-Fi router to work with Rostelecom and Dom.ru providers that use PPPoE to access the Internet, follow these steps:

- Select "WAN" from the menu on the left
- Install required parameters connections, the key among which are the Connection type (PPPoE), automatic receipt of the IP address and DNS (you need to set "Yes"), your login and password Rostelecom or Dom.ru. The rest of the parameters can be left unchanged. If the settings are not saved without entering something in the Hostname field, enter rostelecom or domru. Also, if you need to configure IPTV by Rostelecom, specify the port to which you will connect the set-top box.
Save the settings and wait a short time. The router will have to establish an Internet connection and if you try to go to any page, it will open, despite the fact that the connection of Rostelecom or Dom.ru on the computer itself is disabled. Now it is desirable to adjust the parameters wireless wifi networks.
Setting up a wireless network and how to put a password on Wi-Fi Asus
Another of the main tasks when setting up a Wi-Fi router is setting up the wireless network settings, which is necessary so that, firstly, strangers cannot connect to it, and secondly, to make it more convenient for you to use it. Setting up Wi-Fi does not depend on which provider you have - Beeline, Rostelecom or any other.

In order to configure the basic parameters of the wireless network and set a password for Wi-Fi, in the settings menu on the left, click "Wireless Network" and on the "General" tab, enter the basic parameters:
- SSID (Wireless Network Name) - Enter something of your own here, so you will distinguish your network from others. It is better to use the Latin alphabet, otherwise some devices have problems connecting via Wi-Fi.
- Authentication method - WPA2-Personal
- The WPA preshared key is your Wi-Fi password, which must be at least 8 characters long.
- The rest of the parameters can not be changed, especially if you do not know what they mean.
Apply settings. Wait for a message that the Wi-Fi settings have been successfully changed. And, in fact, that's all - you can try to connect via Wi-Fi from a laptop, phone or tablet, everything should work.
Setting up an Asus RT-N10 router with a new firmware
Frankly, I don’t know if there are Wi-Fi routers with this type of firmware on sale (in my opinion, yes, for example, Asus RT-N10P and RT-N10U), but it can be downloaded and installed on some models of the RT-N10 router . The firmware has an index of 3.0.0.x and the web interface of the router with this firmware version looks like this:

As you can see, despite the fact that the design style has changed, the location of the settings menu items has remained unchanged when compared with firmware 2.0.0.x and 7.0.0.x. That's why, basic setup Wi-Fi of the Asus router with the new firmware occurs in exactly the same way as described above for Beeline, Rostelecom and Dom.ru.
Asus RT-N10 Firmware
If you want to flash the Asus RT-N10 router, then there are no particular difficulties in this. First of all, you need to download the firmware from the official website. Considering that there are enough modifications of this router a large number of, it is important not to make a mistake here. To do this, go to the router settings panel and select the "Administration" item in the menu on the left, then open the "Firmware Update" tab.

Pay attention to two items: Product ID and Firmware version - this information tells you which Asus RT-N10 you have, as well as what firmware is currently installed.
At the top of the page there is a link to the page with firmware, but you should not follow it - from experience, it does not always lead to the correct router model. Therefore, the best option to download the firmware for the Asus router is to go to the site http://www.asus.com/ru/, select products - network hardware - Wireless routers, then go to the page of your router model, click the "Support" link, and then - "Download". In Group " Software» you will find all the firmware that can be downloaded and installed on the router. Download desired version firmware, extract the firmware zip file and return to the firmware update page for your router.

Click Select New Firmware File and then Submit. Wait for the firmware of the Asus router to complete, it will take about three minutes, during which the connection with the router may be interrupted. When finished, you will see that the firmware version on your router has been updated.
I hope this guide has helped you. If not difficult - share it in in social networks using the buttons below.
Router Asus RT-N 12 - standard device with average characteristics, which should be enough to meet the needs of users. The presented model is compatible with IPTV, but iptv setup on an asus router, it can only be done at the standard level: a port is allocated for this, but traffic is not registered. Wi-Fi is fully supported by 802.11n, which, under ideal conditions, allows you to overclock the Internet to 300 Mbps. But in reality, of course, the speed is several times lower, although this is enough.
So how is Asus? Let's figure it out.
Setting up the router
The IP address on the network for the presented device is the most common - 192.168.1.1. To see the web interface, you need to drive the following into the browser line: http://192.168.1.1. It looks something like this:Figure 1 Interface
The username and password are standard - admin, admin. After the first login, the "Setup Wizard" will be displayed. The tool is useful for beginners, as it allows you to configure the router in simple conditions. After clicking the "Next" button, an attempt will be made to automatically select the connection type. If unsuccessful, the device will give you a choice.
By setting up the asus rt router, L2TP is selected for Beeline, and PPPoE for Rostelecom and other providers of this type. Click "Next".
advanced setup
How to set up wifi asus router rt nt12 on its own without a program?If the default is English language, then change it:

Figure 2. Changing the interface language
Below are the settings for popular Russian providers at the moment.
These include:
- Rostelecom;
- Dom.ru;
- beeline.
Setting up PPPoE for Rostelecom
In chapter advanced settings you need to select the subsection "WAN":
Figure 3. Select WAN
We use the parameters set in this way:
- WAN type - connections - select PPPoE;
- Receiver digital television(IPTV STB parameter) – select exactly the port where the STB device is connected;
- UPnP - connect;
- Get an IP address in offline- turn on;
- DNS - server - enable offline receiving;
- Login - information indicated on the card or in the agreement concluded with the provider;
- Password - provided by the provider;
VPN L2TP to Beeline
How to configure the Asus RT N12 router to work with Beeline?- WAN - connection - L2TP;
- Port selection - where the device is connected;
- UPnP - enable;
- Automatic WAN acquisition - enable;
- Standalone DNS server - enable;
- Login and password - the latter is issued by the provider, and the login is directly the phone number;
- L2TP server - resource tp.internet.beeline.ru.
Opening the port
In the advanced settings section, go to "WAN" and click on the subsection of the virtual server:
Figure 4 Virtual server
We turn on the "Virtual Server" service, that is, we set "Yes".
Fill in the service name string. Here you need to write the name of the program or application for which, accordingly, the port is opened.
In the "Port range" value, enter the one that opens for the application. The same is indicated in the value of the local port.
In the line of the local IP address, enter the value of the nominal PC for which it will be registered.
Confirm and apply the settings.
Setting up Wi-Fi
Setting up wifi is pretty simple. How to set up correctly? Let's go to the extra section. settings and in the subsection of the wireless type network.
Figure 5. Wi-Fi setup
Step-by-step instructions for setting up the Asus RT N12 lx router to work with a wireless type network:
- "SSID". In this field we write the name (identifier) of the network. It can be absolutely anyone;
- "Verification method". Select the "WPA2-Personal" option;
- "WPA Preshared Key". Enter your Wi-Fi password here. It can be either an alphabetic or a number combination. But the main rule is at least 8 characters.
Reset
How to setup wifi router Asus RT N12 on factory reset? It should be noted that this procedure is optional and is used if the user cannot connect to personal account due to hacking or intentional alteration of identification data.
Figure 6. Reset button
To reset the settings on the asus rt router, it is necessary that the router is connected to power (anything happens).
The button is located inside the case. Above it you can see the inscription, which for Asus means reset (in other models, everything is simpler - Reset).
It is possible to press the button using a toothpick, pen, etc. You need to hold for about 15 seconds. When the WPS button flashes, you can release and wait a couple of minutes for the settings to reset.
Unfortunately, not every problem can be solved by resetting the router settings, since problems may not be related to the program, but to physical damage, incorrect network settings, and more.
Video clip with instructions for connecting
The video clearly and step by step tells and shows how the connection to the network is made, what settings are made and other necessary steps.
Setting up a router is something that intimidates most inexperienced users. But this fear is completely unjustified. Modern routers are very easy to set up. Now we will prove this by considering the process of setting up the ASUS RT-N12 router. This instruction also suitable for ASUS RT-N12 VP, ASUS RT-N12 D1 and ASUS RT-N12E modifications.
Preparing to configure the ASUS RT-N12 router
Before you start setting up the ASUS RT-N12 router, you need to connect it correctly. Fortunately, connecting the router is very simple. The first thing you need to do is connect the router to the power supply. After that, connect the cable from your Internet provider to the WAN port of the router. On the ASUS RT-N12 router, this port is marked in blue (photo below).
You also need to connect your computer to one of the yellow LAN ports (photo below). Used to connect a computer network cable that comes with the kit.

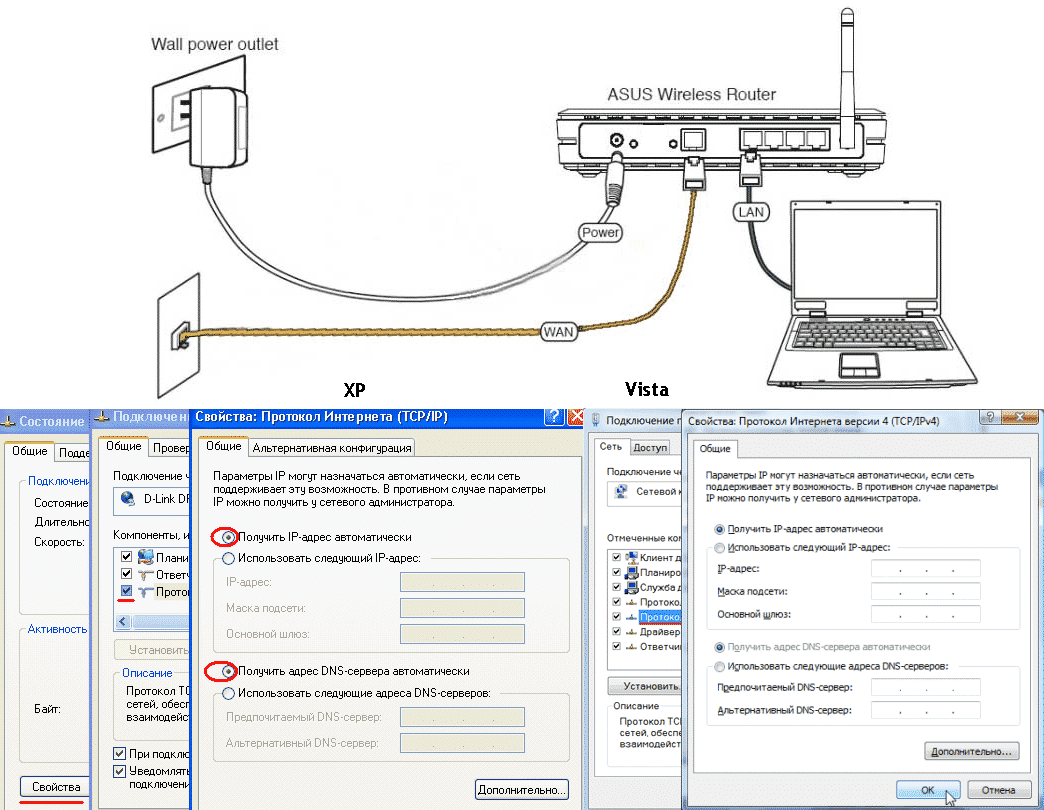
Another important point. Your computer must be using automatic IP address acquisition. In most cases, that's exactly what it is. But, before you start setting up the router, it’s better to go in and check so that you don’t get distracted by such trifles later.
To do this, after connecting the router, go along the path: Start - Control Panel - Network and Internet - Network and Control Center and public access– Local Area Connection – Properties – Properties for the IPv4 component. In this window, automatic acquisition of IP and DNS addresses should be selected.

Automatic configuration of ASUS RT-N12 router
In order to start the automatic configuration of the ASUS RT-N12 router, simply open the browser. If you have correctly connected all cables to the router, then auto tuning should appear in the browser window. If such a window appears in the browser window, as in the screenshot below, then everything is fine. Click on the "Go" button and continue configuring the router in automatic mode. If, for some reason, the automatic configuration did not start, then enter 192.168.1.1 in the address bar of the browser and the page with the automatic configuration of the router should appear. If the router has already been configured before, then you can start automatic configuration using the “ Quick Setup Internet" in the web interface.

After clicking on the “Go” button, a page for setting a password will appear. Here you have to choose New Password to enter the router. Given password you will have to enter every time you want to change the router settings. Therefore, you need to choose something that will be easy for you to remember. The password should not be too short or too simple. Enter the password and click on the "Next" button in order to proceed to the next step of automatic configuration.

Then the router will start automatic detection connection type. Depending on your ISP's connection method, this step may be automatic or a window will appear requiring you to enter connection data. In our case, the connection type was determined automatically. It should be noted that in some cases, the definition of the connection type may be wrong and select the wrong type of connection that is needed. But, it can always be fixed manually.

The next step is setting WiFi networks. Here you need to enter only the name of your Wi-Fi network (you can leave it just ASUS or enter any other name) and the password to access Wi-Fi (network key). The rest of the settings will be set automatically by the router. By default, the WPA2-Personal AES security method is used. This method protection is optimal for home use. Therefore, in most cases, no manual adjustments are required after the automatic tuning is completed.

This completes the automatic configuration of the ASUS RT-N12 router. Information about the current settings will appear on the screen. Here, simply click on the "Next" button.

After clicking on the "Next" button, a window will open asking you to enter your username and password to enter the router. Enter the login admin (the login did not change during the automatic configuration stage) and the password you chose. After entering the login and password, the web interface of the router will appear on the screen.
Manual configuration of ASUS RT-N12 router
After automatic setup is complete, you should test the Internet on your computer. If the Internet is, then no additional manual setting no longer needed. Everything that was required of you in terms of setting up the router, you have already done at the stage of automatic configuration.
But, quite often there are situations when, after the automatic configuration is completed, the Internet does not work. The most common problems are incorrect detection or configuration of the connection type and binding to the MAC. We will now consider both of these cases.
Internet connection type setting
In order to manually configure the type of Internet connection, you need to go to the "Internet" settings section. The link to this section of settings is located in the left side menu of the web interface, in the "Additional settings" block.

In the "Internet" section, you can configure all the settings that relate to your Internet connection. Miscellaneous internet providers use different settings. Therefore, you should check with your ISP's technical support about which settings you need to use.
The most important thing is not to make a mistake with the choice of connection type (highlighted in red in the screenshot below). After selecting the connection type, the list of available settings changes. Therefore, if you correctly specify the type of connection, then further configuration will be much easier for you. For example, we demonstrate how the settings for the Beeline Internet provider should look like (see the screenshot below).

Setting MAC address A
Not infrequently, the automatic configuration of the ASUS RT-N12 router correctly determines the type of connection, but the Internet still does not work due to the fact that the Internet provider is tied to a different MAC address. In order to solve this problem, you need to change the MAC address in the router settings.
To do this, you need to go to the same “Internet” settings section that we talked about above. At the very bottom of the "Internet" page there is a "MAC address" field in which you can enter the MAC address to which your Internet provider is associated.
If the ISP is tied to the MAC address of the computer from which you are setting up, then you can simply click on the "Clone MAC" button. In this case, the router will automatically copy the desired MAC address and you just have to click on the "Apply" button.
 Data Validity Check
 Deleting, rearranging, and adding slides
 What to do if there is no sound on the computer
 FAT32 or NTFS: which file system to choose for a USB flash drive or external hard drive
 DVR with radar detector Highscreen Black Box Radar-HD: (not) exceed
 How to distribute mobile Internet from a smartphone via Wi-Fi?
 Power, mute, volume button not working