How to run a new iPhone 5s step by step instructions. Configure iPhone as new. Basic settings Iphona
When I was going to buy my first a couple of years ago iPhone 4S., of course, I was interested in anything that concerned this device. And before his purchase, asked many questions Yandex, Google and his acquaintances, who he was already. I even recorded something at that time.
And recently, a leafing notepad, stumbled upon these records, and decided to keep them on the blog.
Today's article is unlikely to be called relevant: who has an iPhone - most likely knows everything. Nevertheless, let my " unofficial guidance user iPhone.
"Will remain here.
If you need it, then official iPhone User Guide You can view on your iPhone through the browser Safari.By opening the "Iphone Guide" tab:  You can also go to the application iBooks. And free download the guide from the iBooks Store store.
And you can also go to the website of Apple from a computer And there find the desired manual for your version of iOS.
So my questions before and after buying an iPhone and answers to them:
1. Does my ordinary SIM card suitable for iPhone?
Not. For iPhone 4S need Micro-Sim., for iPhone 5 and 6 - Need Nano-Sim.: You can try to independently make a sim card from your usual sim card for an iPhone by cutting it with scissors. But it is better not to risk, but simply contact your salon mobile operator - You will be given a new one. With me for it, 50 rubles took me, and they were also credited to my account. After you give you a new one - the old SIM card will stop working.
2. What to buy to protect iPhone from scratches?
Personally, I immediately after shopping iPhone.acquired in the store protective film for him. A set of two films (for the front and back of the smartphone) I cost 400 rubles. The fact is that I did not want to immediately buy for an iPhone or a book book nor a protective cover for the back wall. But if the smartphone is not protected in any way, then microzarappins will appear on it (especially on the back side). That's why I bought a protective film, stuck it and satisfied.
It is not difficult to glue the film: it is enough to read the instructions for it (or watch a video on YouTube) and do not rush everything. If you are afraid that it does not take it gently and "there will be bubbles", you can contact the specialists (I was right in the store offered to do this for 200 rubles). 
3. What to do with iPhone immediately after purchase?
First you need to insert a SIM card into it and then turn on the device itself. Turns on iPhone 4S. and 5
Hold the button from above: 
On the iPhone 6. This button is on the right side face: 
4. Where to insert a SIM card in iPhone?
In a box with an iPhone there is a special clip. Take it and insert the apparatus on the hole. A small tray will be pulled from the housing. Insert the SIM card into it and move the tray back.
By the way, it is possible to install and remove a sim card from an iPhone without turning off the device itself. 
5. What to do with iPhone immediately after switching on?
After the first enable iPhone need to activate. There is nothing complicated in this: follow the instructions on the screen - Inex smart and you yourself will tell you everything. The only thing you can confuse is a proposal. Do not be afraid - just create it.
For full-fledged configuration, you need access to the Internet. Therefore, at this moment it is better to be in the zone of any Wi-Fi network.
6. What is Apple ID?
Apple ID - This is your account that allows you to use all Apple services. Namely - this is a bunch: address email + Passwordthat you specify when registering account.
Having an Apple ID, you can install games and applications from App Store., buy media content in iTunes, use cloud store iCloud. And with it to synchronize your post, contacts, notes, etc.. In general, if you are the owner of the iPhone or iPad, without Apple ID you can not do.
7. How to activate an iPhone?
After the first turning on the iPhone will need to activate. First, we will meet a welcome screen. Spend your finger from left to right to unlock the device: 
Then select the language (in our case - Russian). Further, the country of location (Russia):

Then choose Wi-Fi Network (Without the Internet, activate an iPhone will not work). Next you need to enable or disable geolocation service. Geolocation determines your location (needed for cards and navigation, for stationing in photos of geometers). It can be enabled later for individual applications:
 You can configure iPhone in two ways: like New, I. restore backup of cloud service ICLOUD or computer via iTunes program. If you have the first iPhone, then feel free to choose the item " Customize as new iPhone
”.
You can configure iPhone in two ways: like New, I. restore backup of cloud service ICLOUD or computer via iTunes program. If you have the first iPhone, then feel free to choose the item " Customize as new iPhone
”.
On the next screen, click " Create Apple ID Free”:

Further specify your e-mail (I entered the address of my mailbox, which I always use it), pick a password (It should consist of at least 8 characters, and contain a minimum of one capital letter and one digit).
Be sure to remember or record the invented password - it and the e-mail will now have to be frequently entered when applying for Apple services. Set e-mail and password - this is your apple ID.
Further to ensure the security of the account you will define several additional questions, asked to specify the backup email address - we do what they ask. On the mailboxThe above mentioned you will be sent. You can open it later (I, for example, went to my mail from the computer after a few hours later) and follow the link in the letter to complete the creation of an Apple ID.
Then you will ask if you agree to use different apple services. You can agree or not - in any case, all this can then be turned on or on the contrary, disconnect in the smartphone settings.
In the last paragraph, we will be asked - whether we want to send diagnostic data to Apple. You can refuse the company to help.
That's all. Finally, the iPhone is ready for work! 
8. What is the operating system on iPhone?
Operating system: iOS.. At the time of writing the article actual version: 8.4
9. How to check that my iPhone is original (not fake)?
Each original device has own serial number. You can find it on the box at the bottom, on the smartphone itself on the tray for the SIM card or see in the settings:
Click the icon Settings"On the iPhone main screen - then select" Maintenance” – “About this device". Scroll down, find the serial number.
Rooms everywhere must match (and on the box, and in the settings).
After we found the serial number of the device - it can be checked on the Apple website. On the page that opens, enter the iphone serial number and click "continue."
If all letters and numbers serial number We have introduced correctly, the name and model of our device should appear. If it appeared, then it means our iphone original and issued officially. If you just bought a new iPhone and did not activate it, then when you check on the site you will see the following message: "You must confirm the product acquisition date":  If nothing has come, then you have a fake in your hands.
10. I call from the new iPhone, but I do not hear the interlocutor badly. What's the matter?
You will laugh: Immediately after the purchase, I checked the quality of communication and called a friend from iPhone - I heard him badly. I have already managed to upset, but I noticed that did not revealed the protective film from the screenwhich closed the speaker 🙂. When I removed her, hearing became excellent.
Not to be confused with that film that I specifically bought to protect against scratches.
11. How to copy photos and video from iPhone to a computer?
Connect your iPhone to a computer using a USB cord (it comes complete with a smartphone). Windows will automatically determine the device.
Open it double-click - then open " Internal Storage"- go to the folder DCIM. Here we will see the folder (or folders), in the title of which contains letters and numbers. In it and lie a photo and video taken on the iPhone. Select the necessary files and copy them to your computer.
In more detail and with the screenshots, I described this process.
12. How to copy music from a computer to iPhone?
To throw songs or, for example, audiobooks, from a computer in the iPhone - you need to install the program on this computer iTunes.. All manipulations for copying any files to Apple devices are performed only through this program.
Because Instructions for copying music from a computer on the iPhone turned out to be quite voluminous, I designed it in the form of a separate article - you can.
The official application for reading books is already built into the iPhone - it is called it. iBooks.. This "reader" knows how to open formats PDF. and epub.. About how to copy books from a computer to iPhone - I told.
14. How to install applications in iPhone?
On the iPhone main screen, click on the icon App Store.. Application store will open. Here is like paid applicationsand free. Press your finger on the word " Top Charts"At the bottom of the screen - then moving on top to the tab" Is free". Before us will appear a long list of applications that can be installed completely free. Click on the right of your favorite button " Download". Later " Set”:
Next we will be asked to enter the password from their Apple ID. We introduce it. Then we wait when the application load indicator will make the full circle. All - the application is installed. It appeared on our main screen, we can open it: 
15. How to delete an application from iPhone?
Press your finger to the icon of any application and do not tear the finger for a few seconds. Suddenly, on the screen, everything will begin to "walk the walker": applications will start "rattling". On the icons of those applications that can be removed in the left upper corner A cross will appear. Click on it and select "Delete". 
16. How to enable Wi-Fi on iPhone?
Need to go to " Settings” – “Wi-Fi". Here you can not only turn on Wi-Fi, but also select the network to which you want to connect.
And you can spend your finger across the screen from the bottom up - An additional menu will be released on wi-Fi icon:
17. How to close applications in iPhone?
Press Double-button HOME. On the smartphone (this is a round button in the center). The multitasking panel opens with running applications. Finger wrap up rectangle with necessary application. The screenshot of this application will "fly away" from the screen. This means that the application was successfully closed.
It is impossible to close all applications at once, but you can close three pieces at a time, brightening them up with three fingers.
You do not have to close the application every time. There is nothing terrible in that it will hang in the multitasking panel (in such a state of the application almost do not consume your iPhone resources).
18. How to disable mobile internet on iPhone?
Many applications on the iPhone periodically refer to the Internet. And if you want them to do it only through Wi-Fi networks, then definitely disable your iPhone access to global Network via EDGE and 3G. Otherwise, you risk encouraged with the situation when money will be charged with your account it is not clear for what.
Go to " Settings” – “cellular
"And deactivate the switches here" Cell data"And" Turn on 3G”:
19. How to remove a password to unlock an iPhone?
If you set a password for unlocking with the initial configuration of your iPhone, and now you are tired of entering it every time - do the following:
Go to " Settings” – “Password"- Then enter your password - click" Turn off the password"- And the last time enter the password. More iPhone will not ask him. 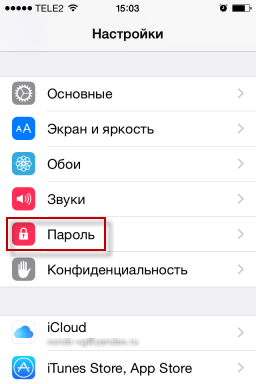
20. How to turn on the flashlight in iPhone?
Spend your finger across the bottom screen - the additional menu will be released, in which you need to click on the flashlight icon in the left corner. It turns off in the same way.
21. How to translate iPhone to silent regime?
Press the switch " Call / silent"To translate the iPhone to a silent mode:  In this mode, the iPhone does not play the call signal (vibro only), sound warnings and others sound effects; But at the same time alarm clock, sound applications (for example, "Music" or "YouTube") and some games will still play sound through the built-in speaker.
22. How to disconnect the sound of the iPhone camera when photographing?
To do this, simply translate your iPhone to a silent mode using a switch that is located on the left side of the case.
23. How to throw off incoming call on iPhone?
If your iPhone is in a blocked state and incoming the incoming call, then there is no "Reject" button on the smartphone screen - only "answer". How to reject the call or at least turn off the sound of an incoming call?  Turn off the sound with an incoming call, you can, if you press 1 time on the button on Iphon (POWER):
  Pressing the POWER button will reset the incoming call, and the calling person will hear short beeps.
24. How to make a screenshot of the screen in iPhone?
For this you need to simultaneously press round button Home. And the inclusion button iPhone (POWER):  The screenshot will automatically be saved there, wherever all your photos are saved. Go to the "Photo" application and see the screen test.
25. How to put your melody on a call in iPhone?
On the iPhone, put your ringtone on the call is not so easy. To do this, you need to do certain manipulations. If short, then the procedure is as follows:
1. Add the melody you need to program iTunes. on the computer.
2. From this melody cut the musical fragment lasting no more than 38 seconds. It will be our ringtone, which we then put on the call.
3. Convert Ringtone to the format Aac.
4. After conversion, change the extension from the received file to .m4r..
5. Ready Ringtone Copy from iTunes program to iPhone
6. On the iPhone, we put our melody as a call to concrete personor at all.
Although the list of actions and turned out to be impressive, in fact, all this is done pretty quickly. If you were not afraid, then go to which I painted everything in more detail.
26. How to group multiple applications into one folder on the iPhone screen?
Press your finger to the icon of any application and do not tear the finger for a few seconds. Suddenly, on the screen, everything will begin to "walk the walker": applications will start "rattling". Take the selected application icon to another icon. The folder will be automatically created in which both these applications will be located. The folder name can be edited by going into it.
The folder will automatically delete if it is removed from it all application icons.
27. Through what browser to go online on iPhone?
The iPhone has already built a browser Safari.which is perfect for surfing the Internet. If you want to experiment, you can install and third-party browser ( Google Chrome., Yandex Browser, Opera). Personally, Safari is quite suitable.
28. How to copy video from a computer to iPhone?
This can be done through the program. iTunes.. But there is one important moment: To add video to iTunes, it must be converted using codec h.264. and have format .mp4 ,.mov.or .m4v. If your video in another format (for example, .avi.), it must be converted to the desired format. You can read more.
29. How to transmit files on bluetooth on iPhone?
The iPhone does not provide a function of transferring or receiving files using Bluetooth technology. In the iPhone Bluetooth is needed for synchronization with various external devices: headsets, sports accessories, monopods. Honestly, when I myself just became the owner of Iphon, it was very surprised by this circumstance. However, over time, I was convinced that it was not particularly me that I needed 🙂
You can send a file from one iPhone to another using Airdrop technology. That's just both of these iPhones should be not lower than the 5th version (so I fly with my 4S 🙂).
I note that the owners of an iPhone can pass the file on bluetooth to another smartphone (not iOS) Jailbreak. To do this, you will need to download a special extension in an alternative app store. Cydia (like the App Store).
30. What is jailbreak on iPhone?
Jailbreak (Jailbreak) - This is a software operation with mobile devices operating under the operating iOS systemwhich opens for various software access to the file system. Speaking simple words, Jailbreak gives you access to the system, as an administrator, and not as a user.
This operation can be done by itself: on the Internet full programs for jailbreaking IOS. and instructions for them.
The main advantage of the jailbreak is the ability to install third-party applications that Apple for some reason have not approved for downloading in the App Store.
After the jailbreak on your iPhone automatically cydia will appear. This is an alternative application store for iPhone - like the App Store. Just like in the App Store in Cydia, you can download various applications (most of them are free).
Also, after the jailbreak, you can download paid applications from the App Store for free.
Although Jailbreak is an officially unsupported Apple operation, it is not a violation of copyright companies. True after the jailbreak procedure, the device loses apple guarantee And not subject to warranty repair. But you can restore the factory settings of the iPhone through program iTunes. And no one will prove that you have ever done a jailbreak on this device.
Know that if you are made on your iPhone jailbreak, and you decide to update iOS to the latest version - this will remove the jailbreak with the iPhone. Each time it turns out the firmware update for the iPhone, you need to wait for a while, until the enthusiasts release a new jailbreak.
Do I need to do jailbreak? Personally, I think that there is no particular need for this: only if for the sake of interest, just "play." But that the jailbreak can bring harm, I believe. Software available in Cydia, unlike the App Store, is not checked for reliability and safety, and therefore may damage your data on the device or cause its unstable work.
It always seemed to me that there is nothing complicated in Apple gadgets. However, this trend is fixed faster on no and from each new version iOS settingsBehind which you need to watch more and more. In this article we will tell you what to pay attention to when configuring a new iPhone or iPad.
Do not update to ICLOUD DRIVE
iCloud Drive is supported only by iOS 8 and OS X Yosemite, so if you often use iCloud and you have Mac, do not rush to update to ICloud Drive, until the OS X Yosemite opens.
Set up icloud sync

iCloud allows you to synchronize many different information. Mail, contacts, photos, third-party files - all this can be customized and better to do it.
Disable keyboard sounds and screen lock

Because they are annoyed.
Disable duplicate messages notifications

For the same reason.
Turn on the auto date of messages

Surprisingly, over time, media files in iMessage can occupy gigabytes of free space. In order not to delete correspondence on one, you can turn on automatic removal old messages.
Configure Push Notifications

Push notifications in iOS are amenable to very detailed configuration. You can change the type of notification, turn on the sticker on the Bain, alert on the locked screen and so on. And you can do it for each individual application.
Add keyboard abbreviations

Despite the fact that more and more third-party keyboards appear, there are still many supporters of the standard iOS keyboard. If you are one of them, then do not be lazy to customize keyboard reductions. With their help, you can write whole phrases with several characters. Subsequently, they will save you a lot of time.
Find the number of rows in the preview of the mail

Standard number of rows in preview - 2. Their number can be increased to 5. Thereby, you can understand what a message is about, even without entering it and immediately send it to the archive or to a certain list.
Activate "Hey Siri"

Despite the fact that Siri in our territories is still a rather useless thing, with its help you can already find out the name of the playing songs, weather, to put reminders and so on. The phrase "Hey Siri" can be launched Siri, without even touching the gadget. You can do this in the settings → Siri.

iOS 8 brought for developers great amount opportunities, but as a result, a lot of buns for us! Widgets, extensions, application interaction and much more. For applications updated under iOS 8 in the App Store there is a separate tab that you certainly see.
When buying in the store, sellers offer to enable and run iPhone 5 for free. But for some reason I did not want this service.
The fact is that when other people make such a job, the question of how to set up an iPhone 5, remains a mystery to you. While, say, you can not buy new gadget. But when will it still be?!
You can first enable and configure iPhone 5 three ways:
- Restore copies icloud.
- Restore copies iTunes.
- Set up as a new iPhone
But this is in theory, and in my version, when you get the device for the first time, and there is also no other than the previously saved these gadgets, there is only a third option from the number above to set up an iPhone 5, which is called, from a clean sheet.
True, after such an initial launch, then I had to manually rewrite all contacts from the Address Book of Old Nokia to the new iPhone. But this is a completely different story, it was already.
1 Resolutely turn on a new iPhone 5
Let's return to the initial start of the iPhone 5. To begin with, we connect the charger to it and make sure that the battery device is not discharged completely. Otherwise, it must first be charged, better up to 100%. On the screen when connecting the iPhone to charger The image of the battery appears, and the numbers show the level of charge - an intuitive picture that does not require special explanations.
And here, we turn on the power, press the button on the iPhone. The initial invitation of "Hello" appears, that is, "hello" (Fig. 1).
Note. This is not the hell, who lost the elephant and not to the monkey in the famous cartoon "Hello Martyshka":
- "When I handaire hello, I give you a good mood," - explained the boa.
- And now Martyshka has "hello" and a good mood.
- Oh, if two more "brings" ... "
In the iPhone, quite normal hello, meaning that the device begins preparations for the initial configuration.

Fig. 1. The initial greeting is not in Russian after the first turn on the iPhone
Greeting "Hello" now appears again, but already in an understandable Russian (Fig. 2).

Fig. 2. The initial greeting is already in Russian after the first inclusion of the iPhone
Again, tadam on an intuitive inscription "Set up" at the bottom of the screen (Fig. 2).
A warning appears that there is no SIM card in iphone (Fig. 3). Here we answer "OK", and we do not have options for choosing a response - this is the only possible option: tap on "OK" (Fig. 3).

Fig. 3. Warning of the need to insert a SIM card in the iPhone to connect to a cellular operator
SIM card that program warns us initial setting IPhone, you need to allow the iPone to immediately connect to the network cellular operator.
Honestly, do it immediately, without sobering in the initial settings of the device, I did not want. Because you can have a sneaking, without silenting something to download something from the Internet when settings, and then get and pay a decent account from the cellular operator. Why do it, if, who can distribute, say, a laptop, and which in turn is connected to unlimited wired Internet - Download how much you want without restrictions!
2 We deal with languages \u200b\u200band countries
After refusing OT connections iPhone To the network of the cellular operator, choose the language of communication with our device. I suggest to do this in Russian, unless of course you do not want to learn some language with the work on the iPhone, for example, Chinese! Tabay on the inscription "Russian" (Fig. 4)

Fig. 4. Selecting the language of communication with iPhone
Next, in the settings of the device, we are invited to choose a country and a region where we are. It would seem why, because we have already indicated the language we will work with the iPhone. But not everything is so simple and obvious. After all, it is possible, for example, to be abroad, but with the preferred language of communication with the iPhone to consider Russian. Therefore, the choice of language and the choice of the country and the region are separate operations of the device settings (Fig. 5).

Fig. 5. Choice of the country and region where we are
In fig. 5 It can be seen that Russia is not in the selection menu. Of course, no, because Russia is written with the letter "P", and we see in Fig. 5 Only countries on the first letter of the Russian alphabet, the letter "A". Therefore, we look up the menu of selection of the country and the region until we reach the countries starting with the letter "P". There we will see Russia, and tapin on the name of our Motherland.

Fig. 6. Choosing Russia as a country and region for initial iPhone configuration
By the way, it is interesting, but how is the choice of the country, if you choose Chinese as a language of communication with the iPhone. After all, there is no alphabet in this language, therefore it is unclear how countries are located there in what order?
With the same problem, as far as I know, the organizers of the 2008 Summer Olympiad, which took place in China. Indeed, on the opening day, the Olympics of the country should pass on each other in the strict sequence of the alphabet of the language of the country where the Olympic Games are held. But this is also a completely different story. We return to the initial iPhone 5 settings.
And now the warning is on the lack of a SIM card (Fig. 7) again occurs. And there is no Wi-Fi, that is, the device is not connected to the Internet, and it means that it cannot be adjusted further. What is called, came ...

Fig. 7. Re-warning about the absence of a SIM card, as there is no connection to Wi-Fi
3 Iphon connect to Wi-Fi Internet
For a while we put the iPhone to the side, without turning it off. And begin to engage in Wi-Fi network - try to run the distribution of Wi-Fi using a laptop. But here there is an unexpected problem. In my laptop, the Internet access point has a very complex and long password. This is done by a laptop manufacturer to protect the access point from unauthorized connection. And I did not change this password.
But it is simply impossible to enter this password manually. Make it without a mistake did not work anyone and never. The password can only be copied and transferring, say, inside the file, on a mobile gadget. But the transfer of any data on our new iPhone is not possible, because it is not yet running.
What to do? The idea of \u200b\u200bcreating an access point with a different gadget, with a smartphone comes to the rescue. Fortunately, the smartphone knows how to become an Internet access point for other devices. And here we can easily, say for a while, make a password to access the Internet network simple and easily entered using virtual keyboard iPhone.
Of course, now you have to agree that we will spend the mobile smartphone traffic connected to the cellular operator. You could immediately insert the sim card in the iPhone. But we will be comforted by the fact that we will still try to work the device from wi-Fi network, not immediately from the SIM card of the cellular operator. Practice if you can say so.
After a few minutes of waiting, the iPhone screen comes to life. And the first sentence appears on the launch of geolocation services (Fig. 11).

Fig. 11. We refuse the offer to launch the Geolocation Service
You do not need to run these services when you initially configure, it is never too late to do when the iPhone is configured, and starts its work. Therefore, we will refuse to start this service, for which Tapmen on the inscription "Disable geolocation services" at the bottom of the screen (Fig. 11).
5 Creating an iPhone Access Password
In the next step of the initial setup of the device, you need to come up with and enter a password to access the iPhone. From the moment of creation of this password It is impossible to "reach" without this password. Therefore, it is necessary to consider responsibly to create a password. On the password entry screen, this password will be asked to enter the first time using the phone keypad with numbers and Latin letters under them (Fig. 12).

Fig. 12. Enter access password to iPhone
Password is better to do only from some numbers, since the use of letters will complicate input. If someone confidently owns a telephone keyboard, he can include Latin letters into the password. I repeat, I created a password only from 6-digits. And then a lot, it was possible to make a shorter password, for example, from 4-digit modes like a PIN code.
Then you need to repeat the password to make sure the password is entered correctly (Fig. 13).

Fig. 13. Re-entering an iPhone access password
The entered password now needs to be remembered or even write! Remember forever, at all time using the iPhone.
6 Setting up new iPhone programs and data
Now, finally, it is time to configure software and data of our iPhone. It will be proposed to set them up in several ways (Fig. 14).

Fig. 14. Select options for configuring programs and data iPhone
We, as we decided, choose the option "Set up as a new iPhone", because this is our first device, and we do not have old copies in the icloud or in iTunes. And to transfer them from the Android, which Wi-Fi regularly gives us, it is not necessary at all, since it does not need a program or contacts from it, since this is not my personal apparatus.
So, select the "Configure as a new iPhone" option, taping on this inscription and wait until all the necessary settings are performed. But this is not the end of our "torment". We will continue to configure the iPhone and cook it to work.
7 Refusal to configure accounts to access Apple services
Here is a strange thing! For some reason, the developers consider their users very advanced. Once at the dawn personal computers for setup Windows Actigely, understandable questions, understandable for Russian person, and at the very end of the setting suddenly there was a question about a certain 866th page. Where is it, what is it? No explanations, and at least kill or with this, you need to configure it. And no reasonable explanation.
Then it becomes clear, after a while, it is only about the consent to the use of the Russian alphabet when working with Windows. Well, why then do not ask, they say, do you want Russian letters on your computer, or do you not need them? It is absolutely clear that you need to answer this question, of course, "yes yes and yes and again yes!".
Here and the developers of Apple devices for some reason are confident that everything in the world knows what an account is to access apple services, or "Apple ID". And in the next step of the initial setting of our gadget, you offer this account to configure (Fig. 15).

Fig. 15. Offer set up an account for access to "apple" services, to Apple services
The most remarkable is that all these settings can be completely able to do later when our iPhone will work. During the gadget tincture, you do not need to enter accounts and so on.
We need to start the device, and not try to configure a lot of things on it instead. Therefore, we will refuse this "attractive" sentence, and Tapmen on the inscription "Set up later in the settings" (Fig. 15 - Here we are even explained, where we can perform the missed settings)
Despite the ability to refuse Apple ID settings, our gadget "will surprise" to such an increasing, according to the iPhone, decision. And we will ask us again about the refusal to use this option (Fig. 16).

Fig. 16. Re-offer to set up an account for access to "apple" services
And here we are firmly replied "no!" For which we tapam on the inscription "Do not use" (Fig. 16).
8 Taking conditions and provisions
Abroad in countries of developed capitalism are very developed by the actions related to legal rules and restrictions. Citizens of these countries are almost never led to read a dozen other pages with small and illicitable shuttle text that it is possible, and what can not be done with anything:
- with microwave: Is it possible to dry a cat;
- sO washing machine: Is it possible to wash dogs in it
- etc.
I agree that it is important to know, to know exactly what it is possible that it is impossible. Know what guarantees the manufacturer and what is not. But for some reason, not in our country. Well, we do not read these agreements! Perhaps someone reads, I will not talk about everyone. But most of our citizens are still not interested in legal intricacies.
I will not comment or give this definitions. So there is, and that's it. But our iPhone is clearly not Russian. Therefore, before working with him, we are offered to read the conditions and regulations, and. With disagreement with the provisions given, the device will not work. Therefore, as such a choice we do not. Regardless of whether the conditions and provisions read or did not read.

Fig. 17. Making conditions and regulations
9 Failure to Siri
It would seem that it was happiness, conditions and provisions we accepted - you can begin work. But it was not there. Now we will be asked to include Siri.
Siri is an interactive system that allows you to control the phone with a voice that appeared for the first time in models iPhone. 4s. So it is on our fifth model. But, again, Siri can be enabled later when our iPhone earns. Therefore, let's answer in response to this invitation, we will respond, tapping on the inscription "Enable Siri later (Fig. 18).

Fig. 18. Refusal to include Siri
There is a reasonable question, why are it all offered to us when you initially configure our gadget if all these settings can be made later. The answer looks quite simple - it's just marketing moves Manufacturer of iPhone or its partners developing software for its work. No more.
The manufacturer believes that we are poorly aware of the possibilities of the device, and perhaps, in this manufacturer of rights. But the manufacturer does not understand or does not want to understand that we are not so easy to master everything right away. Everything needs to be done in order. First set the iPhone 5, and only then learn all it infinite features.
Nevertheless, the manufacturer thinks differently, and thus we have to abandon different options again, leaving their launch and study for later.
10 Sending diagnostics
Hardware and software mobile gadgets are constantly improving. Manufacturers sometimes at their own risk are installed in these devices new elements, new programs. And they do not always have time to test all this in calm conditions of their research laboratories.
This is due to competition. If you will test for a long time and do not withdraw the product to the market, you can be late and the market will be engaged in "someone else's" products. So you have to risk.
And once there is a risk, then there may be a malfunction of the device. To fix these failures, the developers of the iPhone also "sew" special programs. These programs "catch failures", one way or another they are a little systematized, and can send information about them to the company manufacturer.
Modern manufacturers received information about all occurring failures are very like, as it allows them to constantly improve the equipment and software. Therefore, we are offered to configure or automatically send information about any malfunctions in the application of the iPhone to the company manufacturer, or refuse this option.
Here you can advise how to send information, never send. Do not send better to those who will use the iPhone in mobile networks, and spend limited limited and fairly expensive Internet traffic. You can send to those who will more often use the gadget, working on Wi-Fi and unlimited traffic.
Skeptics may argue as mobile networks Sending diagnostic messages does not spend significant volumes. Yes, of course, it is. While one day you do not receive an invoice from the mobile operator and you see very unusual figures, say, the cost of the Internet while in foreign roaming. After that, most often disappears any hunt to automatically send or receive any unnecessary messages through mobile Internet.
Therefore, in this case we will refuse (just in case) from automatically sending diagnostic messages to Apple. To do this, tapa on the inscription "Do not send" at the bottom of the screen (Fig. 19).

Fig. 19. Refusal to automatically send diagnostic messages
11 Long-awaited start to work on iPhone 5
And now, after all our numerous agreements and failures on / from the inclusion of certain options for new iPhone, we get the opportunity to start work on it. There is an inscription on the screen "Welcome!" and invitation to "start work".
For this inscription "Start work", we tapai (Fig.20)

Fig. twenty. Initial settings Completed, we are invited to start work on the iPhone
So waited! Patience and a little effort. We can start working on the iPhone, install the SIM card in it, enter data into the address book, call, send SMS and so on. The question "How to set up iPhone 5" managed to solve safely, cheers!
The icons will appear on the screen, with which you can do a lot of things on the iPhone. But this is a completely different story ...
How to activate iPhone through iTunes
For those who are ready to activate their new iPhone through iTunes, you can advise to do the following.
It is necessary to download from the official website of developers ITunes software (the latest version). Download the application according to the established software on the computer.
Install the application, connect the iPhone to your computer (the cable for this comes with the phone).
The phone must be fully charged, and the SIM card must be in its place (in the appropriate compartment).
Connect the Internet on your computer.
Take the Terms of License Agreement, then continue the activation process of the device. Now go to fill the necessary data. Check them, click on "Send". The program will then shift to Apple the entered information itself. Thus, the warranty and the phone is activated.
Cell phones iPhone better Buy in Apple salons either in special electronic technology stores to avoid problems with further activation of the device. Avoid dubious outlets, do not buy a phone from hand or online from little-known sites.
I will show how to set up an iPhone from the very first inclusion. I'll show you how to create an Apple ID, put a password and other first difficulties.
1. The first inclusion of iPhone.
Initially, turn on the iPhone. Press and hold 1-2 seconds button on iPhone. On the old versions of iPhone (iPhone 4.4S, 5.5C, 5S) it is on top, on the new (iPhone 6, iPhone 6 Plus) it is right. Appears at the beginning of a white apple on a black background, and then greeting on different languages: Hello, greeting and so on. We need to smear your finger from left to right to start the first setting of iPhone.
Initially, you need to select the iPhone language and its interface language. Click the language on which you want to configure iPhone. I choose Russian.


Enable or disabling geolocation. Next, you can turn on the geolocation to enable the GPS module on the iPhone and it will determine where you are in to offer you, for example, the weather is exactly the place where you are currently or the nearest store, or set you the current time zone when You move from one city to another or from one country to another. Or to determine where you are at the moment you can find yourself on the map. Also, the iPhone can remember frequently visited places with you and follow your move. I wrote about this in the article.
But the GPS module consumes the battery charge and at the moment it is not needed, so I will disable it by choosing to disable geolocation services. Geolocation can be enabled and later or allowing it to use it for a specific application at the time of its operation.


Now we approached the use of the already existing Apple ID or creating new Apple. ID.
2. Create an Apple ID.
If you have not had an iPhone or Ipad or you want to create a new Apple ID, then choose to configure as a new iPhone. If you already have an Apple ID and you want to use it, then select Restore from the copy of ICloud or restore from iTunes copies. I told about the restoration of iPhone in the article.
I will show how to set up an iPhone with a new Apple ID and choose set up as a new iPhone.

Apple ID is your IOS account (iphone or iPade), to use it in Apple devices.

FROM using apple ID You can make purchases of applications, music, movies on iPhone, send free iSessage (SMS messages between iPhones and Ipads), make facetime calls (free video calls between iPhones and Ipads) and so on.

In general, without Apple IDs either there or its presence.


Now we choose to specify your name and surname.


For creating apple The ID need an email address. You can specify your already existing mailbox, there will be different notifications about buying applications in the AppStore (when you make them), security notifications and other Apple letters.

You can create a new mailbox on the Apple server and link the new email box to Apple ID. To do this, choose to get a free e-mail in ICloud and click Next.

Now invent your new e-mail. It will be this type: [email protected]. This will be your username in Apple ID.

To switch the keyboard with Russian to English, click on the left below on the globe icon.

After the e-mail came up with a click further.

Confirm the creation of e-mail. Press Create.

Now you need to create a password to Apple ID. The Apple ID password cannot contain less than 8 characters, while it must contain at least one digit, one capital and one lowercase letters.
That is, the password must be type: Genadii6 or kartohul0 or 4tyresta or dvustoroniidild0.

After you came up with good password And they confirmed it, press further.

Now you need to choose control questions and come up with answers to them. Control questions Used to experiment a user when changes are made to the account data.
Click on select a question.

Can choose:
- the name of the best friend of childhood
- nick your first pet
- the first dish you learned to cook
- the first film you looked at the cinema
- where are you first flew by plane
- name of your favorite teacher

I chose the name of the best friend of my childhood and gave him an answer. The answer can be absolutely any. The main thing is that you remember this answer if something happens to your Apple ID account.
After you chose the question and gave the answer to it further.


And finally, the third question and answer and press further.

Now you specify the backup mailbox, in case your main e-mail will not be available you can restore access to your Apple ID through the backup mailbox. This e-mail will be used only to ensure security.

After you specify your mailbox, click Next.

Now setting up updates. Get news I. software updates Apple, as well as fresh information about Apple products and services.

I do not want to receive news and Apple information to your email, so disable these updates.

Now we accept the terms and conditions of Apple. We read and click Accept.

Confirm the acceptance of the conditions and position of the iOS, ICloud and Game Center.
Click to accept.

The creation of a new Apple ID begins. We are waiting for a few seconds or minutes.

Now we are invited to use icloud. iCloud is cloud storage Apple, it allows you to have automatic access to music, photos, programs, contacts, calendars and many other things on all your devices.
If you do not have a computer, then you need to use iCloud to save your contacts and music and programs to your account on iCloud and in case you lose your iPhone or IPAD, then you could buy a new ipade or iPhone to restore your contacts and Photos and programs on new iPhone or ipad.
If you have a computer, then you can save your backup iPhone or Iipad, in which your contacts, photos, programs and other on your computer will be stored via iTunes.
I will click not use iCloud

I confirm that I really do not want to use icloud.
Click not to use.

3. Create a password to iPhone
Now you need to create a password for your iPhone or Ipad, so that anyone can not take it, climb to you and watch your photos, video, correspondence and other personal information.
To begin with, create a simple password of four digits.

Confirm the new customized password by entering it again.

Later you can change your password on the iPhone, if you want. You can even put a complex password consisting of numbers and letters in different languages. I already wrote about this earlier in the article.
4. Diagnostics and use.
Now you will configure the item "Diagnostics and Use". Automatic sending diagnostic data and use will help Apple improve produced products and services. Diagnostic data may contain geodata.

That is, you can help Apple by clicking "Send Automatically", then periodically your iPhone or IPAD will send data on use in Apple: In which applications, and how much you are sitting, where you are, where you click, what settings are you writing, write and so on. All this helps to understand who and how to use their products. If you do not want your data to be sent periodically in Apple, select "Do Not Send".
I choose "not send".
On the sending of statistics in Apple and other tracking in the iPhone, I wrote in the article.

iPhone. Welcome!
Click start work.

Ready. Your new iPhone or Ipad is configured and you can start using them.

5. Include mail on iPhone
At first, you can enable mail by entering the settings\u003e mail, addresses, calendars.


In the ICLOUD settings, click on the mail slider to enable mail reception on your iPhone or IPAD.

Now the slider burns green, it means it is turned on.

6. Other iPhone's first settings
iCloud Drive. Store files in iCloud and access access at any time on all your devices. Attention: access to your documents currently stored in ICloud, on other devices will be closed until these devices are updated to iOS 8 or OS X Yosemite.
In ICloud Drive, you can store all your settings and files from your Apple devices. You can click Update to ICLOUD DRIVE.

Siri helps solve problems simple request. You can call, send a message, dictate a note or read the outlook using Siri. If you want to hurt or you want to manage your iPhone or Ipad voice, click Siri.
Siri is an analogue of Google Nowwhere you can tell Okay Google and then say what to do: for example, call mom or turn on the music and so on.

7. Setting up Game Center on iPhone.
When you first start the game on the iPhone, you will need to configure the Game Center. The Game Center stores your achievement from games to Apple devicesAlso in Game Center can be kept your salary from games and you can start playing the game on the iPhone, and continue to play Aipad (at the same time one Apple ID should be used on iPhone and Iphade).

Enter your Apple ID and password from it and press SIGN IN.


Privacy. You can make your gaming profile public so that other players can watch what you have achievements in games and what you are playing. Or make a profile closed.
Click Next.

Friend Recommendations. Recommendations of friends. You can give game center access to your contacts and if they have an Apple ID and account in the Game Center you will receive notifications about the games in which they play and you can play along with them (for example, in poker with each other).
Or you can not give access to your contacts and do not play with your friends from your contacts.
Click Done.

Other entries on Iphona:
Speed \u200b\u200bslowdown work iPhone - Beach of all owners of "apple gadgets". The most likely the problem beats by users who used to actively exploit the device and use hundreds of programs. Increase the speed of the programs on the iPhone allow special programs to help configure iPhone as new.
To start working on the iPhone, you need: After the operations all the data (video, photo, music, contacts) will be stranded, and to lose memories of meaningful moments of life and restore the extensive list of numbers for sure I do not want anyone.
With the help of the algorithm described in the article, you can increase the speed of both iPhone and iPad.
Preparing iPhone or iPad
Before accelerating the iPhone, the device needs to be prepared for the procedure. This is done as follows:
- IOS update to the latest version. The current version of the operating system should be installed on the smartphone. If this for some reason has not been done earlier, you need to go to the "Update" section ("Settings" → "Basic" → "Update by"), check the installed iOS version And if necessary, download and install update. If the iPhone functions with Jailbreak, iTunes will be required to update the operating system.
- Backup copy. You can create a backup copy of the smartphone in several ways:
- via iTunes: Phone needs to be connected to a computer, select the device in the list available in iTunes, activate the "This computer" switch, click the "Create Backup Now" button, after completing the procedure to enter the "Devices" and see if a backup has been created;
- through ICloud: You need to go to the "Backup" menu ("Settings" → ICloud → "Backup") and press the appropriate copy.

|

|
- Disable messages. Before accelerating the iPhone, you must turn off the iMessage. To do this, you need to find the "Messages" item in "Settings", go to it and press the appropriate key.
- Disable "Find iPhone". The device's search program at the time of the device is accelerated also should not work. Disable "Find iPhone" is carried out through the ICloud item in the smartphone settings.
By carrying out all the preparatory work, you can proceed to the next stage of work - cleaning the device.
Cleaning this on iPhone or iPad
How to clean the device, you can learn more in our article (to factory settings) or briefly, with the following steps:
- . You can roll back the iPhone to the source version using the " Reset iPhone."(" Settings ", item" Basic ").
- Delete settings and content. On the this Chase You need to select the "Erase Content and Settings" key.
- the confirmation. The iPhone does not delete the data immediately after pressing the keys: To start the cleaning process, you need to confirm the selection.
- Expectation. Before you set up an iPhone, you need to expect until all the information is deleted - it takes a few minutes.

|

|

|
If the cleaning process is fully implemented correctly, there will be no information on the iPhone (in addition to the system), and the device will display a welcome message on the screen. Did you do everything right? You can go to the most important - setting up smartphone / tablet.
Setting up iPhone as a new
- Select the item "Set up as a new iPhone" (appears in greetings after cleaning your smartphone from information).
- We skip Identification through the Apple ID (it is necessary that the phone settings saved in iCloud are not transferred to the device).
- Complete the process.

 Error appearance during program launch
 FRIGATE plugin for Firefox
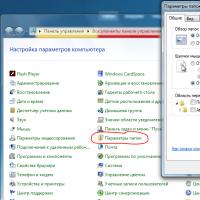 How to show hidden folders and files in Windows
 Ways how to make a screen on a laptop brighter or darker
 How to format a flash drive, disk protection
 If installing Windows to this disc is not possible
 During installation of Windows "Make sure that the controller of this disc is included in the computer's BIOS menu.