Electronic textbook on the course "advanced training of executives, specialists and university teachers in the field of ICT". Remote administration of nodes. To create a virtual server
Chapter 11 Create a Web Site Using Wizards and Templates
Templates and Wizards
We have seen the main window of FrontPage. Before you start developing your Web site yourself, let's take a look at the templates and wizards that FrontPage provides to speed up your development.
Building a Web site is a rather time-consuming process, requiring not only a large investment of time, but also extensive development knowledge. FrontPage caters to developers' needs by providing them with tools designed to minimize the time it takes to create a project. These include a large number of templates and wizards for creating Web pages, frames, Web sites, and styles.
What are templates and wizards and how are they different from each other? You have probably come across templates when working with other office products, for example, when working with Microsoft Word.
Sample is a collection of document parameters for its multiple use, in other words, the skeleton of your document. Having chosen one or another template, you will use the tools that are already included in it in the future. For example, by choosing the One-column Body template, you get a page on which information must be placed in one column in the center. Other templates have predefined areas for text and graphics, and so on.
Using the wizards expands your development capabilities as master asks you questions as you work, and builds a Web site or Web page based on your responses, posting headings and pieces of information. Thus, when using the wizards, you get a project that is close to your main tasks.
Web Site Wizards
Follow these steps to start the New Web Site Wizard:
1. On the File menu, select New, and then in the submenu that opens, the Page or Web option. As a result, the New Page or Web panel appears in the main window of FrontPage (Figure 11.1).
Rice. 11.1. Create a web page or site panel to work with new pages and web sites
2. Select the Web Site Templates value in the panel. The Web Site Templates dialog box opens, where you can select a template or wizard to create a Web site (Figure 11.2).

Rice. 11.2. Web Site Templates Dialog Box
The dialog box contains one Web Sites tab, which contains icons for the templates and wizards provided by the system for creating Web sites. Table 11.1 describes the purpose of the wizards provided by FrontPage.
Table 11.1. Wizards Used to Create Web Sites
|
Master |
Appointment |
|
Enterprise Web Site Wizard(Corporate Presence Wizard) |
Creates a Web site for representing the enterprise on the World Wide Web |
|
Database interface wizard(Database Interface Wizard) |
Creates a Web site that uses a database to store information, where you can view records, add new ones, delete existing ones |
|
Web Discussion Wizard |
Creates a Web site for discussion |
|
Web Import Wizard |
Imports data from Web sites created using other software into a Web site created in FrontPage |
Comment
In the Web Site Templates dialog box, FrontPage provides four wizards for creating a Web site. They are listed in table. 11.1. The rest of the list are templates.
3. Select the icon of the wizard whose services you want to use. A short description of the selected wizard appears in the Description area.
4. In the Specify the location of the new web field, specify the URL for the Web site, that is, the name of the Web server where you want to host the Web site and the name of the Web site. The names must be separated by "/". For instance, http: // localhost / Corporate. In this case, the following options are possible:
- The web server is installed on your computer. In this case, the server name is automatically substituted into the URL. The server can also be assigned the default network name of your computer, localhost.
- You are using your ISP's Web server available on the Internet. In this case, the real URL of the server is entered as the name of the server.
- Save the Web site on your computer. In this case, the physical path to it is indicated as the address.
- To establish a secure SSL connection with the Web server, select the Required checkbox in the Web site templates window. SSL connection(Secure connection required (SSL)).
5. Click OK. The wizard starts.
Advice
Alternatively, double-click the icon of the selected wizard to launch a wizard or template.
To create a Web site using the wizard, proceed as follows. After starting the wizard, dialog boxes appear on the screen one by one for entering the parameters of the website being created. You must answer all of the suggested questions. To move between screens in the process of the wizard, use the buttons located in the lower part and have the following purpose:
|
Button |
Appointment |
|
Cancellation(Cancel) |
Terminates the wizard |
|
Back (Back) |
Allows you to return to previous steps in the wizard to change previously entered information |
|
Lets you go to the next step of the wizard |
|
|
Ready(Finish) |
Allows you to go to the final stage in creating a Web site based on the information entered |
After answering all the questions of the wizard, you click the Finish button. The wizard creates a Web site and displays it in the main program window for viewing and editing.
Comment
You can proceed to the final stage from any wizard window using the Finish button. In this case, FrontPage will create the Web site using the default options.
Let's take a quick look at the wizards' capabilities for creating a Web site:
- Corporate Presence Wizard. Creates a Web site that represents the company on the Internet. The website you create may include:
Pages used by visitors to a Web site to view company news and information about products and services
A table of contents to make it easier for visitors to navigate the Web site
Customer feedback form on a particular issue
- Database Interface Wizard A Web site created with this wizard can contain the following pages:
· Page for viewing information from the database
A page for entering information
· A page that allows you to edit the website database from a browser
- Discussion Web Wizard. Creates a Web site on the pages of which the user expresses his opinion about. ongoing discussion. The website you create may include:
Discussion pages and the page that the visitor uses to determine if their message has reached the website
Web site table of contents
Streaming responses form
A search form that allows site visitors to find information of interest on a Web site
- Import Web Wizard Imports data from other Web sites into the Web site you are creating with FrontPage. You can import the entire Web site or individual pages. Import can be done from your computer, from a computer on your local network or from the Internet by specifying its URL
Web Site Wizard for Company Representation
Let's take a look at the Corporate Presence Wizard, which creates a Web site to represent your business on the Internet. Follow these steps to create a Web site using this wizard:
1. On the File menu, select New, and then in the submenu that opens, the Page or Web option.
2. In the New Web Page or Site panel that appears in the FrontPage program window, select Web Site Templates (Web Site Templates).
3. In the Specify the location of the new Web site box on the Web Site Templates dialog box, enter the location and name of the Web site you are creating.
4. Double-click the Enterprise Site Wizard icon.
5. The master begins his work. Its first window appears on the screen, which contains short description masters
(fig.11.3). Review the information provided and click Next.

Rice. 11.3. First Information Window of the Wizard Enterprise Site Wizard
6. At the next step of the wizard, you are asked to decide on the pages that will be included in the Web site (Fig. 11.4). The dialog box contains the following check boxes:
Home (Note) - the home page of the Web site
What's New - Web site news page
products and services (Products / Services) - a page representing products or services offered by the company

Rice. 11.4. Dialog box for selecting Web site pages
Table of Contents - A page containing a table of contents for the Web site you are creating. From this page you can go to all pages of the site
feedback (Feedback Form) - a page in the form of a form on which website visitors can post their opinion about the offered goods and services
search form - a page in the form of a form for searching for words on a Web site. This form will allow the visitor to quickly find the information they need
By default, all checkboxes are selected. Uncheck the boxes next to the pages that you do not want to include in the Web site you are creating. Home (Note) checkbox is not available for correction. This is understandable. After all, you cannot do without a home page. Once you have decided on the choice of pages, click the Next button to proceed to the next step.
7. The next dialog box of the wizard allows you to define the format of the home page of the created Web site (Fig. 11.5). It contains checkboxes, the setting of which leads to the reservation on the page of space for the following information:
Introduction - for introductory information
purpose (Mission Statement) - about the goals and objectives of the company
Company Profile - about the company profile
Contact Information - for contact information
Uncheck the boxes next to those sections, the information of which you will not post on the home page, and click Further.

Rice. 11.5. Dialog box for defining the format of the home page
Comment
When you create a Web site using the wizard, certain dialog boxes may be missing. Their presence is determined by the pages that will be present in your development and that you specified in the second dialog box of the wizard.
8. The next wizard window allows you to set the parameters of the page that will contain the latest news from your Web site or report on which page of the Web site new information has appeared (Fig. 11.6). This window contains three check boxes that, when checked, will place the following sections on the Web site:
|
Checkbox |
Purpose of the section |
|
website changes |
Site News |
|
information messages |
Posting information messages |
|
articles and reviews |
Posting articles and reviews |

Rice. 11.6. Dialog box for setting the parameters of the news page
9. At the next step of the wizard, in the Products and Services fields (Fig. 11.7), you can set the parameters of the page containing information about the goods and services provided by the company. According to the entered numbers, one page will be created for each advertised product or service. Enter the required numbers in these fields and click Next.

Rice. 11.7. Dialog box that allows you to set the number of advertised goods and services
10. In the dialog box that appears in the next step, you can specify the sections for which places will be reserved on the pages advertising goods and services (Fig. 11.8). It contains two groups of flags. The first group of checkboxes defines the parameters of the page representing products:
Product image - reserves space on the page for placing a product image
information about the price (Pricing information) - reserves on the page a place for placing prices for the specified product
Information request form - leads to the creation of an information request form
The second group of flags defines the parameters of the page advertising services:
Capabilities list - reserves space on the page for a more detailed description of the service
Reference accounts - reserves space on the page for placing accounts
Information request form - indicates the need to form a request form to website visitors for services
Select the required checkboxes and click Next to proceed to the next step.

Rice. 11.8. Dialog box for setting parameters of pages containing information about goods and services
11. The next dialog box allows you to specify the fields of the form-questionnaire feedback with visitors to your Web site (Fig. 11.9). This form is used to collect information and then submit it to the Web site. Do not place too many fields on this form so as not to intimidate visitors who want to register with your Web site. Check the boxes next to the information you want about guests and click Next.

Rice. 11.9. The dialog box allows you to specify the fields of the form-questionnaire for feedback from visitors to the website
12. In the next dialog box, you need to set the format of the data coming from the form-questionnaire feedback with visitors to your Web site (Fig. 11.10). The choice of one format or another will be determined by the way they are processed. You are offered two options to choose from:
Yes - use tab-delimited format - data is saved as a table. This option is used if the survey results will be processed using a database or Microsoft Excel spreadsheet.
No - the format of web pages (No, use web-page format) - the data is saved in the format of the Web page
After setting the required option, click the Next button to proceed to the next step of the wizard.

Rice. 11.10. The dialog box allows you to set the format of the data coming from the questionnaire form
13. At the next step, the wizard offers to set the parameters of the page of the table of contents of the Web site (Fig. 11.11). The dialog box contains three check boxes:
Automatically update the page list (Keep page list up-to-date automatically) - checking the box allows the information in the table of contents to be automatically updated when the pages entering the Web site change
Show pages not linked into web - the checkbox determines whether it is necessary to show pages in the table of contents that do not have direct links from other pages
Use bullets for top-level pages - when checked, the list of top-level pages is displayed as a bulleted list

Rice. 11.11. The dialog box allows you to set the parameters of the page containing the table of contents of the Web site
Warning
Selecting the Keep page list up-to-date automatically check box when there are many pages in
Web site and frequent updates can increase the load of the table of contents page.
14. By checking the boxes in the wizard window shown in fig. 11.12, you reserve space for information to be displayed at the top and bottom of all pages on the Web site. The parameters are divided into two groups. The first group of flags defines the information to be placed at the top of the pages. This is the company logo, the name of the page, links to the main pages of the website.

Rice. 11.12. Dialog box for placing information at the top and bottom of the pages of the website
The second group of checkboxes define page parameters at the bottom of pages, such as links to main pages on the Web site, Webmaster's e-mail address, copyright information, and the date the page was last modified.
Comment
Checking the boxes in this wizard window is only used to reserve space on Web pages. After completing the wizard in the FrontPage editor, you can place the necessary information in these places.
Select the required check boxes and click Next.
15. Further in the work of the wizard, it is proposed to place an Under Construction icon on the pages, indicating that the creation of this page has not yet been completed (Fig. 11.13). Set one of the two options provided and click Next to move to the next dialog box.

Rice. 11.13. You are prompted to place an icon under construction on your pages
16. In the next two dialog boxes, you need to specify information about the company for which the website is being created. In the dialog box shown in Fig. 11.14, you must enter the full and abbreviated name of the company, as well as its address. The rest of the information about the company - phone number, fax number, Web-master's e-mail address and company e-mail address, enter in the window shown in Fig. 11.15.

Rice. 11.14. Dialog box for entering full and abbreviated company name and address

Rice. 11.15. Dialog box for entering telephone, fax and e-mail addresses
17. In the next step, the wizard prompts you to select the style of your Web site (Figure 11.16). You can accept the default design and click Next. Later, you can change the appearance of both the entire Web site and any of its pages using the Theme command on the Format menu. If you want to customize the design of the Web site you are creating at the moment, click the Choose Web Theme button located in the center of the dialog box. The Choose Theme window will open on the screen (Fig. 11.17).

Rice. 11.16. Dialog box for specifying the style of the website

Rice. 11.17. Dialog box for choosing the theme of the website pages
At the top of the Select Theme dialog box, the All pages option is set by default, indicating that the site theme you choose will be applied to all pages. Below this option is a list of skins provided by FrontPage. When you select a value from this list, in the Sample of Theme area, you can view the suggested styling for text, headings, lists, navigation bars, and hyperlinks. If you check the boxes below the list of topics, then:
Vivid colors - the colors used in the design will be more saturated
Active graphics - you can add active graphics to the design
Background picture - you can add a background image to the page design
Apply using CSS - an external style sheet is added to the page design
After choosing a theme to your liking and selecting the necessary checkboxes, click OK to close the Select Theme dialog box. This brings you back to the wizard window. Click "Next.
18. In the next dialog box (Fig. 11.18), the wizard informs you that it has finished collecting the information it needs and is ready to proceed to building the Web site. By default, the Show Tasks View after web is uploaded check box is selected in the wizard's dialog box, which indicates that after the wizard finishes and the created Web site is loaded, the screen will display a list of generated tasks for finalizing the site. ... Leave this checkbox selected, because immediately after completing the wizard, you will be able to view the list of work that you have to perform and make sure that the wizard has completed all the main work for you.

Rice. 11.18. Final information window of the wizard
Comment
Before clicking the Finish button, you can return to the previous dialog boxes, view the information you entered, or change something. To do this, you can use the Back button. After reviewing the settings, you do not need to return to the last dialog box. To start the process of creating a Web site, click the Finish button in any window.
Click Finish to complete the Web site creation.
The wizard proceeds to create a Web site. If the Show Tasks after Web Site Load check box was selected in the last dialog box
(Show Tasks View after web is uploaded), then after completing the wizard, the screen will open in tabular form a list of tasks for finalizing the Web site (Fig. 11.19). Tasks are sorted by priority. The Associated With column contains the name of the page that needs revision, and the Description column describes the work you will be doing.

Rice. 11.19. Checklist for Completing Site Creation
Place the cursor on the task you want to start, right-click and in the context menu that appears, select the Start Task command. The page you have selected will open in edit mode. The cursor is positioned in the place where you need to rework. You can start to edit the Web site created by the wizard.
Editing the home page of a Web site is the first to-do list. Therefore, when you start the first task in the list, the home page opens in edit mode (Fig. 11.20). Consider the elements located on it. They will usually be found on the rest of the Web site as well.
- Page title (the home page has the title Home). Is a graphical object
- Web page background. Like a title, it is a graphic object

Rice. 11.20. Web site home page
- Horizontal and vertical link bars located at the top of the page above the heading and in the left common area, respectively. The horizontal navigation bar contains links to Note (Home), Feedback, Table of Contents and Search Form. The vertical panel of the home page contains links News, Products, Services, designed to go to pages with company news, as well as to pages advertising products and services
- Horizontal dividing lines
- Contact phone numbers, mailing address, email address, company name. This information located at the bottom of the page
Comment
Graphic images displayed on Web pages can be created using these software products like Microsoft Photo Draw, Microsoft Image Composer, CorelDraw, Adobe photoshop etc.
Elements placed on a page, as well as the page itself, are characterized by properties that can be viewed and changed using the element properties dialog box. To open this window, select an element, press the right mouse button and select the Properties command from the appeared context menu with the name of the element being modified. For example, to open the page title properties window, you must use the Page Banner Properties command, the link bar - Link Bar Properties, the horizontal line - Horizontal Line Properties, etc.
Let's take a look at the navigation structure of a Web site for presenting a company on the Internet (Figure 11.21) and how the pages are related. To do this, switch to the Transitions mode by clicking the button of the same name on the Views panel.

Rice. 11.21. Web site navigation structure Enterprise Web site wizard
As you can see from the structure of the Web site, the pages to which you navigate using the hyperlinks of the horizontal link bar are located at the same level of the hierarchy as the home page. The next level of the hierarchical structure contains pages that you navigate to using the vertical link bar of the home page. In turn, the pages of the second level (Products, Services) contain link bars for navigating to the pages of the third level of the hierarchy.
Web site for discussion
To create a Web site for a discussion group:
1. In the File menu, select New, and then in the submenu that opens, the Page or Web site option
(Page or Web).
2. Select the Web Site Templates command on the Create Web Page or Site panel that appears in the FrontPage program window.
3. In the Specify the location of the new web box of the Web Site Templates dialog box, specify the location and name of the Web site you are creating, and then double-click the Discussion Web Wizard icon.
4. The master begins his work. Its first window appears on the screen, which contains a brief description of the wizard. Review the information provided and click Next.
5. In the second dialog box (fig. 11.22) checkboxes are located. They allow you to specify the pages that are generated on the Web site and the functions to be implemented:
New section form (Submission Form) - a form for entering comments during a discussion
Table of Contents — A table of contents used to organize and view previously submitted notes on a specific topic. Include a table of contents on a Web site if you want visitors to read and comment on other contributors' questions
search form - a form for information search by a given criterion
Threaded Replies - when checked, comments on a common topic are merged to provide a consistent view for the visitor
confirmation page(Confirmation Page) - a confirmation page that lets the visitor know if their message has reached the website
By default, all checkboxes are selected. If you want to opt out of any pages or functions, uncheck the corresponding checkbox, and then click Next to go to the next step.

Rice. 11.22. A window that allows you to specify the pages of the created Web site
6. In the next dialog box of the wizard (Fig. 11.23) there are two fields. In the upper field, enter the title of the discussion, and in the lower field, enter the name of the folder in which the messages of the discussion group will be placed. You can leave the default folder name suggested by the wizard. When you finish entering your information, go to the next step by clicking Next.

Rice. 11.23. Dialog box for entering title
Comment
Please note that the folder name must start with an underscore "_".
At the next step of the wizard (Fig. 11.24), you must specify which fields should initially contain the form for submitting comments during the discussion. By default, it is suggested to include the Subject and Comments fields. Subsequently, in addition to the selected ones, it will be possible to add other fields to the form. After setting the required option, click Next.

Rice. 11.24. Dialog box for specifying form fields
8. In the next window of the wizard (Fig. 11.25), you must specify whether you want to limit the number of participants in the discussion group. The default is No, anyone can post article, indicating that anyone can participate in the discussion. Leave this value and click Next.

Rice. 11.25. Window for limiting the number of participants in the discussion group
9. The following wizard dialog boxes indicate how to organize the articles submitted to the website, whether to place a table of contents on the home page, specify the search form fields, the website theme, whether to use a frame to decorate the pages, and if so, its appearance. ... In these windows, you can accept the default options provided by the wizard. In the final window of the wizard, click Finish. The wizard proceeds to create a Web site. After completing the wizard, switch to the Folders mode by clicking the button of the same name on the Views mode panel.

Rice. 11.26. Viewing a sent message
10. Web site in a browser. Select the Post a new article link on the home page. A form for entering a message opens. Enter a subject, your name and a post in the form fields, and then click the Post Article button. Depending on the security mode set in the browser, a security warning may appear on the screen. Click the Yes button on this window. A confirmation of receipt appears in the bottom frame of the page
Web site of the message. In fig. 11.26 shows the table of contents page with the sent message.
Import Web Sites Wizard
Let's take a look at the Import Web Wizard. You can use this wizard if you want to rewrite a Web site you like on the Internet to your computer or modify a Web site. created without using FrontPage.
Follow these steps to import a Web site using the wizard:
3. In the Specify the location of the new web box of the Web Site Templates dialog box, specify the location and name of the Web site you want to create, and then double-click the Import Web Wizard icon. ...
Advice
You can also use the Import command from the File menu to launch the Import Web Wizard. The Web Site Templates dialog box appears and the Web Import Wizard icon is selected by default.
4. The wizard starts and its first Choose Source dialog box (Figure 11.27) appears on the screen, in which you must specify where the Web site is imported from. The window contains two options:
- Catalog on local computer or in the local network (From a source directory of files on a local computer or network) - when this option is selected, the file will be imported from the directory of the local disk or from the network. Select the Include subfolders check box if the copied directory contains subdirectories. You can use the Browse button to specify the full path to the Web site.
From a World Wide Web site - This option allows you to import a Web site from a WWW server. You only need to specify the URL in the Location field
Install one of the two options provided, specify the location of the imported Web site, and click Next.

Rice. 11.27. First Dialog Box of the Import Web Site Wizard
5. The appearance of the next dialog box depends on the option set in the first step. If you import a Web site from a directory, the Edit File List window (Figure 11.28) opens, listing all files, including the subdirectories you specified. When importing all files, click (Next). If you want to exclude individual files from import, select them and remove them from the list using the Exclude button. To restore an erroneously deleted file in the list, click the Refresh button. After completing the formation of the list, click the button.

Rice. 11.28. Wizard dialog box when importing a Web site from a directory
6. When importing a file from the Internet, the Choose Download Amount dialog box opens (Fig. 11.29), in which you are asked to create a number of conditions for the number of copied levels in the page hierarchy and the maximum amount of information in kilobytes. If the Limit to text and image files check box is selected, only text and image files will be imported. After specifying the necessary parameters, click the button to go to the next step in the wizard.

Rice. 11.29. Wizard dialog box when importing a Web site from the Internet
7. The next dialog is informational. Click the Finish button. The import process begins, which maintains the structure of the imported Web site.
Comment
If the structure of the Web site does not contain a private directory in which FrontPage places confidential files, as well as an images directory for placing graphic files, they will be added to the created structure.
When the wizard completes, the imported Web site is displayed in the FrontPage window and you can start working with it.
Database interface wizard
The Database Interface Wizard is a new wizard introduced in FrontPage XP. He creates a Web site that allows you to work with the information contained in the database Access data, Oracle or SQL Server. To use this wizard:
1. On the Create Web Page or Site panel, select Web Site Templates.
2. In the Specify the location of the new web box in the Web Site Templates dialog box that appears, specify the location and name of the Web site you are creating, and then double-click the Database Interface Wizard icon. ...
3. The master begins his work. Its first window appears on the screen (Fig. 11.30), in which it is necessary to indicate the database with which the website will be connected. The window contains options:
Create a new Access database within your web - this option indicates that the connection will be made to a new Access database
an existing database connection (Use an existing database connection) - when this option is selected, it becomes possible to select an existing database from the list below the option
use a sample database connection (Northwind) - connect to the test database Northwind
Let's take a look at how the connection to the new database is made. Leave the default New Connection to Access database option on the Web site and click Next.

Rice. 11.30. The wizard window for selecting a database
4. The next window of the wizard contains one field for entering the name of the database. Enter a name and click Next.
5. At the next step, the wizard offers to create a list of database fields (Fig. 11.31). Field information is presented as a table with three columns. The first column contains the name of the field, the second - its type, and the third - the interface object, with the help of which the information of this field will be presented in the form. By default, the table contains three fields. Using the buttons located in the dialog box, you can add new fields to the table, edit and delete existing ones.

Rice. 11.31. Window for generating a list of database fields
Add - opens a dialog box (Fig. 32), with the help of which a new field is entered into the database
Modify - opens a dialog box with the help of which information about the field of the created database selected in the table is edited
Delete - deletes the field selected in the table from the database Using these buttons, form the table fields.
When entering a new or editing an existing field, a window similar to that shown in Fig. 11.32. It contains the following interface objects:
Column name - field name
Column type - field type. Determines the type of information stored in the field. Can be a Text, Memo, Integer, Long, Float, Double, Date, Boolean (Boolean)
Form field input type - indicates the interface object with which the field information will be presented in the form. The list contains the following values: Text Box, Text Area, Option Button, Drop-Down Box
Number of options - the number of options in a radio button or values in a list. This counter is available when the Option Button, Drop-Down Box values are selected from the Input data type list of the form field

Rice. 11.32. Wizard window for entering and editing information about a database field
6. After all the information about the fields has been specified, click Next. The wizard proceeds to create a database based on the information entered. After the database has been created, an information window will appear, in which also click the Next button.
7. By checking the boxes at the next step of the wizard (Fig. 11.33), you specify the pages included in the Web site. The wizard offers three pages:
Result Page - page for viewing information contained in the database
Submission Form - a page for entering information into the database
Database Editor - A page that allows you to edit a Web site's database from a browser

Rice. 11.33. Generating a list of Web site pages

Rice. 11.34 Dialog box that allows you to create a password to access the page used to edit the database
Specify the pages to include in the Web site and proceed to the next step in the wizard.
8. If the Web site includes a Database Editor page, a dialog box appears allowing you to specify a username and password to access that page. To restrict access to the page, in the Username field, enter the name of the user who will edit the database structure, in the Password field - the password and in the Confirm field - confirm the password. If you want this page to be accessed without entering a password, select the Don "t project Database Editor with a username and password check box. After completing the settings, go to the next step by clicking Next.
9. An information window appears, showing the list of pages that the wizard will include on the Web site. Click the Finish button in this window. The wizard completes the creation of the Web site and opens it in a FrontPage window for viewing and editing (Figure 11.35).

Rice. 11.35. One of the pages of the Web site created by the wizard in edit mode
Web site templates
In addition to wizards, templates can and should be used to develop Web sites. They help you create a typical Web site structure.
Follow these steps to create a Web site using one of the templates provided:
1. In the File menu, select New, and then in the submenu that opens, the Page or Web Site option ( New page or Web site).
2. On the Create Web Page or Site panel that appears, select the Web Site Templates command.
3. The Web site templates dialog box that opens contains templates for creating Web sites (Table 11.2).
Table 11.2. Templates Used to Create Web Sites
|
Sample |
Appointment |
|
One page website |
Creates a Web site containing one page |
|
Customer support website(Customer Support Web) |
Creates a Web site to support customers of your products, where they can post their comments and suggestions regarding the quality of goods and services |
|
Blank website |
Creates an empty Web site |
|
Personal website |
Creates a multi-page personal Web site |
|
Project website |
Project Web site. This template can be used as a focal point and discussion center for a large project. On the pages of the website, you can post information about project participants, the state of affairs, discuss the most important issues, etc. |
|
SharePoint team site(SharePoint-based Team Web Site) |
Cooperation Web site. Contains a calendar of events, a library of shared documents, a list of contacts, tasks, etc. |
Select with the cursor the icon of the template you want to use. The short description of the selected wizard appears in the Description area.
4. In the Specify the location of the new web box, enter the location and name of the Web site you are creating.
5. Click OK.
Based on the selected template, FrontPage generates the required Web site template and opens it in browse and edit mode. You are now ready to start editing the generated Web site preimage.
Single Page Web Site Template
First on the list of templates and wizards offered is the One Page Web template for creating a one-page Web site. Using this template, FrontPage builds a Web site structure of folders and adds one blank Web page to it.
To view the structure of the Web site created using the template, display the Folder List panel in the program window by selecting the command of the same name from the View menu. The page that is part of the created Web site structure is saved in a file named index.htm. By default, it is assumed that this page will be used as the home page. Open this page by double-clicking the index.htm file name. The page will be opened in edit mode in the workspace of the FrontPage program (Fig. 11.36).

Rice. 11.36. Web site created using the Single Page Web Site template
Comment
The structure of the Web site, created on the basis of the Single Page Web Site template, can be further modified by adding new folders and as many pages as necessary.
Blank Web Site Creation Template
The Empty Web template is used to create an empty Web site. Using this template, FrontPage creates a Web site structure with _private and images folders.
After the completion of the template formation, the created Web site opens in the editing mode. In the folder pane, you can view the structure of the Web site. It does not contain a single page.
Comment
The Empty Web template is useful when you intend to use a page with a more complex structure, such as a frame, to create your home page.
Multipage Personal Web Site Template
Using the Personal Web template, you can quickly create a personal Web site. In it, you can post personal information, photos of friends, reference information, and, using links, view the most frequently visited pages on the Internet. Plus, the Web site is a great starting point for anyone looking to explore the capabilities of FrontPage.
To create a personal website using a template, follow these steps:
1. On the File menu, select New, and then select Page or Web Site (New Page or Web Site) from the submenu that opens.
2. On the Create Web Page or Site panel that appears, select the Web Site Templates command.
3. In the Specify the location of the new web box in the Web Site Templates dialog box that appears, enter the location and name of the Web site you are creating. Let's call the Web site, for example, My Pers_ Web.
4. Double-click the Personal Web icon. The process of creating a template begins. After a while, the resulting Web site will open in the main window of FrontPage for viewing and editing (Figure 11.37).
The Folder List pane contains the page files of the created Web site. Selecting files one by one with the mouse cursor, view the pages offered to you. Using FrontPage tools, you can modify them, change page names, add new pages to the Web site, and insert your own text.

Rice. 11.37. Personal Web site created using a template
Modifying a Personal Web Site
In fig. 11.37 shows the home page of a personal Web site created with a template. It contains a set of items that you can use as suggested by the wizard, or change them.
At the top of the home page is the Welcome! Header, which is an object called ad on page (Page Banner). This object is used to graphically display titles on Web pages. The type of header is defined in the Page Banner Properties dialog box, which is opened by double-clicking on the header or the context menu command of the same name.
In the center of the home page (below and to the right of the dotted lines) is located plain text, which can be changed. Experiment to find out if it's just text on a Web page or some object. Move the cursor within the home page and watch how the appearance of the cursor changes when placed on certain objects.
When the cursor is over the page title, above the date below the title, the cursor changes to a hand holding the page.
Place your cursor over the text in the center of the page. The cursor does not change its appearance. You can safely delete the text and place the necessary information in its place.
To change the properties of objects, over which the cursor takes the form of a hand holding a page, the corresponding dialog boxes are used. For example, to change the format of the date displayed on the page, you need to position the cursor on the date and double-click. The Date and Time dialog box (Fig. 11.38) will open, using which you can set a different date display format.

Rice. 11.38. Date and Time Dialog Box
On the left of the page is placed link bar, also called the navigation bar. Use the Link Bar Properties dialog box, which opens when you double-click on the Link Bar, to configure the properties of the Link Bar.
The names of the link bar buttons correspond to the names of the pages included in the Web site to which you click on these links. You can check the actions of these links. To do this, follow these steps:
1. Place the cursor on the title of one of the pages on the navigation bar.
2. When the cursor changes to a hand holding a page, press
You cannot select a text box in the navigation bar and change the text placed on it. To change the names of the buttons on the link bar, you must assign different names to the pages that you navigate to using these buttons. For example, to change the name of Hobby to Hobby, you need to do the following:
1. Open the page with the name Hobbies in edit mode. To do this, do one of the following:
Double-click the interes.htm file icon in the Folder List pane
To go from the home page to the Hobbies page, use the links bar: hold down
2. Position the cursor over the page title and double-click.
3. In the Page banner field of the Page Banner Properties dialog box that opens (Figure 11.39), enter a new title name instead of Hobby, for example, Hobby.

Rice. 11.39. On-page ad properties dialog box
4. Click OK. The On-Page Ad Properties dialog box closes. The page will look like the one shown in Fig. 11.40.
Advice
Please note that not only the page title has changed, but also the title of the button on the link bar located on the left of the page. Go back to the home page and take a look at the link bar posted on it. The name of the corresponding button has changed both on the home page and on all pages of the Web site. Proceeding in the same way, you can change the names of other buttons, except for the Home button.
In addition to the above method for changing the name of the pages, and, accordingly, the names of the buttons of the link bars, there is another one:
1. Switch to the Navigation mode by clicking the button of the same name on the Views mode panel. The FrontPage workspace displays the navigation structure of your Personal Web site, which displays pages as rectangles.
2. Place the cursor on the page whose name you want to change, right-click and select the Rename command from the context menu that appears. The page name becomes available for editing (Fig. 11.41).
3. Enter a new name for the page and press the key.

Rice. 11.40. Web page view after changing its name

Rice. 11.41. Changing page titles in Jumps mode
Both of the above methods for changing the text of the Link Bar buttons do not allow you to change the name of the Home button.
To change the title of the home page button on the link bar, you must use the Navigation tab of the Web Settings dialog box (Figure 11.42).


Rice. 11.42. Web Site Setup Dialog Box
To open this window, use the Web Settings command from the Tools menu. Then, in the Home page text box, instead of Home, enter a new name for the link and click OK. Check out how the link bars look now. Browse the pages of the Web site.
Advice
Using the Navigations tab of the Site Configuration dialog box, in addition to the Home link bar button, you can change the names of the buttons that allow you to navigate the pages of a Web site at the same hierarchy level.
The fonts, the color of text and hyperlinks, and the background image of the personal Web site are determined by the default theme set by the wizard. To change the theme of a Web site, use the Themes dialog box opened by the Theme command from the Format menu. For more information on Web site themes, see Chapter 15.
Customer Support Web Site Template
The Customer Support Web template lets you create a customer support Web site for your products. On the pages of the site, visitors will be able to familiarize themselves with the offered goods and services, ask their questions, post their comments and suggestions regarding the quality of the goods. In fig. 11.43 shows the structure of a Web site created using this template.

Rice. 11.43. Structure of a Web site created using the Customer Support Web site template
- What's New (What "s New) - information about what is new that is offered to the visitor
- Products - a page with information about the offered goods and services
- Frequently Asked Questions (F.A.Q.) - Frequently Asked Questions page
- Service Request - Product customer support page. Contains a form in which the user can describe the problem they encountered and ask relevant questions
- Suggestions - a page where visitors can enter their suggestions using a form
- Catalogs / Manuals - a page from which users can download software or documents from your Web site to their computers using the File Transfer Protocol (FTP)
- Support Forum - page for participating in the forum
- Contact Us - Contact Us Page
- Search - a page containing a search form the information you need on the website
Project Web Site Creation Template
The Project Web template lets you create a Web site that you can use as a focal point and discussion center for a large project. On the pages of the website, you can post information about the participants in the project, the state of affairs, discuss the most important issues, and so on. In fig. 11.44 shows the structure of a Web site created using this template.

Rice. 11.44. Structure of a Web site created using the Project Web site template
The website contains a large number of pages with the following purposes:
- Members - page with information about project participants
- Schedule - the page containing the project plan
- Archive - page for access to shared documents and files
- Search - a form for finding information contained in the documents of a Web site
- Discussions - A page containing links to discussion groups Requirements and Information base data (Knowledge Base), intended for dialogue forums
- Contact Inf - page with contact information
Templates and wizards for creating web pages
To view the templates and wizards that FrontPage provides for creating Web pages, choose New on the File menu, and then Page or Web from the submenu that opens. The New Page or Web panel appears in the program window, on which select the Page Templates command. The Page Templates dialog box, shown in Fig. 11.45.

Rice. 11.45. The Page Templates dialog box allows you to select templates and wizards for creating a Web page
The Page Templates dialog box contains three tabs. The General tab lists the names of the main page templates. The Frames Pages tab contains the names of page templates that use frames. In this chapter, we will focus on the General tab templates. A description of the templates for the Frame Page tab will be given in Chapter 20.
There are many more templates for creating Web pages offered by FrontPage than templates for Web sites. As you navigate through the list of templates, a brief description of the selected template appears in the Description area of the window, and the Preview area displays an example of the page it will create.
First in the list of templates is the Normal Page, which is a blank page template. You do not need to open the Page Templates dialog box to create a page using this template. It is enough to click on the New button on the standard toolbar. The default is always to use the Regular Page template.
Table 11.3 is a list of templates and page creation wizards provided by FrontPage.
Comment
When describing page templates, the term is used design effects. This term means the use of graphic elements and text that has a different design style than the main text of the page.
Table 11.3. Web templates and wizards
|
Template or wizard |
Appointment |
|
Regular page |
Empty page |
|
Bibliography |
|
|
Confirmation form |
Confirmation form of receipt of information |
|
Feedback form |
Form for entering comments |
|
Form Page Wizard |
Customer survey form wizard. With the help of this wizard, you can create a list of questions to which you want to get answers from customers |
|
Typical questions |
|
|
Guest book |
A guest page where website visitors can give their opinion |
|
Narrow left-aligned text |
Information on this page is arranged in one column along its left edge; on the right you can place a graphic image |
|
Narrow right-aligned text |
A page with information placed in one column on the right; on the left you can insert a graphic image |
|
Single column text |
Information is placed in one column in the center of this page |
|
Single column text with table of contents and frame |
Information is placed in one column in the center; on the left of the page is a table of contents, and on the right is an effects area, which can contain text and graphics |
|
Single column text with table of contents to the left |
A page on which the table of contents will be shown on the left, and all other information on the right |
|
Single column text with table of contents on the right |
A page on which the table of contents will be shown on the right, and all other information on the left |
|
One-column Body with Staggered Sidebar |
A page that has two staggered columns on the left and a column of body text on the right |
|
Single column text with two frames |
The main text will be placed in the center of the page, to the left of the text there will be two columns with checkerboard design effects, and to the right - another column with design effects |
|
One-column Body with Two-column Sidebar |
A page with a column of body text on the left side, and two columns with design effects on the right |
|
Photo collection |
The page intended for the placement of graphic images |
|
Search page |
Form page used to search for words |
|
Three Column Text |
|
|
Text in two columns |
|
|
Two-column text with table of contents and frame |
|
|
Text in two columns with a table of contents on the left |
|
|
Zigzag text in two columns |
|
|
Zigzag text in two columns with table of contents and frame |
|
|
Registration form |
User registration form |
|
Wide text with headings |
A page designed as multiple paragraphs with subheadings |
Photo collection template
The Photo Gallery template creates a page for placing graphic images (Fig. 11.46). This template was not available in previous versions of FrontPage. Convenience of the template A collection of photographs is that it is easy to add new graphic images to the page created using this template, delete existing ones.
To customize the graphic images placed on the page created using the Photo Gallery template, use the Photo Gallery Properties dialog box (Fig. 11.47). To open this window, position the cursor over the area where the graphics are located and do one of the following:
- Double click
- Right-click and select Photo Gallery Properties from the context menu

Rice. 11.46. Page created using the Photo Collection template

Rice. 11.47. Photo Collection Properties Dialog Box
The Photo Gallery Properties dialog box contains two tabs. The Pictures tab is intended for forming a list of images placed on the page, indicating their order. The Layout tab allows you to define how graphics are positioned on a Web page.
At the top left of the Pictures tab is a list of graphics displayed on the Web page. To the right of the list is the image viewing area where the cursor is positioned. The buttons located above the list have the following purpose:
- Add - adds a new graphic image to the list and, accordingly, to the Web page. When you press this button, a menu of two commands appears. The Pictures from Files command opens the File Open dialog box, which allows you to add an image that is in the file. The Pictures from Scanner or Cameras command adds a graphic image from a scanner or digital camera to a Web page
- Edit - opens the Edit Picture dialog box (Fig. 11.48), which allows you to edit the graphic image
- Remove - removes the graphic from the list
The Move Up and Move Down buttons below the list change the order of the images in the list and, accordingly, on the Web page.
On a Web page created using the Photo Gallery template, graphics are displayed as thumbnails, sized using the Width and Height fields in the Thumbnail area.
The Pictures tab contains two checkboxes that can be checked:
- Maintain aspect ratio - indicates the need to maintain the aspect ratio in the miniature
- Set as Default Size - indicates that fixed size must be used as default
The Caption field allows you to enter text for the graphic image that will be displayed on the Web page. The formatting of this text (font, color, size, style) is carried out using the lists and buttons located above the field.
The Edit button of the Pictures tab opens the Edit Picture dialog box (Figure 11.48), which allows you to edit the graphic images placed on the Web page.

Rice. 11.48. Edit Picture dialog box
Counters Width and Height of the area Picture size
(Picture Size) allows you to set the size of the graphic image in pixels. Below are the flags for the following purposes:
- Maintain aspect ratio - when checked, the aspect ratio in the image is preserved
- Set as Default Size - a selected checkbox indicates that the specified size will be used as the default value
The buttons in the Rotate Picture area have the following functions:
|
Button |
Appointment |
|
Rotates the image counterclockwise 90 degrees |
|
|
Rotates the image clockwise 90 degrees |
|
|
Displays the image about the horizontal axis (creates a vertical mirror reflection) |
|
|
Displays the image about the vertical axis (creates a horizontal mirror image) |
The Crop button located in the Edit Image dialog box allows you to place on the Web page not the entire image, but part of it. When this button is pressed, a frame with selection handles appears on the graphic image. Positioning the cursor one by one on the markers, move the outlines of the frame, changing the size of the area bounded by the frame so that it selects the desired area on the image. Then click the Crop button again. The cropped image will replace the original one.
In addition to the named buttons, the dialog box also contains the following buttons:
- Previous - displays in the window the image that is in the list of the Pictures tab before the current one.
- Next - displays in the window the image that is in the list of the Pictures tab after the current
- Reset - restores the original image
Layout Tab of the Photo Collection Properties Dialog Box
(Photo Gallery Properties) (Fig. 11.49) allows you to set the way of positioning graphic images. The Choose a layout list contains options for positioning images and captions to them on the Web page. The Preview area allows you to preview how the page will look in the selected layout. The Number of pictures per row list indicates the number of pictures in one row.

Rice. 11.49. Layout tab of the Photo Collection Properties dialog box
After the Web site is created, it can be published on a server for public access. Web site publishing involves posting files containing pages and graphics on a Web server that is connected to the Internet. If you are going to host your Web site on a provider's server, you need to find out if the server supports the technologies you use during development.
For example, a Web site contains forms. During design, FrontPage allows you to specify how the data should be processed. Information about the method of data processing should be transmitted to the server using FrontPage server extensions, which provide full support for the operation of the Web site on the server, as well as user access to all implemented site functions.
Server Extensions are tools create and manage Web sites using Microsoft FrontPage. They provide the following capabilities:
- - Using FrontPage to develop a site directly on the Web server;
- - saving documents created in applications Microsoft Office XP, on a web server;
- - the use of FrontPage components on a Web site, such as a form processing component, a conferencing component, a full-text search component, a Web site hit counter component, and so on.
Therefore, if a Web site created in FrontPage is hosted on a provider's server, the FrontPage Server Extensions must be installed on that Web server. Only in this case, you can be sure about the normal functioning of all components included in the web pages. FrontPage Server Extensions also allow the developer to use HTTP instead of FTP. With server extensions, FrontPage can ensure that files hosted on a Web server are the same as those on a Web server. local disk.
Before publishing a Web site, you should thoroughly test it. Special attention should be paid to broken links. The website is constantly being updated and the current version is published on the server. At the same time, some of the files are ready for publication, while others are still being developed. By default, all files are assigned the Publish status.
For files that are too early to publish, as well as those published earlier, you can set the status of Don "t Publish in the Publish Status report table (Fig. 3).
To open this report, go to the Reports mode and select the Workflow value from the first list on the Reports toolbar, and then the report type - Publish Status. The publication status is changed using the list in the Published column.
Rice. 3. Setting the attributes for publishing Web site files
After you prepare the Web site for publication to copy the Web site files to the server, you must do one of the following:
- - select the Publish Web command of the File menu;
- - click the Publish Web button on the standard toolbar;
- - press the key combination
The first time you publish a website, the Publish Destination dialog box, shown in Figure 3, opens. 4.

Fig. 4. Dialog box for entering the publication address
If the server hosting the Web site has FrontPage Server Extensions installed, you can use the HTTP protocol to copy files. In this case, you need to do the following:
- 1. In the Enter publish destination field, enter the Web site address. You can use the Publish location dialog box, which opens when you click the Browse button, to locate the address.
- 2. Click OK. The Publish Web dialog box opens, where you can set the parameters for publishing the Web site.
- 3. If the created Web site contains subwebs, select the Include subwebs check box in the Publish Web window.
- 4. To configure publishing options, click the Options button in the lower left corner of the window. The Options dialog box (Figure 5) opens with the Publish tab selected by default.

Rice. 5. Publishing tab of the Options dialog box
- 5. Using the Publish radio button, select the file copy mode. When you set the option only changed pages (Changed pages only), only those files selected for publication that have been changed since the last publication will be copied to the server. To copy all selected files to the server, set the option all pages overwriting existing pages (AI pages, overwriting pages already on destination).
- 6. The Changes check box specifies how FrontPage determines whether the files published and hosted on the Web server are different. When you set the Determine changes by comparing source and destination webs option, the file contents are compared. The option using timestamps (Use source file timestamps to determine changes since last publish) indicates the need to compare the creation time of the files published and posted on the Web server when publishing files.
- 7. The Options dialog box contains the Log changes during publish check box. When you select this check box, the log file records the changes made when the Web site was published on the server. View log button ( View log file) I allows you to view the contents of the log file.
- 8. After setting the publishing parameters, close the Parameters dialog box by clicking OK. The user is returned to the Publish Web window.
- 9. To start the publishing process, click the Publish button.
- 10. When the publication is complete, a dialog box opens that contains a message about successful publication and links to the main page of the published Web site and view the generated log file.
- 11. To check the publication result, select the Click here to view your published web site link. The main page of the Web site you created, hosted on the server, opens.
If the server does not have FrontPage Server Extensions installed, FTP is used to publish Web site files. In this case, you must enter the domain address FTP server and the root directory where the Web site will be stored, for example, ftp://ftp.glasnet.ru/books. The rest of the steps are similar to publishing using the HTTP protocol.
General principles of creating a Web site
You decided to create and place in information space WWW (World Wide Web, World Wide Web) own Web site. What steps must be taken to make it interesting, useful and, which is important, visit. The first question that needs to be answered clearly is: What is the purpose of creating a Web site? Much depends on this: the style of design, the costs required for the creation and subsequent operation, the format for presenting information for posting on the Web, the tools and requirements for software Web-server and communication channels with the Internet. Several options are possible here.
If you are creating a Web site for a company that sells a product, the main goal may be to disseminate information about the company and advertise the product, as well as to organize a Web store. In this case, the following tasks will be solved:
· Changing the image and raising the prestige of the company;
Promotion brand;
· Availability of information about products and prices for customers;
· Support of the dealer network, availability of information on products and prices for dealers;
· Direct sale of products on the Internet, organization of a Web-store;
· Availability of inside information for employees working outside the office.
Another option is to create a Web site for a scientific or general educational organization that does not engage in commerce on the Internet, but distributes information. In this case, we will talk about the collection, processing and placement on a Web site of large amounts of data with the organization of search and access to them.
And the last option is when you consider it necessary to place your personal page on the Internet.
In order to correctly answer the questions posed, it is necessary to form the categories of users for which the website is designed. Based on their psychology, an information structure should be built that will attract and retain customers. In the future, all questions about the appropriateness of any actions associated with the Web site should be considered in accordance with how visitors will respond to them, and how they will contribute to the achievement of the main goal.
After the goals have been formulated and the categories of users have been defined, it is necessary to distribute the prepared information among the Web-documents, think over the links between them and provide for additional navigation capabilities, for example, a search engine for the content of the Web-site.
A typical structure for a firm's Web site is usually represented as follows:
Information about the company... You should talk about the goals and business image of the company, its history, etc. Show how your customers will benefit from working with you, and not with other companies.
Information about products and services... Post photos or drawings of your products on the Web page. Describe its properties and advantages, give examples of use. If you have a paper product catalog, you can transfer its structure and content to the Web site. This will facilitate the creation and further updating of the electronic version of the catalog. If you plan to receive orders for products or services via the Internet, then you need to place an order form here, which will be received by e-mail.
Information support... This section contains additional technical information, FAQs, troubleshooting tips, and more.
news... Inform clients about new products and services provided by the firm, publish press releases, etc.
Feedback... Tell us how you can be contacted, where you are. Submit your feedback form, guest book, e-mail addresses to which the client can send a request, etc.
When filling a Web site, you should always remember two principles: the uniqueness and reliability of the published material.
Uniqueness is the primary requirement for content. V Www there may already be many pages with similar materials. Your Web site should be somewhat different from servers with similar topics, if only to attract attention. The presence of unique materials on your page will increase its traffic. In order to create a unique information resource, it is not necessary to invent something fundamentally new; it is possible to arrange existing resources in a different way, but at the same time not to force the client to spend a lot of time searching for them. You can check the resources for uniqueness using search engines. With regard to credibility, it all depends on how carefully you select the information, check it and update it in a timely manner.
When creating a Web site, remember that the individual documents that make it up must be united by a common style and navigation. Consistency is one of the hallmarks that differentiates a professional from an amateur Web site. By using consistent documents, users will distinguish your Web site from others and remember it. This does not mean that the documents should be similar to each other like two drops of water, but the general idea, a single style, must be present without fail.
The same applies to page navigation. Don't expect your visitor to know the structure of your Web site as well as you do. He should easily understand where he is now and how he can get to any other place. You should be able to navigate to the first document, search program, or sitemap.
In addition, the unity of style allows the use of templates - pages containing only common design and navigation elements (no content). With their help, you can quickly and efficiently create new pages and distribute the work of creating them among several people. When using a template, to get a ready-made page, you just need to enter the necessary information into it. Consistency, consistency, consistency are essential qualities of a good Web site. The cascading style sheets introduced in HTML 4.0 will greatly simplify the work of styling and styling your Web site. Some of their capabilities will be discussed below, and a separate chapter is fully devoted to them.
After the goals have been defined, the structure is set and the text and graphic information, you need to design the look and feel of the Web site. It also depends on the goals that need to be achieved. The range of possible solutions here is very wide: from viewing existing pages and creating similar ones to seeking help from professional designers and artists. At the same time, it is necessary to keep in mind some of the already established rules for constructing Web-documents that make up a Web site.
Structure... Today, the idea of the structure of the document is fairly well established. The web document must contain the following sections: title, company name, navigation bar, content itself, contact information, date and time of update, copyright and document status.
Logo... When creating a Web page, you need to ensure that the name of the company is always present on the screen. To do this, a colorfully designed company logo is usually placed at the beginning of each Web document. In addition, the name of the company must also appear in the imprint of all documents.
Navigation bar... One of the most important sections of a Web document is the navigation bar or control panel. Www conquered the whole world largely due to the fact that hypertext links provide complete coherence of published materials. But these same links are fraught with the danger of plunging into complete chaos, when, after going through a chain of three or four documents, you can no longer go back, entangled in the abundance of links. Your Web site should provide clear and intuitive navigation routes for the user.
Numerous studies have shown that visitors to Web servers are very impatient and do not want to go deeper than two levels of documents into the content of the server. Therefore, creating a large Web site, you should provide for intermediate documents, usually located at the first or second levels, from which any information is located no further than two transitions.
Your Web site's navigation bar should be included in every document. First and foremost, it should include direction links such as "Forward" - "Back" ("Next" - "Previous"), pointing to neighboring documents in the structure of the Web site. Further from the control panel, there must be links to all large sections of the Web site - the so-called first-level sections. Finally, the user should always be able to instantly return to the home page of the Web site. In addition to the links, you should specify the path to the local search engine and index.
Content... First of all, it should be noted that the content of Web-documents must fully meet all the requirements for ordinary newspaper or magazine publications: grammatical and spelling correctness, accuracy and reliability of the proposed materials, and much more. In addition, there are a number of specific requirements that a Web document must satisfy.
The question often arises about the size of the document: how many pages is optimal? At first glance, the answer may seem strange: one screen page or no restrictions at all. Numerous studies have shown that users do not like to work with browser scrollbars. Most of all they like documents that are located on one screen page. So in Www- you can in no way give the user more information than in a concentrated presentation on one page. If, nevertheless, you do not fit into these frames, create another document.
One screen page has proven to be a suitable measure for presenting information. If the document size exceeds one page, then in most cases it can be divided into several logical parts, each of which will occupy no more than one page. If the logical division of information fails, then it is necessary to revise the style of presentation, and perhaps the materials themselves. There is now a consensus that the Web server should be built around single-screen documents. There are only two exceptions to this rule. It does not apply to articles published in Www, and the second exception is the questionnaire forms, which, of course, cannot be torn apart.
Graphics... When designing a Web page, you need to be very careful in choosing the optimal ratio of graphic and text materials. One good picture can replace a thousand lines of text, but it will also take a thousand times longer to load over the network. Therefore, graphics must be used with caution. It can be assumed that the graphics on the page should be slightly smaller than the Web-master wants. Users may simply not have the patience to close the document before it is fully loaded. The system response delay is annoying to the user. Everyone understands how difficult things are now with the channel infrastructure on the Internet. Therefore, the delay time increases depending on the time of day, according to various estimates, up to 15-60 seconds. Now imagine that the client only has a 19200 bps modem. It is very difficult to achieve more on Russian telephone lines. Then in a minute, that is, before the client loses patience, only about 170 KB of data can be transferred. Therefore, the size of the document should not exceed this value.
It should be noted that usually the control panel, logo and company name are made in the form of graphic elements. After creating the layout, you can start implementing it using the HTML language and other tools offered by modern technologies Www.
When you have finished creating your Web site, you need to put it on the Internet. There are two options here: the first is to use a computer that, together with a Web server and a Web site, is located in your office and connects to the Internet via a dedicated or dial-up line; the second is to use specialized organizations to host the Web site.
Let's consider the second option. Right choice the provider that provides access to the Web page will allow your customers to get the information they need with maximum convenience. In addition, the accessibility support of the Web server will greatly facilitate the development of the Web site.
What should you consider when choosing a provider to host your Web site on their server?
Channel capacity... So that your visitors do not have to wait too long for the pages to load, the provider must have a reliable high-speed connection of the order of 1-2 Mbps.
Server support for SSI provider(Server Side Includes). Using SSI allows the Web server to insert small amounts of dynamic data directly into the HTML document it sends to the user. The requested HTML page is "scanned" looking for SSI elements. Upon finding such an element, the server inserts the required dynamic information. With SSI, you can include one file within another, execute CGI scripts, and pass other information. It is necessary to clarify which SSI functions are supported on the provider's server.
CGI Scripting Provider Server Support... CGI (Common Gateway Interface) is a specification that allows a Web server to execute arbitrary application programs. As a result of the work of such programs (scripts, or "scripts"), HTML documents are created. With the help of CGI-scripts, data from the user can be received, they allow organizing dialogues on Web pages, queries to databases, etc. You can create a CGI script using any popular programming language: Perl, Basic, C, C ++, Pascal, etc.
Instant transcoding support... Unfortunately, for the Russian language on the Internet, when working on different platforms (Windows, Mac, Unix, etc.), different encodings are accepted. To make it easy for a user to browse the pages, the provider's Web server must be able to automatically recode documents based on an incoming request. Otherwise, either the content of your Web site will be unreadable for some visitors, or you will have to provide multiple copies of the Web site, one for each supported encoding.
How to refresh pages... Typically, pages are refreshed using FTP (File Transfer Protocol). Some FTP clients allow you to work with files on the provider's computer in the same way as with your own disk - copy, delete, rename, etc.
As a rule, a provider provides the opportunity to host a Web site to its users for a small fee or free of charge.
There are services that provide Web site space for free along with an email address and other services. As a rule, the condition for such "free" placement is the allocation of some space on your pages for advertising. In addition, there are limits on the size of your files.
Working with web sites.
Let's take a closer look at the various host-level administrative tasks that you can perform in IIS. We've already taken a quick look at the basic properties dialog for the WWW service, and you already know that it has ten tabs containing a variety of settings that you can configure. Nine of these ten tabs are also used at the site level (for administering individual Web sites); in this section, we will explore these various tabs and their settings in detail. As an example, in this chapter we will configure Default Web Site.
Web site tab.
The Web site tab of the host properties window allows you to set the identity of the Web site, configure a limit on the maximum number of concurrent TCP connections that make HTTP sessions, enable or disable persistence of HTTP connections, and enable IIS registration on your server.
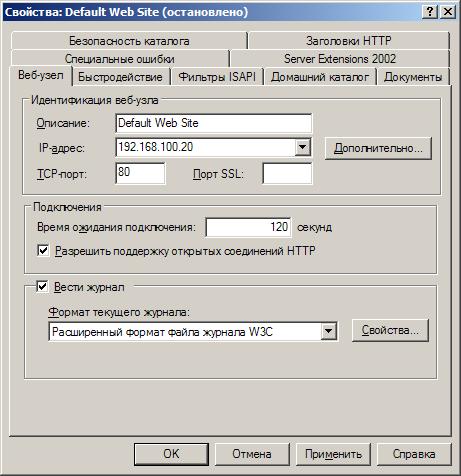
Web site identification.
Each Web site hosted on an IIS machine must be uniquely identified so that browser clients can connect to it and download content from it. Web sites can be specified using three different parameters: IP address, TCP port number, and host header name.
Web site identification is set in the page of that Web site's properties window, with the Web Site tab. For web sites on the same computer to have unique identifications, they must differ from each other by at least one of three identification parameters. Consider different ways Web site identification tasks and discuss how you can have several different Web sites on the same server.
Configuring Multiple IP Addresses for One Server NIC
You can configure multiple IP addresses for one server NIC, or install multiple NICs so that each card has a different IP address. Choose a different IP address for each of the web sites. Do not change the TCP port setting for these sites (80 is the default TCP port setting for HTTP) and do not configure host header names. The advantage of this method is that it is convenient for clients to connect to each of the sites using the site's IP address in the URL they request (or using a fully qualified DNS name if a unique host name has been configured on the DNS server for each of the computer's IP addresses IIS).
The disadvantage of this method is that if the computer contains many web sites, then they will have to assign many IP addresses. This is not a problem for private intranets using one of the blocks of private IP addresses, such as 10.y.z.w, 172.16-31.z.z, 192.168.z.z. But on servers that are directly connected to the Internet, you will have to obtain the required number of IP addresses from your ISP. However, this way the task of identifying a website is the most common.
Configuring only one IP address for the network card
Ask different TCP ports(with numbers greater than 1023) for each of the web sites to connect to. The main disadvantage of this method is that clients need to know the port numbers of the web sites to which they need to connect. For example, if the DNS name of the server is Win2003s.test.fio.ru, and the web site on this server is assigned the port number 8023, then the client will have to use the URL http://Win2003s.test.fio.ru to access this site: 8023.
Configuring one IP address while keeping the standard TCP port
This method configures only one IP address for the server's NIC and leaves the TCP port at the default value (80) for all sites. Configure a unique host header name for each site using the Advanced button. Host header names are possible in the HTTP 1.1 protocol. The host header name mapped to each of the nodes is the typical fully qualified DNS name assigned to the node in the database available DNS server(or in the local Hosts file on clients).
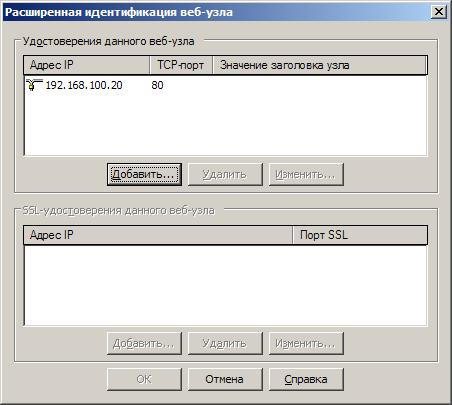
When you open the Properties for the Default Web Site and the Tab Page Web site, then the IP address is set to All Unassigned. This means that the site will respond to any IP address not specifically assigned to other sites on the published computer. That is why this site is the default and the only Web site on an IIS computer for which this method of setting the IP address is possible.
When a client requests a URL like http://vio.fio.ru, the client passes the host header name vio.fio.ru in the HTTP request headers passed to the server. The server parses the host header name, identifies the web site to which the client should connect, and returns files matching the request. The disadvantage of this method is that the client must also support host header names, that is, must be able to pass the site's DNS in its HTTP request headers. Host header names are supported by Microsoft Internet browsers Explorer versions starting from 3 and up. Another disadvantage of using host header names is that this method does not work in conjunction with SSL connections, because in this case the HTTP sessions are encrypted.
If you are working with older browsers that do not support host header names, you can implement a cookie-based mechanism that allows browsers to distinguish between Web sites that have the same IP address and TCP port number. More information on this can be found in the online documentation.
Changing the port number for a Web site does not require a server reboot for the change to take effect.
Connections.
The Web site tab page allows you to configure a limit for the maximum number of concurrent TCP connections to the server for HTTP sessions. You can also enable or disable the HTTP Keep-Alives setting and set the connection timeout value. Configuring HTTP Keep-Alives is an HTTP 1.1 tool that allows a client to keep a TCP connection to a server open after downloading a file if any other files are to be downloaded from that server. If clients start to suffer from server slowdowns or get frequent "busy" error messages
HTTP 500: Busy errors
then try decreasing the Connection Timeout field so that unused TCP connections are completed faster.
The timeout specified on the Web Site tab applies to active TCP sessions. TCP has its own settings to terminate half-open TCP connections, such as those created during Denial of Service (Denial of Service) attacks when attackers try to "flood" a web server by flooding it network connection TCP SYN packets.
Logging.
The Web Site tab allows you to enable (or disable) logging for your server. By default, this setting is enabled, which allows administrators to monitor site access to client browsers. The registered information can be saved in various formats:
- General NCSA Log File Format. Creates a space-delimited ASCII file with a predefined set of fields.
- ODBC logging... Fixed format of logging in the database.
- W3C Extended Log File Format... This is the default custom log format; a space-delimited ASCII file is created with an administrator-defined set of fields.
- Microsoft IIS log file format... A fixed format ASCII file is created.

New IIS log files can be generated hourly, daily, weekly, or monthly, or when the existing log file grows to a certain size. By default, the log files are stored in the \% systemroot% \ System32 \ LogFiles folder, but you can change this setting using the Browse button.
Enabling IIS logging on a Web site tab page does not mean that visits from all parts of your site will be logged. You can use the Logging check box on the Home tab of the Web site's dialog box to enable or disable logging of access to content located in the site's home directory. Visits to other directories and even individual files you can track using other tabs.

Tab Additionally allows you to configure advanced log settings.
Performance tab.
Performance tuning of individual Web sites is performed on the page with the Performance tab of the site properties window.

On this page, you can configure the following settings:
- Limitation bandwidth... You can enable and set the bandwidth limit for this site in the Bandwidth Throttling section. This will prioritize access to specific sites located on the same server.
- Number of connections to websites. You can limit the total simultaneous connections to the website. To do this, set the switch to the position no more and set the value corresponding to the number of connections.
ISAPI Filters tab.
ISAPI (Internet Server Application Programming Interface) filters are optional dynamic DLLs that perform specific actions when IIS handles HTTP client requests. On this tab, you can specify the set of ISAPI filters and the order in which they are processed by IIS. Filters set at the site level apply only to the selected site. Filters set at the server level apply to all web sites on the server.

ISAPI filters take action before the server actually responds to the HTTP request itself. You can, for example, develop ISAPI filters that perform custom authentication, encrypt data, write traffic information to a custom log file, or perform other tasks.
Home Directory tab.
On the Home Directory tab page, you can specify the location of the content that is mapped to the home directory of the Web site to specify access permissions and other settings for the directory and web applications implemented in this catalog.

Home directory.
The site home directory specifies the location of the content that is accessed using a URL like
http: // SiteName / FileName
where SiteName is the NetBIOS name, IP address, or DNS name of the site, and FileName is the name of some HTML page, or picture file, or script, or some other file from the site's home directory.
The site home directory can be set using the Content source switch when connecting to a resource in one of the following ways:
- As the name of a directory located on the local disk of the computer (position Directory this computer).
- As a UNC path to a network share on file server(the location of the Shared folder of another computer).
- As a redirect to a URL that prompts a client wishing to access content mapped to a home directory to connect to another web server, not necessarily an IIS server (position Permalink URL). Redirection can be either temporary or permanent.
Access redirection.
The ability to redirect access for the home directory (or for any virtual directory) to the URL is useful when a Web site is in the process of being created or when it is down due to maintenance or upgrades. IIS allows you to redirect a request to any of the files in your home directory to the same URL (for example, to a page with an announcement "Maintenance in progress. Site will be available in 15 minutes") or to the same file in the network directory (this is how you can redirect clients to a temporary mirror site). You can also redirect access to a subdirectory of the current home directory if the maintenance notice page or mirrored content is on the same server.
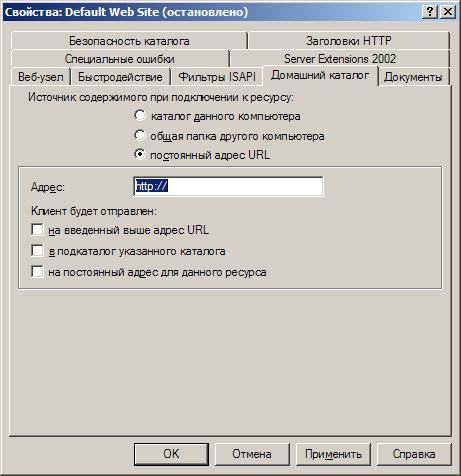
Set permanent redirection only when you really plan to move the content of the site to another server. some browsers receiving a "Permanent redirect" message
HTTP 301 Permanent Redirect
Permissions.
If you specify the location of the home directory as a local directory or as a network share, then on the Home Directory tab page, you can set access permissions and other settings for that directory.
If you specify URL redirection as the home page location, these settings will not be available. The following settings are possible:
- Access to script text... When checked, users can access the source text of the scripts (for example, ASP files). Please note that if you do not enable the Read or Write setting, this setting will have no effect. (When you enable the Read setting, users will be able to read the source texts of the scripts, and when the Write setting is enabled, they can modify the scripts.) Setting Access to the script text is usually enabled when designing servers in which content is created. It is disabled by default.
- Reading... If you select this check box, users will be able to see the contents of the directory or file and its properties, such as creation time and file size. The setting is enabled by default.
- Recording... If you select this check box, users can modify the contents of the directory or file. Only those browsers that support the PUT command of the HTTP 1.1 protocol can write to the server (this includes Internet Explorer starting from version 4). By default, the setting is disabled.
- Directory overview... If you select this check box, users can see the contents of the home directory when it does not have a default home page. Usually this setting should be turned off (by default it is off) to hide the directory structure with contents from accidental viewing by users who want to go where you do not want them to.
- Logging... If you select this check box, each time the client accesses any of the files in the home directory, an entry will be added to the log file. Note that before this setting takes effect, you must select the Log in check box on the page with the Web Site tab. By default, logging of home directory visits is enabled.
- Directory indexing... When selected, the Indexing Service adds the contents of the home directory to the master index. By default, the Indexing Service is installed during Windows installations Server 2003.
Although the authority Reading and is installed for Default Web Site, however, the ability to access the content of a particular Web site depends on many conditions.
Configuring a web application.
If you specify a local directory or a network share as the location of the home directory, you can configure settings for any application implemented in this directory on the Home Directory tab.
An example of a web application is a set of ASPs that work together to provide algorithmic capabilities for site visitors. The settings you can make in the area Application parameters:
- Entry field Application Name... The field specifies a unique name for the application.
- Source folder... An application can consist of a tree of directories and their contents. The top of this tree is the starting point of the application.
- Allowed to run... With this setting, you can define the types of applications that can run in the home directory. You can select Nothing, Scripts Only, or Scripts and Executables.
- Application group... This setting allows you to select a group of applications associated with a given home folder.
- Button Customization... Clicking this button will open the Application Configuration dialog box, in which you can configure options for mapping the application to interpreting script machines or programs, for copying ISAPI applications (to improve performance); to set the timing of sessions; to set the default ASP scripting language for debugging settings.
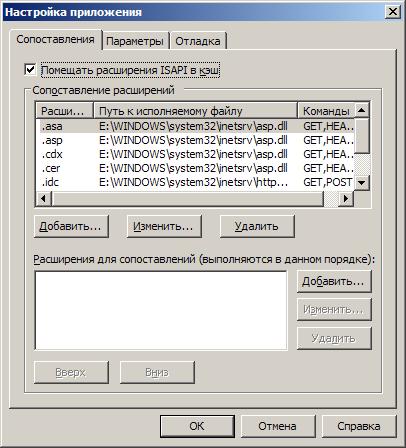
If you set the Write access permission for the directory along with the script and executable files configuration, there is a security risk: a user you do not trust may be able to upload a hostile program in an executable file to the server and cause damage.
Documents tab.
On the Documents tab of the Web site properties window, you can specify possible file names for standard home directory documents and the order in which they are accessed by the browser.

By default, four files are specified in the following order: Default.htm, Default.asp, index.htm and iisstart.htm... For example, if the browser tries to connect to the default Web site on the Win2003s.test.fio.ru server using the URL http://Win2003s.test.fio.ru, then the server will first check if there is a Default.htm file in the home directory ... If there is such a file, then it will be returned to the client. If there is no such file, the server will look for the Default.asp file. This process will continue until a file is found or until the list of default documents ends. You can specify additional standard documents (for example, Index.html) or remove documents already in the list. You can completely cancel calls to standard documents, in this case, clients must know and indicate the actual name of the file they want to access on the server, setting, for example, the following URLs: http://Win2003s.test.fio.ru/NoDefault .htm.
Using this tab, you can also specify the name of the footer file (written in HTML format); a footer must be added to the bottom of each of the files delivered from the site to the client. Headers and footers allow you to add a copyright statement or copyright disclaimer to the bottom of each page. If you are using FrontPage to create your content, you can create complex footers to display information such as the date the file was last modified, popularity count, and so on.
Microsoft Frontpage XP is a modern, integrated frontend for building individual web pages and entire web sites. Even an inexperienced user unfamiliar with programming languages can use Frontpage to create their own website and publish it on the Internet. The Frontpage web editor is also a great addition to the arsenal of an experienced web designer.
Building a website
In this lesson, you will become familiar with a new Microsoft application Office is a Web site editor by Frontpage. You will learn how to create and modify a node structure. Some of the components and operations covered in the activities in this lesson are:
- web site wizard;
- task list;
- viewing site folders;
- navigation;
- checking hyperlinks;
- reports;
- node color scheme;
- general page margins.
A Web site is a collection of HTML files located in a specific folder and linked together by hyperlinks. One of the web site files is designated as the main one, it is the home page and is opened in the user's browser when connecting to the web site. The rest of the web pages are displayed in the browser window as you navigate to them via hyperlinks. In addition to HTML files, the site includes a set of graphic objects in GIF or JPG format, designed to decorate pages. With the development of browsers offering a wide variety of extensions to the HTML standard, other file formats have increasingly appeared on web sites.
Web site creation
Frontpage XP is an integrated environment that contains a web page editor, site structure management modules, and site-to-server publishing tools. With Frontpage, even a beginner who is completely new to HTML can build a fully functional website. In the hands of an experienced user, Frontpage becomes a powerful tool for building web sites of any complexity.
Note
Frontpage XP combines three separate modules - the page editor, site builder, and web server support tools - into one integrated shell that provides easy access to all instruments.
Web site wizard
To create a complete web site, it is not enough to simply place several HTML files in one folder. A well-built node has a well-thought-out structure. This makes it easier for the user to find the information they need. If you don't have a lot of experience with web pages, the web site wizard will help you build the site correctly, and all you have to do is fill the pages with content. To use the services of a wizard, follow these steps.
- Start Frontpage.
- Select the File command > Create ^ Page or Web Site (File > New > Web). In the task pane of the application, the New Page or Web window will open with a list of templates and wizards that you can use to build a web site (Fig. 3.1).
- In the New from Template section, click the Web Site Template icon and in the Web Site Templates dialog box that appears, click the Corporate Presence Wizard icon ...
- In the Options section field, enter the name of the folder where the site files will be stored (I will use the C: \ My Documents \ Mu Webs \ Corporate folder for this purpose).
Rice. 3.1.
- Click the OK button.
- In the first window of the wizard, click the Next button.
The second window offers a list of the main web pages that can be included in the new web site:
- Home Page;
- What's New (What "s New);
- Products and services (Products / Services);
- Table of Contents;
- Feedback (FeedBack form);
- Search form.
- Leave all the check boxes selected and click the Next button. The next wizard window, shown in fig. 3.2, offers to define the type of the home page. By checking and unchecking the checkboxes of this window, you add or remove the corresponding sections of the home page.
- Check all four boxes.
- Click the Next button.

Rice. 3.2.
- The tenth window of the wizard sets the general design of all pages. Check the boxes of this window in accordance with Fig. 3.3, then double-click the Next button.

Rice. 3.3.
- Enter the full name of the company, the same name abbreviated to one word, and the address of the company. Click the Next button.
- In the next window, enter the company phone number, fax number, web-master's email address and information support address. Double-click the Next button and then the Finish button. The wizard will generate a new web site and open it in task view mode with a list of steps you need to take to get the complete site. The items in this list shown in Fig. 3.4 were added by the wizard. They list the operations by which you should fill the generated web pages with semantic content. During site development, you can manually add new tasks associated with a particular web page. You will learn this in the next exercise. The task list is always at hand, it is stored along with the files of the website and will not let you forget about unfinished operations. To open it, just click on the Tasks button on the mode bar.
 Skype free download Russian version Install Skype application
 How to recover a photo on Android after deleting it?
 Original hosts for Windows operating systems What should be in a Windows 7 host
 An authentication error has occurred
 Open the following ports at the client's workstation
 How to hide all VKontakte friends in the new version?
 Hide friends on VKontakte