HP Pavilion how to boot from the disk. Conversion in MBR without data loss. Bios Basic Settings for installation "WINDOVS". Turn off Secure Boot
You have a question: "How to boot from a flash drive on a HP 15-AC003UR laptop?"Now I will show you in the photos, how to load from the flash drive.
This HP 15-AC003UR laptop comes with a pre-installed Windows 8.1 and here we conclude that the BIOS has been able to load in uEFI mode.
And if you have a boot flash drive without a UEFI bootloader, then you will have to configure the BIOS.
And so let's look at the download option from the flash drive with the UEFI bootloader on the HP 15-AC003UR laptop.
1
Press key "F9" . To appear "BOOT OPTOIN MENU". Here you choose your flash drive. If you have it without a UEFI loader, then in "BOOT OPTION MENU" It does not appear.
P.S.: Also, in this menu (Pressing the F11 key) you can roll back / restore Windows 8.1 if the recovery partition is intact.
Go to the BIOS settings to boot from a flash drive without a UEFI of the bootloader on the HP 15-AC003UR laptop.
Go to B. "Startup Menu"(as written above) and press the key "F10", or when you turn on, press the key immediately "F10".And the BIOS laptop HP 15-AC003UR appears before us. Here we see the main characteristics of the laptop, such as: the volume of installed random access memory, processor, BIOS version and much more.

We need to disable, and more accurately translate the operation of the BIOS operation from UEFI in Legacy.
Go to the tab "SYSTEM CONFIGURATION"and option “Secure Boot”
transfer from "Enabled" in "Disabled".
The "Legacy Support" option switches to "Enabled". 
After switching, a warning window appears. We do not pay attention, just confirm. 
Saving the settings, the laptop to restart and messages appear that the settings have been changed and if you want to download with the parameters that were set to that press 9365 and ENTER. 
P.S.: You will be different numbers.
1
Enter the numbers that you have appeared on the display and press "ENTER". After clicking on "Enter" immediately press "F9" to call " Boot Menu. Option. " 
P.S.: If you failed to run Boot Menu Option, you will have to do all the settings to do, this is such protection at the BIOS.
That's all the setup BIOS to download from the flash drive on the HP 15-AC003UR laptop
How to upload from flash drive or disk HP Pavillion laptop? Hello Admin! The whole day was broken today with a HP Pavillion laptop, I want to install Windows 7 operating system on it instead of the Windows 8 installed now. Connect the Verified Boot USB flash drive to Windows 7 V USB port 2.0, then restart the laptop and often click on the ESC key,
i get into the "Start Menu", now I already click F-9 Boot Device Options (Changing the download settings),

i get into the download menu, but my Kingston flash drive is not there, although it is already connected to the laptop (the flash drive is exactly loading).

The same thing happens with the boot windows disk 7.
I think the "miracle of hostile technique", then I will act differently, modify the priority of download directly to the BIOS UEFI, restarting the laptop, then I will start the ESC again when loading, I get into the "Start Menu", now I already click F-10 BIOS SETUP

And I enter into the BIOS UEFI and choose the System Configuration option, and in it the Boot Options tab, I go to it.

As you can see the Secure Boot Upload option in the BIOS is turned on,

i turn it off, I put it in the "Disabled" position, and the "Legacy Support" option was transferred to the "Enabled" position, it turns out a warning, I choose YES,

Then click F-10 (I save the settings, I press YES and reboot),

after the reboot comes out this window, with the message
A CHANGE TO THE OPERATING SYSTEM SECURE boot Mode. is pending. Please Enter The Pass Code Displayed Below to Complete The Change. IF You Did Not Initiate This Request, Press The Esc Key to Continue Without Accepting The Pending Change

eSC and ESC, and ENTER, and Other Keys, everything is useless, the laptop is restarted, and the Windows 8 operating system is loaded. And if you start again into the UEFI BIOS, then everything is no change, the Secure Boot option is enabled, and "Legacy Support "disabled disabled, that is, as if I did not change anything.
Please explain to me a simple user why I can't download HP Pavillion Laptop from USBWhy do not change the settings of the BIOS UEFI, which I do wrong. And most importantly, why the UEFI laptop with the BIOS can only be installed only Windows 8, and there is no other operating system, and you have to "finish" and spend the "nervous" cells. Toganych from Vitebsk.
How to upload from flash drive or disk HP Pavillion laptop
Hi friends! Our reader does everything correctly until the last screenshot. It was necessary only to translate this message correctly:
"For change safe mode Downloads, please enter the code below to complete the change. If you have not sent this query (to change), then press ESC to exit without changing. "I think you already realized that in this message we are asked to enter on the laptop keyboard here is this code 8721 (in your case the code will naturally be different) and press ENTER, after that your changes in the UEFI bios settings will be saved and the laptop will restart,

and after rebooting, click on the ESC, we get into the "Start Menu", click F-9 Boot Device Options (Changing the download settings),

We get in the download menu and here our flash drive Kingston is already present, choose it and click Enter, our laptop is loaded from the flash drive.
Good hour to everyone!
I do not know much or accidentally so it turns out, but installed Windows On laptops, it often happens terribly brake (with unnecessary additions, programs). Plus to this, the disk is not very convenient - one single partition with Windows OS (not counting another "small" backup).
Here, in fact, it was not so long ago to "understand" and reinstall Windows on the HP 15-AC686UR laptop (very simple budget laptop without frills. By the way, it was on it that the extreme "buggy" Windows was installed - because of this, I was asked to help. Some points took a picture, so, in fact, this article was born :)) ...
Setting up HP BIOS Laptop for download from flash drive
REMARK! As on this laptop HP no CD / DVD drive, then installing Windows S. USB flash drives (Because this is the easiest and fast option).
The question of creating a boot flash drive in this article I do not consider. If you do not have such a flash drive, I recommend to get acquainted with the following articles:
- Creating a loading windows flash drives XP, 7, 8, 10 - (In the article, I consider installing Windows 10 from a flash drive created by this article :));
- Creating a loading UEFI flash drive -
Buttons for entering into bIOS settings
REMARK! My blog has an article with large quantity Buttons for entering the BIOS on various devices -
In this laptop (I liked it), there are several buttons for entering a variety of settings (and some of them duplicate each other). So, here they are (they will also be duplicated in photo 4):
- F1 - system information about a laptop (not in all laptops is there, and here in such a budget built :));
- F2 - laptop diagnostics, viewing information about devices (by the way, the tab supports Russian, see photo 1);
- F9 - selection of the boot device (i.e. our flash drive, but about it below);
- F10 - BIOS settings (the most important button :));
- ENTER - continue loading;
- ESC - See the menu with all these laptop download options, choose any of them (see photo 4).
Important! Those. If you do not remember the button to enter the BIOS (or something else ...), then on this model row Laptops - you can safely press the ESC button after switching on the laptop! Moreover, click better several times until the menu appears.
Photo 1. F2 - HP laptop diagnostics.
Note! You can install Windows, for example, in UEFI mode (for this you need to record a USB flash drive and configure the BIOS. More details about it here :). In your example, I will consider the "universal" method (because it will also be suitable for installing Windows 7).
So, to enter the BIOS on the HP laptop ( approx. HP15-AC686 laptop) You need to press the F10 button several times after you have turned on the device. Next, in the BIOS settings, you need to open the System Configuration section and go to the Boot Options tab (see photo 2).
Photo 2. F10 button - BIOS BOOT OPTIONS
- Make sure that USB Boot enabled (must be enabled);
- Legacy Support Enable (must be enabled mode);
- In the LEGACY BOOT ORDER list, move the strings with USB to the first places (using the F5, F6 buttons).
Photo 3. Boot Option - Legacy Enabled
Actually, you can now start installing Windows. To do this, insert, pre-prepared, bootable flash drive in USB port and reload (turn on) laptop.
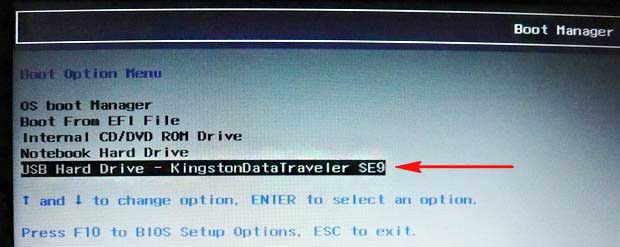
Photo 4. Boot Device Option (Selecting the HP Laptop Download option)
A window should appear in which you can select the boot device. Because Windows installation We carry from a flash drive - you need to select a string with "USB Hard Drive ..." (see photo 5). If everything is done correctly - then after a while you should see the Windows Installation Welcome window (as in photo 6).
Photo 5. Selecting a flash drive to start installing Windows (Boot Manager).
On this, the BIOS setting for installing the OS is completed ...
Reinstalling Windows 10.
In your example below reinstalling Windows It will be done on the same disc (though, on a completely formatted and broken somewhat different).
If you configured the BIOS correctly and recorded the USB flash drive, then after selecting the boot device (button F9 (photo 5)) - You must see the Welcome and Offer window to install Windows (as in photo 6).
We agree with the installation - click the "Install" button.
Photo 6. Welcome window for installing Windows 10.
Next, reaching the installation type, you must select " Selective: only to install Windows (for experienced users)". In this case, you can format the disk, as needed, and completely delete all old files and OS.
Photo 7. Selective: Only installing Windows (for experienced users)
The next window will open a manager (a kind of) disc. If the laptop is new (and no one has "commanded" in it), then most likely you will have several sections (among which there are backup, for backups that will be needed to restore OS).
Personally, my opinion is in most cases, these sections are not needed (and even the OS, which goes with a laptop, is not the most successful, I would say "trimmed"). It is not always possible to restore with their help using Windows, remove some types of viruses are impossible, etc. Yes, and backup on the same disk as your documents are the same not the best option.
In my case, I just allocated them and deleted (everything is united. How to delete - see photo 8).
Important! In some cases, the removal of the device that goes with the device is the reason for refusing warranty service. Although, usually, it never applies to warranty, and yet, if there are doubts, specify this moment (before removing everything and everything) ...
Photo 8. Removing old partitions on the disk (which were on it when buying a device).
Photo 9. Everything was removed - one not marked disk remained.
Then it will also be left to select this section (97.2GB), click the "Next" button and make it installing Windows.
REMARK! By the way, the rest of the hard disk is still not formatted. After Windows is installed, go to "Disk Management" (through the panel windows management, for example) and format the remaining disk space. Usually, they make just another section (with all free space) under media files.
Photo 10. A single section of ~ 100GB is created to install Windows in it.
Photo 11. Installation process (you just need to wait :)).
Have long wanted to reinstall the operating system, but do not know how it is performed on the HP laptop in BIOS Loading From flash drive? In this topic, we will tell you about the ways of entry into the BIOS on the devices of this brand and describe the actions necessary to run the launch from the flash drive in the HP BIOS.
Connecting flash drive
First of all, you should know that various developers set various "hot" keys to enter the BIOS. On HP laptops is the "F9" key. During launching or restarting the laptop, constantly press this key until you see the menu on a blue or gray background.
You can have a model that uses another button for the BIOS input. To find out this button, it is enough when you restart the laptop to constantly press the "ESC" button. You will appear menu with Startup Menu heading. In it you can find out what key must be used to enter the BIOS. Opposite this key, Boot Device Options should be.

When you go directly to the BIOS itself, you will see a list of download options. The principle of operation is that the system is loaded from the highest in the media list. Your task is to put a loading flash drive on the first position. To make a download from a flash drive on the HP laptop to BIOS, select it in the list of available media and press Enter, thereby changing its priority to the highest.
After the actions taken, the laptop should be automatically restarted, and you will make sure that the flash drive started.
Now you know how in HP BIOS to set the download from the flash drive. For details, contact the comments below so that we can answer all your questions.
Greetings to all in the next article! First of all, I would like to inform you that starting from today, I begin to publish answers to your frequently asked questions related, first of all with malfunctions or unsatisfactory work of your computer, laptop or tablet. To date, I received and continue to receive from you over 350 letters. If you say briefly, the majority of people are mainly interested in issues that directly relate to the elimination of various kinds of errors, both in the computers themselves and on mobile devices.
Therefore, if you had to be like a similar situation when, on the screen of your computer, a laptop, tablet, and even on the phone began to occur: such as incomprehensible pop-up errors, spontaneous reboot of the device, hang, then, in this case, eliminate such incasions on your device You can independently. To do this, go to my site and, using the search on the site, you can find an answer to your question. Otherwise, write to me through the form feedback. I will try to help you in the shortest possible time.
In today's article, I am publishing another such a question that Sergei Vasilyevich asked me from the city of Chelyabinsk.
Dmitry hello. I master your laptop for about two years, so you can call me an advanced kettle. But today I had a question: what on the HP laptop brand to boot from the flash drive? There was a desire to set the second system to your laptop. I read your other articles in which you offer to enter the BIOS through the DEL or F2 buttons, but unfortunately I do not work in this way to enter the BIOS. Help me please.
Well, Sergey Vasilyevich, so that you do not spend money on a call to the master, I will tell you how to boot from the flash drive on the HP laptop to install the operating system. In fact, the process passes quite simply, so any novice user will cope with it. Just follow my instruction and everything will turn out. Usually, the user needs to be downloaded from an external drive to install or change settings. operating system. It should be noted that on some portable computers, the download from the flash drive may differ from the same process on a stationary "machine".
Important! The instruction described in this article is suitable for all HP production laptops. The only thing that may differ is the boot menu launch keys when the computer starts. This moment is given a small section in the material.
For successful work, we will need a flash drive with installation files And charged or connected to the laptop network. As a rule, the Internet connection is not required here. If you do not have problems with a flash drive, and you are sure that it is recorded correctly, you can immediately move to step by step instructions On the launch of files from the loading flash drive.
Creating a loading flash drive
If you entered this article, most likely you already have a bootable drive in your hands. But if you do not know how to make such a flash drive, check out the simple instruction. I will not describe several ways, we will bypass one, since the article is devoted to another issue. We will create a bootable flash drive using a simple and, most importantly, free program Ultraiso.
Download the application from here http://ultraiso-ezb.ru/
If necessary, you can use another attachment to create boot drives. I believe that Ultra ISO is the best option - it is as simple as possible and does not require investing. What else do you need for an ordinary computer user?
I have already told this question in one of, well, I will probably repeat in this article how to write an image on the flash drive. So, it is desirable that the flash drive be empty and formatted in NTFS. Run the Ultra ISO program on behalf of the administrator. After opening the application window, you must click on the "Open" button, which is located in the Ultra ISO Top Toolbar. In the screenshot below, the button we need is circled:

In the window that opens, you must specify the image of the operating system or other software for the subsequent entry on external storage. The easiest way to work with images, in the window "Open ISO file." you are taking the desired file.And then click on the "Open" button. For example, I chose an image windows systems 8 Pro.

After these actions, in the right part of the program window, you will see an image of the operating system, in my case it is Windows 8 Pro. The screenshot shows all the files that are required to create a boot drive:

Now insert a flash drive in the laptop. Note that the recording of modern operating systems requires a drive with a volume of at least 4 GB. I have already said about formatting. You can perform this procedure directly to Ultra ISO. Do not forget to copy the important data that is present on the flash drive. In the formatting process, all files and folders will be removed from the flash drive.

So, the flash drive is ready, now in the application window, click on the "Self-loading" button, and then select the item "Record image in the context menu hard disk…».
After that, the process of creating a bootable flash drive will begin. The speed of the procedure depends on the power of your computer and the features of the flash drive. After some time, you will see a message about the successful completion of the recording. Close the Ultra ISO program, we performed the first stage. Now you can go to the main process to which this material is devoted - as on the HP laptop to enter BIOS.
How to boot from the flash drive on the HP laptop?
Now insert the bootable USB flash drive in the laptop and restart the laptop. For the first seconds of the laptop download, you need to press the key to enter the download menu. As practice shows, in most models it is the "F9" button. You can boot from the flash drive through the BIOS setting, but this is a longer and complex process.
IMPORTANT! If the "F9" button does not work, you can find out the exact key in menu Bios.. To do this, you need to click the "ESC" button while the computer is booting - do it at the moment when the image appears on the screen. The photo below shows the menu, in this model, the "F9" key corresponds to the input to Boot Device Options.

After learning the desired key, you can download from the flash drive. You will appear a simple menu where download options will be listed. In the first place, as a rule, it is worth hDD - It is from it that the operating system always loads. Our task is to place priority on the USB flash drive. That is, when you start a computer, the download should be performed not from the hard disk, but from the flash drive.
The name of any flash drive in this menu starts with USB Hard Drive - in my example it is Kingstondatatraveler S9. You need to select a flash drive in this list and press the "ENTER" button on the keyboard to apply the changes.

After automatic reboot The laptop will start from the flash drive. You will only have to perform the necessary operations - be it reinstalling the operating system or changing some settings.
Act on this simple scheme in order not to encounter problems. On the forum I saw the topic where the user decided to explore the BIOS and accidentally hit the defense. Incorrectly entered password led to BIOS work defects, so the easiest way to work with fast keys, in our case it is "F9".
By completing today's article, I hope that this material helped you solve the problem. Now you can create yourself boot flash drives and perform various operations with the system. Plus you will be surprised how much money for such simple work Take people from computer services. And today it's all if you have questions, ask them in the comments or send me through the feedback form, dear users!
You may be interested in these articles:
Dear users, if you have any questions after reading this article or you wish to add something to the subject of this article or the entire Internet resource as a whole, then you can use the form of comment. Also ask your questions, suggestions, wishes ..
So, today it's actually everything, what I wanted to tell you in today's release. It remains to hope that you have found interesting information and useful information in this article. Well, in turn, waiting for your questions, wishes or suggestions regarding this article or the entire site as a whole
 How to pay a domain name
 Domain zone of tokelau islands
 What is domain what problems may be
 Yandex Wordstat: detailed instructions for using the service and grouping operators and a complicated request
 Editing DBF files
 Xenu Link Sleuth - What is this program how to use the Xenu program
 Methods Copy and insert text from keyboard without using mouse