VirtualBox is not installed Windows. VirtualBox Installing Windows XP. Run VM and installation of the operating system
Install VirtualBox. On the computer simply. Configuring virtuals is more complicated. This article also addresses the settings of VirtualBox.
Installing Virtual Machine VirtualBox
To install VirtualBox on Windows 10, download the installer. Installer for the Windows version of universal - you can put VirtualBox on Windows 7, 8, and even XP.
- Go through this link. Or download the button below. On the website click on the string "Windows Hosts". Loading will begin installation File.

- Open the downloaded installer. Click "Next".

- In the next menu, the user chooses which components of the program components. Pressing the button Browse, You can select the installation site of the program. Button "Disk Usage" Shows a window with disk sections and occupied on them. To continue clicking "Next".

- Here you need to note or leave empty checkboxes: Create a shortcut in the "Start" menu, on the desktop or in the panel quickly launch. The latter option is responsible for the association of files with defined permissions of VirtualBox files.

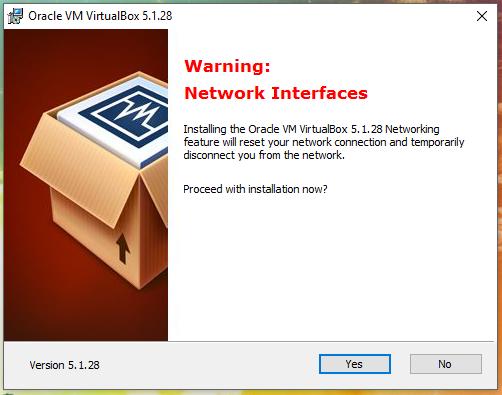
- This window warns: during installation due to installation network drivers Internet connection can be interrupted. Click "YES".

- To start the installation, click "Install".

- Wait until the installation is completed.

- To run the program immediately after installation, without removing a tick from a single check box in this window, click "FINISH".

Creating a virtual machine
Putting the virtual boks, it's time to create virtual computers.
- Run VirtualBox. In Levom upper corner Click "Create".

- In the window that opens, name Virtual, select OS (Windows, Mac OS X, Linux, BSD, and so on) and the version of the selected OS with the bit (Windows XP X32, Mac OS x 10.6, Ubuntu x64). By installing the parameters of the virtual PC, click "Further".

- The program automatically selects the number random access memory. The amount of RAM can be changed.

- Virtual Machine Manager proposes to create a virtual drive. Click "Create".

- Storage type Leave without changes and click "Further".

- The following describes the difference between the fixed and dynamic drive. Stay on suitable for you, click "Further".

- Using a slider or text field, set the storage size. Click "Create".

Settings existing virtual machine
To configure a virtual PC, click on the panel on the left side of the program. Then on the top toolbar, click "Tune".

- First section - "General". The General section contains four tabs - "Main", "Advanced", "Description" and "Disk Encryption". The "Main" tab varies the name, view and version of the OS.
 In additionally, the Drag and Drop functions and the common clipboard are included, indicates the location of the screen shots.
"Description" - a regular text field in which you can describe a virtual.

The "Disk Encryption" tab includes encryption of Wirth. Disc, you can put a password.

- The second settings item is "System". There are three tabs: " Motherboard"Processor", "Acceleration". The Motherboard tab is configured by the volume of RAM, the procedure for loading disks, chipset, cursor manipulator. You can connect an additional functionality: I / O APIC, EFI and clock in the UTC system.
 The "Processor" tab is configured how much CPU will work on a virtual motherboard, the limit of their load. You can connect PAE / NX.
In the "Acceleration" tab, the type of pathrahritualization and hardware visualization is selected.

- The third section - "Display". "Screen" - This indicates the number of video memory, monitors and scaling. You can also include 3-D and 2-D acceleration.
 Remote access "- here turns on and configured remote access To virtual.
"Video Capture" - There is an entry from the Virtual Screen, the frame rate is configured, the location of video, quality, bitrate and everything related to the capture video from the virtual machine.

- The fourth section is "media". There are connected disks to the virtual machine, their attributes change, connected drives are removed.

- Fifth section - "Audio". It turns off and the sound playback in the virtual machine is turned on. You can select an audio driver, audio controller and enable audio input or audio output separately from each other.

- Sixth section - "Network". There are four tabs with adapter settings. Settings within each tab are the same - this is the type of connection, the type of adapter and the MAC address.

- Seventh section - "COM port". Virtual service supports up to four com ports, for each of them you can select the number, port mode and path to it on the user storage.

- The eighth section - "USB". Here the USB generation is selected, from the first third, you can add USB filters.

- In the ninth section, "Shared Folders", the path to the folders to which more than one virtuals have access to.

- The tenth section is the "user interface". Here is configured appearance Virtual machine.

- First section - "General". The General section contains four tabs - "Main", "Advanced", "Description" and "Disk Encryption". The "Main" tab varies the name, view and version of the OS.
Now it remains to check whether virtualization is enabled. Reboot your computer and go to the BIOS, for the overwhelming majority of computers, the input to the BIOS is carried out by the key, the laptops may have another key. Enabling virtualization is in the construction projector (CPU), approximately this path: Advanced \u003d\u003e CPU Configuration \u003d\u003e Virtual-ization technology.
This is how it looks like in the BIOS on ASUS motherboards: Click to show / hide ... Turn on, if not included and store changes. Now go to the creation and configuration of the virtual machine.
Run VirtualBox. On the toolbar, one button "Create" is available to us, here and click
Click to show / hide ... The Create Virtual Machine window opens. In the line name: Enter any named name. In line Type: Choose Microsoft Windows.. In the line version: Windows 8.1, the bit is worth choosing from what kind of systems you are going to put 32 or 64 bits. Click to show / hide ... Click Next, in the next window select the amount of memory that will be installed in the virtual machine for 32 "Bit is quite enough of 2 GB of memory.
We again press Next, here we are offered to create a virtual hard disk, select "Create a new virtual hard disk" and click creating.
In the next window, we are offered a hard disk type, select VDI and click Next.Dayer it is proposed to create or dynamic diskor fixed size disk. This is to choose from. All the difference between them that the virtual fixed disk file will occupy space how much it is assigned, and the dynamic file will constantly change, depending on what and how much will be installed in the virtual system.
In the next window, we specify the size of the virtual disk, it is quite enough of 25 GB of the default. If you want a virtual disk file somewhere else, and not by default (VirtualBox VMS folder in the user profile), click the folder icon next to the virtual disk file name line
Click to show / hide ... press Create and get virtual diskTo which the system will be installed. Go to the system settings.
On the toolbar, we are now available to "Set up"
Click to show / hide ... Click it and the guest system settings window opens. Click to show / hide ... We leave everything here by default.
Next system
On the Motherboard tab, you can change the number of memory and you need to set the order order, as well as enable I / O APIC. On the Processor tab, turn on the PAE / NX. On the Acceleration tab, we set both galkinage to show / hide ... Display video tab turn on 2D and 3D acceleration, video memory Set 128 - 256 MBNEM, to show / hide ... Settings on other tabs are left unchanged.
Carriers
Here we need to configure from what we will install our system. If you recorded the downloaded image on a blank, check the Live CD / DVD. And you can click on the disk icon and specify the image file from which the installation will be made: Press to show / hide ... or the virtual drive, which already mounted the image of the installed system. Suitable settings are left unchanged if you need to be changed. After installing the system. Click the "OK" button. Now everything is ready to install. It remains to click the "Run" button. Click to show / hide ... To start installing the system. Click to show / hide ... and welcome. If you want to distribute this guide somewhere else, please, but do not forget to put a link to the original source
Pioneer with a screwdriver at high level Inquisitively able to independently repair the technique of any complexity. Hard ...! It is better to be silent and seemed fool than opening your mouth, dispel the last doubts.
pc-forums.ru.
How to install Windows 10 in VirtualBox
VirtualBox is a program that allows you to install operating systems in isolated mode. You can install Windows 10 on the virtual machine to get acquainted with it or experiment. Often, users will thus decide to check the compatibility "dozens" with programs in order to further commit the upgrade of their main operating system.
Read also: Use and configure VirtualBox
Creating a virtual machine
Each OS in VirtualBox is installed on a separate machine. In fact, this is a virtual computer that system accepts for a regular device where you can install.
To create a virtual machine, perform next steps:

After this step, a virtual machine will be created, and you can proceed to configure it.
Setting the parameters of the virtual machine
The new virtual machine although it will allow you to install Windows 10, but most likely the system will slowly slow down. Therefore, we recommend it in advance to change some parameters to increase the speed.

You can perform other settings yourself now or at any time when the virtual machine is in the off state.
Installing Windows 10 on VirtualBox

The desktop will be loaded, and the installation will be considered over.

Now you can configure Windows and use it at your discretion. All actions performed within this system will not affect your basic OS.
We are glad that you could help you solve the problem.
Survey: Do you help this article?
Well nolumpics.ru.
Installation instructions for Windows 10 on a virtual machine
There are situations where you need to install two OS on a separately taken computer. Due to software, which is supported by different platforms or with the preferences of family members, at work. A lot of applications have been developed that allow you to "get out" on one PC with two different OS. Acquire the second computer to achieve the goal not necessarily if the virtual machine for Windows 10 is installed. Install VirtualBox 64 BIT on Windows 10 is an obvious solution of a non-trivial problem.
What is a virtual machine
Consider this issue on the example of VirtualBox from Oracle Corporation. The rights to operate and install this program imply free download and use. For the happy owners of Windows 10, the installation of this medium allows you to start the emulation of two different environments on one PC. In essence, it reproduces means Windows work Another OS, such as Linux. So we can set it to try.
Everything is solved simply - you need to set the OS Operation on the non-physical platform. And it "deceives" new system, Posted by a full-fledged PC. In order to find out for sure how it works, consider how to install a virtual machine on Windows 10.
Download and install a virtual machine for Windows 10
Go from the browser to the official page of VirtualBox Oracle Corporation www.virtualbox.org/wiki/downloads. See the window:

Here is obviously presented information about the possibilities. In particular, swing and install the virtual machine anywhere. We need to install on Windows Hosts. On the screen current at the time of the article version, so you can see others. After clicking on the link of the selected release, we will be given to the VirtualBox on Windows 10.

Click "Next" and a list of three components preparing to install components appears.

- VirtualBox USB Support - install for the correct USB operation on a virtual machine. Without installing this part of the package, they will not function;
- VirtualBox Networking - Set for normal operation on an unfinished device network card and the correct interaction of the ports of the car with physical;
- VirtualBox Python 2 x Support is used to trigger algorithms written in Python.
All three components affect the proper functioning of the virtual environment and stable interaction with the physical parts of the present computer. There is a special button specifying the location of executable files. If you want to change it - "browse" and specify the desired one.
In order to launch a virtual machine on Windows 10 without long searches, labels will be used. In this window, you can install or remove checkboxes for them. automatic creation.

Put a virtual machine on Windows 10 will have to be together with additional tools. They are needed for the correct display and operation of the non-physical device. Agree.

I confirm the start of installation.

The virtual environment mount progress can be observed on the screen. We must wait, he needed time.

When the installation is over, the final window will appear. A check mark means that after confirmation (button) the program itself will open. If you remove, the window will close without subsequent actions, and run the application later, if necessary.

After starting the application, create a new emulation.

To parse an exemplary case, take Linux. This is common - Many want to try to try, and it is not solved to demolish the usual Windows.

To do this, we turn to the official website of the developer of this system www.ubuntu.com/download/desktop and download its actual image. Then we turn to VirtualBox and create a new virtual. We assign it a corresponding name, we denote the type and version. It remains to click "Next".

Similar activities are performed installing windows 10 on virtual boxing including. The difference is that when carried out installing Windows. 10 On VirtualBox, the image must be signed on the official Microsoft website, and then download a virtual machine for Windows 10.
Let's go back to Ubuntu. We indicate which size of the RAM is ready to give a virtual environment. If there is a solid stock, specify a large one. Ultimately, it depends on the tasks that you decide to establish.

Initiate the creation of a new disk. We allocate your future future tasks.

Check the "VDI" checkbox to set the disk type.

You also need to create a dynamic information storage. We do it.

We call it and determine the limit volume for it. You can assign any name, except those that are already used.

This is completed on this process of creating a virtual space. In it, you can change the volume of RAM, the number of disk space and all other parameters. Make a virtual machine on Windows 10 it turned out to be simply, and you can use two OS Operations on the only personal Computer.

As boot disk We choose the created.

And she began to boot.

Everything goes as if we really install Ubuntu - settings and so on. 
Somehow in the process is forgotten that everything is virtually, so everything is really emulated. The feeling that was really installed on the computer a new system with all its capabilities.
VirtualBox is an intuitive virtual machine, that is, a program with which you can run additional operating systems within the framework of the main installed on the hard disk or SSD. Windows XP is an old, but time-tested and, in a sense, another, lightweight and usual operating system. By installing it on a virtual machine, you can solve a variety of tasks.
What is it for
For a start, some terminology. The operating system in which you work now and read this text is called the host. The OS, installed and running within the host system, is called the guest. Installation "Ex-PI" on VirtualBox can pursue different goals. Even if your working windows system XP, guest "Copy" can also come in handy. Here are some popular use options for such an opportunity:
- Installing and launching "Windows" programs in an environment (Ubuntu, Debian OS, etc.).
- Use old applications and games that do not work in new systems (7, 8.1 or 10).
- Testing potentially dangerous applications (guest OS is isolated from the host system if you do not create public folders).
This is at least three reasons why installing Windows XP on a virtual machine is not a meaningless idea. In the end, it is possible to simply work out for self-education. The VirtualBox program cross-platform and runs on most operating systems. The only rule for its correct work is to have a good stock. system resources. That is for windows startup XP as a guest system should be at least 500 MB of unused RAM and a more or less not loaded processor.
Step-by-step deploying of the guest OS
First of all, you need to download VirtualBox from the official site. Suppose that your host system is one of the latest Microsoft OS, 8 or 10. Installing VirtualBox is no different from installing any other program, except in the process it can issue a message about what is not tested with this version of the operating system. Do not pay attention to it. It may appear up to 3-5 times, just continue the installation.
The program interface on different OS is slightly different, but, in general, it looks like this:
You must have a CD or image windows disk XP in ISO format. But before you need to create a virtual machine itself. For this:
- Click the Create button.
- In the drop-down menu, select the type and version of the OS, as well as set the machine an arbitrary name (nothing depends on it, except the name in the window header).

- Click the "Forward" button.
- Now specify the accessible memory available to the guest system. The default values \u200b\u200bare enough to work the Windows XP itself, but little to start programs. If your RAM volume allows, move the slider at least 512 MB, and better at 1024 (the green zone is the most comfortable values \u200b\u200bfor the joint work of the host and guest systems).

- Click "Forward".
- Create virtual hDD For a guest system. All indicated on the screenshots.


Important Mark: By selecting a fixed hard drive, you will automatically create a file on your real hard disk. specified size. The dynamic hard disk will increase proportionally installed on it Windows XP (with installing new programs and so on).


- After clicking on the "Create" button, the virtual machine will be ready.

You can look into the settings by clicking on the "Configure" button.

For example, in the "Display" section on the "Screen" tab, you can add a video memory virtual machine or turn on 2D or 3D acceleration to improve the quality of video or using 3D applications. But usually the default settings have enough to run Windows XP.
Now make sure the disk disk in the drive or disk image lies in some folder. Click the Run button. Such windows will open:

If you use the drive in the drive, just click "Continue." If the image in format.iso is the folder icon and select your image and also click the "Continue" button. Installing the operating system will start. It does not differ from the one that can be produced on the real iron. For those who forgot, here are the main points.


Next will begin formatting virtual hard diskCopying the installation files and reboot, at the time of which you should not press any buttons. Just so guaranteed to open, actually installing the OS on VirtualBox, and will not begin by new preparation To the installation, as in the screenshots. Ideally, after rebooting, you will see about such a window:

Entering the key, the name of the owner of the computer, time zone and other information varies depending on what Windows XP you have, so this question will not be considered.
It is worth noting only one moment. The VirtualBox window can capture the mouse cursor (not always) and it becomes inaccessible for other actions. To "return" it. Hold it right Ctrl on the keyboard and click the left mouse button.
After installing the system on VirtualBox, you will be finished and you will see the desktop, set the additions of the guest OS for better permission Screen I. full-fledged work Operations - "Guest".


Install and reboot.
In addition, if you need common folders Between the host and the guest system, do the following.


Select the desired folder. For example, this is a kind of folder called Downloads, lying in the documents. Save the result and open the command prompt in the guest system. Enter the command:
net Use X: \\\\ vboxSvr \\ downloads
where X is the letter of the disc, and downloads - the name of the folder created in the previous step. Press ENTER. In case of success, the X-screen disk appears in the "My Computer" section, which will be available to files lying in folder downloads host system.

This installation is over. You can use Windows XP in parallel with your main operating system.
(Visited 24 530 Times, 2 Visits Today)
VirtualBox is intuitively understandable to use the program. If you are not interested in the theory and you want to immediately proceed to practice, refer to the instructions for using VirtualBox to install and run operating systems in virtual computer:
- Installing Linux to a virtual computer (on the example of Linux MINT)
In this cycle of articles, the possibilities of VirtualBox are considered in detail, and also given detailed description Her options. This material is recommended you if you want to thoroughly understand VirtualBox, and also if you have any problems or questions that you cannot solve yourself.
What is virtualization and its usefulness
VirtualBox is a program that allows you to run multiple operating systems simultaneously on one computer. Among these operating systems can be Linux, Windows, Mac and others. VirtualBox itself also works on various systems (is cross-platform).
This means that with using VirtualBox Being, for example, in Windows you can, without reloading a computer and not even installing another OS on the actual computer, boot into Linux, work with any linux applications as if you have operating operational linux system. You can, for example, launch others windows version To check the settings and programs that you do not want to run in your main operating system.
Virtualization (launching operating systems inside virtual computers using VirtualBox) has a number of useful features:
- simultaneous launch of several operating systems - you can get acquainted with the new OS without turning off your main system;
- the separation of real and virtual computers - when working in a virtual OS, it is not necessary to fear erase the bootloader, losing files or in any way to harm your main operating system, since the virtual system is completely dedicated from your main system. Whatever errors you do not perform in a virtual computer, your main OS will always be untouched. For this reason, the virtual computer is suitable for various tests, including capable OS; For example, in a virtual computer, you can analyze malware (viruses) without fear of the main system;
- easy installation software - If you are in Windows and you need to work with a program that runs only in Linux, then instead of tedious tasks in an attempt to run a program on someone else's OS, you can easily deploy a virtual machine Linux and work with the desired program from there. Or vice versa while in Linux you can create a virtual machine with Windows to work with windows programs Without having to try to run them in Linux;
- the ability to roll back the changes - you do not need to be afraid to do anything wrong in a virtual computer, as you can make any number of "snapshots" at any time and, if desired, return to any of them;
- consolidation of infrastructure - Virtualization can significantly reduce the cost of iron and electricity; Today, most of the time computers use only part of their potential opportunities during their work and, on average, the loading of system resources is low. A large number of hardware resources, as well as electricity spent invested. Therefore, instead of launch large number Physical computers used only partially, you can pack a lot of virtual machines into several powerful hosts and balance the loads between them.
VirtualBox concepts
When we are talking On virtualization (as well as to understand further information), it is useful to get acquainted with the terminology, especially the following terms will be found:
Host operating system (host system).
This is an operating system of the physical computer on which VirtualBox was installed. There are VirtualBox versions for Windows, Mac OS X, Linux and Solaris.
Guest operating system (Guest OS).
This is an operating system that works inside the virtual machine. Theoretically VirtualBox can run any X86 operating system (DOS, Windows, OS / 2, FreeBSD, OpenBSD).
Virtual machine (VM).
This is a special environment that VirtualBox creates for your guest operating system during its work. In other words, you run the guest operating system "in" a virtual machine. Usually VM will be displayed as a window on your computer desktop, but depending on which of the various VirtualBox interfaces you use, it can be displayed in full screen mode or remotely on another computer.
In an abstract form, inside VirtualBox thinks about VM as a set of parameters that determine its behavior. They include hardware settings (how much memory should have a virtual machine, which VirtualBox hard drives should virtualize, through which container files, which disks are mounted, etc.), as well as status information (among them can be: virtual machine in Present is launched, saved, about its pictures, etc.). These parameters are reflected in the VirtualBox Manager window, as well as in the program command line Vboxmanage. In other words, the virtual machine is also what you can see in the settings dialog box.
Guest add-ons.
This applies to special software packages that are supplied with VirtualBox, but are designed to install inside a virtual machine to improve the performance of the guest OS and add additional functions.
Installing VirtualBox in Windows
To download VirtualBox, go to the official website https://www.virtualbox.org/wiki/downloads. Click the link " Windows Hosts.»To start downloading the installation file. Run the file by double click - the installation process is similar to any other programs in Windows.
You can choose which components it is recommended to install all VirtualBox components for full support for all options:
Messages to install unsigned drivers can appear - agree to their installation. So that the program worked correctly, agree to all the inquiries of the installer.
The following warning reports that for a short time will be reset network connections. You temporarily disconnect from the network. We agree, connect to the Internet to resume automatically literally across a second.
Installing VirtualBox in Linux
In Linux VirtualBox can be set in several ways:
- from the standard repository
- binary file downloaded from the official site
- from the VirtualBox repository added to the sources of applications (only for Debian distributions based on Distributions)
Installing VirtualBox in Debian and Derivatives (Ubuntu, Linux Mint, Kali Linux)
For Debian and Derivatives (Ubuntu, Linux Mint., Kali Linux) You can install VirtualBox from standard repositories:
Sudo Apt Install VirtualBox VirtualBox-QT Linux-Headers - "$ (Uname -R)" DKMS VDE2 VirtualBox-Guest-Additions-ISO VDE2-Cryptcab
Installing VirtualBox in Arch Linux and Derivatives (Blackarch and others)
For in Arch Linux and Derivatives (Blackarch and others), you can install VirtualBox from standard repositories:
Sudo Pacman -s VirtualBox Linux-Headers VirtualBox-Host-Dkms VirtualBox-Guest-ISO
Installation information to other distributions, as well as additional details, you will find on the appropriate page: https://www.virtualbox.org/wiki/linux_downloads
Installing Extensions Package (Extension Packs) VirtualBox
To expand the functionality of the basic package VirtualBox can be downloaded additional packages Extensions. Currently, Oracle provides one extension package.
VirtualBox extension package adds the following functions.
- Virtual uSB device 2.0 (EHCI)
- USB 3.0 virtual device (XHCI)
- Support protocol Remote table VirtualBox (VRDP)
- Moving host webcam
- Intel PXE Boot Rom
- Experimental PCI Transmission Support on Linux Hosts Hostats
- Disk image encryption algorithm AES
VirtualBox extension packages have an extension in the file name .vbox-extpack. To install the extension, just double click on the package file and the assistant will appear, which will take you along the installation steps.
To view the extension packages currently installed, open the main VirtualBox Manager (Main program window), in the menu " File»Select" Settings" In the window that opens, go to the tab " Plugins", There you will see the current extension currently and can delete the package or add a new one:

Package Extensions For the latest version you can find on the download page.
If you use not last version VirtualBox, then you can find the extension package - select the folder with your version number and download, then start the double click file with the extension .vbox-extpack.
Running VirtualBox.
In Windows VirtualBox, you can run from the menu or from a shortcut on the desktop.

In Linux you also find VirtualBox in the menu,

or you can type the command in the terminal:
VirtualBox.
The following window opens:

Or if you have already created virtual machines:

VirtualBox is an operating system emulator based on the host machine, and simply on our computer. The program installation usually does not take much time and does not require any skills, and today we will consider in detail this procedure.
First you need to visit the official website and download the installer. This can be done by reference below. Next, we will consider in detail the installation process and analyze the main nuances of the program settings.
Installation

Setting
So, we have installed the application, now consider it setting. Usually after installation, it starts automatically, unless the user has canceled this function - in this case, you will have to run on your own. When this happens for the first time, a welcome window is displayed. As virtual machines are created, they will be displayed on start screen Together with the settings.

Before creating the first virtual machine, you should configure the application. You can open the settings window, proceeding along the way "File" - "Settings". More fast way - Pressing a combination Ctrl + G..

Tab "General" Allows you to set a folder to store virtual machines. They are quite voluminous, which should be considered when determining the place of placement. The folder must be located on a disk having enough free space. Anyway set folder You can change when creating a VM, so if you have not yet been determined with the place, at this stage you can leave the default directory. Paragraph "VDRP authentication library" It remains the default.

On the tab "Enter" You can set key combinations to manage the application and the virtual machine. The settings will be displayed in the lower right corner of the VM window. It is recommended to remember the key Host. (this is Ctrlright), but there is no urgent need for this.

The user is given the opportunity to establish the desired application interface language.

You can also activate the update check option or refuse it.

Configure the display parameters should be separately for each virtual machine. Therefore, in this case, in the settings window, you can leave the default value.

The same applies to the network settings.

Installing add-ons to the application is performed on the tab. "Plugins". If you remember, the additions were downloaded when installed the program. In order to install them, press the button "Add Plugin" And choose the desired supplement. It should be noted that the versions of the plug-in and the applications must coincide. In more detail this procedure Considered in the following articles below.
 How to reflash iPhone with PC and iTunes
 Best Bitcoin Wallets for iOS Download application wallet on iPhone
 Lenovo Vibe X2 Description, Features, User Reviews
 The computer does not see the flash drive: causes and solving the problem
 About Windows Update From Wannacry Encrypter Virus
 Hot browser keys
 New Mac Mini turned out to be five times more powerful than the predecessor