Internet travel guide - all the fun on the web. A guide to the Internet - all the fun on the web The installer prepares the computer for first use hangs
Welcome! This blog is about the Internet and computers, or rather it was dedicated to them.
Probably, it is immediately obvious that no new articles have appeared on the site for many years. Yes, that's the fate of most blogs. This project was once an ambitious undertaking, and the author, like many others who wrote at the time, had ambitious plans to become one of the best Russian bloggers. Well, if you look now, then of those blogs that were created simultaneously with mine, most have already disappeared into eternity. And I just didn't have enough time to blog. So yes, it is not being updated anymore. Although once we with this site won the competition "Blog of Runet 2011".
I even had an idea to delete all this, but then I revised the old materials, and realized that they can still be useful to readers. Yes, some articles are outdated (if I have enough strength, they will receive appropriate notes), but the site, for example, can be useful for beginners - here you can read about basic concepts Internet, learn how to configure the Internet, Windows, or even decide to switch to Linux. So look at the rubrics and choose the one that's right for you.
And yet, I hope this is more than just a blog, but a real guide to the Internet. The site can be viewed in the directory mode, where all available articles are structured by category. And who knows, maybe one day new high-quality articles will start appearing here.
Sander
Picodi.ru is a discount portal from International Coupons, a Polish expert in savings and cheap shopping. Poles are considered one of the most economical nations in the world, so it is not surprising that this type of project grew out of the Polish startup kodyrabatowe.pl. How can this portal be useful to an ordinary Internet user in Russia?
Modern android phones are more than phones. You get used to typing installed programs, to your call and text message history, photo collection and more. But time is running, and the device that suits you completely begins to slow down, glitch, or simply loses its presentable appearance due to chips on the case or scratches on the screen. The question arises of choosing a new phone and changing android phone... And if we now bypass the question of choice, then "moving" to new phone remains a serious problem - you absolutely do not want to start all the data from scratch. This is what we are going to talk about today.
Most of the readers of this blog, most likely, have never encountered version control systems and will not come across any in the near future. It's a pity. This extremely convenient invention is widely used by programmers, but, in my opinion, it could be very useful for those who actively work with texts. But, probably, now there is not a single version control system that would be easy to start using for the "office" ( Microsoft Office) work. Nevertheless, I think that the material presented in the article may be interesting for all readers.
If you have thought about how to watch movies on the network from your TV and go online, this article is for you. No, I know that some TVs already have Smart TV functionality, but I have never seen it work properly. Apparently, therefore, recently the Google corporation demonstrated an absolutely stunning device, which immediately became a sensation. It is about the Chromecast media streamer (Chromecast), a more advanced and affordable version of last year's disastrous Nexus Q player.
Dongle Chromcast, which is less than 2 inches in size, plugs into the port HDMI TV and allows you to enjoy watching streaming web content. To control the streamer, you can use any device (tablet, PC, smartphone) based on operating platform iOS, Windows, Android or Mac OS.
This article is about the device system memory android, problems that may arise due to its lack and how to solve them. Not so long ago I myself was faced with the fact that my phone is on android base began to regularly issue messages about the lack of memory when trying to install an application. Which was very strange for me, given that, according to the description on the market, there should have been about 16GB, and I also increased this volume with the help of additional card memory. However, there was a problem, and I had to tinker a lot before I found the right solution, which did not require root access or a full restoration of the phone to the factory state.
I'll show you how to reinstall windows 7. Installing Windows is very simple, don't be afraid of it. Windows will restart several times during installation - this is normal.
Insert a disk or flash drive or mount an image with Windows 7... Autoshop should come out.
If autorun does not open, then we go into the computer and right-click on a disk or flash drive with Windows 7 and select open.

By entering a disk or image with Windows 7 right-click on setup.exe and select open.


The installer copies temporary files ...

Installation starts.

Get important updates for installation.
Connect to the Internet for the latest installer updates (recommended). Recommended to download Latest updates security and device drivers. (The computer will remain connected to the Internet during the installation.)
Do not download the latest installer updates.
Without these updates, your computer will be more vulnerable or the installation may fail.
Choosing not to download the latest installer updates.

If you have several versions of Windows 7 in the image or on disk, select the one you need. For most users, Windows 7 Home Basic or Home Premium is fine. Select Windows 7 Home Basic and click Next.

Click I accept the license terms and click next.

Select the type of installation.
Update
Full installation (advanced options)
Installing a new Windows copies... the files, parameters and programs will not be saved. Changes in the organization of disks and partitions are available only when you start the computer from installation disk... It is recommended that you archive the files before starting the installation.
We choose complete installation(Extra options).

Select the partition to install Windows. We select the disk on which Windows 7 is installed (if we want to reinstall Windows 7, and not install another one Windows version 7)and click on.

The selected partition may contain files from a previous Windows installation. If so, these files and folders will be moved to a folder named Windows.old. You will be able to access the information in the Windows.old folder, but you will not be able to use previous version Windows.
This means that the folders my documents, my music, my drawings, files and folders from the desktop will be located in the folder C: \ Windows.old \ Users \ Username
Click ok.

Windows installation has started. Received all necessary information... The computer will restart several times during installation.
Copying Windows files.

Unpacking Windows files.


If you have an installation CD or DVD inserted or bootable USB drive with Windows 7, then a message will appear during PC boot - Press any key to boot from CD or DVD. Press any key to boot from CD or DVD.
Do not press any keys or the Windows installation will start from the beginning. After a few seconds, the message will disappear and the Windows 7 installation will continue.
The dispatcher appears Windows boot... Select the operating system to start, or press the TAB key to select a program:
(Use the arrow keys to highlight, then press Enter.)
You don't have to press anything and the Windows 7 installation will continue. Or you can select Install Windows and press ENTER.

Start Windows.

The installer updates the registry settings.

The installer starts the services.

Completion of the installation.

Installation will continue after restarting your computer.
The installation program prepares the computer for first use.

The installer checks the video performance.

Configuring Windows. Select a country or region, time and currency, keyboard layout and click on.

Enter (invent) the username and computer name and click next.

Set a password for your account... We come up with a password, confirm the password, write a hint in case we forget it and click on.


Help protect your PC and improve Windows automatically.
Install only the most important updates.
Install only security updates and other most important updates for Windows.
Postpone the decision.
Until a decision is made, the security of your computer remains at risk.
We choose to postpone the decision so that for now no updates are offered for installation or downloaded.

Select the time zone, date and time and click next.

Select the current location for your computer.
This computer is connected to the network. The correct network settings for this network location will be automatically used.
Home network.
If all computers on this network are at your home and you know which network is considered your trusted home network. Do not choose this network if you are in a public place such as a cafe or airport.
Working network.
If all computers on this network are known to you and are located at your work, then such a network is considered a trusted work network. Do not choose this network if you are in a public place such as a coffee shop or airport.
Public network.
If you do not know all computers (if you are in public places or are connected to broadband with mobile phone), then such a network is considered public (there is no trust in such networks).

Windows finishes applying the settings.

Welcome to Windows 7.

Preparing the desktop.

Windows 7 installation is complete and the system is ready to use.

To customize the location of the taskbar right-click on the taskbar and select properties.

In the properties of the taskbar and the start menu, select the position of the taskbar on the screen to the right.

AND press ok.

The taskbar is now on the right.

If you often have to reinstall the system or have a fleet of machines with fixed software and settings, then you should think about creating your own distribution kit.
In my situation, it was an office with a fleet of laptops and a certain amount programs and strict settings.
So, given:
Original Windows distribution 7, let it be Starter for example.
A certain number of programs, for example:
1. Office 2007 Standart Rus
2. Google Chrome
3.7zip
4. Notepad ++
5. PuntoSwitcher
6. FoxitReader
7. Skype
8. MS Essential
9. TeamViewer Host
Settings for all users:
1. Taskbar - use small icons
2. Notification area icons - Always show all icons
3. Games uninstall
6. Mapping network drives
We will need the same tools:
0. Your work computer (PC1) with installed Windows system 7 of any bit depth. In the case of x64, there is a nuance, but more about it below.
1. The Windows 7 installation disc (in my case x86 Starter) can be downloaded from the Internet or from MSDN - whoever has access to the subscription, for experiments, we do NOT even need a product key. Windows 7 is normally installed without it, and after installation, we can "mock" a fully functional system for at least 30 days.
2. The installation disk WAIK (Windows Automated Installation Kit), you can download, quite safely, from the Microsoft website.
3. Virtual machine(VM), or a physical machine (PC2) - if available.
5. Distributions of applications that will be installed on the system and later will be deployed during installation operating system, automatically (I put everything from www.ninite.com).
Action plan.
1. Installing the operating system from the installation Windows disk 7
2. Now let's apply the registry tweaks.
3. Preparing the system using the sysprep utility.
4. Let's move on to preparing the Windows PE image
5. Capturing an image of the installed system.
6. Creation of a distributive ISO image.
7. Integration of drivers into the image.
Let's get started.
1. Installing the operating system from the Windows 7 installation disc
Install Windows 7 Starter in VM or PC2. I advise you to make the first image x86 in any case, for training and something else, about which below.
The installation is not fraught with any tricks. If you plan to save the customized image to a non-system disk partition, use the installer to create partitions and create two partitions in VM (or PC2) during installation.
Advice... When installing the system on VMWare Workstation or Virtual Server 2005, you can connect a second virtual disk and later use it to save the image. This will make it easier to copy the image to your production environment, as these virtual machines there is a possibility of connection virtual disk to the physical system.
Proceed with the installation until the OOBE phase. It is easy to recognize when prompted to select an account name and computer name.
At this stage, without choosing an account name , press CTRL + SHIFT + F3. This key combination will put the system into audit mode with the privileges of the built-in Administrator account.
The system will reboot and the message "The installation program is preparing the computer for the first use" appears. Then you will see the desktop:

Do not close this window. If, nevertheless, they closed it, what to do will be described below.
Now you can put required programs, I also installed updates through the Center Windows updates... If the application requires a system reboot to install, you can do so. After reboot, the system will return to audit mode.
In the "Control Panel - Programs and Features" through the snap-in "Enable or Disable Windows components"I turn off games and platform Windows gadgets, turn on the telnet client (sometimes helps for diagnostics).
2. Now let's apply the registry tweaks.
The peculiarity of using tweaks at this stage is that we cannot apply custom settings in the usual way, because real user does not exist yet, which means that its registry does not exist either. The solution to the problem is reduced to setting the default user (Default User), which will become a donor for all subsequently created users.
The default user registry file is located at the path C: \ Users \ Default \ NTUSER.DAT and to make changes to it, you need to connect this file to the active registry. To do this, run the command:
reg load HKEY_USERS \ Custom C: \ Users \ Default \ NTUSER.DAT
Now you can open the registry (WIN + R >> regedit) and make sure that there is a new branch HKEY_USERS \ Custom, in which we just have to make the settings.
We apply the following settings:
Windows Registry Editor Version 5.00
; Use small icons on the taskbar
"TaskbarSmallIcons" = dword: 00000001
; Show all icons and notifications in the notification area
"EnableAutoTray" = dword: 00000000
; Prohibiting the use of USB drives
"Start" = dword: 00000004
After applying this tweak, unload the registry file with the command:
reg unload HKEY_USERS \ Custom
If all programs are installed and all settings are made, then preparation is performed using the sysprep utility.
3. Preparing the system using the sysprep utility.
At manual installation The system sysprep utility runs when you enter audit mode. To prepare the system for further use (in this case, for creating a customized image), you need to set the parameters to the utility, as shown in the figure below.

Or. if you accidentally close this window with the command:
% SystemRoot% \ system32 \ sysprep \ sysprep.exe / generalize / oobe / shutdown / quiet
The first three command line parameters are listed in the same order as the above parameters graphical interface utilities. Parametr / quiet- provides quiet operation and is necessary for automation. Now let's look at the last two.
After sysprep shutdown, the system will shutdown. Now it is fully configured, and you can create an image of it using the utility ImageX .
4. Let's move on to preparing the Windows PE image
Windows Preinstallation Environment, what it is, you can read on Wikipedia.
In short, this "piece" is loaded when Windows installation and is a shell for the installer.
Further actions are performed on the working computer PC1.
We need to install WAIK. After that:
We are creating a Windows 7 Starter distribution, then the image to capture will be Windows PE x86. First, open command line, WIN + R write CMD in it and press Enter.
Go to the folder with the WinPE files:
cd c: \ Program Files \ Windows AIK \ Tools \ PETools
Now, we need to copy Windows files PE. Let's name the folder win_pex86 and copy the x86 architecture files into it, the folder does not need to be created in advance, it is created automatically when copying.
copype.cmd x86 d: \ win_pex86
Also, we need to throw ImageX to d: \ win_pex86 \ ISO folder
copy "c: \ Program Files \ Windows AIK \ Tools \ x86 \ imagex.exe" d: \ win_pex86 \ ISO
Just in case, let's add a memory diagnostic tool to our disk, by default it is not added, but it is present in the menu, this is done in case when incomprehensible system glitches occur during installation and a memory test can greatly make life easier when the cause of the failure is not clear. but there is no way to download and cut into a disc:
copy c: \ Windows \ Boot \ PCAT \ memtest.exe d: \ win_pex86 \ ISO \ boot
Now, we need to add windows image PE which will boot from our disk.
The d: \ win_pex86 folder contains the winpe.wim file, which is exactly what we need, it must be copied to the d: \ win_pex86 \ ISO \ sources folder and renamed to boot.wim, let's do this.
Copying the Windows PE image
copy d: \ win_pex86 \ winpe.wim d: \ win_pex86 \ ISO \ sources
Go to the folder:
cd d: \ win_pex86 \ ISO \ sources
Rename the winpe.wim file to boot.wim
rename winpe.wim boot.wim
With the main task all, we need to create a bootable ISO image, which can be written to an empty disc, for this we need to go:
Start-> All Programs-> Microsoft Windows AIK->, copy the following there:
oscdimg -n -bd: \ win_pex86 \ etfsboot.com d: \ win_pex86 \ iso d: \ win_pex86 \ winpe.iso
Attention. Here everything is OK with spaces, errors in the record -bd: ... no.
As a result of all our actions, the winpe.iso file will appear in the d: \ win_pex86 folder, this is an image ready for writing to a disc. You can write to a blank disk or directly mount in a VM.
5. Capturing an image of the installed system.
We need to boot from winpe.iso, which we created on PC2 or VM.
The Windows PE shell is the following:

We are not afraid :) everything is as it should be.
Enter notepad, press Enter.
Through File-open, we look at our disks in order to determine which of them is who.
For example, in my case the C: drive with installed Windows 7 Starter became the E: drive, and the D: drive remained so. And the drive with the winpe.iso image has the letter F:.
We remember these moments, or better write them down :)
Close the notebook and cut the image installed Windows 7 Starter.
f: \ imagex.exe / capture E: d: \ install.wim "Windows 7 Starter" "My Windows 7 Starter"/ compress maximum / verify
This command uses the following parameters:
/ capture E: - capture section E:
d: \ install.wim - location and name of the saved .wim file. Specify the drive letter corresponding to the non-system partition or USB drive.
"Windows 7 Starter" is the name of the image. The name must be enclosed in quotation marks.
"My Windows 7 Starter" - (optional) description of the image. The description must be enclosed in quotation marks.
/ compress maximum - (optional) the type of compression of the files in the image. Valid values for this parameter are maximum (maximum compression), fast (fast compression), and none (no compression). If no parameter is specified, fast compression is used. Maximum compression reduces the size of the image, but takes longer to capture than fast compression. Image decompression speed is practically independent of the compression type.
/ verify - Provides verification of file resources for errors and duplications during creation and application. This option is enabled by default for network operations.
At maximum compression, capturing an image can take quite a long time.
Capture in progress:

While the image is being created, we go for a walk / drink coffee / eat, etc.
We have previously created a folder along the path d: \ win_pex86 \ ISO, we will need it again, in it we will collect installation image, from the ISO folder, you must delete all its contents and copy into it, the contents of the installation disk with Windows 7, go to the d: \ win_pex86 \ ISO \ sources folder and copy the install.wim file there (which we got when we captured the system), i.e. To. this folder already contains a file with this name, then we agree to a replacement.
Basically, now you need to integrate the drivers into the distribution. But if this is not necessary, then the next item can be skipped.
6. Integration of drivers into the image.
Start-> All Programs-> Microsoft Windows AIK-> Deployment Tools Command Prompt on behalf of the Administrator.
We mount the image:
dism / mount-wim /wimfile:d:\win_pex86\ISO\sources\install.wim / index: 1 / mountdir: d: \ win_pex86 \ mount
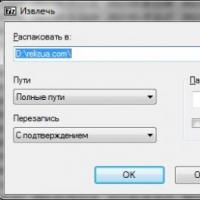 Download the new version of the archiver 7 zip
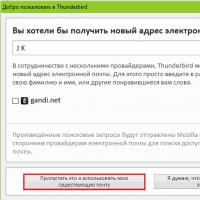 Configuring Mozilla Thunderbird: How To
 OL PORTAL - all social networks and messengers in one application
 Programs for communication in games
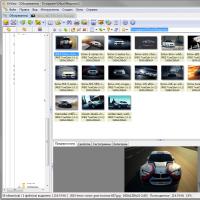 XnView free download for Windows (Russian version) Xnview help in Russian
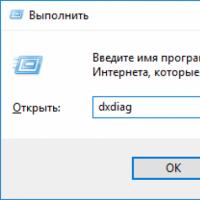 Crashes when installing or running DirectX in certain applications
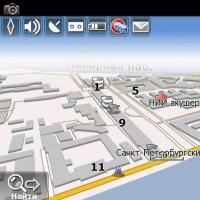 Navigators offline (no internet) for Android: rating review