The program for creating an ftp server windows 10. What you need to set up an ftp connection. Installing FireZilla Server
Hello admin, please explain to me what an FTP server is and can I create it myself on my computer?
In short, I have an ordinary one at home system unit and three laptops, all these machines are connected to the Internet through a router, can I make a real one from a stationary computer FTP server, and download and upload files to it directly from all laptops? Just installed on a regular computer HDD by 3 TB and it turns out that no one uses it, all relatives prefer laptops on which disk space is already running out.
Hi friends! Our Ro8 wrote a cool article for you on this topic, read it.
Firstly, FTP is a client-server file transfer protocol over the Internet, and An FTP server is a file storage on the Internet, that is, an ordinary computer with installed Windows 7, 8.1 or Windows Server 2012 and multiple large hard drives that can hold any of your files. There is a program installed on this computer, for example - FileZilla Server, anyone else can connect to this computer using: command line , Windows explorer and various programs, we will consider two in our article:FileZilla Client, and Total commander ... After connecting to You can upload any files (movies, music, etc.) to the FTP server and also download them.
ControlThe FTP server will be performed by the administrator who installed the program - FileZilla Server. It is here that you can assign different access rights to each user. (the ability to change files on the server): Append (the ability to modify files), Read (read only), Write (write), Delete (delete). Naturally, most of the users can not be given the Delete permission.
- Note: From almost any computer or laptop (even with one hard drive) you can make FTP server and connect other computers to it to receive files and it is not at all necessary that all computers be connected to one router,An FTP server can be created on the Internet and made available to hundreds and thousands of users.
How is the work going
As a software implementation of an FTP server, the article will consider the FileZilla Server program, which will be installed on a machine with Windows Server 2012
Also, a computer with preinstalled Windows 8.1 Enterprise (x64) will act as the machine from which the connection to the created FTP server will be made
In order for a machine with Windows 8.1 to be able to connect to the FTP server, the FileZilla Client program will be installed on it (one of the connection methods using this program)
Go to https://filezilla-project.org and download FileZilla Server and FileZilla Client
Downloaded file Run FileZilla Server on a Windows Server 2012 machine, but FileZilla Client file on Windows 8.1 machine... Both programs are installed the same way. First of all, we will install the FileZilla Server program.

Installing FileZilla Server
After launching the downloaded FileZilla Server file on Windows Server 2012, click next

Click Install


Install

FileZilla Server installation process

Installation completed

After installation, this window will open, in which we enter the local address of the FTP server and click OK

After entering the local address of the FTP server, the main window of FileZilla Server will appear

Let's make some settings by selecting Edit-Users

On the General tab, to add a new user, click on the Add button

Enter the username. OK

Opposite Password, put a tick and enter the password of the added user

Go to the Shared Folders tab. On this tab, add the FTP01 folder, which will be available to the created user Ro8. Click Add

We indicate the previously created folder FTP01. OK

Select the added folder and specify access rights for it: - Read (read only), Write (write), Delete (delete), Append (the ability to change files in this folder)

Determine the ip address of the machine with Windows Server 2012 (192.168.1.4)

Installing FileZilla Client
Go to a Windows 8.1 machine and install the FileZilla Client program
We accept the license agreement


Installation


Installation completed

We have a network shown in the diagram

Let's connect to the FTP server in different ways.
Connect to FTP server using command line
On a Windows 8.1 machine, launch a command prompt.
We indicate the username (Ro8) and enter the password. Password is not displayed when typing
Logged on means that we have logged into the FTP server

Create a folder My_Backup_win8.1 on the FTP server - by entering the command mkdir My_Backup_win8.1

Let's see the list of folders on the FTP server - by entering the ls command
As you can see, there is a folder My_Backup_win8.1 on the FTP server.

Close the connection to the FTP server by entering the bye command

Connecting to an FTP server using the T program otal Commander
Let's run it on a Windows 8.1 machine file manager Total Commander. To set up a connection to an FTP server, click on the button indicated in the screenshot

Click Add

Specify the connection name (optional), server and port (the server is the ip address of the FTP server, the port is 21). We also indicate the username and password. OK

Select the created FTP connection and click Connect

FTP server connection established


To disconnect from the FTP server, click Disconnect

Disconnected from FTP server

Connecting to an FTP server using the program FileZilla Client
Let's start the FileZilla Client program

The main program window will open

In this article, we will cover such things:
- how to set up an FTP server on a computer that is connected to the router;
- how to provide access to it from the World Wide Web.
Setting up the FTP server program
Installing FileZilla Server
Download and install any FTP server you like or are used to working with. For example, we will download a free program Filezilla Server from the official site: https://filezilla-project.org/download.php?type=server
Run downloaded setup file:

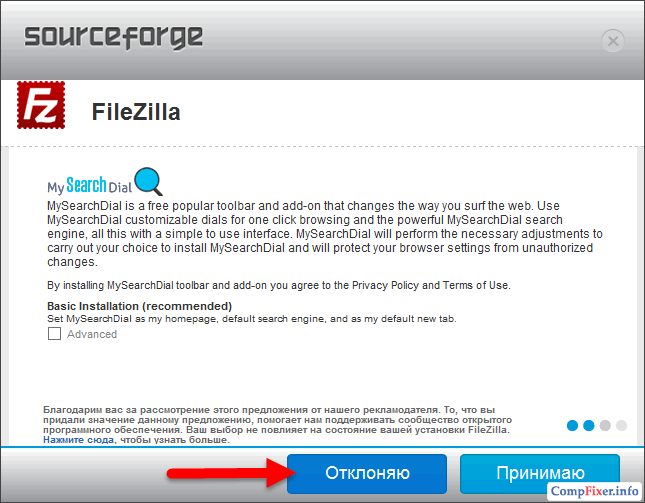
Click on Reject:

Click on Reject again:
Click on Install:

Click on I agree:

Next:


Install:

Configuring FileZilla FTP Server
Launch the program interface.

Enter settings: menu Edit -> Settings:

Now you need to configure passive FTP mode.
1) Select a section Passive mode settings;
2) Check the box Use custom port range;
3) Set a convenient range of ports for use in passive mode;
4) In the field Use the following IP register your external IP;
5) Press the button OK to save the settings.

Now you need to configure Accounts users and specify home directories.
Enter the menu Edit and select Users:

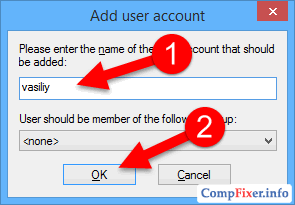
In chapter General click Add:

Enter your username and click OK:
1) Check the box next to Password... This will indicate that a password will be required for this account.
2) Set a password for this account;
3) Go to the section Shared folders:

In chapter Shared folders click Add:

and select a folder that will be opened for this user for access via FTP. After selecting the shared folder, click OK:

Set permissions for given user in folder.
In area Files you can enable or disable the following file operations:
- Reading;
- Recording;
- Removal;
- The change.
In area Folders you can enable or disable the following folder operations:
- Creature;
- Removal;
- List view;
- View subfolders.
After you set the permissions for this user in the current folder, click OK to save the settings:

Computer settings
After configuring the FTP server program itself, you need to allow incoming connections in the firewall.Go to Control Panel and choose Windows Firewall.

Right-click on Inbound rules and choose Create rule:

Choosing an option For the program and press Further:

Set the switch to position Program path and using the button Overview specify the path to the file FileZilla Server.exe.
Then, press Further:

Select option Allow connection and press Further:


Give an arbitrary name to the rule and click Done:

Configuring a router: creating port forwarding rules
Now we need to create port forwarding on the gateway. The gateway can be a router, modem, or other device. Log in to the router's web interface (read the article on what a web interface is and how to access it :) and open the port forwarding section. For more information on port forwarding, see our article: What is port forwarding.
Create two rules.
Rule # 1: forwarding external port 21 to port 21 of the computer where the FTP server program is installed.
Rule # 2: forwarding a port range to the same port range on a computer with installed program FTP server.
Save settings.

How to remotely connect to an FTP server
To access the FTP server, you can use either an FTP client, a browser, or even an explorer. It is of course preferable to use an FTP client. We recommend the free program FileZilla client... You can download it on the official website: https://filezilla-project.org/download.php?type=client
In field Host enter either) or the external IP address of the router. Then, enter the username you created in the FileZilla Server program on the computer, the corresponding password and click the button Fast connection:
If in port forwarding in the router settings you did not change port number 21 to a non-standard one, then the field Port can be left blank - the program will connect to port 21 by default.
FTP servers are rare guests on home computer... But sometimes there is a need for them: to organize general access to files for computers that cannot be connected to a local network, "raise" a small website with a file storage or a home media server. Standing apart are the tasks of flashing or restoring various network machinery, media players and set-top boxes after "oskirpichivaniya". Solving these problems requires mastering the principles of FTP. The price of the wrong decision can be high, so it is important to carefully study the material.
FTP, TFTP servers: description, operation, configuration
FTP (File Transfer Protocol) is one of the oldest computer protocols used to receive / transmit data over a distance. Servers with its use were actively used long before the advent of the Internet. The protocol has now been modified to use TCP / IP channels. The protocol uses a client-server architecture, that is, one program is used to organize the server, and another program is used to upload and download.
How to start an FTP server via Golden FTP Server
Configuring and configuring an FTP server Windows tools 7 is a reliable but slow method that requires a large number qualified actions. If you need a server “for yesterday”, but you don’t want to bother with instructions and settings, then a good option would be to use the compact and very simple program Golden FTP Server... It exists in the form of a free and professional version, although the first option will be sufficient for domestic applications. Despite the modest size of the distribution kit, the program has a number of advantages:
- ease of customization and small size of installation files;
- using the full speed of the Internet channel. Although this may be a disadvantage, since when 50-100 users are connected at the same time, the program will put the channel on the blades together with the corporate network;
- the ability to resume files when the connection is broken. To take advantage of this feature, you need to use an FTP client that also supports downloading files;
- Russian interface by default.
After downloading and installing the distribution kit, configure the program to start the FTP server.
The address obtained using the Golden FTP Server is accessible only within the network. If you need to provide access to the server via the Internet, then you will have to set routes and port forwarding through the web interface of the router.
For ease of use and configuration, you have to pay for the extremely low level of security of such a server. Use the servers created in this way only in home network without giving them access from the Internet.
How to open an FTP server in File Explorer
Since the ancient Windows 98, the operating system has blurred the boundaries between the "File Explorer" and the Internet browser. Explorer allowed you to open pages directly in its window, but this required the inclusion of the unreliable Active Desktop at that time, so the mechanism did not receive much distribution at that time. Technologies did not stand still, and now you can safely enter the FTP server by entering its address in the "Explorer":

You should not upload large files, since Explorer does not support resuming data when the session is broken. For this, use FTP clients with the ability to resume.
What to do if the FTP server won't open
The inability to access the FTP server can be due to several reasons related to both the settings of the computer itself and the policies within the corporate network.
Table: Common Causes of FTP Server Access Errors and Solutions
| Cause | Possible Solution |
| Incorrect username or password (no password) with which an attempt is made to access the resource. | Try again with the correct password pair. Please be aware that many corporate FTP sites do not support guest login. |
| Access is through a third-party program that is not added to the exclusion list firewall and it blocks outgoing client requests. | Add the client program to the firewall exceptions table. |
| TCP / IP port 21, through which FTP resources are accessed by default, is blocked by the router settings. Alternatively, the server can be configured to work with a different port. The resource administrator needs to find out with which one. | Use the web administration panel of your router to change its settings so that it can work with port 21 or another port used by the server. |
| Promotional tariff plan your ISP does not allow you to work with a number of Internet protocols, including FTP. | Take care of a more expensive plan. Many providers provide the capabilities required to run an FTP server (static address, permission for incoming requests, scripts) only at expensive corporate rates. |
How to configure and run an FTP server using the built-in tools of windows 7
Many software packages for creating FTP servers can be downloaded from the net. But first, try configuring the server using the built-in capabilities of the operating system. Distribution-integrated tools for creating web servers are available in Windows 7 Basic and higher.
If you have Windows 7 Home edition or Starter installed, you will have to use software packages third party developers or upgrade your operating system to Windows versions 7 Basic and higher.
These instructions will walk you step by step through all the steps of starting the FTP server. During the setup process, you may need a distribution kit of the OS you have installed on optical media or a USB flash drive. You will also need to log into the OS as a user with administrator rights.
- Open Control Panel and select Small Icons in the View preference.
- Go to the "Programs and Features" section, then to the "Turn Windows features on or off" subsection.
 Go to the "Programs and Features" section - it contains the subsection "Enabling and disabling Windows features"
 - Put the checkboxes:

- Click "OK" and wait for the process to complete.
 Wait for the completion of the component installation process
 - Go to the "Administration" section of the "Control Panel".
 The section "Administration" contains tools for configuring the server
 - Select the Internet Information Services Manager tool.
 Open "Internet Information Services (IIS) Manager" - this is the main element of the FTP server
 - Go to the Sites tab.
 In the "Internet Information Services (IIS) Manager" go to the "Sites" tab
 - Make a right click on the "Sites" tab and select the "Add FTP Site" action in the drop-down menu.
 From the context menu of the Sites tab, select the Add FTP Site action
 - Specify the name of the future FTP site and the path to the directory, the contents of which are going to be distributed from the FTP server.
 By default, the "Physical path" field contains the path C: \ inetpub \ ftproot - you can change it to your own
 - Click Next and specify the parameters for launching the FTP site. If you do not want the site to start automatically when you turn on your computer, then uncheck the "Start FTP site automatically" checkbox.
 Configure FTP server startup parameters
 - In the SSL section, select No SSL. Click Next, then click Finish.
 In the "Authentication and Authorization Information" window, just click the "Finish" button
 - You've managed to create an FTP site. Now go to Control Panel> Firewall> Advanced Options> Inbound Rules.
- Select and activate the FTP Server Passive (FTP Passive Traffic-In) and FTP server (incoming traffic) items.
 To activate a rule, place the cursor on it and click the "Enable Rule" button in the right menu
 - Go to the Outbound Rules section and enable the FTP Server (FTP Traffic-Out) rule.
 Activate the rule FTP Server (FTP Traffic-Out) in the section "Rules for outgoing connections"
 - Navigate to Control Panel> Administrative Tools> Computer Management> Local Users> Groups. Right click on the "Groups" parameter and select the "Create group" action.
 Create a group of users who will be able to access your FTP server
 - Enter the name of the FTP group and click "Create".
 Come up with a name for the user group
 - Right click on the "Users" section and select the action " New user»From the context menu.
 Create users to include in your group
 - Enter your username and password (at least 8 characters). We recommend that you check the boxes “Prohibit user changing password” and “Password does not expire”. Click the Create button.
 Set user authorization parameters (name, password), enable or disable available options
 - Right click on the created user and select the "Properties" action, then go to the "Group Membership" tab. Click Add.
 In the properties of the user you created on the "Group Membership" tab, click the "Add" button
 - Enter the name of the group you created in the text box and click Check Names.
 Remember to click the Check Names button after entering the group name in the text box
 - Go to Control Panel> Administrative Tools> IIS Manager. In the "Connections" section, place the cursor on your FTP site and click the "FTP Authorization Rules" icon.
 Place the cursor on your FTP site in the Connections menu, then click the FTP Authorization Rules icon
 - Click "Add Allow Rule".
 Click the "Add Allow Rule" action for your FTP site
 - Select the Specified Roles or User Groups option, type your group name in the text box. Check the "Read" and "Write" checkboxes. Click OK.
 Specify the name of your group and put a tick in the checkboxes "Read" and "Write"
 - If you want to allow access to all users, then click "Add Allow Rule" again and select "All Anonymous Users". Put a tick only in the "Reading" checkbox.
 If required, add the right to download files from your FTP server to all users
 - Now click on the "FTP Authentication" icon.
 Click the "FTP Authentication" icon
 - Make a right click on the "Anonymous access" mode and select the "Enable" action. Now everyone can connect to the FTP server.
 Turn on anonymous access so that all users can access your FTP server
 - Click the FTP Logging icon.
 Click the "FTP Logging" icon
 - In the window that opens, configure logging.
 Set up logging for your FTP server
To work with the created server, you can use one of the numerous FTP clients or simply windows explorer... Do not forget to configure port forwarding in the router and create routes if you need to provide access to the server via the Internet.
Mapping an FTP share folder to a network drive in Windows OS
Many users find it more convenient to work with a regular system disk, which is displayed in Explorer. Third party programs for working with disks, not everyone welcomes. To get such a drive, you need to mount the FTP folder and associate it with a logical drive. This can be done in two ways:
- through the "Explorer";
- via a special console utility ftpuse.
Mount FTP share using Windows Explorer

Mount an FTP resource using the ftpuse console utility
Unfortunately an FTP share mounted as network drive with the help of "Explorer", will be visible only in the "Explorer". If you need access to such a disk through a file manager or from the command line, you will have to use the special ftpuse utility.
Ftpuse is distributed free of charge. After downloading and installing the utility is available from any open window command processor. To keep the network drive connected even after closing such a window, the utility must be used in conjunction with the PowerShell program. Once installed, the utility is available from the command line or PowerShell processor.  Using the ftpuse utility, you can configure console access to the FTP server as a network drive
The PowerShell processor has been part of the OS since Windows 7 SP1. If you do not have the service pack installed, you will have to download the shell installation file from the Microsoft website.
Table: ftpuse commands for configuring FTP access
| devicename | Sets the name of the logical drive under which the network share will be mounted in the OS. |
| ftphostname | Specifies the name or address of the server to connect to. |
| remotepath | The network folder that will be used by the root directory of the mounted logical drive. |
| password | Sets the access password. |
| / user | The name of the user who connects to the server. |
| / nopassive | Sets the active operating mode. |
| / owneraccessonly | The network drive is visible only to the program from which the ftpuse utility is launched. |
| / port | You can set an arbitrary address TCP port used to communicate with the server. By default, this is port 21. |
| / hide | Runs the utility in the background, no messages are displayed on the screen. |
| / debug | Utility work in debug mode. |
| / delete | Deletes the current session, disconnects from the server, and unmounts the disk. |
Examples of the ftpuse utility
Here are some examples of using ftpuse commands to configure a server as a local disk:
- ftpuse F: ftp.abrris.com - this is how we create a logical drive F: in the system associated with the ftp server ftp.abrris.com;
- ftpuse F: ftp.abrris.com / USER: junkers 1944 - connect the authorized user junkers with the password 1944 to the ftp.abrris.com server;
- ftpuse F: / delete - disconnect drive F: and disconnect from the server.
An FTP resource connected using the ftpuse utility will always be displayed in Explorer with a disk space of one gigabyte. This is not a bug, but a feature of the utility. However, a disk connected by means of an explorer will not display its volume at all.
How to set up an FTP server
On the vastness of the network, you can download a large number of ready-made distributions, which, after unpacking and simple configuration, deploy a ready-made FTP server on your computer. There are both commercial and free products that are not inferior to the first in opportunities. Below we will look at two free solutions that have long become the industry standard for computer enthusiasts and small firms.  Even a non-professional can handle the launch of a server for the needs of a small office or an apartment building
FileZilla Server - flexible, powerful and secure
FileZilla Server - Developed by the team behind the famous FireFox browser... It is distinguished by a huge number of settings, the presence of versions for 32 and 64-bit operating systems, possibility remote administration... And you don't have to pay a dime for this whole range of possibilities. Server installation and configuration is divided into several simple steps. The program exists on many platforms, and if you have learned how to configure such a server in Windows environment, then with minimal differences you can do the same in Linux or MAC OS.
Installing FireZilla Server
- After downloading the installation file, run it, and then follow the prompts of the installation wizard.
- Read and accept the license agreement.
 Accept the license agreement to continue with the installation process
 - Select the required installation type (we recommend the standart type):

- Decide on the folder in which the program will be installed, and proceed to choosing the method for autorun FireZilla Server (we recommend the first option):

- Now specify the port for the server interface. Leaving the default value of 14147 is undesirable for security reasons.
- The final stage of the installation will be the choice of the type of launching the interface of your server (we recommend the first option):

- Start the installation process by clicking the Install button.
Server Tuning
With the server software package installed successfully, restart your computer and start the FireZilla Server software.
- In the dialog box that appears, specify the server address and port. You do not need to enter a password for the first connection. This connection will be possible only from the computer on which the server software components are installed. It will not work to reach the server from another machine, since the address 127.0.0.1:14147 serves only for local connections.
 Enter the server address and port to connect
 - The Settings section of the Edit menu contains numerous settings that will allow you to configure the software package properly.
 Go to FileZilla Server Settings
 - On the General Settings tab, you can change the primary settings:

- For the convenience of users, you can set up a text greeting in the Welcome message section, which the client program will show to the user upon successful connection to the server. Using metacharacters, you can customize the output service information into the client's window.
 In the Welcome message section, you can set up a welcome message and display service information for users
 - In the IP bindings section, specify the range of IP addresses from which users can access the server. This section of settings allows you to organize access to the resource only from local network or even from one segment of it.
 Limit the range of addresses from which it is possible to access your server
 - Configure address filtering in the IP Filter section: the upper text field specifies the "white" list, and the lower one - the "black" one.
 Complete the "white" and "black" lists of IP addresses
 - Configure logging in the Logging section. Log files can be created anew every day, or all statistics will be written in one.
 Configure FileZilla Server logging in the Logging section
 - In the Speed Limits section, you can limit the bandwidth available to the server. You can set up global restrictions, or you can use the calendar and even individual hours. The unit of measurement is kilobyte.
 If necessary, you can adjust the bandwidth limits in the Speed Limits section
 - In the Filetransfer compression section, you can configure the compression of files on upload. But we recommend leaving the default settings.
 Better not to change the Filetransfer compression settings section
 - It's time to set up user accounts that will be allowed access to your server's resources. Go to the Users section of the Edit menu to open the user management interface.
 You can add a new user in the Users section of the Edit menu.
 - Click the Add button to add a new user, give him a login and indicate his group membership.
 For a new user, set a login and indicate which group he belongs to
 - For the created user, set a password and a limit on the number of connections to your server.
 Customize user password and the allowed number of connections to the server
 - On the Share Folders tab, you can configure user access to specific resources on your server. To do this, select the Shared folders tab and click the Add button.
 Do not confuse the Add buttons: to add folders, click the Add button that is highlighted in the picture
 - Select a folder on the disk, and using the options on the left side of the window, set the required access rights:
- read only - read;
- write - write;
- delete - delete;
- changing files in the folder - append.
On this initial setup finished. The server is ready for use and the security settings meet the criteria for home use or a small office network.
Video: Install and Configure FileZilla Server Step by Step
TFTP - Small Needs Server
Among the varieties of FTP and programs for working with them, TFTP stands apart - it is a simplified version of FTP to the limit. The lack of traffic protection mechanisms and even user authentication does not allow TFTP to be used to exchange files over the Internet.
But it is perfectly suited for uploading firmware and firmware to routers, digital TV set-top boxes, tablets and smartphones. The bootloader of such devices contains a TFTP client that will allow you to download and install into the device software even if it is in emergency mode due to damaged firmware.  The main application of the TFTP protocol is firmware wireless routers via recovery console
Install TFTP server on your computer:
- Download yourself the distribution kit of the program:
- tftpd32 if you have a 32-bit OS;
- tftpd64 if you have a 64-bit OS.
- Install the program in one of two options: standard application or a system service.
- If you chose to install the service, then restart your computer when the installation process is complete.
The server does not require any special settings, but after starting it, make sure that all settings on the TFTP tab look like in the picture.  This is how the default settings of the tftpd32 utility look like
To download files from the server or to upload to the server via the command line, use the following commands:
- tftp 192.168.1.10 GET filename.txt - to get a file from the server;
- tftp 192.168.1.10 PUT filename.txt - to send a file to the server.
To work with the TFTP client in Windows 7, it must be installed through the "System Components" dialog. In older versions of the OS, the client is available without additional steps.
 TFTP client is added using the System Components dialog box
 Video: Working with TFTP Server - Emergency Restore of Router Firmware
Client programs for connecting to FTP servers
Client programs perform functions such as:
- connecting to FTP servers;
- resuming files when the connection is broken;
- connection logging;
- storing many settings to different servers;
- group operations with files;
- search by servers.
Also, the client programs have a built-in editor that allows you to use the program as a full-fledged website builder.
Total commander
Perhaps the most popular file manager for Windows. It contains a built-in FTP client that allows you to work with a remote server as with a regular logical drive. The program is shareware, and before purchasing a license, it will constantly remind the user that it would be good to finally buy it. This does not affect functionality.  Total Commander has a built-in FTP client
FAR
Like Total Commander, this program is a multifunctional two-panel file manager. It is much more ascetic in the design of the interface (it works in text mode), but it is cross-platform - available for half a dozen different operating systems. An FTP client is built into the distribution, and you can start working with sites without installing add-ons. The undoubted advantage is that the program is free. Activation FTP client is carried out using the plugin manager, but it is a very simple and intuitive procedure that will not cause any difficulties even for a novice user.  FAR will be able to work with FTP servers on any operating systems
Another free client program from the creators Mozilla browsers and Firefox. Simple and accessible to the user thanks to the laconic interface and excellent Russification. There are versions of FireZilla for Windows, Linux, Mac OS, and even Andriod.  FileZilla - FTP client from the creators of the world famous FireFox browser
Among the features that distinguish it from competing programs, it should be noted:
- support for a large number of protocols;
- resume downloading files when the connection is broken and support for working with large files;
- cross-platform;
- the ability to maintain bookmarks;
- support for dragging files (drag & drop technology);
- flexible settings of the transmission speed and the ability to reserve part of the Internet channel;
- editing files directly on the server;
- remote file search.
The interface of the free FTPRush program has a lot in common with the products Microsoft Office and is configured in a similar way. Of the highlights, it is worth noting:
- the ability to transfer files from server to server without downloading to a computer;
- high-quality implementation of the two-panel interface;
- built-in download manager with configurable download list.
 FTPRush should appeal to MS Office users
 It is better to work with the English version of the interface, since the quality of the Russian localization leaves much to be desired.
CoffeCup Free FTP is a client for the most undemanding and inexperienced users, it allows you to download and upload files with just one click of the mouse. The scarcity of settings is more than offset by an intuitive interface, high-quality localization and free software. Nevertheless, the program supports a full-fledged two-panel mode and the ability to transfer files from server to server without preloading, and also has a simple HTML editor.  With the CoffeeCup Free FTP client, you don't have to tinker with settings
Setting up an FTP server is an easy way to get multi-access file storage on your desktop. The large number of programs and the relative ease of customization make this method very popular. Allocate one computer purely for the server and do not store any other data on it other than what should be on the server. And even in this case, two to three dozen users simultaneously accessing your resource can almost completely "sink" the Internet channel. And the provider will unobtrusively offer to change the tariff plan to a corporate one. If you need a file storage with simultaneous access of a large number of users, then host the FTP server on a commercial hosting. Or use ready-made file sharing portals, for example, Google Drive or DropBox.
There are often times when we need to exchange files with someone on the network. For small files, you can use mail or transfer the file, for example, via an Internet pager. This is acceptable when its size does not exceed a few megabytes. And if it's a movie or a game, or an archive with photos of several gigabytes ?! You can, of course, use a public file hosting service, split the file into parts and provide it for download, but here, too, not everything is smooth, most users are used to downloading for free, and this, as a rule, is speed limiting and waiting for a timer. This is where our own FTP server (File Transfer Protocol) comes in handy.
What are the advantages of your own FTP server:
- server management;
- server user and resource management;
- there are no speed limits if you do not want it yourself;
- no need to pay for hosting the server to the hoster;
- there is no need for a static (permanent) IP address for the server.
Everything in order
 In this article, I invite the readers of MirSovetov to consider how, having a dynamic address and a connection using ADSL technology, make sure that any network user, regardless of where he is on the planet, can access your FTP server, of course, from your permissions. In order for your FTP server to be available, you need a service that will match Domain name Your IP address. Domain name mapping is handled by the DNS server.
 What is a DNS server ?! It is a domain name system (DNS) that allows you to map a domain name to an IP address. Thanks to DNS, we do not type IP addresses in the address bar of the browser, but the names of sites that are understandable and familiar to us. But a regular DNS server only works with static IP addresses, and we cannot bind our dynamic IP address to a domain name. So what do we need to have a domain name for our FTP server ?! We will need to register in such a system that can provide us with such a service that will track the change in our IP address and match it to our domain name and, preferably, completely free of charge.
Today, the most popular services are DynDns (http://www.dyndns.com/) and No-IP (http://www.no-ip.com/). Since there are no special differences in them, we will consider one of them in a little more detail.
check in
We will register at DynDNS.com. Go to the page and click on the "Sing up Free" button, then on the "Sing Up" button.In the "Hostname" field we write the name that you like, the main thing is that it is not occupied by anyone. Next, select the domain you like from the list. The list of domains is quite large, so there is plenty to choose from.
In the "IP Address" field, you can enter your current IP address. That's it, nothing else needs to be changed or marked. You should have something like this:
 Then click on the button at the bottom of the "Add To Cart" page, and if everything is in order and the domain name is not occupied by anyone, then the registration process will continue, otherwise the system will prompt you to change the name or domain. In our case, everything went well, and Dynamic DNS Hosts was created with the name mirsovetov.homeftp.net. Now we need to create our account. It should be noted right away that the email addresses of the mail.ru server are not allowed.
  Well, here, in fact, that's all, it remains to go to the mail and confirm the registration. Follow the link specified in the letter and activate the service by clicking on the "Activate Services" button. I do not recommend the readers of MirSovetov to get involved in creating a large number of names, since the service will provide no more than five names for free, and even if you delete those you do not need, the counter will still not be reset. So pay enough attention to the name.
 Now we need a little program that will track your IP address change and send it to be matched against the domain name. It is located on the Support page (https://www.dyndns.com/support/). Download DynDNS® Updater, install, log in. There are no difficulties in this. The program will start automatically at system startup.
So, with our dynamic address we figured out, now the DynDNS service will provide us with a permanent domain name for our FTP server. It's time to move on to installing and configuring our FTP server on your home computer. We will use the Pablo's FTP server program due to its availability, free, simplicity and intuitive interface (you can download it from the link: http://gooddi.webhop.net/files/pablos_ftp_server_v1_52.rar).
Installing and configuring an FTP server
To get started, download the Pablo's FTP server program and unzip it to any place convenient for you. The program works without installation and requires minimal settings. Let's create a folder "FTP_SERVER", to which we will provide access.Let's start the program and go to the "Configuration" tab:
 In the "IP address" field, enter the IP address of the computer on which the FTP server is running. If you have one computer at home and your ADSL modem has the address 192.168.1.1, but nothing has changed in the modem settings, then the computer address will be 192.168.1.2. You can find out by right-clicking on the network connection icon and selecting "Status" from the menu, then going to the "Support" tab, or by executing the "ipconfig" command in the command line (press "Win + R", enter "cmd" without quotes, and in the window that opens, type "ipconfig" also without quotes). I think that all the other parameters do not need an explanation ("Autostart", "Start minimized to tray", "Automatically activate the server at startup").
 Now let's start creating users, assigning root directories and rights to them. Click the "Add" button and create a "guest" user. After clicking "Ok", the program will ask you to specify the root directory for the user, above which he will not be able to climb, wherever it is. You can set a password and assign rights for the user. The number of users is limited by your imagination, but you should not get carried away, otherwise you yourself will get confused. As you can see in the image below, we created the user “guest”, gave him a password and the root directory “FTP_SERVER”, gave him the rights to upload, download and create directories. If you wish, you can connect a virtual directory, which can be located anywhere, but will be visible in the user's root directory. This feature is available in the "Directories" tab.
 We press the "Start" button - and your server will start working. It remains to check his work. Click "Start - Run" (or the key combination "Win + R") and write the following address: ftp://192.168.1.2.
 If everything is in order, you will see the user authentication window, in which we enter the name "guest" and the password that was set for this user. As a result of the work, you will see an explorer window - this means that your FTP server is working. But for now, your server is only available locally.
In order for your server to be accessible from, you need to do one more thing, namely, configure your ADSL modem so that it sends requests to your FTP server. This is called port forwarding.
Modem configuration
To do this, you need to enter the modem interface. Most likely, its address is 192.168.1.1. Check the documentation for your modem. You need to enter it in the address bar of your browser. Further settings will be for example ADSL modem D-Link, in other models of modems the settings are not much different.So, you entered the modem interface, go to the "Advanced Setup - NAT - Virtual Server" section and click the "Add" button. In the window that opens, select "FTP Server" from the list, then in the line "Server IP Address" write the address of the computer on which you have FTP-Server running (in our case - 192.168.1.2), click "Add / Apply" and restart modem. After downloading the modem, you can send emails to your friends and tell them that you are happy to give them access to your own FTP server for file sharing. Do not forget to provide them with the address that you registered with the DynDNS.com service. For greater convenience, so that you do not have to explain to your friends how, where and what they need to enter, you can create a shortcut for connection yourself and send it by mail.
Create a connection shortcut
To do this, you need to open the control panel and click the "Network Neighborhood" icon, then in the network tasks select "Add a new item to the Network Neighborhood". The Add to Network Neighborhood Wizard will start. Click "Next" and in the line "Network address or Internet address" enter the address that you registered in the DynDNS.com system. In the next window, uncheck the "Anonymous login" checkbox and enter the username "guest". Next, give a name to the shortcut, for example, "MyFTP_Server", and complete the wizard. You can uncheck the "Open this place in the network environment after the wizard completes" checkbox, because when you open this address you will be taken to the modem configuration interface, your server is accessible locally at the address of the computer on which the FTP server is running. Now you can send this shortcut by mail with the words "Rate your friends, how cool I am, I have my own FTP server."It is worth drawing the attention of the readers of MirSovetov that the FTP server works great with the Download Master download manager and supports multithreading, resuming files, and also works great with any FTP client.
So we finished creating and running our own FTP server on your home computer, it's not that difficult, is it, and at no cost. But how can you facilitate the exchange of files between users and at a good speed, without any restrictions.
I wish you all success in your endeavors.
Files) is a standard protocol for transferring files over TCP networks (for example, the Internet). FTP is often used to download web pages and other documents from a private development device to open hosting servers.
The protocol is built on a client-server architecture and uses different network connections to transfer commands and data between client and server. FTP users can authenticate by passing their username and password in clear text, or, if allowed on the server, they can connect anonymously. You can use the SSH protocol for secure transmission that hides (encrypts) username and password, and encrypts content.
The first FTP client applications were interactive command line tools that implemented standard commands and syntax. Graphical user interfaces have since been developed for many operating systems still in use today. These interfaces include general web design programs such as Microsoft Expression Web and specialized FTP clients (such as CuteFTP).
FTP is one of the oldest application protocols dating back long before HTTP, in 1971. It is still widely used today for software distribution and access to remote hosts.
Creating an FTP server on Windows 7 step by step:
Go to Start> Control Panel In View, select "Small icons" Next, select "Programs and Features"  Select "Turn Windows features on or off"
  Select "FTP Extensibility", "FTP Service" and "IIS Management Console"
  Click OK and wait for the process to complete
  Go to Control Panel> Administrative Tools
  Selecting "IIS Manager"
  Go to the sites tab
  Press the right mouse button and select "Add FTP site" in the drop-down menu
  Specify the site name and location (by default "C: \ inetpub \ ftproot")
  Click "Next". We specify the parameters for launching FTP ("If you do not need automatic start FTP, uncheck "Start FTP site automatically" "). In the" SSL "section, set" No SSL "
  Click "Next", then "Finish".
  The site has been created. Next, go to Control Panel> Firewall> Advanced Settings> Inbound Rules. Select and activate the FTP Server Passive items (so that you can connect to FTP in passive mode) and the FTP server. Go to the "Rules for outgoing connections" section and activate the "FTP Server" item. Next, go to Control Panel> Administrative Tools> Computer Management> Local Users> Groups> (right mouse button)> Create group
  Specify the group name "FTP" and click "Create".
  Next, go to Users. Right Click> New User
  We indicate the username, password (at least 8 characters). Set the checkboxes opposite "Prohibit user changing password" and "Password validity period is unlimited". Click create
  Next, select the user, right-click, "Properties", "Group Membership". Click "Add" and select the "FTP" group, click "OK".
  Click "OK" again.
  Go to the directory that we specified for the FTP server (see "Specify the site name and location"). Right Mouse Button> Properties> Security> Edit
  Next, "Add", indicate the name of the group and "OK".
  Set Permissions "Allow All"
  Go to Control Panel> Administrative Tools> IIS Manager and select our FTP. Go to "FTP Authorization Rules".
  We select "Add Allow Rule" and specify our group "FTP". We put a tick in front of "Reading" and "Writing". Click "OK"
  If you want to allow access to all users, again "Add allowing rule" and specify "All anonymous users". Check the box just opposite "Reading"!
  Go to "FTP Authentication"
  We select "Anonymous access", right mouse button, "Enable". Now everyone can connect to the FTP server.
  Go to "FTP Logging". Install maximum size log or disable it altogether.
FTP response codes
Below is the short description response codes that can be returned by the FTP server. These codes have been standardized by the IETF in RFC 959. As mentioned earlier, the response code is a three-digit number. The first digit is responsible for one of three outcomes: success, failure, or an indication of an error, or an incomplete answer.| The code | Description |
|---|---|
| 100 | The requested action has been initiated, please wait for the next response before executing a new command. |
| 110 |
 Making money for a car How to make money if not 18
 Earning money on traffic on the Internet: step by step instructions
 Yandex Direct doesn't sell?
 Delivery. Yandex.Delivery Yandex.Delivery
 Practical lessons: registration at Wildberries, working with a personal account and other important tasks Supply of wildberries
 How to enter the personal account of tiu ru
 How "black" and "white" promotion on Instagram works: interviews with developers of the deferred posting service Parasite service