Control panel. Quick access to Windows Control Panel applets. Hardware and Sound
Security and maintenance are important to any computer, and Windows 7 has a number of enhancements that make these tasks easier.
In this lesson, you will learn how to use Action Center, User Account Control settings, and troubleshooting to keep your computer performing at the highest possible level. You will also learn how to restore your system settings using windows 7 system restore.
What is a support center?
The Action Center is where you can view security and maintenance messages for your computer. It also performs troubleshooting on your computer.
To use the support center:
If there are important messages for you, a red X will appear next to the checkbox on the taskbar.
- To open the Action Center, click on the checkbox icon in the taskbar.
- Review the messages.
- Click Open Support Center to respond to messages.
To open Support Center from Control Panel:
- Click Start.
- Go to your control panel.
- Click Check Computer Status under System and Security.
Troubleshooting using the support center:
The Support Center dashboard displays messages for you. About important messages there is a red stripe, for less important ones - a yellow one. If a security or service problem has a solution, then to the right of the message there will be a special button to solve the problem.
Some messages simply indicate a problem, but do not indicate a solution to the computer problem. These messages do not contain a resolution button, but they may contain important information and instructions.
- To fix the problem, click the solution button and follow the instructions on the screen. After performing the required actions message will disappear from the support center.

What is User Account Control?
User Account Control alerts you when a program or user tries to change the settings on your computer. It creates a temporary lock on the computer until you confirm what changes can be made.
This helps protect your computer from malware ... When this feature was introduced in Windows Vista, many users disliked the sheer volume of messages from it. In Windows 7, you can configure how often messages are displayed.
To change your User Account Control settings:


Windows 7 Diagnostics
Not all computer problems show up in the support center. For example, you may have problems with specific device, program, or internet connection. For these types of problems, look at the troubleshooting options.
- Click Troubleshoot at the bottom of the Action Center pane.

In the Troubleshooting pane, you will see a series of programs called troubleshooters. They can help you identify and fix hardware and software problems.

1) Programs
Click here to troubleshoot problems with programs built for previous versions of Windows.
2) Hardware and sound
Use these options to solve problems with external devices eg with a printer or monitor.
3) Network and Internet
Use these options to troubleshoot network connectivity and file sharing problems.
4) Design and personalization
Use these options to troubleshoot display problems with Aero effects.
5) System and security
Use these options to troubleshoot the latest Windows updates and performing maintenance tasks.
6) Online troubleshooting service
Check the box at the bottom of the panel to automatically download the latest troubleshooters from Microsoft.
What is System Restore?
The programs you install can change the system settings, which can sometimes lead to computer problems. System Restore is often the most in a simple way their solutions. System Restore allows you to "rewind" your computer's settings to an earlier state called restore points. Keep in mind that System Restore will not destroy your documents, nor will it be used to recover lost files. However, the function may remove the latest programs and drivers.
To start System Restore:

In which the main functional tools for configuring the parameters of the computer and the operating system are collected. Using commands Control panels you can quickly customize the look and feel of Windows Vista to suit your needs.
Elements in Control panels grouped by functional characteristics. The category name briefly describes the actions that you can perform using the settings located in it. For example, the category Network and Internet serves to configure the network parameters of the computer and establish Internet connections.
Default Control Panel presented in the form Home page as shown in fig. 7.1. In this mode, teams are grouped into separate categories, and the same team can appear not in one, but in several categories at the same time. So, for example, elements from the group Parental control that restrict the child's work on the computer, as well as prohibit access to sites and games of certain content, are located both in the category and in the category Security... Thus, it is easier for an untrained user to find desired settings... Also, the settings Parental control refer to both security settings and accounts (for setting parameters Parental control additional account required).
Rice. 7.1. Control Panel - Home Page
Control Panel can be presented in the classic form, which displays settings icons without grouping. View Control panels is selected in the left part of the window (Fig. 7.2).

Rice. 7.2. Control Panel - Classic View
MULTIMEDIA COURSE
The material in this chapter corresponds to chapter"Control Panel" multimedia course: you can see practical actions by referring to video lectures and interactive tasks.
System and its maintenance
In the category System and its maintenance there are two points - Getting Started with Windows and Backup computer data... They run Centre initial setup and . If you click on the name System and its maintenance, a window will open in which all the settings for this category are presented. Here are the icons Welcome Center, Backup and Restore Center, System, Update centre and so on, that is, the item icons used to set the system parameters.
User accounts and family safety
In a group User accounts and family safety you can create user accounts, define their rights, and configure parental control settings.
Often several people, such as family members, use the same computer. It is more convenient for each user to create their own account. Everyone will be able to log into Windows under their own name, store documents in their own folders, have their own Windows settings and Desktop and so on. Each user can use a password to log in to the system. Accounts can be of two types - Administrator and User... The first has full control over the operating system, can create and delete accounts, configure important parameters etc.
The user can control the computer only within his own account, that is, his rights are limited. The administrator can vary the rights of user accounts.
Parental control Is a feature that allows parents to plan and monitor their child's computer use. You can set the time when the child is allowed to work at the computer (Fig. 7.3), view which programs the child has launched and which sites they visited, etc.

Rice. 7.3. Specifying the time at which the user can work on the computer
Parental control allows you to block the launch of programs, films and sites that are not intended for children (Fig. 7.4).

Rice. 7.4. Assigning programs that the user can run
Security
The next group of settings is Security... Objects in which at first glance there is nothing suspicious, for example email from a friend or a link to a web page, may be infected with viruses or spyware that can lead to unstable computer operation or even system failure. An attacker can take control of your computer, then confidential information and passwords can be intercepted from your computer, or it can turn into a spam server, that is, it will send advertising and malicious messages all over the world without your knowledge.
To avoid this, you need to configure the security system of your computer. Let's start with Firewall... This program allows you to recognize and block the activity of some programs and commands from the outside, trying to access your computer and information on it. Firewall you can enable, disable and configure as needed, for example, define a list of programs that it ignores, because sometimes Firewall interferes with the normal operation of some programs, such as ICQ.
Automatic update allows you to always have a fresh version of the operating system on your computer. Any operating system at the time of release has flaws. Microsoft developers regularly monitor such omissions and release updates that fix bugs, security holes, improve features, and more. Automatic update the latest updates are automatically downloaded and installed on your computer (of course, it must be connected to the Internet).
Anti-malware protection allows you to monitor the status of the antivirus applications installed on your computer. First, the system monitors the presence of such programs and whether they are running. Second, it checks how long the virus definitions files have not been updated and issues appropriate warnings.
Design and personalization
The next group of settings located in the control panel is - Design and personalization... Settings Desktop and skins using tool controls Design and personalization already discussed earlier. This group also includes settings Taskbars and Main menu, and Centre special features which you have already read too.
Consider a group Fonts... Fonts are a graphical representation of a set of numbers, letters, and signs. A font has a specific style and other properties - size, spacing, and slant. A large number of fonts are supplied with Windows. You can install any number of additional fonts on your computer (Fig. 7.5).

Rice. 7.5. Fonts window
Next to the name of the fonts there are icons with a letter. Some have the letter O, on others - the combination TT or TS... Combinations TT and TS indicate that this is a TrueType font. TrueType font sizes can be changed without affecting legibility. If there is a letter next to the name of the fonts O Is an OpenType font. These fonts are TrueType fonts, but contain an extended base character set, including small caps, old-style numbers, and other complex characters.
In the window Fonts there are also point fonts, the display quality of which changes when the font size is changed. PostScript fonts are also used. They are smoother, more detailed, and higher quality fonts. They are often used for high quality printing of books and magazines.
You can see how the font will look by double-clicking on its icon (Fig. 7.6). In the window Fonts you can install new fonts or remove existing ones. Fonts can also be installed by copying their files to the folder Fonts(Fonts) located in the folder Windows, after which you need to go to the window Fonts and update its content.

Rice. 7.6. View font style
Regional settings
The next group of settings in Taskbars- this is Clock, language and region... The first group of settings in this window is date and time opening the window of the same name. Here you can change the current time and date, select a time zone, enable or disable the synchronization of the computer clock with a time server on the Internet, etc. ...
Windows Vista introduced the ability to activate and use an alternate clock for the first time. In the tab Additional hours you can turn on an additional clock and set it to a time different from the current one. For example, the time in a different time zone, which you should always know. In this case, the current time will be displayed in the notification area, and when you hover the mouse pointer over the clock, a tooltip will appear, in which the time on the additional clock will appear.
The second group of settings in the group Clock, language and region- this is Languages regional standards ... Here you can install the required Windows Vista language pack... This feature is rarely used because localized versions of Windows are released so that you can communicate with your computer in your own language.
In this group, you can change the abbreviations and units of measurement that are used by the operating system: the designation of the national currency, date and time formats, decimal numbers, etc. Here you can also change the keyboard layout parameters: add new languages, set the default layout language , change the keyboard shortcut to change the keyboard layout, etc.
Network settings
Consider a group of settings Network and Internet... There are two subgroups here - View network status and tasks and Customization general access to files... In both cases, the Network and Sharing Center window is launched. In Windows Vista, all operations for configuring network facilities are performed in this window, which is the control center for all network operations and setting their parameters. This window shows the mode of use of all active in this moment connections.
Hardware and Sound
The next group of settings is Hardware and Sound... In it, you can install and configure printers, mice, keyboards, scanners and cameras, audio equipment and define the behavior of the system when installing into a CD-ROM drive and connecting removable media.
In the window Printers all printers installed on the system are displayed. Any printer can be shared with other members computer network... To install a new printer, you must press the button Setting up the printer on the toolbar in the window Printers- a step-by-step installation wizard will start. Launch window Printers can also be done by running in Main menu command Printers.
An unwanted printer can be removed by right-clicking on its icon and executing the command Delete context menu. If the system is the default printer, a message appears asking you to confirm that you want to delete the printer. The default printer has a green check mark.
Group settings Autostart determine the reaction of the operating system to installation in the drive optical disc or connecting removable media. When installing a disk and connecting external media, the operating system detects their contents and may offer to launch a specific program to work with data.
For example, when a music disc is inserted into a drive, the operating system prompts you to start playing tracks in the player, and when a flash card with photos is connected, it prompts you to start Windows Photo Gallery... Such Windows actions are configured by default, but can be changed. For example, you can configure the operating system so that when you insert a music disc, it will not start. Windows Media Player and Media Center, or no action at all.
In the window Autostart(Fig. 7.7) there are many drop-down lists, to the left of which are the data types on the connected media - Audio CD, Movie on DVD, Images, Programs and games and so on. In them, you should select the desired Windows response to the connection of media with a certain type of data. There are media with a mixed data type. For example, a single CD may contain music, photos, and documents. In this case, when installing the disc, a window will appear in which several actions will be offered at once: open a folder, start a multimedia player, start a photo album, etc.

Rice. 7.7. Autostart window
If you press and hold down the Shift, the autorun menu will not appear.
The next group concerns sound settings. In the window Sound there are three tabs (fig. 7.8).

Rice. 7.8. Sound window
In the tab Playback an audio device is selected, the parameters of which need to be configured. This activates the buttons Tune and Properties... When the button is pressed Tune a dialog box appears Speaker setting, in which you can select the playback mode: Stereo, Mono, 5.1 , 7.1 etc. The number of available audio channels depends on the capabilities of the sound card. Here you can press the button Examination to check if the speaker placement is correct. When checking, the sound is heard from the speakers connected to the computer in turn, and the diagram on the right side of the dialog box shows the speakers that are currently sounding. This way you will not confuse the left speaker with the right speaker, which is important when listening to stereo recordings and watching surround sound movies.
Let's consider the properties of the sound card. Window Properties appears when the button of the same name is pressed. In the tab General you can change the sound card icon. By pressing the button Properties on this tab, you can view the properties of the sound adapter, the resources it uses, or update the sound card driver.
In the tab Sound Use the Bass and Treble sliders to change the tone of the sound being played. For some types of sound cards, these settings are disabled. This is not a big deal, as many multimedia players, for example Windows Media Player, have their own equalizer, with which you can fine-tune the desired sound.
In the tab Levels changes the volume and balance of sound reproduction from different sources. You can separately adjust the playback volume of various audio files (Wave / MP3), Audio CD, the volume level of the signal input to the line-in or microphone input.
In the tab Additionally you can select the sampling rate and bit depth of the reproduced sound.
In the tab Recording window Sound The recorders installed on the computer are listed. Most often this is a microphone and line-in... The device to be configured must be highlighted, and then pressing the buttons Tune and Properties, open dialogs in which you can configure recording devices.
In the tab Sounds you can select sounds accompanying various events. An event could be Windows startup, mouse click, window minimization, program error, etc. You can select one of the suggested sound themes or assign custom sounds to Windows events using any sound files... For example, you can assign a fragment of your favorite song to start Windows. All changes made can be saved as your own sound theme.
Hardware and Sound concerns the mouse settings. Dialog window Properties: Mouse contains five tabs (fig. 7.9).

Rice. 7.9. Mouse Settings Dialog Box
In the tab Mouse buttons you can swap the mouse buttons (this setting is used by left-handers), adjust the double-click speed, and enable or disable the sticking mode (you do not need to hold down the mouse button to drag objects with it). Sticky mode is convenient for laptop owners, since it is inconvenient to move your finger along the pointing device while holding the key.
In the tab Pointers you can change the appearance of the mouse pointer when performing various operations. There are many ready-made schemes.
You can also choose the pointer view for the action by highlighting the action in the list Customization and pressing the button Overview to find a file with the right kind pointer. You can save your changes as your own theme.
In the tab Options pointer, you can change the speed at which the mouse pointer moves, enable the mode of automatically placing the pointer on the selected button, enable the mouse pointer loop (there will be a trace behind the mouse pointer), enable the mode of hiding the mouse pointer while using the keyboard and the mode of indicating the pointer when pressing a key Ctrl.
In the tab Wheel the reaction to manipulations with the mouse wheel is configured. You can determine how far the document will scroll when the wheel is turned, and set the horizontal scrolling modes when the wheel is tilted to the side (if the mouse supports this function).
In the tab Equipment you can see the name and type of the pointing device (mouse or pointing device on a laptop), as well as by pressing the button Properties, get information about the mouse driver, update it, etc.
Next group of category settings Hardware and Sound v Control panels concerns power settings.
In the window Power supply you can select and change the power saving profile of the computer, configure the reaction to pressing the power button of the computer, and configure the modes to turn off the display and switch to sleep mode when there is no user activity.
Consider the group settings Keyboard in category Hardware and Sound... Window Properties: Keyboard contains two tabs (fig. 7.10).

Rice. 7.10. Keyboard Settings Dialog Box
In the tab Speed the following settings are located.
Delay before replay starts... If you press any key with a number or letter in a text editor, the corresponding character will be entered into the document. If you do not release the key, then after a short time interval the entry will be repeated, that is, the line will begin to fill with the corresponding sign. It is this interval that is determined by this parameter.
Repeat speed... While holding down the key, the line text editor is filled with the corresponding character. This parameter determines the filling rate.
Cursor blink rate... Determines how often the text cursor flickers in text editors.
In the tab Equipment you can view the properties of the connected keyboard, information about the drivers used by the keyboard, and update the driver.
Settings group Scanners and Cameras located in the category Hardware and Sound, is designed to control and configure scanners, photo and video cameras connected to the computer. In the window Scanners and Cameras the icons of scanners and cameras detected by the system are displayed. If the system was unable to initialize the connected devices, press the button Add device and follow the step-by-step wizard to install the scanner or camera. Most likely, these devices will need drivers.
Button Scan profiles allows you to create modes for scanning documents or photos with pre-selected parameters. You can set a low resolution and black and white mode for scanning documents, and select a high resolution and color mode for scanning photos, and you will not need to set scanning options depending on the type of document every time. It is enough to choose a pre-prepared profile.
By pressing the button Properties, you will open a dialog box in which you can view the properties of the device and change some Extra options, for example, choose a reaction to pressing a button Scan(Scan) on the scanner. In this window, you can also load and apply the desired color profile for the selected device. Such profiles are usually supplied as part of software for scanners and cameras.
The next item of the group Hardware and Sound– Device Manager... In the window of the same name, which appears when you select it, a grouped list of all hardware devices of the computer is displayed (Fig. 7.11).

Rice. 7.11. Device Manager window
For example, in the group Video adapters there is a list of video adapters installed on the computer, in the group Sound, video and game devices are located sound cards, TV tuners, modem sound modules, etc., in a group DVD and CD-ROM drives- optical drives installed on the computer.
The list may contain a group Other devices, in which the item may appear Unknown device, Unknown network controller etc. This group contains devices for which there are no loaded required drivers or if the drivers or the devices themselves are not working correctly. The inoperability of the device is indicated by an icon in the form exclamation mark in a yellow triangle.
Device Manager is used not only to monitor the health of the computer hardware, but also to configure it and install the necessary drivers. To configure or install hardware for it required drivers, you must double-click on the device line in the list. A dialog box will open Properties: Device, where Device- the name of the selected device, where you can update or replace drivers, view information about the drivers used and, in some cases, configure settings. In the tab Resources The device properties dialog box displays the resources it occupies. These resources include occupied memory range, interrupt request (IRQ), and input / output (I / O) range. V latest versions Windows data settings are controlled by the system, so you are unlikely to be able to change them, as, for example, you could do in Windows version 95 or 98.
Any device can be turned off and on. Sometimes devices interfere with each other's normal operation. For example, several modems connected to a computer are trying to share common resources, which is not always possible. To disconnect an unnecessary device, you need to right-click on it and, in the context menu that appears, run the command Disable.
In a group Gaming devices categories Hardware and Sound joysticks, game controllers and other game devices connected to the computer are configured.
In a group Windows SideShow you can set up Windows SideShow compatible devices. These are additional displays on the laptop lid, computer case, or on the keyboard. Various information can be displayed on these displays - messages Email, weather forecast, news, etc. You can receive information using Windows SideShow technology without turning on your computer. it new technology, so there are currently few devices that support it.
Group Pen and input device intended for customizing Tablet PCs, which are also not very common. To configure tablet computers, there is also a group Tablet PC parameters where you can change the screen orientation.
Group Color management serves to set and configure color profiles for displays, scanners and printers. Color profiles allow you to more accurately work with the colors displayed on the screen, as well as with the colors when scanning and printing documents. These are the settings windows you are already familiar with.
Programs

Rice. 7.12. Program Window
Group Programs and Features allows you to remove or change the list of programs installed on your computer. Some programs can only be uninstalled, and some, such as a package Microsoft Office, allow a change in composition, that is, without complete reinstallation package, you can install or remove a component of it.
On the left side of the window Programs and Features there is a list of tasks in which there is an item Turn Windows features on or off... With this setting, you can remove components from Windows that you do not use. For example, if the computer is not a tablet computer, the component Additional components for tablet PCs not needed. It can be removed by unchecking the corresponding checkbox.
Some outdated programs may have compatibility issues with Windows Vista. This was encountered in Windows XP when launching programs designed for more early versions Windows. To configure the compatibility of programs, use the item Using old programs with this version of Windows... It launches a step-by-step wizard in which you need to select the desired program and the Windows version it was designed for. There you can also specify additional compatibility parameters - color depth, screen resolution and other settings.
Paragraph Default programs group Programs is used to configure programs that open when launching certain types of files (Fig. 7.13). For example, when you launch an MP3 file, the program is automatically loaded Windows Media Player, in which its playback starts, when the graphic file is opened, the Windows Photo Gallery etc. However, to associate with the program, you can define other file extensions, for example, open MP3 files not in Windows Media Player and in Winamp.

Rice. 7.13. Setting the default programs
In the window Selecting default programs the required program is selected in the list on the left. Further, by pressing the button Select defaults for this program, you can list the file types, opening of which will automatically launch the application highlighted in the list. At the same time, the Programs in the list include not only programs from Windows, but also additionally installed ones.
There is a reverse setting. Using item Mapping file types or protocols to specific programs you can select a file type and then assign a specific program to open it.
The last group of the category Programs– Purchasing software over the Internet... This service connects to servers that distribute programs - commercial and free. You can select the desired program and download it, or read the terms of its purchase and download.
Hello friends! I have written a lot of articles about the Windows 8 operating system, but about one of the most important tools, namely Panels Windows management 8 , the article turns out to be no, today I want to improve and tell you about it. I hope you find this information useful.
The Windows 8 Control Panel is without a doubt the control center of the latest operating system, as it provides access to almost every configuration tool out there. Trust me, even if you do not often spend time at the computer, then you still have to access this panel sometimes. Using the control panel, you can get to the very last cog in Windows.
Of course, I understand that before you manage, you need to explain to people how to get into this very Windows 8 control panel, because there is no button with this name on the desktop. This can be done in numerous ways, and I even wrote an article on this topic, it is called "?" Here I will show you two of the easiest ways.
Move the mouse pointer to the hot left corner and right-click on the Start menu, select Control Panel.
Or take the mouse to the right hot corner and click on the "Options" button and then "Control Panel"

and the Control Center of the Windows 8 operating system opens in front of us.
Windows 8 Control Panel
At first glance, it seems that there are only eight tools in the Windows 8 Control Panel,
But in reality, this is not the case, each of the eight hides a whole group of other instruments. There are already detailed articles on many of the Windows 8 Control Panel tools on our site.
Windows 8 Control Panel may take on a different form. Pay attention to the category button on the right, click on it.

If you select the Large icons option, the control panel will look like this.

If you select Small icons, the Windows 8 Control Panel will look like this.

system and safety
This section of the control panel

It contains 11 tools and the very first one is the Support Center, I'm sure you are already familiar with it.
Support Center

Notice in the lower right corner of the taskbar there is a small checkbox, it is directly related to the support center. If something is wrong with your computer, a red circle with a cross appears on the checkbox.

If you left-click on the warning, the already familiar window of our support center will open, in which there will be certain information for us about what the danger actually lies. For example, I do not have an antivirus program in Windows 8, and the built-in Windows Defender antivirus is disabled. This means that the message from the support center will warn me about this.
If your Windows 8 has a problem, then you will see it in the form of a message like this. For example, in this example, Windows Defender has not been updated for a long time,

And in this example.

The "Recovery" tool is also available here, with the help of it you can roll back your computer to a previous restore point or apply recovery using a pre-created image Windows recovery 8. Details can be found in our article.

In the Support Center can be produced Changing User Account Control Settings

UAC (User Account Control) is a Windows security tool that prevents unauthorized malware from running on operating systems Windows 7, Windows Vista, Windows 8. Pro this remedy we have written an article, if you want you can familiarize yourself. But I'll say the most important thing, by default the slider is set to -Notify only when applications try to make changes to the computer. I recommend that you don't change anything here. Many users immediately after installing Windows 8 disable UAC (by moving the slider down), thereby greatly reducing their security.


If you want, you can change the firewall notification settings or disable it altogether (but it's best not to).

If you have antivirus installed in Windows 8 third party developer, the built-in firewall is disabled automatically.


Provides basic information about your computer: Windows 8 edition, processor model, amount of installed random access memory, computer name, description, workgroup name, information about Windows activation 8. Also from the "System" window you can get to the "Device Manager, setting remote access, system protection (also written in a separate article) and additional system parameters.


It will show you whether Automatic Updates is enabled in your system, if not, you can enable and configure it.


The basic power management settings are shown here. You can create four different power schemes for all occasions and apply them as you like. Click the Configure Power Scheme button. Configure everything here so that it is convenient for you to work on your computer.

Dim the display: After 2 minutes of your complete inactivity on the computer. Turn off the display: 5 minutes. The monitor will turn off after 5 minutes.
Put the computer to sleep: 15 minutes. After 15 minutes of computer idle time (for example, you forgot to turn off your computer and left home), your computer will go into sleep mode. After changing the settings, click the Save Changes button.
You can assign a password when you wake up from sleep mode.


A time machine or an analogue of the "Previous versions of files" in Windows 7, you cannot tell about this most useful tool in a nutshell either, so I advise you to read it. In short, this tool keeps a file history for the section specified in the history settings. hard disk and if you accidentally deleted a file past the recycle bin while working on your computer, you can restore it using the file history. Or, for example, you can work on a file for a week, the file history will remember the state of your file for all seven days of the week, and if you edited the file incorrectly on Friday, the file history will allow you to restore the state of your file on Thursday.


You can protect your data on any section of your hard drive using the built-in encryption tool in the Windows 8 operating system. At the moment, a detailed article is being written on this topic on our website.
Disk Spaces
In this section, you can combine space from various data sources (hard SATA drives, external USB hard drives, USB flash drives, and so on).
Adding Components to Windows 8.1
You can buy a key online and upgrade your Windows 8.1 edition to Windows 8.1 Pro.


This Windows 8 Control Panel tool contains two dozen operating system management tools.

For example, using the Disk Optimization tool, you can optimize disk space defragmenting it.

Disk Cleanup will clean your file system from unnecessary files.

Viewing the events will reveal various errors in the operating system.

So, we examined the very first tab of the Windows 8 Control Panel, let's move on to the second.
Network and Internet


In this section you can change the parameters network adapter... Change advanced sharing options. Create and configure new network connection... Apply network troubleshooter. You can join home group... Configure Internet Explorer browser.


In the Devices and Printers section, you can add wireless or network device to the computer.

In the autostart section, you can configure the parameters various devices, for example, enable automatic playback of a video on DVD, or you can completely disable the autoplay function for all devices.

Here you can change various parameters audio devices- adjust the volume, assign a device to play sound. For example, you connected a TV to your computer and want the sound to come from the speakers of the TV, please go to the Sound tab and set the default device for sound playback to be the TV speakers. Are you interested in the details? Read our article.

Screen
In this section, you can adjust various screen parameters - resolution, change text size and even adjust color calibration.


Here we can uninstall programs, enable or disable Windows components, view installed updates.

Here you can set default programs or map certain file types to specific programs.

For example, you want to open all music files with the .mp3 extension Windows Player Media, please, all this can be done in this section. Click the button to associate file types or protocols with specific programs. As we see now the .mp3 files are opened by the KMPlayer program by default, press the "Change program" button

And let's pick Windows Media Player, that's all.


With this tool, you can customize the external windows view 8, change the theme and desktop background, icon size.

Taskbar and navigation

Dock the taskbar, if you uncheck the box, then you can move it with the mouse to the left or right. Automatically hide the taskbar and the panel can be hidden off the screen.

If you check the item "Display desktop background on the initial screen", then our desktop will be visible through the Metro start screen.

This section will allow you to make various settings with folders in Windows 8. When working in the operating system, you may need to enable the display of protected system files, hidden files and folders. All this you can do here.

When working with various applications, such as a program Adobe photoshop you will probably want to add new fonts to the operating system, you can download fonts from the Internet and add them to this folder ..


In this section, you can change the date, time, time zone and even change the language Windows interface 8.


This section contains operating system settings for people with visual impairment, hearing impairment and limited mobility. Here you turn on Magnifier, Narrator, on-screen keyboard, adjust high contrast. This section includes in-depth help.
Good afternoon, dear readers, not so long ago we updated to windows 10 creators update version 1703 and surprisingly it turned out to be much more stable than its predecessors, it no longer has such a large number blue screens and other glitches, but there is still a fly in the ointment and is called the Control Panel. Surely many have already noticed that now missing control panel in windows 10 Creators Update, it is now hidden so far away that you will spend more time to find it. I'll show you how to fix this and return the control panel to the context menu of the start button.
What is Control Panel
To put it simply, this is a snap-in application, the task of which is to organize the snap-ins by field of application, so that it would be convenient for the user to configure the operating system and administer it from a single panel. It includes the following groups:
- Windows To Go
- Administration
- Windows firewall
- date and time
- Disk Spaces
- Device Manager
- Credential manager
- Home group
- Infrared communication
- File history
- Keyboard
- Taskbar and navigation
- Indexing options
- Explorer options
- Remote Desktop Connections
- Programs and Features
- Default programs
- Working folders
- Speech recognition
- Regional standards
- Windows Backup and Restore
- Browser properties
- System
- Phone and modem
- Color management
- Troubleshooting
- Devices and Printers
- user accounts
- Security and Service Center
- Synchronization Center
- Accessibility Center
- Network and Sharing Center
- Bitlocker Drive Encryption
- Fonts

Where did the control panel go in windows 10
Though new version operating system and has become more stable and there are no problems in it, that the OS gives the error msvcp140.dll, Microsoft is trying to get rid of classic applications in Windows 10 and in version 1703 the "Control Panel" came under the knife. According to Microsoft, this is done in order to make it easier for the user to learn dozens, so that all actions are the same on:
- Phones
- Tablets
- Computers
It seems to be good, but for people who use Windows starting from XP and higher, it is strongly disliked, as they got used to it over the years of use. Previously, in Windows 10, you could easily right-click on the start button and see the item in the context menu

now it is simply not here, you must admit that it was more convenient before, but do not worry, we can return the control panel to the Windows 10 start context menu (Win + X menu) in minutes.

How to open Control Panel in Windows 10 Creators Update
So how to enter the windows 10 control panel after the 1703 update, there are three methods to get into the Control Panel, below we will return the old method through the "Start" context menu.
- via the start menu structure
- Execute through the window
- Through the command line
- Through search
- Via shortcut
Open Control Panel from the Start Menu
You can enter the Windows 10 control panel, using the old classic method, through the menu structure of the "Start" button. We find the item "Utilities - Window" and in it the item "Control Panel"

Open the Control Panel via the "Run" menu
And so we press the key combination WIN + R and in the Run window that opens, write control panel and press Enter, as a result of which you will open the classic control panel.

V command line you can also type control panel and press Enter, the effect will be the same.

Open control panel via search and shortcut
You can enter the control panel using the search, for this we press the magnifying glass icon to the right of the "Start" button. In the search field, enter the control panel and at the top you will see the desired shortcut in the search results.

And the last method is through a shortcut. Since the rig itself lies along the way:
C: \ Windows \ System32 \ Control
Then by launching it or creating a shortcut from it to the desktop, you can turn on the Windows 10 Control Panel.

We have learned how to find the control panel in windows 10 Creators Update, now we will return everything as it was and add an item to the start context menu.
How to return Control Panel to windows 10
In order to return everything as it was, there are two ways:
- Create a shortcut and place it where you want it
- Using the Win + X Menu Editor utility
Win + X Menu Editor is a free utility, you can download it from the link and you need it in order to customize the context menu of the bunch button, which is invoked using the WIN + X hotkey combination.
- Launch Win + X Menu Editor
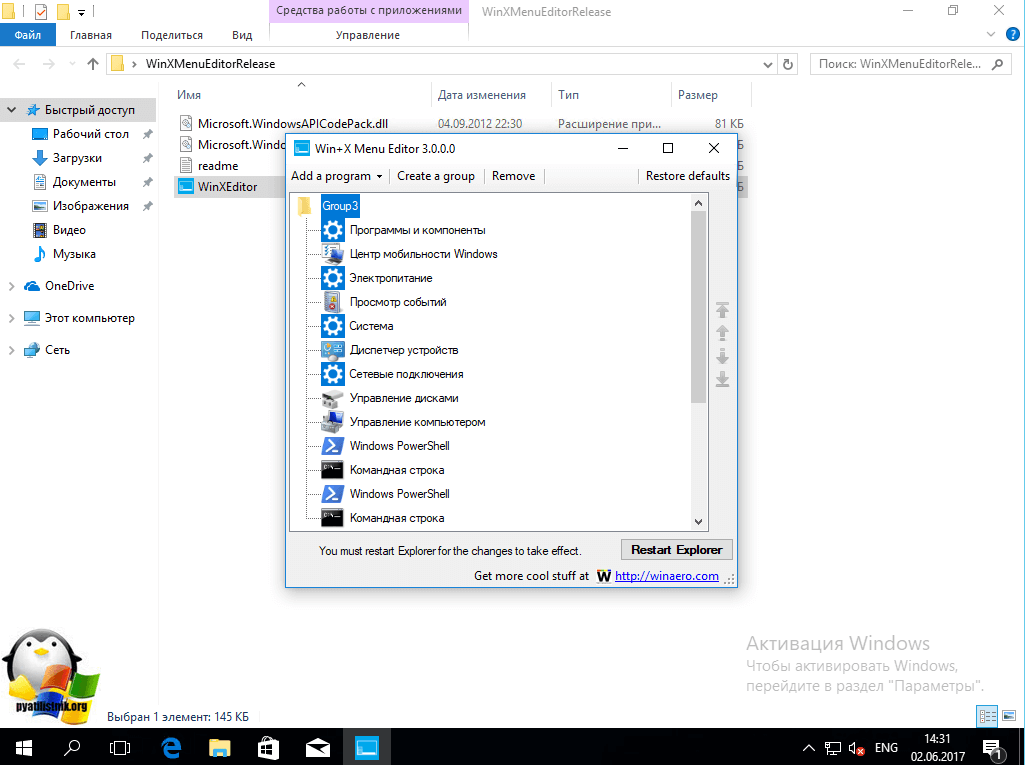
- Select Group 2, this area allows you to return the control panel to the desired location. Please note that the already existing "Control Panel" item has a gear icon and will open the "Options" item, but we need to click the Add a program> Add a Control Panel item at the top, it is he who will return the old control panel to windows 10.

In the resulting list, find the item "All elements of the control panel" and press Select.
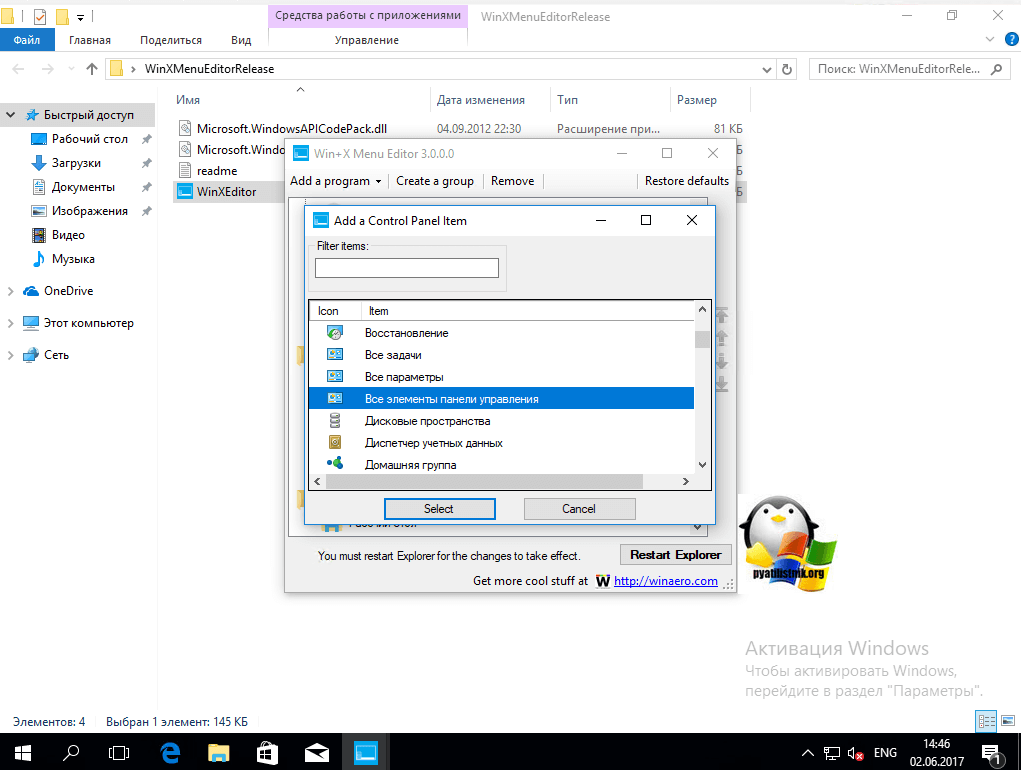
Now you need to restart windows explorer to do this, click the Restart Explore button.

We check everything, your Win + X Menu Editor utility should add a control panel to Windows 10, I have the "All Control Panel Items" item, I don't like it and I want to rename it.

Go to the Win + X Menu Editor utility and press the F2 key on the desired item to rename the menu item.

We set the name of the element.

We check the context menu of the "Start" button and see the restored item Control Panel we need! As you can see, it is very easy to restore the Control Panel using this method, but there is still an alternative.

Restore by adding a shortcut
In order to return the control panel to the Win + X menu, you need to copy the control panel shortcut (you cannot create your own, they will not be displayed in the menu) of the context menu from previous version Windows 10 (up to 1703) or 8.1, you can download from me or go for more old version along the way
After that, a shortcut to the classic control panel will appear in the menu.

I hope this instruction helped you and the willows were able to find and return the control panel in the new operating system Windows 10 Creators Update,
The control panel is used in operating rooms Windows systems starting with Windows 2.0. Therefore, users are very accustomed to it and can no longer do without it. But, in the Start menu there is no longer a link to Control Panel; instead, using the Start menu, you can open a new panel with settings called Settings. Nevertheless, everyone's favorite "Control Panel" remained in the system and can be opened. Here's how to find Control Panel in Windows 10.
Method number 1. Right click on the "Start" button.
The easiest way to find the Control Panel in Windows 10 is to right-click on the Start button. After that, a small menu will open, in which there will be an item "Control Panel".
Method number 2. Search in the "Start" menu.
You can start any program or system tool by searching the Start menu. You can also use it to find the control panel. To do this, simply open the Start menu and enter the phrase "control panel". After that, the system itself will find the Control Panel and show it to you.

Method number 3. Execution of the "control" command.
You can also find the Windows 10 Control Panel using the Run menu. To do this, press the key combination Windows + R and in the window that opens, enter the command "control".

Alternatively, this command can be executed using the Command Prompt.
Method number 4. Create a shortcut.
If you frequently use the Control Panel in Windows 10, then you can create a shortcut to it on your desktop. To do this, right-click on the desktop and select "Create - Shortcut".

After that, a window will appear in which you need to specify the location of the object. Here, just enter the "control" command mentioned above. Then click on the "Next" button.

At the next stage, you need to enter the name of the shortcut and click on the "Finish" button.

As a result, a shortcut to access the Control Panel will appear on your desktop. If desired, you can configure the opening of this shortcut using a keyboard shortcut. To do this, open the shortcut properties and set the desired key combination in the "Shortcut" field.

After saving the properties of the shortcut you will be able to use the keyboard shortcut of your choice.
 How to make money in Minecraft: creating maps, hosting a server and selling resources Creating a Minecraft server
 How to set up Skype on Android How to use the mobile version of Skype
 The basics of programming for beginners - where to start learning, the best courses and lessons What you need to study as a programmer
 Skilled sailor Able Seaman What is 1 point in degrees
 How to change a cartridge in a printer: step by step instructions
 About microcontrollers for beginners - the history of creation, the main types and differences What is the difference between a microprocessor and a microcontroller
 Personal information space of the teacher (from work experience) IV