Update and restore (flashing) iPhone, iPad. Sony Xperia Update and Recovery - Instructions Update and Restore
How to prepare iPhone and iPad to iOS update
Some users prefer to prepare their devices to the update. Personally, I never do this, but if you are very worried about the safety of your data, it is better to make a number of steps that will help you to secure from possible failures And errors.To begin with, you need to make a backup copy iPhone. or iPad. I prefer to create it in ICloud, but you can and in iTunes.
After that, try to free at least 2 gigabytes on your iOS device. This amount of free space will be more than enough to unpack the necessary files.
And the last one, your device must be connected to the network or to a computer. It is necessary in order for the device to not take at the time of the update, but still if it happened, you will have to make a recovery procedure, but about it below.
How to update iOS version on iPhone or iPad
You can manually update in two ways:- via iTunes, when connecting the device to a computer;
- "By air", with using wi-fi Directly with iPhone or iPad.
And updated. Naturally, the gadget should be.
How to restore iPhone or iPad from backup
IOS-Device Restore implies full formatting Built-in drive with subsequent installation of the latest version of iOS. The need for recovery occurs with a variety of circumstances and is recommended when you unstable your iPhone or iPad.If iTunes sees the gadget, then simply click on main page Devys management button "Restore". If a latest version You have already downloaded, you can click "Restore" holding the SHIFT key on Windows and Alt on OSX, after which you will have the opportunity to specify the path to the loaded firmware.
At the same time, after flashing the iPhone, iPad, you will be prompted to restore data from the backup. If you did not turn off the function reserve copyThe copy of the data and settings is made automatically with each device synchronization with iTunes.
If iTunes fails to see iPhone or iPad, then you need to restore the device from dFU modes. Read more about how. Throughout flashing, do not disconnect the device from the computer.
If you did not find an answer to your question or something did not work out, and in the comment below there is no suitable solution, ask a question through our. It is fast, simple, convenient and does not require registration. Answers to your own and other questions you will find in the section.
19.10.2015
How to upgrade windows 8.1 or 7
before Windows 10.
If you have a desire to update your Windows 7 or 8 to Windows 10, but in the Computer notification area, the message about such an opportunity does not appear in any way - do not despair. It is not necessary to wait for this moment. You can update the system right now.
After upgrading to Windows 10, almost all programs and their parameters are saved on the computer, with the exception of incompatible. You may also have to download and install new drivers for some devices. If something does not suit you after the update, you can easily return to the former version of Windows.
11.10.2015
 How to refuse to update
before Windows 10.
After the release of Windows 10, Microsoft, which is known is the developer of this operating system, suggested users licensed windows 7 and Windows 8 to update free to "dozens".
The update menu to Windows 10 automatically appears in the computer notification area and periodically reminds the user about himself, even if he is not going to use it. With that, the ability to failure from updates in this menu is not provided.
However, you can refuse to upgrade to Windows 10 and remove its icon from the notification area.
15.09.2015

in Windows 7, Windows 8
Disabling automatic update in Windows 7 and Windows 8 is the privilege of the computer administrator. If the user does not have administrator rights, it will not be able to disable auto-update.
15.09.2015
 How to disable automatic update
in Windows Vista.
Disable the automatic update in Windows Vista can only a computer administrator.
14.09.2015
 How to disable Windows XP Auto-update
The automatic update of Windows is not recommended to disable, as this may adversely affect the level of security and stability of the computer.
However, in some cases, it is still advisable to disconnect the auto-update. For example, if a computer uses expensive mobile Internet connection or in other similar situations.
19.10.2015
How to return to windows 7 with Windows 10
or Windows 8.
Not everyone fell by to taste Windows 10. Many users after updating the operating system of their computer are interested in how to return Windows 7 or Windows 8.1 back.
Probably B. microsoft. We predicted this option for the development of events and provided for the possibility of fast rollback of "dozens" to the "eight" or "seven" (depending on which system was updated from).
You can use this feature during the first month. windows work 10.
08.02.2016
Creation, Use and Removal
points windows restoration
Windows Recovery Point is a copy of the main settings of the computer that can be used to quickly return the Windows operating system to the state in which it was at the time of creation of this point.
Fans experiment with a computer be able to use the recovery points are simply necessary. If something goes wrong and the computer will start working unstable, in just a few minutes it can be returned to the operating status, "retire" settings to the last stored point.
For the purpose of economy disk space At the same time, stored on a computer many recovery points inexpedient (one is quite enough).
Due to the presence of viruses, inconsistencies of drivers or softwaremay be failed in the operation of the OS. If you have "flew" windows, do not hurry to panic. The situation can be corrected by returning the status of files and programs by the time when PC worked properly.
During operation of OS Windows 7th, 10th or 8th version, certain errors and malfunctions may occur. As a result of such failures, the new launch of the operating system in operation becomes impossible. At the same time, it is not necessary to make a time-consuming reinstalling OS. It is enough to restore the system.
OS Restore Using Recovery Environment
When working, use the following scheme of action:
- Restart the computer, click the F8 key during loading;
- Troubleshooting;
- System restore, select OS recovery point;
- Click "Further" and again "Further";
- Press the button "Ready", Perform a system to restart (select the download with the last successful configuration in the menu).
There are several ways to which you can resume to resume OS. Some of them are based on a rollback to the saved parameters. Others simply clean the data.
Perform the "resuscitation" of the OS can be one of the ways:
- using the selection of recovery points;
- by using the command line;
- by means of a secure mode;
- using the recovery environment;
- using the image / boot disk.
Restore the OS system with the use of control points for resuscitation of the system is one of the most accessible, efficient and popular options. To apply it, you need to hold a number of clicks:
- Panel "Start";
- "System Restore";
- "Further";
- "Choosing a recovery point";
- "Ready".
With such an operation, problems will be eliminated in the computer, changes are canceled and the operating status of the system, which allowed the PC to be loaded normally. Loss of data, files and documents does not occur with this recovery. All data is saved. The operation is reversible. You can roll back the system to the previous computer status and use another point for recovery.
Many are asked as independently (manually) to make a reducing point so that in the future to choose it? To do this in the same menu "Start" - "System Restore" You can at any convenient and suitable moment for you to create the most such point. It will be saved with the current date, which can only be remembered.
From the recovery point
In computer engineering there is a concept as a recovery point. These are saved PC parameters. As a rule, saving occurs automatically with each successful OS load. The easiest way to resume Windows 7 is to use these data.
Press F8 when booting a computer. This command will call the system launch options. Next, you need to select the option of the last successful configuration.
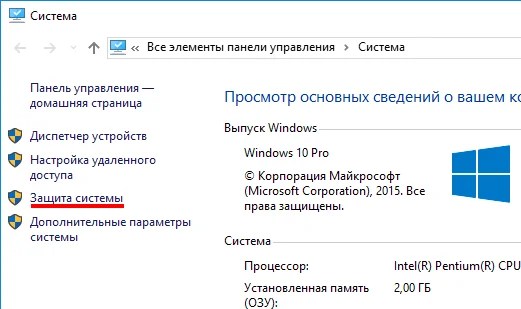
You can use another way. Enter the properties of the My Computer folder. Locate the system protection line by clicking on which you open the same name dialog box. Click Restore - Next. We specify the control date, specify the discs that are subject to correction and confirm the actions. After rebooting the PC should work normally.
No recovery points
You can fix the problems with the OS and without the presence of recovery points. To do this, you will need to resort to the LiveCD program. It needs to download and record on a flash drive with extension.iso.
Next, all actions will occur in the BIOS. You must configure the download from the flash drive. To do this, in the BOOT section, select USB-HDD in the FIRST BOOT DEVICE line.
Before proceeding directly to recovery, copy everything files on the removable drive. The LiveCD program provides for a special menu for these purposes.
We will be corrected system errorUsing an archive copy. Connect the USB flash drive, open the Windows \\ System32 \\ Config \\ folder. Files with Default, SAM, Security, Software, System, System, System, you need to transfer to any other folder. We carry similar files from the RegBack folder and restart the computer.

The described method will only help if the problem is associated with the registry.
Command line
You can resort to "renovation" of Windows 7 from the command line if the PC began to hang or slowly work, however, the system is loaded. Enter the menu "Start" And with the right mouse button, run the command prompt on behalf of the administrator. Set the rstrui.exe command, which will open the system recovery program. Click "Further". In the next window, select the desired point of rollback and click again. "Further". Upon completion of the process, the PC should work normally.
Go to the utility can otherwise. Go to B. "Start". To call the command line click "Run" And we prescribe a CMD command. Click the mouse on the found file of cmd.exe and wait for the launch. Next, we enter B. command line rstrui.exe and confirm the action of the Enter key on the keyboard.
It is not always possible to be reinforced and pre-create an OS recovery point in advance. There may be problems that block the variant of the "resuscitation" of the PC. Then you can use other, no less effective and easy option - Restoring Windows system using the system itself.
Rely on the scheme:
- Icon "My computer" - right mouse button "Properties";
- "System Protection";
- In a new window, click "System Protection", recovery button;
- "Further";
- Select the recovery point in accordance with the date;
- Indicate the recoverable system disks;
- Confirm operations and reboot the system.
Restoring Windows 7 by means of a secure mode
This method is preferred if the usual loading of the system is impossible. Then after pressing the PC's power button on system block Hold the F8 key to call "Launch" menu. One of the options "menu" is « Safe mode» . Select it and press ENTER on the keyboard. As soon as Windows proghes, we perform the algorithm of the actions that we described earlier.

Restoring Windows 8 / 8.1
If you managed to run OS, you can resume Windows 8 through "Parameters". Mouse over the right top corner And enter them. Click on "Changing computer parameters" – . Section "Restoration" Suggest several options:
- "Normal recovery with information preservation".
- "Deleting Data and Reinstall OS".
- "Special option".
Decide what exactly needs to be done. Next, follow the menu prompts.
If you choose the last way, in the window that opens, click on the diagnostic item. You will be offered such options:
- "Restore";
- "Return B the initial state» ;
- "Extra options". This item includes the ability to roll back to the desired renewal point.

To resume Windows 8.1, press Win + R and call SYSDM.CPL. In the properties window in the tab "Protection" Specify the necessary system Disk. Click "Restore". Press "Further"You can see a list of rollback points. Select the desired and click "Search for affected programs". Changes that were produced on the PC from the selected point will be deleted. Complete the process by clicking "Ready".
In case of operation with Windows 8, malfunctions may occur incorrect work Internet, etc. To fix this, you can use the classic recovery method through the recovery points.
Another option is to roll back the system. To do this open the menu "Start" - "Control Panel" - "Centre windows updates» . Select item "Delete updates". You can also make using the command line.
So, in the opening list of updates, we remove those of which from the installation of which (see the date) problems and problems began. Remove unnecessary files And make a reboot.
In Windows 8.1, you can reset the settings. Important files With such an operation, they will not be affected. The method is effective, but for its implementation you need the OS fragilely loaded. We use the algorithm:
- The right side of the monitor - "Parameters";
- "Change settings";
- "Update and Restoration" - "Restoration";
- "Recovery without deleting files".
If you log in in conventional method It is impossible to use the disk with the system. Load the installation disk, choose "System Restore". Press the button "Diagnostics", I. "Restore".
If problems arose with Windows 10, press Windows + Pause. Go to "System Protection" and press "Restore" – "Further". Select the desired indicator and press again. "Further". Upon completion, click "Ready". The computer will be automatically rebooted and the changes will take effect.
One of the advantages of "dozens" is the ability to return the settings to the factory. It helps to avoid the need to install the system first. To reset data go to "Computer Settings" – "Update and Security" – "Restoration" – "Return the computer to the original state". Click "To begin".
You can take care of the possibility of rollback in advance. Renewal points can be created independently or configure them. automatic creation With the desired frequency. To do this, select the Update and Security Parameters, select Archiving Service. Specify where you want to save copies, click Add a disc. After selecting the device, the function will be activated.
Restore windows system 10 can be again through the use of recovery points. At the same time, the system rollback will occur until it bootably loaded and worked without failures. This method Recovery is described at the beginning of the article.
If the OS is not loaded, the warning table with the key appears on the screen. « Additional options recovery ". Click it and choose "Diagnostics" - "System Restoration". We make the selection of the Windows recovery control point, wait for the system rollback and reboot.
If such operations did not help and the computer continues to work incorrectly, you can roll back to basic settings. Part of the programs and utilities personal settings PCs will be reset, and personal data - deleted.
This technique is used extremely rarely if the other options described above do not help. The algorithm of actions with this:
- "Start" - "Selecting Parameters" - Tab "Updates and security";
- Paragraph "Restoration" - Button "To begin";
- Select delete all files or partially save them.
System rollback after that will take 40-90 minutes.
Renewal using the installation disk
One of the radical methods of correcting the error involves the use installation disk. By running it into the BIOS, click Restore System. In the Troubleshooting point, specify the desired action. Next, follow the system prompts to complete the process.
The "File History" utility (File History) in Windows received its name for the ability to restore older versions of the file. This feature is part of all backup programs, although it is often called "Restore" (Restore). Although the idea is the same: from the backup archive you are withdrawn old version file. The "File History" feature simplifies this process and work with files in general.
In order to return the old version of the file with backup diskYou need to perform the following steps.
- If you need to replace the current version of the new one: select "Restore", and then "Replace the file in the target application". The current file is replaced with a backup.
- In order to save both the current version and the restored backup, you must click "Restore" and select "Restore B". Select the target folder for the recovered file.
- To view an archive copy: Click Open. The file is not restored, but you can view its contents to find out whether it contains the necessary information.
4. Then click Close the "Properties" window when you finish. If a previous versions No, you will see a message "There are no previous versions available after step 2. This means that the file is new and has not been copied that the file has not changed or what backup copy this file does not exist. The "File History" utility is not a replacement for recovering a file from the basket; If you delete the file, you need to restore it from the basket.
The file history works only with files in the folders you selected when setting up the utility.
Videos: How to restore an incomplete or damaged Microsoft Word, Excel or PowerPoint document
Leather things are comfortable, beautifully looks. Require a delicate circulation, because over time, flooding areas, scuffs appear on the surface, and with an inaccurate movement you can break clothes. How to update the leather jacket at home and what to do if you, by chance, broke it? The main thing is not to panic and not hurry to throw away.
In order for the skin with time did not save and not covered with cracks, it is necessary to periodically refresh it and restore it. You can do this using different means.
Milk and Skipidar Mix
The components (milk and turpentine) are mixed in equal amounts and applied to clothing. After that, the jacket should be hung on the shoulders, replete folds and leave until complete drying. Then you will need to apply a special leather cream or a fatty hand.
Creamy oil and ammonia
To a liter of hot water, add 3 tablespoons of oil and wait until it melts. Then throw to the mixture to mitigate 15 drops of ammonia, thoroughly stir and cover the skin with this composition.
Fish fat
How to soften the leather jacket in this way? Heat the liter of water and dissolve 1/2 of the bar of the economic soap in it. Then add the ammonia alcohol (2 tablespoons) and fish oil (1 tsp.). Mix thoroughly to the recovery tool, and, smoeming a rag or a sponge in it, treat the skin.
Ammonia
Tools apply on the skin, and then process it with glycerol. The main thing is not to use such a way with ammonic alcohol for lacquered materials, suede and nubuck.
Castor oil and squirrel eggs
The ingredients are mixed in the proportion of 50 ml of oil per protein. You must have a homogeneous mass. With the help of a sponge evenly apply the restoring composition on the old jacket and leave to dry, waving a thing on the shoulder.
The following ways will help make a thing soft, which will prevent the formation of scuffs, scratches, cracks and other damage, and also give skin shine.
How to remove scuffs?
 In the process of socks, the surface of the leather jacket is wiping and becomes lighter in these areas, and also appear female places. How to remove these damage?
If a we are talking About light loss, you can process this place with a fat cream for hands or special wax for the skin. As well as for these purposes, fresh orange peels are used.
Sawdilled areas are processed as follows:
- Problem places are degreasing with alcohol.
- When the tool evaporates, the surface is processed by lemon juice.
- After drying, glycerin is applied to the skin.
At the end, it would be nice to handle these places with cream or wax, and then graze a piece of soft tissue.
How to give shine?
 Sunlight contributes to the gradual loss of the original shine of the skin. How to restore the former view of the jacket and return the brilliance? Apply the following ways:
- Lemon juice and alcohol. To a liter of water, add a citrus juice 1 and a teaspoon of alcohol. Apply the composition on the skin, having impregnated with a sponge of the foam rubber, and then wipe the thing dry.
- Summer and soap. Add 5-7 drops of ammonia to a strong soap solution and process the thing. At the same time, make sure that the skin does not much soak, and the cleaning solution did not hit the product lining.
- Coffee grounds. Put the remains of coffee in a bag of woolen or flannel fabric and gently wipe the entire surface of the jacket.
- Glycerol. With it, we not only give shine, but also soften the material. Wipe the thing with this composition and dry on the shoulders.
The listed methods will help not only return the material shine, but also remove pollution on the surface.
How to return the color?
 If you wear a jacket for a long time, it leads to the fact that it wipes on cuffs, collar and elbow bends. The color becomes uneven, and the thing looks unattractive. But it does not matter, you can paint the skin, and the clothes will become like a new one. To do this, you can apply paint in the form of an aerosol or powder, picking up the appropriate shade.
How to treat a leather jacket with powder composition? Observe such an order:
- Divide paint with water according to the instructions. Watch that there are no lumps left.
- Perfoliate the solution to update the color and place the jacket on the time specified in the instructions.
- Then press and carefully pop up the product.
- Treat the skin with a solution of liter of water, a glass of 3% vinegar and 2 teaspoons of salt. It will help secure the dye.
- Send the processed product to be dried.
Remember that hang leather things, including for drying, follows only on the shoulders.
How to restore color with aerosol paint and remove scuffs? Make the following:
- Wipe the thing with a damp cloth.
- Color her on her shoulders, placing the collaps and races.
- Spray the aerosol, holding the canister at a distance of 20 cm from the clothes.
If during painting you noticed the drums, immediately erase them with a foam sponge. After processing the jacket should dry at least an hour.
 No one is insured against the gaps and cuts of the delicate material, even if you handle the thing neatly. It is not possible to sew a leather jacket possible, but it can be repaired in a different way, namely, stick. How to do it right? Use one of these methods.
How to put a hole with liquid skin?
This composition makes it possible to disguise problem place And prevent further "sprawling" of the material. You will need a piece of bandage and a small spatula. You can make yourself, cutting off from an unnecessary plastic card strip of 1 cm wide.
Products are repaired in this way:
- Cut from the bandage a piece whose size will be slightly larger than damage.
- Apply a liquid skin on the face with the front side of the product and attach the bandage, tightly pressed it.
- Top to spread the bandage with adhesive composition, while pulling a thin fabric. It is necessary to do it carefully, otherwise it breaks.
- Leave the glued product to dry for 10 minutes, and then apply liquid skin again.
- After that, the thing should dry at least 3 hours.
How to eliminate cut with glue?
This damage is least problematic, and it is possible to flick the cut that it will be completely unnoticed. But for this you need to choose the right glue. He must have such characteristics:
- Elasticity.
- Viscosity.
- Heat resistance.
- Resistance to moisture and fat.
- Ability to quickly stick.
As a rule, the "moment" or niphite glue is most often used. To do this, you will need to do the following:
- Prepare glue, skin flap or suede and workplace. Better, if it is a table in a well-lit part of the room.
- Remove the torn leather jacket, find a place on the lining, where the outer seam passes. It is there that should break the material.
- After you pursue the lining on the jacket so much that you can put the hand in there, click on the place of the cut from the inside.
- Perform degreasing damaged area and "patch" with alcohol. This is necessary so that the glue "grabbed".
- Apply the adhesive substance to the cutting area, wait 15 minutes, spread the glue re-and tightly attach the flap from the wrong side. Under pressure, the composition is better glued.
- Remove the repaired product "evident", with the help of toothpicks, tighten the edges of damage as close as possible to each other, to better glue them.
- After you make a sticking, place a heavy item on the site of the former cut and leave for 24 hours.
When the glue is completely dry, tinted the edges of the "patch", and it is also necessary to neatly cut the spin lining.
The above methods will allow repair the product so that the damage will become completely invisible.
 Privazer program for cleaning the computer for the benefit of performance and in order to notice tracks of activity
 How to change Adobe Reader in Russian How to put Russian in Adobe Reader
 Professional video shooting on smartphone
 Free SAMSUNG KIES drivers in Russian for computer with OS Microsoft Windows
 How to create a channel on YouTube and make money - step by step instructions
 How to completely remove Yandex browser
 Free Update Anti-Virus 360 Total Security do not put vulnerabilities