The cable that connects the drive to the laptop. Discovers external for computer and laptop. When the external drive may need
There are cases when the optical drive of the laptop fails. You can leave for a warranty repair or replacement for a while, and on a laptop you need to open the disk on the laptop. Of course, you can go to friends, make a virtual disk image, copy it to the USB flash drive, download the Mounting Program virtual images And with it to open the disk. But you can do differently. Take a drive from a home computer and temporarily connect it to a laptop. The second way will be much faster and more convenient.
You will need
- Laptop, USB-interface drive or SATA interface, USB-IDE / SATA adapter
Instruction
Instruction
The method of connecting the drive depends on the interface of your drive. If you have a disk drive with a USB interface, connect it to any USB port and turn on. Wait until the system detects new connected equipment and installs drivers. After the window appears, the "Device is connected and ready to work". Go to My Computer. The connected drive icon will be there. Now they can.
If you have a SATA disk drive, it will have to purchase a special USB-IDE / SATA adapter. In addition, via this adapter can be connected not only to optical drives, but also hard drives and other equipment that supports these interfaces.
Turn on the laptop. Wait until the operating system starts. Must work a wizard for connecting and setting up new equipment, as in the case of a USB drive. Further the procedure is the same.
If the device was not detected automatically, click the "My Computer" icon with the right mouse button and select "Properties". Next to select the Device Manager tab. A list of equipment will appear. Upon top row, right-click and select "Update Equipment Configuration.
If the "Unidentified device" appears in the list, click on it with the right mouse button and select "Update Drivers". In the next window, select Automatic Drivers Search. If you have an Internet connection, you can install a tick on the line "Use Internet".
Video on the topic
Many movie lovers came across such a function as a binding a DVD player to a specific zone. This is caused by the struggle of film rental with the so-called video pools. The most profitable situation was the owners of multizone devices. Nai ordinary DVD can also be made multizone.
You will need
- Software for flashing DVD drive.
Instruction
Determine the zonality of the installed DVD a. Click the right button on the "My" icon and select "Device Manager". In the window that opens, find the installed DVD drive unit. It is usually indicated as "DVD and CD-ROM drives". Select the required DVD from the list drive unit And right-click we call the submenu. Then select the function "Properties". In a new window, several of which "region for DVD" will open. It contains the region, as well as the possibility of hardware changes.
Run the program to change the region's code. It will determine the location of the distribution and makes the appropriate changes to the provision. This operation occurs similarly to tweaker software, configuring Windows for users' requests. Just specify only to which zone should bind DVD drive unit and that's it. Program B. automatic mode Products required installations.
If you cannot change the zone for the DVD region from the available DVD drive unita, the virtual DVD-ROM. The most famous of them were initially made by multi-member, so when playing files, the requirements are automatically adjusted for these requirements.
Video on the topic
note
In total, the user is given 5 attempts to change the region. When attempts are completed, the DVD drive will stop working, even after reinstalling the OS or transfer the drive of the drive to another computer.
Not all DVD manufacturers are equipped with similar features. For each region, they, by agreement with large film companies, produce DVD drives only for a particular region - Europe, Asia or America. In this case, in order to make a DVD multi-member drive, special software will be required.
Sources:
- DVD DVD Discussion Drive DVD 2018
To connect to a CD-DVD computer drive unityou need to know some nuances this process. In particular, you should know what measures should be taken in order not to get a blow to the current and not harm the computer as a whole.

You will need
- CD-DVD drive, computer, cross screwdriver.
Instruction
Preparation . Before you start installing drive unit You need to de-energize it. If the PC is in working mode, turn it off through the "Start" menu by selecting the "Shutdown" item. After that, switch the toggle switch on the rear panel of the computer that is responsible for the power to the "OFF" state. After the PC is de-energized, remove with system Block Side, unscrewing them fixing them. Removing the cover C, you can proceed to connect drive unitbut.
Install and secure screws drive unit on a specially provided shelf. Pay attention to the loop that comes from the motherboard to the hard disk. On it you will see a branch with additional plugs. Connect the plug data to the corresponding on drive unite and make sure that the contacts are tightly adjacent to each other. After you connect, you can assemble the system unit.
Before turning on the computer, do not forget to switch the power to the "ON" toggle. Wait until the system is full. The computer will automatically determine the type of connected device, after which you can be installed. Installing any additional drivers is not required.
Video on the topic
Modern laptops provide not only connecting to them external hard discbut also replacing storage devices already mounted in them. For installation hard disk The laptop is not at all necessary to be a specialist in the computer industry, just possess the initial knowledge.

You will need
- Notebook, hDD.
Instruction
For a start, let's talk about what is the hard drive of modern and how to get to it. The inexperienced user will surely think that for replacement it will have to spin the covers and other ridiculous "television". Not. In our case, everything is simple. The hard disk is a compact plate that may be not only individual (approach specific model laptop), but also universal (approach several models immediately). What needs to be performed to install a hard drive in? Perform the following.
Turn the computer and find the cover on which the hard disk will be hidden. This cover is usually attached on the latches, and it is extremely difficult to confuse it with anything (however, it should be confused with, and happens). Remove this cover. After that, you will open the hard disk installed. To understand that this is exactly two ways: according to characteristic stickers on the device, as well as simply comparing installed device With the one on which you plan to replace it. If both devices are identical, you can proceed to replacing the hard disk.
Freeing the old hard drive from all fastening elements that lock it, pull out the device from the housing. Install in its place new hard Disk and attach all the elements of fasteners into place. Close the lid, after which, turn on the laptop. At this stage you will need installation. new system And disk formatting (all this is done in the BIOS).
Sources:
- hDD installation In a laptop
Virtual optical drives - A very convenient thing that allows you to save and run on a computer virtual copies of discs. It does not need to insert them into the PC drive every time. You can also mount several optical drives at once to run the number of information carriers you need at the same time.

You will need
- Computer, Alcohol 120% program, Internet access
Instruction
Virtual mounts are used special programs. One of the most famous and multifunctional programs - Alcohol 120%. Download and install it on your computer. After that, a request for a reboot of the computer will appear in the window. Click on the "Restart Computer Now" string.
Run the program, after which the automatic mounting of the virtual drive will start. Wait until the program mounts the drive. Then go to My Computer, where in addition to the physical drive, the virtual drive will appear.
If you need several virtual drives, you can mount them through the Alcohol menu 120%. On the left in the main menu of the program is the toolbar. Find the "Settings" section and select "Virtual Disc" in it. Find "Number virtual disks" At this point, select the number of virtual disks you need. Consider the more virtual disks you select, the longer the process of mounting virtual drives will go.
In order to mount on the created virtual drive, in the program menu, click on the "Search Search" tab. From the found virtual disks, select the desired discs And at the bottom of the program window, click "Add Selected in Alcohol".
Then go to the main menu of the program. The files you need are stored in the right window. By right file Right-click and select "Mount to Device".
For creating virtual disk Insert the disk into the physical drive of the computer. In the main menu of the program, on the toolbar, select "Creating images". In the next program window, click "Start". Be sure to wait for the end of the process. Upon its completion, you will have a virtual one, which can be mounted on a virtual optical drive at any time.
Video on the topic
For a long time, for most of us, the computer was not just a gadget, but a full-fledged assistant in work. Computer from time to time requires changes to specificationsthat is, its upgrades. For example, it may be necessary to connect a second drive. How to do it?

You will need
- Two drives, loop, power wires for drives, screws, screwdrivers.
Instruction
First of all, think if you need two simultaneously connected drives? Very often a man buys a new modern drive And we put it the second, because it is a pity to throw out the old one. Of course, you can leave the old drive in the system, but it is worth thinking about the feasibility of its functioning. If a new drive Multifunctional, and old knows how to perform one or two operations, then it is impractical to leave it, since the old drive will be most of the time to be in, but consume energy and computer resources, that is, to create an excess load on the system.
Disconnect all wires from the system. Be sure to do it to avoid shock. Remove the system block cover to gain access to the insoles. If you disassemble your computer for the first time, carefully examine the instruction manual. There you will find ways to fasten the cabinet parts of your computer. Also familiarize yourself with the instructions for assembling the computer. In it you will find the location and connection of all wires and loops.
Now you should decide on the location of the new and old drives. Usually there are up to four cells to install drives. Place the drive in a convenient order for you. Adjust the position so that the opening button is pressed clearly. After that, fasten the drives four screws. Find the loop that connects the motherboard and drive. It has 34 veins and always begins with the Red Wire. Now you need to connect the drives with it with it. Remember that there must be intersecting wires between the connected drives. Then one of the drives will be determined as the main, and the other as the secondary one. Also connect the power wires to both drives. Remember that your power supply must withstand work with both drives, if it is weak, then you will have to buy a new more powerful. Collect your computer and enable.
Video on the topic
Now many users have both home PCs and a laptop. Each of these computers is used for its purposes. They not only complement each other by functionality, but also some components laptop You can also use for a stationary PC. For example, if you broke drive unit on home PC, you can take a drive from laptop And on the time to connect it to a stationary computer.

You will need
- - A computer;
- - Laptop drive.
Instruction
Most drive units are connected using a standard SATA connector. Accordingly, on the motherboard of a stationary computer to which you will connect drive unit from laptopThere must be this connector. On most modern system boards, the SATA-interface is accurate. But if you bought a computer for a long time, then before you start connecting, you need to make sure the presence of the SATA interface on it. This can be done by reviewing technical documentation for the motherboard.
If there is no such interface on the board, it does not mean that you will not be able to connect drive unit to a computer. Just you have to purchase sATA adapter USB.
Remove the system unit cover. Find on system board sATA interface. Connect one end of the SATA cord to this interface. Drive unit laptop Too small to paste it into the 5.25 compartment on the computer case. Insert it in the compartment 3.25. If you are not going to use the drive long, you can simply put it near the computer case. Now connect the second end of the SATA cord to drive unitat, then connect the power to it. To do this, find the SATA cable on the power supply.
If you use an adapter, then insert it into the USB port on the computer. After that, connect with the SATA cord drive unit with adapter. If the length of the adapter cord is small, then you will not be able to insert drive unit In the computer housing. In this case, you need to put it next to the system unit. Also do not forget to connect the power. The minus of this method is that you cannot close the cover of the system unit. So be extremely neat.
After connection drive unitand run the computer. If you have connected the drive using an adapter, then after starting the computer, the system will automatically detect the device and install a system driver. After that optical drive unit will be ready to use.
DVD- drive unit Does your computer broke? Or have you just looked after a more advanced model? In any case, to replace this node you can independently - there is nothing difficult in it. Of course, if you are not mistaken with a choice of model.

Visual tutorial of work on netbook SENKEVICH G. E.
How to connect a DVD drive to netbook?
Let's try to open the network access to the DVD drive installed in home computer. Total access to entire disks opens a little differently than to separate folders.
1. Right-click on the laser drive icon.
2. The context menu will open. Select Team Share | Extended setting general access.
3. The disk properties dialog on the tab opens. Access. Press the button Extended setting.
4. Dialog opens Extended setting shared access. Check the box Open sharing this folder.
5. Click the button Permissions.
6. A dialog opens in which permissions are set. Click it on the group Everything.
7. Check the flags in the column Allow.
8. Press the button OK.
The dialog closes. Press the button OK. in dialogue Extended sharing setup and button Close In the disk properties dialog.
From the book Record CD and DVD: Professional Approach by Bakhur VictorCD / DVD drive CD drives can be internal or external. They can be connected using the SCSI device, and this connection method is most efficient, reliable and qualitative for the following reasons: allows you to work in the background during
From book Work on a laptop Author Sadovsky AlekseyOptical drive CD player (usually represented as music Center) I have long been the same household device like a vacuum cleaner or microwave. Today the CD player can be found in the room of any teenager. However for a long time ago
From the book we collect the computer with your own hands Author Vatamanyuk Alexander IvanovichCD / DVD-drive The performance of any CD / DVD drive depends on the state of its optical components. If optics begins to fill up, then the actuator behaves accordingly. In the home, only cosmetic repair of CD / DVD drives can be performed - wipe optics,
From the book Tutorial work on the computer Author Kolisnichenko Denis Nikolaevich3.2. How to connect the monitor first you need to connect the stand to the monitor. Do not rush, take the instruction, everything is drawn there. Then you need to connect the monitor to the computer. If you have a regular CRT monitor, it connects to the VGA-connector of the video card. If you have an LCD monitor, then
From the book a visual tutorial work on a netbook The author Senkevich G. E.3.3. How to connect the keyboard and mouse connectors for connecting the keyboard and mouse (the so-called PS / 2 connectors) are similar in size and form, so they are easy to confuse. To avoid confusion, all manufacturers of input devices hold color marking: to
From the book first steps with Windows 7. Guide for beginners Author Kolisnichenko Denis N.3.4. How to connect the speaker acoustic system, the main component of your acoustic system, Connected to a green jack. The microphone must be connected through the red socket! Blue nest is used as linear input. With it, you can connect to a computer
From the book laptop for beginners. Mobile, accessible, convenient Author Kovalevsky Anatoly Yuryevich3.5. How to connect a printer and scanner All modern printers can be connected to a USB port. True, some modern printers work through the LPT port (in the old manner). If your printer can be connected to the LPT port, and uSB connectors you have a little, better connect to ltp.a
From the book Laptop [Secrets of Effective Use] Author Ptashinsky Vladimir3.6. How to connect the ADSL modem ADSL modems connect to the nest network adapter, usually it is near
From the book of the authorHow to connect an external monitor? Almost any netbook is equipped with a VGA port for connecting. external monitor. Not only can be connected to this port. computer monitorBut also a projector or a modern television panel equipped with a standard "computer"
From the book of the authorHow to connect a network printer? If when creating or configuring home group Checkbox Printers are installed, printers connected to this computer become available on the network. Network Supports typically detect and connect the available printers
From the book of the authorHow to connect and configure a USB modem? The USB modem has a drive with a driver and utility settings. On any computer equipped dVD drive, Copy the files from this disk to the flash drive. Connect the USB flash drive to the netbook. If the installation program is not
From the book of the authorHow to connect the phone to a netbook? As an example, we give the connection nokia phone Series 6003. It has a memory card installed on which the manufacturer recorded the OVI Suite distribution. Complete with the phone there is a corporate cable USB. Cable Phone with
From the book of the authorHow to connect a Bluetooth mouse? By Bluetooth can be connected to a netbook various devices With support for this technology: mouse, headphones, printer, etc. It is only necessary to make a device detectable and perform a pairing. In a set with a mouse Bluetooth can go uSB adapter. If a
From the book of the author6.4. Windows 7 does not recognize my DVD drive if you installed Windows 7, and it does not recognize your DVD drive, and the DVD-actuator is marked with a yellow triangle in the device manager list, this means that Windows cannot monitor digital signatures DVD drivers. The problem is possible
From the book of the authorOptical drive Optical drive is a device for working with optical information carriers. Can be located outside the laptop, connecting to it directly by usb (if the drive simply does not fit due to modest sizes mobile computer, BIOS has options
From the book of the authorCD-DISC drives and DVDs today in most laptops are installed universal drives that can work with CDs, and with DVDs. Exchanges are slightly different from each other at cost, so installation in the laptops of morally obsolete models
The market filled netbooks - devices in which the CD or DVD drive is not provided. Even Apple refuses these bulky and outdated devices, but the company at least applies USB-Flash to reinstall the system or launch auxiliary utilities. And ordinary users get a chance of the already installed system.
All installation instructions or reinstalling Windows On a netbook without using a DVD drive (from flash drive) so overloaded and intricate that it is not easy to understand them. It used to be easier: drive into the drive and drove. Now it is also possible, only the drive is needed external.
External DVDRW drives for laptops with connecting through a regular USB are expensive expensive. Today the price begins from 1650 rubles, and the upper threshold comes to three thousand. Considerable money for the thing that will be needed a couple of times a year.
Therefore, today we gather an external USB-DVD drive from matches and an acorns that will be much cheaper. As far as significantly - depends on your ingenuity and resourcefulness.
The drive itself I purchased in the DNS store in the DNS store - one laptop drive cost me only 35 rubles. Yes, yes, thirty five rubles for a DVD cutter! Here are the models that are right at the time of writing:
It became a bit more expensive, but you can always buy any laptop drive on a flea market or with hands. If only he worked and had an SATA connection interface. The presence or absence of the front panel of the role does not play - this is an exclusively decorative element.
The second item that will surely need us - USB box for HDD. We need a laptop disk box with SATA connected. The new box is from 400 rubles, but you can find and cheaper, if you search this product with hands.
 It is more profitable (at the price) Boxing is not in the store, but on the flea market, with hands. Shopping guarantee still do not need - we will analyze the box to the screw and a little improve the design.
Why do we choose SATA? This is a more relevant, more speedy and less expensive connection method (for the retro IDE format it is necessary to overpay). In addition, the IDE connector on the DVD drive is completely non-standard, and unnecessary problems for nothing. In general, SATA!
In addition, two pieces of wire are needed (MGTF will go), stationery knife, (nice), one fine crosswater, toothpick, nippers, pliers, soldering iron and necessary accessories for soldering.
Baister!
First you need to pick up the disk box and remove from there an adapter card with USB on SATA. Each model disassembled in different ways, the general tips here will not be lad. We need only a fee, the rest can be thrown away.
The main problem in power connectors. In Sidyukov, for some reason they did shorter and with another pinout. Although in laptop disks of the line in 12V and 3B are not used. In general, we will make food ourselves. Here is a power connector scheme for optical drive and hard disk.
 Now we will deal with the refinement of the drive. It must be disassembled to access the board. There is nothing difficult in the disassembly: unscrew the screws (three) on the top cover and remove it.
 The fee to which we need to get access is reliably hidden under the disk tray. But, as in conventional large drives, the tray can be pulled out mechanically. To do this on a laptop drive without a muzzle, you need to push the toothpick into the hole slightly right from the emission button. If the decorative muzzle is on the drive, then there is a hole where you need to poke. Although it is likely to be a little already, so instead of the toothpicks have to take a dispersed fine paper clip.
 When access to the board is obtained, we will make a refinement with a file. It is necessary to glue in the connector and in the lid a sufficiently large hole so that our adapter from boxing is freely entered. Depending on the accuracy and used tools (I gnawed by books, blindfold and pliers), it should be about it:
 Now we take the stationery knife and cut the tracks from the back of the power connector on the drive. For reliability, you can make two cuts to cut a whole strip and probably get a contact. We do this because the pinout of the SATA-HDD power connector and SATA-DVD is different. Below is evident that the tracks are cut: Compare with the contacts of the SATA data connector (left)
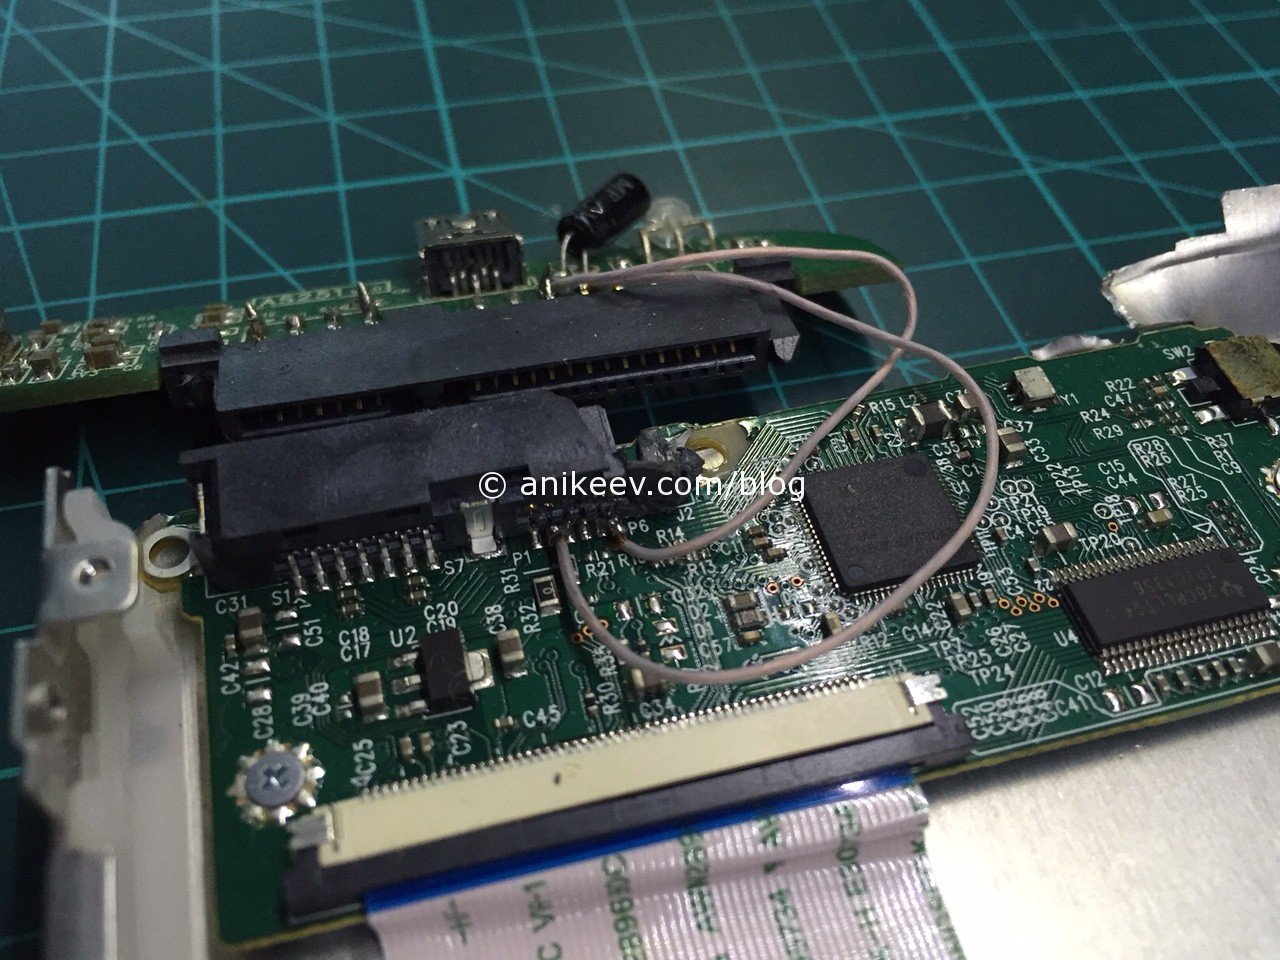
 Power We will give individual wires according to the pinout of both connectors (we need one GND and one + 5V). By the way, if you want, you can add a connector connection to the wires to turn off the drive from the board at all.
This is how the external DVD drive is obtained from which Windows can be installed in case of malfunctions. And no dancing with flash drives. True, the soldering iron in the hands should be able to keep. For whom it is not a problem, he saves.
 Need to make a USB-DVD drive even cheaper and without a soldering iron?
Thanks to the Chinese brothers! On Aliexpress you can buy
The drive is still recently an obligatory element in any computer, today gives the positions of flash drives and goes on peace. Manufacturers caught this trend and now with joy followed by him, refusing to install the drive in computers and laptops. But what if you need a drive? About this - in our article.
First you need to decide why we need a drive. We are not talking about its type - he must be able to read and write DVDs by default, such a time. But there is a concept as a connection type - an interface that our drive connects to a computer. It has to choose it.
The easiest way to identify this is a visual inspection of the motherboard and the definition of available places to connect.

Tell in order:

Considered motherboard? We estimate the presence of free ports. If there are several SATA free ports and the IDE port, you definitely need to choose the first option. Pluses him seriously more, and it is easier to connect. If the free port of SATA is one, then you can think about it - suddenly you want to connect another hard disk to the computer? I need this port more. Well, the easiest option - if you have either SATA ports or IDE. You do not have a choice, proceed by circumstances.
Removing an old drive
To do this, you will need the middle thickness of the cross screwdriver with a good slot and vacuum cleaner.
Note! In advance, take care of the assembly of fixing fittings in a separate place - it will help very help with reverse assembly. It is very unpleasant to look for bolts throughout the apartment.
- Remove the side covers from the system unit. To do this, unscrew the screws on the back of the screws on each side and pull the covers back. Fixing them for a couple of centimeters and freeing the grooves, remove the covers.

- It is time of vacuum cleaner. Neatly without touching until electronic components (This is important!), Remove the top layer of dust. Remains better remove with a cylinder with compressed air - less risk damage components.

- Find your drive from the inside. Remove the flames from the loop with a screwdriver. Be careful!
- Gently remove the loop from the drive connectors and the motherboard. Then pull the power.

- The drive is fastened with sufficiently thin screws on the sides - their number ranges from two to four on each side. Remove them and remember the approximate position.

- Now delete the drive. Pull it inside the system unit and pull out, trying not to touch the rest of the computer components. If the drive does not stretch inside, push it from the inside to out and pull on yourself.

Note! Some models of system blocks do not allow pulling the drive inside. Pulling out the outside prevents the front panel - for example, disc compartments have rounded edges for which the drive is clinging. In this case, you need to remove the front panel, unscrewing four bolts or rejected the latch in four places. Do it with marginal accuracy: the system unit with an unreliable fastened front panel will finally lose its presentability.

Installing a new drive in the system unit
In addition to the screwdriver you may need Pasaltia.
On a note! If you replaced the drive and completed the previous item to remove the old one, then you have already prepared everything for installation.
Now we will look at how to be those who want to put a drive into a new computer, where it has never been, or wants to put a second drive in addition to the old one.
- Using the instructions from the previous item, open the system unit and remove the front panel.
- Gently pull out one of the plugs for five-lifted devices from the front panel. Try not to break the grooves, as it can come in handy in the future if you want to get rid of the drive.

- Using the passage, break the metal plate opposite the selected plug on the front panel. The plate is already not useful for sure, so just take out. You can bend.

- Pull out a new drive from antistatic packaging. Remove all transport stickers. Gently insert the drive in its place in the system unit.

Note!It would be nice to find complete bolts from the system unit, but there are no such, buy four or eight bolts together with a drive for fastening.
- Secure the drive with screws. Watch out for its position: it is important that it is carefully combined with the front panel. One way or another, its position can be adjusted after.

- Install the front panel in place. If the drive has not coincided with it, loosen the screws and move it to the desired position. Tighten the screws.
Connect the installed drive to the motherboard
Consider first option with IDE

IDE is an old format with its setup rules. The loop implies the installation of two devices, so it turns out that one device is always the master ("master"), and the other is always slave ("slave"). This is the problem if the connected drive is not determined. To troubleshoot it, check the position of the jumper on the back of the drive. Pay attention to the screenshot.

Universal case: if your loop drive is one and connected by the extreme connector, then check the jumper to the left position ("Cable SELECT", or the connection type auto definition). If there are two drives or devices at all, the jumper should take a position based on the device position: if the destination is the "Master" connector, that is, the right position if the average is "slave", that is, the average. but motherboards The IDE exists for a very long time, so they can easily not meet the standards. In this case, the Council is one - refer to the instructions.
Now option with SATA

It remains only to close the side covers, tighten their mounting screws and proceed to using the computer. Ready!
Video - Connection (Installation, Replacement) PC Drive
 Causes of why Flash Player does not work, and troubleshooting
 The laptop itself turns off, what to do?
 HP Pavilion DV6: Characteristics and Reviews
 Format representation of a floating point numbers How negative numbers are stored in the computer's memory
 Computer fries and does not turn on what to do?
 Why does not work mouse on a laptop or mouse?
 How to increase or decrease the scale of the page (font) in classmates?