Window 7 Creating a system recovery point. Creating a system recovery point to manual. Restoration of the "eighth version" system
Today we will understand how to create a Windows 7 recovery point for subsequent restoration of the system as a result of a failure. Unfortunately such situations occur after which your computer is not loaded or loaded incorrectly. The fastest and less problematic option to restore work is to take advantage of the system's rollback to the stable version.
"Break" system can different waysBut the most common is the installation of software, installation of drivers, incorrect windows Update. It is these actions that, in 90% of cases, lead, as well as to the failure operating system. But nothing is scary if you always have fresh system recovery points.
In the article will understand how to make recovery points and how to use them to restore the system in case of failure. If the recommendations described below will not help you, you can always contact professionals from Hardmaster.info to restore your data.
Create a system recovery point
To create a system recovery point, open the computer properties.
open item " System protection”
 In the window that opens, click the button " Create”
 enter the name of the recovery point, date and time can not specify in the title, they will be automatically. After entering the name, press " Create”
 It will start creating a recovery point, wait for the process to complete
 if everything went successfully you will see a message.
 after that, calmly perform experimental actions on your computer, in case of problems, it will be possible to restore the working version of the system.
We restore the system from the recovery point
And now I will imagine that the system has refused to work correctly. If the computer does not load at all, you can use the disk for windows installations 7. During the disc boot, select item " System Restore"And go along the way to select the operating system and the created recovery point.
If Windows booted, but it works incorrectly, you can use the standard tools to restore the system. To do this, open the System Properties window and go to the "System Protection" tab (the windows are described above in the Creation of the System Recovery Points.
In the window we click the button " Restoration", Then press" Further”
 we choose the previously created point of recovery of the system (or the latest) and click " Further”
 In the appeared window we click Ready”
 and once again agree with what we do
 after that, the system recovery will begin. During recovery, the computer will reboot without your participation. After successful reboot, you will see a message.

Ready! The system is restored and is in working condition. I would like to add that before each update of the system, the recovery points are created automatically. So if the system update led to a breakdown, you can always use the recovery.
Recovery points allow you to restore the operating system settings and previous file versions in the case of a software failure. In this material, we will tell about how to create a recovery point in Windows 7 and how to use this point to restore the system.
In order to create a recovery point in Windows 7, you must first open the window with the properties of the system. This can be done in several ways. For example, if you have a computer icon on your desktop, you can simply click on it right mouse button and select the menu item "Properties".
You can also open the system properties through the control panel. To do this, go along the path "Start - Control Panel - System and Security - System".

Well, or you can use the most simple way, namely press the key combination Windows + Pause / Break.

After you opened the system properties window, you need to go to the System Protection section. To do this, click on the appropriate link in the left part of the window.

As a result, you will appear small window With system security settings. Here there will be a list of disks, opposite which will be indicated, for which disks is turned on, and for what no. If for your system disk (usually a C :) disk is enabled, you need to highlight it and click on the "Create" button

After that, you just need to enter a name for the recovery point being created and click on the "Create" button again. After that, the Windows 7 operating system will begin the process of creating a recovery point.

If the protection of the system disk is disabled, then it must be turned on first. To do this, select the disk and click on the "Configure" button.

After that, activate the "Restore system parameters and previous file versions" function and specify which percentage of the disk you want to select to create Windows 7 recovery points. After making these settings, close the window by pressing the "OK" button and can start creating the recovery point.

Please note that in the same window you can delete previously created recovery points. To do this, there is a separate button "Delete".

Restoring the Windows 7 system from the previously created point
In order to restore the Windows 7 system using a previously created recovery point, you need to open the control panel and find the "Restore" section by searching.

In the "Restore" section you need to click on the "Running System Recovery" button.


If Windows 7 is not loaded, you can start recovery using the installation disk. To do this, boot from the Windows 7 installation disk, select a language and go to "System Restore".

After that, select the Windows 7 operating system and click on the Next button.


And follow the instructions that will appear on the screen.

Thus, you can restore the Windows 7 system from the previously created recovery point, even if Windows 7 refuses to start.
Windows 7/8/10 recovery point is an entry (cast) important files For system operation, such as registry. When working at a computer, erroneous and even fatal actions are often performed, after which the system begins to work unstable, or not at all is loaded. We can assist this as we ourselves, establishing various programs and drivers and the actions of viruses.
Despite all the ease of creating recovery points and rollback with their help to earlier working conditionMany or do not know about such an opportunity, or know, but do not use. Recovery control points are created by the system regularly, as well as when installing drivers.
System Protection Parameters
It is important to understand that when creating points, the main system files and system settings, wherein software installedMusic and movies are not saved. Restore remote files Also it will not work. To do this, you need to use the "Previous File Version" feature. In other words, the recovery point in no case replaces the full-fledged backup system.
To work the recovery point system, a function must be enabled. To enable or check, the function is enabled or not by right-clicking on "My Computer" on the working table windows and choose "Properties", or simply press the hot keys "Win + Pause"
In the window that opens, we need to choose "System Protection". A window will open, where we can see the current state: on the disk "C:"where the system is installed, the protection is enabled.

By the "Configure" button, we can change the system security settings for this disk.

Here we can choose what exactly to save at the recovery points:
- System Parameters and Previous File Version
- Only previous versions of files
- Disable system protection
It is better to change anything and leave the default saving system parameters and previous versions of the files. If you disable the system protection, the "previous file versions" function is also turned off for the selected disk. In Windows 10, you can only enable or disable protection.
Below in this window can be limited maximum volume used disk space To save points, which is set as a percentage. Install how much it is not a pity, but it is advisable to put from 15% . If the installed limit is exceeded, the points will be created, but by removing obsolete.
To clear the disk from all previously created recovery points, you can press the button "Delete". There is an alternative opportunity, for example. Previous file versions will also be deleted when the limit is exceeded.
Creating a new system recovery point
So, we want to install new program Or the driver, or can change the important system settings, and to reinforce you to roll back. Click "Create" and use the wizard enter the name of the recovery point. After a short expectation, our point is ready, now we can when necessary.
 To start the master of recovery points, you can simply dial the first words in the search menu bar and the program will be automatically found.

What to do if the recovery points disappear
This can occur for several reasons:
- Points are created, but then the system is cleaned and clean, such as Freespace, CCleaner. Similar utilities are better to configure manually.
- On laptops, automatic saving points will not occur when powering from the battery in order to save energy.
- On sections with FAT and FAT32 file systems, it will also not work. These file Systems Do not support shadow copying and do not store information about changes in files.
- If you have two operating systems installed, then with each launch of the younger OS, all points created in Windows 7/8/10 will be deleted, consider this. You can fix it by making a section inaccessible to Windows XP.
Let's look at how to create a recovery point in Windows 7. You should also figure out how to disable the corresponding mode. Thanks to this approach, in case of an unexpected situation, you can return to the settings predetermined earlier.
As in Windows 7, create a recovery point and restore the system
Let's start with clarification that it is a function that allows you to make the recovery point of Windows 7. When recovery is actively, in automatic mode Before installing drivers or programs, as well as after a set time interval, a copy of the most important system materials and settings is created on the computer.
Note that you can create Windows 7 manually. How to do this, then discuss more. You may have a question - what is the creation of the Windows 7 recovery point? It should be noted that we are talking about very useful function. In the event that a certain problem appears in the process of loading the computer, you can make a complete or partial system rollback.
In other words, you can restore system files using the recovery of the control windows points 7, created, for example, a couple of days ago, at the time when the computer worked perfectly.
The specified solution will save your time, and in some cases it may even save money. We recommend to enable the recovery function and, if necessary, manually create points.
As in Windows 7, create a recovery point and activate the process
First, let's check the settings, most likely, you initially have all the necessary functions included. Right-click on "Computer" and select "Properties". Next, use the right " Additional parameters Systems ", after which in the emerging window, go to the" System Protection "tab.

If in front of the protection parameters in front of one (at least) of the local disk there is a "on" mark, then the system recovery function is enabled, and the Windows 7 recovery point will be created. However, if everywhere is written "Disabled", the above function must be enabled. To this end, specify one of the listed local drives, and then click the "Configure" button.
Can, for example, choose the section in which you the greatest number Memory. A window will open, and you need to specify the "Restore system parameters". Next below, using the slider, specify the maximum volume of the hard disk space that you want to allocate to create recovery points. During the creation of new points, the old will be deleted. Click "Apply". After that, the system will report you that the recovery is included. This means that when the problem occurs with personal computer You will be available to restore Windows, even if the system is not loaded.
Disable system recovery
In case you wish to disable it, you can do without much difficulty. Specify local disk With the recovery enabled and click "Set up". Note that the Windows 7 restore point can also disappear according to your desire.

In the window that opens, you should simply set the label near the item that disables the protection of the system, and after clicking "Apply". You will see a special warning, you should press the "Yes" button. Thus, the system recovery will be disabled.
Creating a manual recovery point
Remember that you should create a recovery point before installing certain programs or before making significant changes to the settings. If you are not sure about "challenge" for certain reasons, it is better to create a recovery point to be able to returning the system parameters to its original position.

To manually create a point, you need an active system recovery. You need to go to the properties of the system, switch to the tab called "System Protection". Press the "Create" button. Next, enter the name of the recovery point. It should be a bit wait, so that the system completes the setting. Click "Close". That's all ready, you can safely install new Driver or program.
Restoration of the "eighth version" system
If we talk about the means of restoring this operating system, then first it is necessary to produce initial setting protection. Make sure the system restore is activated for the section that has installed windows files (Usually - "C" C "). Specify the volume of space that is necessary for the operation of the system protection.

It is worth noting that in this system the possibility of recovery is possible using a specially created disk or installation CD. You can also restore Windows 8 without deleting custom files. At the same time launch special programintended for the specified target, you can directly in the working system or in the case when Windows 8 is loaded refuses.
Recovery images
We emphasize that you can create 2 recovery images. The first works with the Refresh program. In case of use this means There is a complete recovery procedure of Windows 8, the personal files will not be touched, but the installed programs will be deleted, and the system settings will be reset to the original.
If you decide to create an image with command line, "Refresh" will apply to the restoration of this image, and will not need to be installed windows disk 8. In this case, the system settings you have installed and will not be reset. They will return to the state relevant at the time of creation of this image.

The image created by the specified method is not suitable if you need to restore when full formatting The main partition of the disk or randomly removal system partition.
Restoring files
The second way is suitable for creating a full backup image. This solution involves creating a second image using the control panel, which is called "file recovery". In this way, you can restore the new Windows system completely on an empty hard disk.
On practice
For example, you create the image of the Windows 8 system and prevent it on the disk (D :), then delete Windows 8 completely from the main disk (C :) to install Windows 7. Using the previous system, you understand what she likes you do not fully least Next, you can easily restore the original Windows 8, which will include all your programs and files.
All this is possible thanks to a pre-prepared image. IN new system There have been a lot of ways to enter the entry capabilities in this now. For example, the transition is possible directly from the operating system. It is also possible if you could not download Windows at all.
Note that the ability to restore previous versions of files that are familiar to windows system 7 were replaced by a special means by name "File Story".
Windows 8.
The recovery tool differs significantly from this on it is necessary, first of all, to enable for the section in which the system is installed. This feature must be enabled by default. The operating system independently creates a recovery point before the events meaningful for it.

For example, the specified action will occur before installing the driver or program. The use of recovery points can help even in the case of infected with the operating system by the virus.
In the Settings window, select the disk (C :) or other system Disk and click "Set up". Next, it is necessary to note the point on the inclusion of system protection and specify the parameters of the maximum use of space within 15%. This figure is enough for stable work The protection features of your system partition containing the installed Windows 8.
Do not forget to click "Apply" and then "OK". You can enable protection for other sections. Periodically, you should independently create new recovery points. In the appropriate section, click "Create". Come up with a suitable name. Once again, click "Create" - and ready. To apply the created point, go to "Parameters", select "Control Panel", then "Recovery", finally, run the system recovery by selecting the appropriate function. So we disassembled how in Windows 7 create a recovery point, as well as a similar possibility in Windows 8.
How to create a recovery point in Windows 7.10 or 8 often occurs after a bitter data loss experience, but we will tell you how to make a recovery point!
This happens in automatic mode. Also, Windows does this when it detects serious changes in its work - for example, when you install updates for OS, driver or some software.
These points are the saved state of all files and registry parameters - with their help you can start at any time. If at some point you will need to cancel some changes, you can quickly return the OS to that temporary segment when these changes have not yet been made.
System recovery uses windows feature Under the name "System Protection". This feature regularly creates and stores information about computer system files, registry key and previous versions files. Return OS to an earlier state affects Windows system files, installed programs, registry settings, changes in scripts, batch files and other types of executable files - but does not affect the user's personal files.
Creating a Wimdows Recovery Point
To create it manually, right-click on the computer icon on your desktop, select the "Properties" item in the context menu, and in the System window, click the System Protection link.

In the "Properties" window, click on "Create". You will open the "Protection" window.

Enter any name (name) and click on the "Create" button.

The process you run is less than a minute.

When the process is completed, you will see a message that the process is successfully completed.

Click "Close". Now at any time you can return the computer to this or any other time point.
Windows restore before the previous state
If problems arise when working problems, you can return your PC to the "normal" period of its state, and this is done as follows. In the Properties window, click "Restore".

In addition, you can open the recovery window using the "Run" dialog. Press Win + R keyboard, enter the rstrui.exe command and press ENTER.

The Restore Window opens. Click "Next".

Select the point to which you want to return your computer, and select "Next".

Now you need to click on the "Finish" button, and then confirm the start of the process startup by clicking the "Yes" button.

The process also includes a reboot of the computer. After rebooting, you will see a message confirming that your computer has been successfully restored.
Read more Read more critical situations.
Excellent day!
 Error appearance during program launch
 FRIGATE plugin for Firefox
 How to show hidden folders and files in Windows
 Ways how to make a screen on a laptop brighter or darker
 How to format a flash drive, disk protection
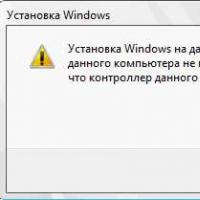 If installing Windows to this disc is not possible
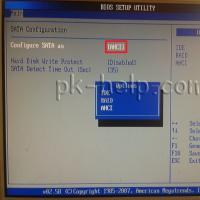 During installation of Windows "Make sure that the controller of this disc is included in the computer's BIOS menu.