SAMSUNG Android devices firmware via ODIN program. We flash, update and tunify smartphone, without leaving Android installation of custom firmware
We are offering to you detailed instructions on the installation of custom firmware in smartphone Huawei.. It is more difficult than installing the official firmware, this is worth familiar with the procedure for action.
1. Custom Recovery.
It is worth starting with the fact that the installation of custom firmware is made through system menu Smartphone (recovery). To get into it you need:
1. Turn off the device
2. Drop the battery (remove for seconds 10)
3. Touch the Volume + button and the power button (the key combination may differ on some models)
However, the standard (factory) menu of the recovery initially does not support the installation of custom firmware, so it needs to be replaced with a custom (modified) recovery. There are many different custom recovery, characterized in both the functionality and externally, design. Most Popular - CWM(ClockworkMod Recovery) and TWRP (Team Win Recovery Project).
This is how the standard recovery menu looks like:

And this is CWM:

TWRP More beautiful:
Replace the standard menu of recovery on custom different ways. Some are described and . These are basic methods suitable for most smartphones both Huawei and other manufacturers. However, for certain models, it may be necessary for a purely individual method of replacing the recovery.
2. Firmware process:
Now when we have modified recovery, You can proceed to the firmware of the smartphone. This sequence is:
1. Be sure to charge the battery
2. Download the desired firmware in format.zip
3. Copy (not unzipping) firmware to the root of the memory card
4. Create backup Systems by selecting Backup (in case of unforeseen problems, you can restore the system by selecting the RESTORE menu and pointed to the Backup created earlier)
CWM choose:
- wIPE DATA / FACTORY RESET
- wIPE CACHE PARTITION.
- ADVANCED -\u003e WIPE DALVICK CACHE
- mOUNTS AND STORAGE-\u003e FORMAT / SYSTEM
- mOUNTS AND STORAGE-\u003e FORMAT / DATA
In TWRP:
- Wipe -\u003e Advanced Wipe:
- Dalvick Cache.
- Cache.
- System.
6. Now directly perform the firmware process:
In CWM:
- install .zip from SD Card -\u003e Choose Zip From SD Card (Select a previously copied zip file with firmware)
- I confirm the choice by turning to the "Yes"
- After the firmware is completed, we return to the previous menu, using the "+++++ Go Back ++++++" item
In TWRP:
- Install -\u003e Select the previously copied zip file with firmware
- Swipe to install (just slide the arrow to the end)
7. Installing the firmware is manufactured, and now you can press the reboot to exit the recovery and turn on the smartphone.
I note that not all custom firmware is set by this method, in some cases the installation is made usingFlash Tool or other programs, but this method is the most popular and frequently used.
I think you should not say that all actions with your apparatus you do at your own risk. You also know about it perfectly. All responsibility for possible consequences lies solely on you.
Surely there were cases when the speed of your Android device made it possible to desire the best. There is no reason to despair and think about replacing the apparatus: the acquisition of custom firmware will come to the aid. In this article, I want to disassemble for you how to install custom firmware on Android. But first, it is necessary to understand what kind of firmware it is and how its installation will help your device.
What is Caste Firmware Android
By purchasing a device in the store, you assume that it will have stock firmware. The official firmware has its own features:
- reliability from the manufacturer;
- quality assurance;
- when damaged, the device can be passed under warranty to maintain the service center.
There is a lot of craftsmen who can enrich the usual firmware large quantity functions, provide modifications, such as free root access.
The advantage of modified (custom) firmware is that you get software installedwhich may be useful to you, an increase in the speed of the device, and therefore, an increase in its performance.
You should decide whether to change your native firmware, but you must remember that the system modifications are not successfully installed on all devices. No need to forget that when installing a custom version you lose official warranty. If you still do it, let's look at ways to achieve this goal.
Put the custom firmware on Android is not too troublesome: you need to carefully read the installation process and repeat the algorithm of the actions that we give below.
How to get root rights: video
Installation
After that, it is necessary to return to the CLOCKWORKMOD menu. Tap the "Reboot System Now" item.
What if the smartphone on "Android" suddenly began to hang and behave as if she wanted to live his life? How to reflash "android"? This issue is asked by many users of modern gadgets of various brands - from the top "Samsung" and "Sony" to the popularity of Chinese "Xiaomi" (more often in colloquial speech - "Xiaomi") and Meza.
Possible ways to solve problems
One of the most simple Soviets There will be a reset of device settings to factory. Indeed, in this case, no third-party intervention will be required - all settings and discharges are made at the program level. But such a trick will work only if the crashes in the work of the smartphone are caused by only software and scored memory. After resetting the settings, and in frequent cases and rubbing the content, the device is turned on as a new one.
What is "recovery" and what is eating
Many immediately rent positions and throw out the white flag, hurry to contact the service centers. But any experienced user will say what to do this is not worth it. Because you can save yourself an extra nerves and cash, just follow simple steps From this instruction.
"Recavievers" is a smartphone software based on Android, which is something like "bios" on PC. That is, with the help of "recovery" you can do full reset Smartphone for factory settings, you can also install updates operating system And just flash. When buying in the store, the user most often gets a device with the factory "recovery" -My, which is a bit limited in the functionality and will not allow the opportunity to successfully flash the operating system.
If we talk about "custom" (translated from the English Custom - "Molded to order") "Recovery", it will allow you to more fully "communicate" with the phone system, to make backup copies of firmware and restore them, and also to do a more complete And deep reset of the device.
How to enter the "recovery"
To flash the device through "recovery", you must first get into this most menu. Make it easier simple, especially since on many devices, the input combination is absolutely the same. So, in case the smartphone has a physical central button or the "Home" button (most often occurs in the old devices "Samsung" and "Eldji", but may appear in more modern devices), You need to hold the "Home" and "Volume +" buttons on the off gadget, after which, without releasing them, press the power button.

The device will turn on in the desired mode. If you have a more contemporary device without a physical button "Home" you need to repeat the process described above, but using only the "Volume +" button and the power button. If the desired result was not achieved, it is necessary to refer to the extended list of entry methods in the "Recavor" menu for different manufacturers.
What else will need
In order to understand how to reflash "Android", you initially need to download the firmware for your device. Most often, the firmware files are hidden from the overall review for the safety and safety of the manufacturer's data. That is why ordinary users create backup copies of their operating systems and of them form the databases of stock firmware, references to which can be found on specialized sites. It is the firmware file that is in the archive with the extension of * .zip, and will need to realize how to restore "Android" through the "recovery".

There are moments when the old stock firmware is tired, and I want something new. That is why there are always craftsmen who create custom firmware, "cutting out" of them extra or, on the contrary, adding something new. In such cases, it will not be possible to use the standard "recovery", and here the most custom CWM Recovery come to the rescue ( ClockworkMod Recovery.) or
Installation or TWRP.
Not necessarily to install "recovery" on Android through a computer, most often, on the contrary, it is easier to use the stock. Everything you need to do is download it required file., Again, in the archive with the expansion of * .zip, and place it on the outer flash card of the smartphone.

After that, entering the Stock "Recovery", you need to select the "Apply Update From External Storage" item and select the same file with custom "recovery" in the list. After confirming the selection, the installation process will begin, after which the device will offer to reboot. The process is completed.
How to flash "android" through "recovery"
Turning directly to the installation of the firmware itself, I would like to say that all the informal android operating system files created directly by users of certain devices should be installed at their own risk. If you still decide to establish a non-rigid version of software, it is necessary to make sure that the firmware is written for the phone that is planned to reflash.

If a we are talking About the stock firmware, then you should not bother with a CWM Recovery or TWRP installation. All manipulations that need to be done are limited to downloading the firmware factory file and placing it on outside map Memory. After that, the process is similar to the installation of custom "recovery". That is, you need to go to the Stock "Recovery" -My, select the "Apply Update From External Storage" item, then specify the firmware file directly and confirm the action. After the process is completed, you need to take another step, which will help to avoid hanging and "glitches" when the device is turned on and operation. Immediately at the end of the firmware, select the Wipe Data / Factory Reset menu item and confirm the action. This very benefits information about the previous software and files that were present on the device to the firmware process.
At the end of these actions, you must select the menu item "Reboot System Now". The device will restart and the process of setting up the smartphone "from zero" will begin. If the inclusion process is delayed and "hanging" the device logo, it is necessary to remember whether the settings reset is executed after flashing.
Custom versions of "Android"
How to flash "Android" through the "recovery", in principle, is understandable. It remains to figure out what to do with the versions of the OS, written directly by users of devices. The answer is simple: the process must be repeated, producing the same manipulations in the custom "recovery". The only difference will be that the firmware file itself can now be placed not only on an external memory card, but also on the internal memory of the device. This adds convenience if the flash card is simply missing. In this case, you have to select "Apply Update From Internal Storage".

It is also worth noting that in CWM Recovery and in the TWRP item "Wipe Data / Factory Reset" is replaced by two separate items: "Wipe Data" and Wipe Cache. After installing "Android" through the "recovery" (namely, the custom version) turned out, in the modified menu of the ClockworkMod or Teamwin, you need to select the Wipe Dalvik Cache subparagraph, which will significantly increase the chances of successful power on the device with a new operating system.
Restoration of stock firmware
If I did not like or did not fit, there is always the opportunity to return everything to your places. Many wonder: "How to restore" android "through" recovery ", namely, the stock version?" The answer lies in the paragraph above. Roughly speaking, the return of everything on the circles is happening in the same way that the conduct of initial changes.

All you need to do is download the firmware from the manufacturer on the flash card or internal memory, then select the appropriate menu item "Recovery" and make a complete reset of settings / content. In principle, nothing complicated.
It seems that it is not difficult to understand how to flash "Android" through the "recovery". But if any items are incomprehensible, or there is no confidence in their knowledge, it is better not to contact such processes. But even if something does not work, you can always restore the firmware of the device through the corresponding menu item. The main thing is before flashing android through the "recovery", make a backup. To do this, you will need a custom "recovery" and a little patience, because the process of backup firmware takes a lot of time.
In case something went wrong, you can always contact knowing people. At least in an authorized service center Be sure to help. The main thing is not to lose heart and confidently go ahead. Only so you can achieve any results. Good luck in reprint!
For each smartphone or tablet, there are both official and custom firmware. Their installation is carried out in different ways: OTA update come through the air, the firmware in ZIP archives are installed manually via CWM, TWRP Recovery. Or the Rom Manager application using a computer, you can flash Android using FastBoot and Sp utilities Flash Tool.
After the firmware android all data from internal memory Will erased, so to save contacts, settings and applications, first.
Android firmware through recovery
Unofficial firmware in ZIP format, such as CyanogenMod, can be installed through custom recovery: CWM or TWRP, as well as applications that use Recovery, for example, ROM Manager. Similarly, the kernels and patches are sewn. To download official "Update.zip" enough opportunities standard mode Recovery, more in the article on the link above.
Install zip file in CWM
On all the devices "out of the box" stands from the manufacturer, instead you need to install CWM software. Then find and download the Zip archive with the firmware. Note that the firmware of other formats via CWM is not installed.
1. Now go to the recovery. To do this, turn off the machine and press a specific combination of buttons. Depending on the manufacturer, the key combination is different, everything is presented below. possible options (It is written in the new how to go to recovery on specific models):
- Volume up + power button
- Volume down + power button
- Volume up / down + power button + "home"
- Volume up + volume down + power button
Great, you got into recovery. The movement is performed using the volume buttons, and the confirmation of the switching button.
2. Before installing the firmware, you must first make the settings: select "Wipe Data / Factory Reset".


4. Excellent! Return to the main menu and select "Install Zip".

5. After that, "Choose Zip From / SDCard".

6. Go to the folder to which the firmware saved and select it.

7. A confirmation request will appear. Click "YES - INSTALL ...".

8. The process of installing the firmware and at the end the "Install from SDCard Complete" appears at the bottom below.
Great, Android has stitched. Return to the Main Menu CWM Recovery and reboot the system. To do this, select "Reboot System Now".

How to install firmware via TWRP Recovery
If you do not like CWM, but TWRP Recovery, take it, guided. You can also install the firmware from the ZIP archive:
1. Download the firmware and place it at any convenient place in the memory of the smartphone.
2. Go to TWRP. This is done just like CWM.
3. Now you need to reset the system. To do this, select "WIPE" in the main menu.

4. In order to start resetting the settings to the factory, drag the slider to the right.

5. Upon completion of the cleaning of the smartphone, the tablet, click the "Back" button.

6. You will return to the main menu TWRP Recovery. Now go directly to the firmware itself. To do this, select "Install."

7. Go to the place in memory where the firmware is saved. Click on it.

8. Take the right slider to the right to start installing the firmware.

9. The process will begin. It usually lasts 2-3 minutes.

10. At the end there will be a message about the successful completion of the firmware. Click on "Reboot System" to download Android.

Another way is considered how to flash Android using a zip update. You can also use special application. About this below.
We use Rom Manager
The ROM Manager application allows. By the way, I advise you to make backup internal memory before the firmware, then to restore the data. Now we will use another feature of the program: to flash the phone using ROM Manager.
For work utilities need rOOT rights - They are obtained by exploits:, or.
Custom Recovery must be installed (in fact, with the help of ROM Manager, we flash the device through it, but you work with simple and understandable interface Applications, not recovery). There are references to the instructions in previous paragraphs.
So, set Rom Manager, find and download the desired firmware for your device. Open the application and follow the instructions:
1. Place.zip Firmware Archive in the memory of the android phone or tablet.
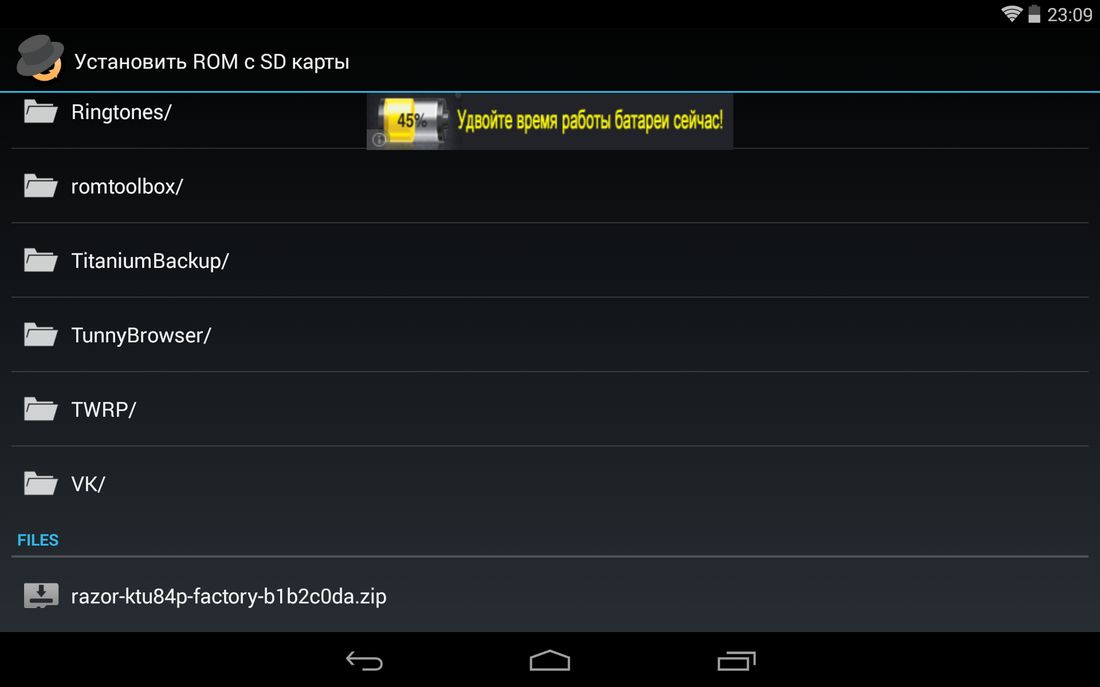
2. On the Rom Manager menu, open the "Install ROM with SD card" item.

3. Find the archive and click on it.
4. In the menu that opens, select "Restart and Installation". I advise you to check the box opposite "Save the current ROM" to be able to restore the system if necessary.
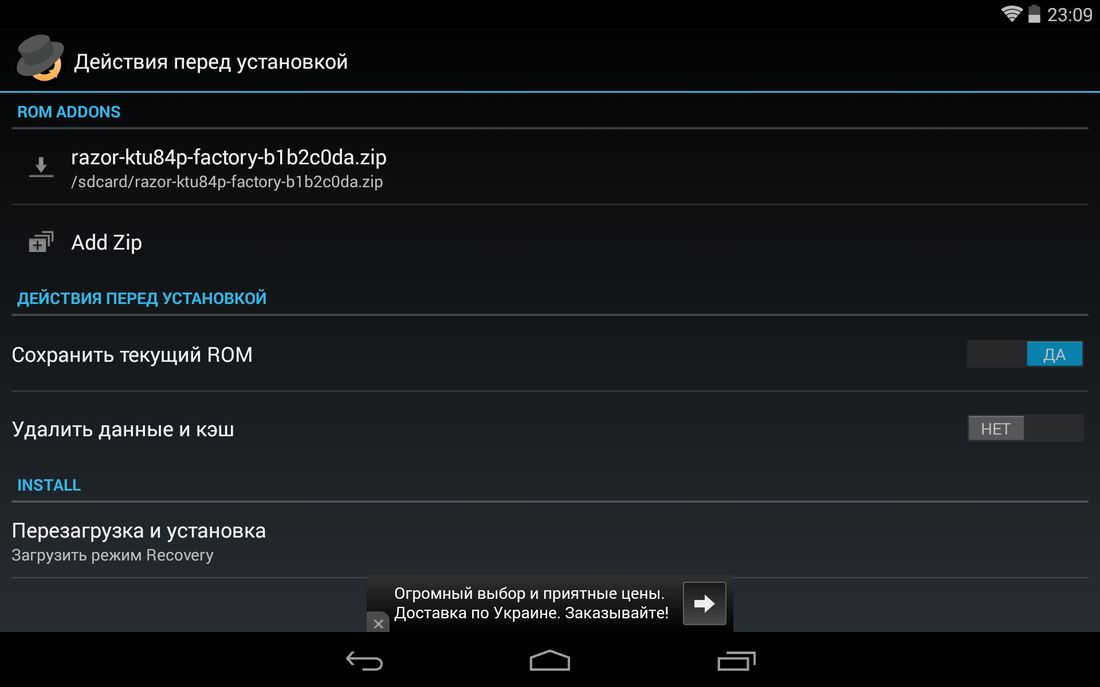
5. In the next window, click "OK", after which the device will boot into Recovery mode and the firmware process will begin.

Also in ROM Manager there is a ROM search function for the device. In the main menu of the program, select "Download Firmware". Some of them are available only in the premium version of the program.

Above, I talked about three ways to install firmware from Zip Archives On the device itself. Then goes information about the firmware android with PC.
How to flash Android through a computer
Many mobile devices are stitched using special PC utilities: Below are the instructions for working with FastBoot and SP Flash Tool. Through the second program, various manipulations with Chinese telephones are produced on the basis of MediaTek processors.
FastBoot: phone firmware instructions
Many firmware must be installed from a computer using the FastBoot utility, restarting the mobile device to the same mode. The program is included in Android SDK Platform Tools, about the installation of which is told in. In addition, the drivers will be needed (all information is on the link).
Also on devices of some manufacturers, you must first unlock Bootloader:
- How to do on HTC:
Next, download the archive with the desired firmware and unzip it in the "Platform-Tools" folder, in which there are "ADB" and "FastBoot". It should be approximately so (I have the necessary components are in a separate folder "ADB").

Then connect Android to a USB computer and translate your smartphone or tablet in fastBoot Mode.. The easiest way to be done as follows:
- Turn on
- On the computer go to command line
- We sequentially enter the command and after each press "ENTER":
cD path to the "adb" file
For example, it is in "C: \\ Program Files (x86) \\ Android \\ Android-SDK \\ Platform-Tools". Then the path will look like this:
cD Program Files (x86) \\ Android \\ Android-SDK \\ Platform-Tools
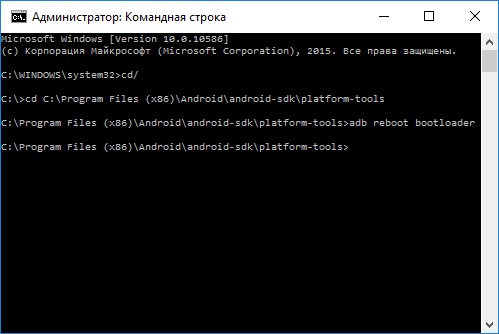
Then Android Gadget Reboot to FastBoot mode.

Before you flash any of the partitions of the system, you first need to format it so that there are no problems in the work. To do this, use commands (after entering each Press "ENTER"):
fastBoot Erase Boot.
fastBoot Erase UserData.
fastBoot Erase System
fastBoot Erase Recovery.
fastBoot Erase Cache.
After cleaning sections, they can be flashing. Enter commands (their quantity may be greater - it all depends on the presence of specific files in a particular firmware, below shows the main set):
fastBoot Flash Boot IMYA-FAYLA.IMG
fastBoot Flash UserData IMYA-FAYLA.IMG
fastBoot Flash System IMYA-FAYLA.IMG
fastBoot Flash Recovery IMYA-FAYLA.IMG
fastBoot Flash Cache IMya-Fayla.img
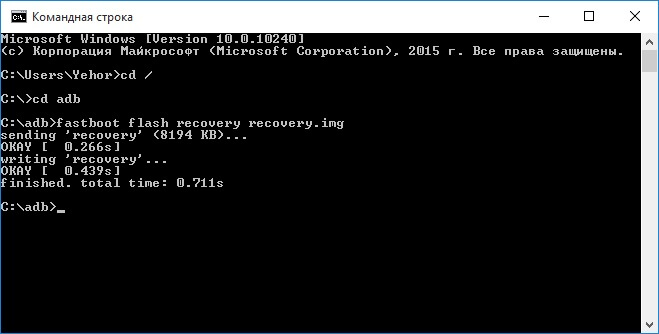
"IMYA-FAYLA.IMG" is the name of the corresponding firmware file. For example, since in my case it sews recovery and its image is called "recovery.img", I introduce:
fastBoot Flash Recovery Recovery.img
Usually, the firmware can be installed entirely, that is, flash all the files immediately. To do this, in the folder with the firmware files, Flash-All.Bat is found. If it is, then simply enter this command and the firmware installation process will begin:

As a result, a message appears on the successful completion of the firmware.

You can download the system. To do this, get out of the FastBoot Mode on the device itself or using a computer. In the second case, you need to enter another command:
Installing ZIP Updates in FastBoot
Using FastBoot can be installed Zip Firmware. To do this, download and place the firmware into the folder where the ADB is located. Move your smartphone or tablet in FastBoot Mode and enter the command:
fastBoot Flash Zip IMYA-FAYLA.Zip
"IMYA-FAYLA.ZIP" is the name of your firmware, replace it with your own.

Wait for the Android setting and restart the device.
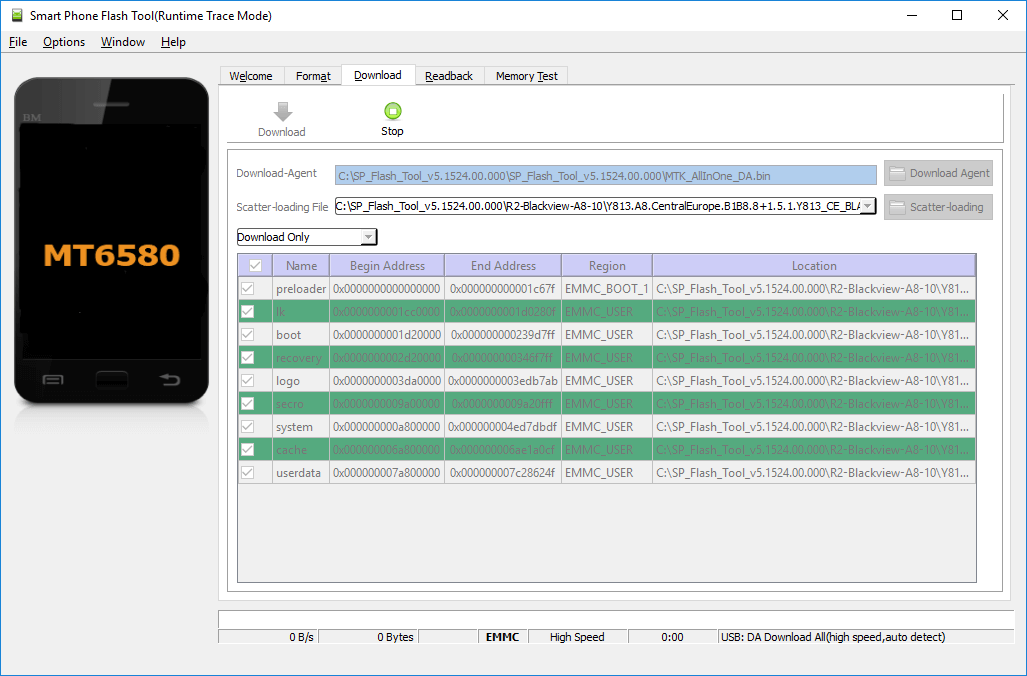
SP Flash Tool: We flash Chinese Android smartphones on MTK
Chinese smartphones Fly, Lenovo, Xiaomi, Meizu, Zte, Doogee, Bluboo, Umi, Elephone, Oukitel, BlackView and other MTK processors based on the SP Flash Tool's special utility. She knows how to sew separate sections, format the system and create backup copies. Models are supported on MT6572, MT6577, MT6580, MT6582, MT6589, MT6592, MT6750, MT6737, Helio P10, Helio P20, Helio X10, Helio X20 and other less popular chips.
The current version of the program is available on the website: http://spflashtool.com/. Before starting the process, install USB drivers under the MTK processor (link to FAQ is in FastBoot item in this manual).
1. Unzip the Sp Flash Tool folder on the "C: \\" disk, next to "Put" the firmware. The path to files should not contain Cyrillic characters.
2. The folder is Flash_Tool file. Run it.

3. In the "Download-Agent" field, the path to "mtk_allinone_da.bin" will already be specified. Next, you need to click "Scatter-Loading" and select the Scatter file in the folder with the firmware.


4. We leave the switch to "download only" and mark which sections need to be flashing (all are allocated by default).

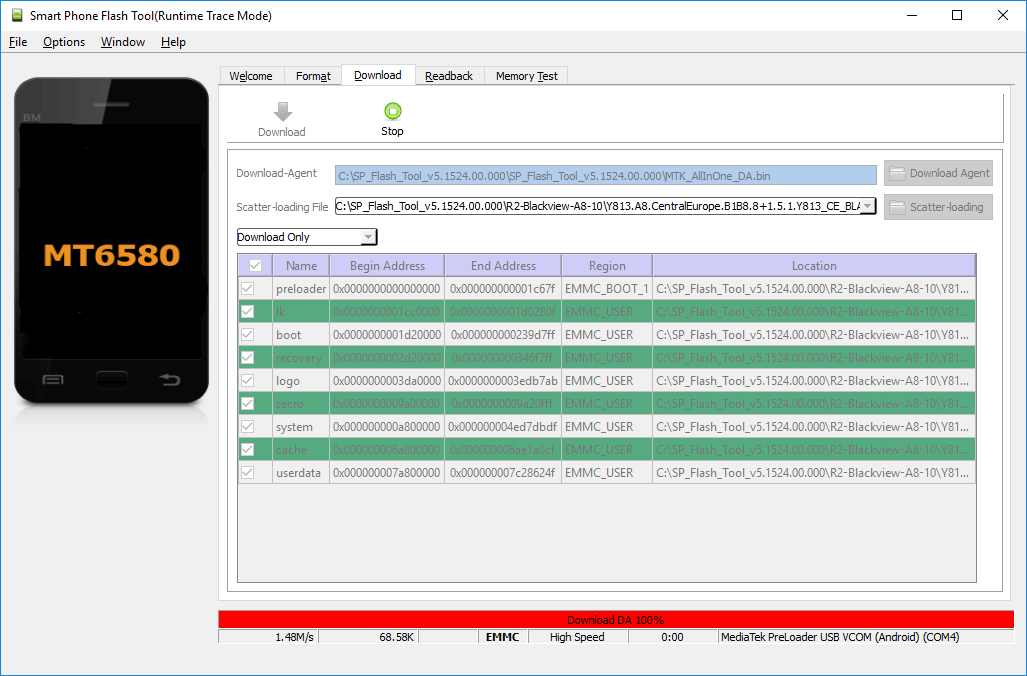
5. Click "Download". Then turn off the phone, remove the battery for a few seconds, insert back and connect off Android smartphone to a USB computer.
6. First, the Red Band "Download DA 100%" will appear.
7. Then yellow with the firmware process. Percentages are displayed as close to the end of the installation.
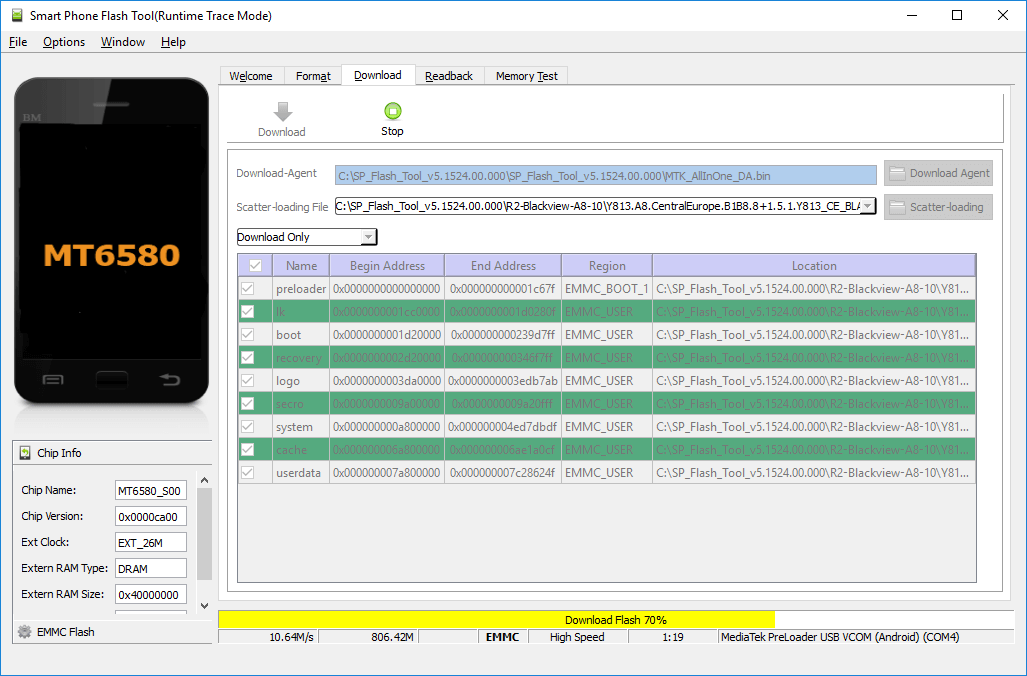
8. SP Flash Tool will report on the completion of the mobile device firmware - the "Download OK" window opens with a check mark.

Turn on the phone. The first launch usually lasts long enough.
SAMSUNG and LG Firmware
Devices of some manufacturers need to be flashing through special branded utilities (firmware). On our site there are instructions on this topic:
- Samsung -
Why flash "Android"? Due to the desire to expand the functionality, see how your gadget can look in the new "wrapper", restore the phone's work when it is not possible to roll back, etc. But regardless of the cause it is so.
How to install the firmware on Android from the computer?
First you need to download it. It is best to download the official from the manufacturer of the mobile device. It is worth noting that the software is selected directly for a specific phone model, otherwise it may not "become", which is why additional problems may arise.
Need to know
Before flashing mobile deviceYou need to remember and follow several rules:
- It is necessary that the battery charge of the phone is at least 80%, and better all 100%.
- Install drivers on your computer for your device.
- Very undesirable if the "Android" firmware breaks through the PC due to shutdown of electricity. Therefore, it is best to use a laptop in this business or with uninterrupted source Nutrition.
- To secure your device from a poor-quality OS, you need to back up the current software and data.
- Extremely undesirable to use uSB port 3.0 when flashing (USB 3.0 blue port, 2.0 - white).
- Repeat again, before downloading the firmware, you must carefully read it. Also worth avoiding suspicious sites.
- It is best to use the original USB cable that walked complete to the device.
- Usually, after flashing the on, the deevis is on, you need to keep 15-20 seconds, so you should not panic if it turns on for a long time. Then it will turn on as before.
FastBoot.
With FastBoot, the Android tablet firmware is available through a computer. Download FastBoot utility, unpack the root system Disc (most often this is a C drive). It turned out a folder with the path to it C: \\ Android. There are 2 more folders: Tools and Drivers. In the first are required programs, In the second - drivers. Open the Drivers folder and install required drivers. Next to the Tools folder to transfer the downloaded firmware in the zip archive. Now connect the gadget to the computer via USB.
Open the command line (or CMD) and enter the command without quotes "CD C: \\ Android \\ Tools". Moving to the directory of this folder, enter FastBoot Devices.
In this case, the device code appears. If the code does not appear, it means that you need to unlock the bootloader.
Bootloader provides information on the status of a memory card, random access memory, kernels and is responsible for loading the OS. And if you do not unlock it, then the flashing will not succeed. It is worth noting that when unlocking the bootloader, the device loses a warranty. However, it is quite simple to block back if such a need arises. You need to pay attention to the fact that unlocking will erase all the contents of the device and the memory card, so it will be best to make data internal memory and an SD card.
Unlock bootloader
To unlock the bootloader (and the Android tablet firmware through the computer has become possible), you need to perform the following steps:
- Turn off your mobile device.
- We connect it to the PC and climb simultaneously the power button and both volume.
- On the computer, open the command line (or CMD), where we enter without quotes "CD C: \\ Android \\ Tools".
- Enter the FastBoot OEM Unlock command.
- Check again by the FastBoot Devices team.
- If Waiting for Device appears instead of the gadget code, it is worth checking for drivers and change the USB cable.

If the device was identified, enter the command: FastBoot Update_File .Zip. After flashing reboot.
FlashTool
Before installing the firmware on Android from the computer using the FlashTool utility, you need to download the OPF in FTF format. After download and install the program. The downloaded file for flashing is placed in the Firmwares folder, which is located in the program directory. Run the utility.
Press the button with the zipper icon in the upper left corner, leave the point on Flashmode.

Now you need the operating system file from the list for the gadget, the on the right should be ticks on Wipe User Data and Wipe Cache. We are waiting for a bit, after which the window with an instruction for connecting the phone will appear. We connect it to the computer and clamp the on and volume button at the same time (the camera, the menu - the key combination can be different for different phones, so you need to specify exactly for specific model). As soon as the program receives access, automatic "Android" will begin to be installed quite quickly, within a few minutes.
After the process is completed, turn on the gadget and pass the primary setting.
This method of installation software is one of the best, as you can install the firmware on Android from the computer using FlashTool when the phone is turned off, in which the Recovery mode is not provided.
With the help of specialized programs
Many developers of mobile devices have developed special service utilities. One of these utilities is an update for smartphones Fly.. With its help, it was possible to update the current OS and the "Android" firmware through the Fly smartphone computer.
Download it, install. Installed, the utility will offer to connect the device to the PC. It is worth noting that it should be enabled. If it is disabled, the utility itself will help it. After that, click "Install Driver".

We connect the smartphone, run the utility. Click "Check the update" and select the model from the list (if it has not been determined itself). Next, a window with information about software will appear, where we click "start loading" and follow the simple instruction.
Such a program is far from the only one, as you install the firmware on the "Android" from the computer using a similar utility from the developer, you can practically on each smartphone.
Recovery mode
In the "Rekkovery" mode, that is, in recovery mode, you can also reflash your device. As in any other case, you need to download the OS and move it to the SD card. It is worth noting that this Android firmware is produced without a computer.
In order to install new Operation on the phone, you need to go to engineering menu or recovery mode. To do this, it is necessary to turn it off, after which it is to press the power on and volume down, up or the "Menu" button at the same time (for each phone manufacturer, the combination may be their own, so you need to find out additionally).
Depending on the "Rekkovery" version, our actions are as follows:
- in standard version Click Apply Update From External Storage;

- in the TWRP- Install Zip version;

- in the CWM version - Apply Update From Sdcard.

After the "Android" firmware of HTC or any other manufacturer will be successful, you need to restart the smartphone and go through the primary setting.
It should be paid to the fact that if all possible combinations were trumpedized, and the gadget to the "Rekkovery" mode did not go, it means that this feature In this apparatus is disabled or absent.
A couple of words
Recall a couple again important momentsthat will save several thousand nerve cells from the faithful death:
- Before installing the firmware on Android from the computer, you must make a backup of the data. This can be done with the help of special utilities from both the official developer and from the unofficial one. This will help to do if the flashing failed.
- After flashing to keep the power button you need 15-20 seconds. If the inclusion has not happened, you can try to remove and insert the battery and try to turn on again.
- Rather, the flash card will have to format. Even if there is a lot of information, the new Android can create new sections on it on top of the old, absolutely ignoring the latter. Therefore, before connecting the USB flash drive, it is best to reset all its contents on the computer.
 Cellular - what it is on the iPad and what's the difference
 Go to digital television: What to do and how to prepare?
 Social polls work on the Internet
 Savin recorded a video message to the Tyuments
 Menu of Soviet tables What was the name of Thursday in Soviet canteens
 How to make in the "Word" list alphabetically: useful tips
 How to see classmates who retired from friends?