Install twrp recovery on Xiaomi. Flashing Xiaomi devices via recovery mode (Recovery) How to exit mi recovery 2.0 1
Users who do not like the standard Android menu recovery have a great alternative in the form of TWRP Recovery, but a question arises related to how to install TWRP Recovery.
This recovery option differs, first of all, in that all functions are completely sensory.
That is, you will not need to use the volume buttons and phone menu to select certain items in Recovery.
Often, all this is extremely inconvenient and only causes unpleasant emotions. Therefore, many people decide to install TWRP Recovery.
Besides sensory selection, it has many other benefits. But we will not consider them now, but instead we will talk about installing this custom recovery.
Content:Option number 1. GooManager
This application has now been renamed TWRP Manager. It is one of the simplest, and therefore convenient for setting the menu we need.
All actions are performed in the same window. In general, the developers have tried their best.
The installation process looks like this:
- First you need to download the manager to. There is a corresponding link for this.
- Then the application is installed and launched. After that, you should go to the application menu. This is done by swaping to the left.
- In this menu, it remains to select the "Install TWRP" item.
- In the next window, you just need to click "Install Recovery".

Rice. 2. "Install Recovery" in the manager
- The installation file is searched for. Its name should include the name of your device. For example, if you have a Samsung Galaxy S3, then the downloaded file will be called "openrecovery-twrp-1.1.1.1-i9300.img", and "i9300" here actually means S3 (this is the code of this phone).
- So, if the name of the downloaded file does not contain the name of your device, you should not install it. Better to use the other methods described below. And if there is, you just have to click "Yes" in the message that appears after downloading.

That's all, the process is over, and you can safely use the new menu.
But not everything is so simple.
Attention! To use this program, you need root rights.
One of the easiest ways to give your device so called is to use the Root Checker app.
All that needs to be done after downloading and installing it is just go to the "Verify root" tab and click on the same inscription a little below.

Rice. 4. Using Root Checker to assign root rights
In principle, this is true for almost all methods described in this review. Therefore, before performing each of them, assign root rights to your device.
By the way, this is useful in many other cases when you need to add some unusual functions to your phone or tablet.
Now let's get back to installing the recovery.
Option number 2. Official TWRP App
Of course, the creators of this beautiful and convenient menu have made their own application for installing the recovery.
But the problem is that quite often the operating system itself blocks its bootloader.
Therefore, you have to use the aforementioned manager or other programs, which we will talk about later.
At the same time, you should not try to understand why this is happening. You won't succeed. Also, do not be afraid of unofficial applications for installing TWRP.
They are all completely safe, at least the ones described in this article.
So, to use the Official App, do this:
- It all starts, of course, with a download. Here is the download link on Google Play.
- After installation, open the program. In the first window, click on the "TWRP FLASH" button at the bottom.

Rice. 5. Button "TWRP FLASH" in the first window of the Official App
- In the next window, select your device. To do this, click on the drop-down menu, which initially says "Select Device".
- Then click on the "Download TWRP" button to download the installation file. Here the principle is the same as in the first option - if the name does not contain the name of your device, then something is wrong. And it is very easy to check it. You need to go to the "Download" folder or the place where all downloaded files go, and check the file related to the recovery there. When this step is completed, the program may decide on its own what to install. If this is not the case, then the text "Select a file to flash" will still be present in the field under the device. Then click on it and select the downloaded installation file.
- In the end, you just need to use the FLASH TO RECOVERY button.

Rice. 6. The main menu for installing TWRP through the Official App
As you can see, in this case, everything is also quite simple. We recommend that you try to use the Official App first. But this does not always work out.
Then you need to take one of the managers indicated in this article.
And if neither the Official App nor the GooManager want to cope with the task we are considering, then there is also the ROM Manager.
Hint: Also, in cases where something will not work for you, write about it in the comments. We will definitely help you solve the problem and install TWRP.
Contact us!
Option number 3. ROM Manager
The use of this manager is even easier than the previous two. This process is as follows:
- From the very beginning, the program is downloaded from Google Play. Here's a link . Then it is installed on the smartphone / tablet. This happens in the same way as with any other application.
- After launch, a welcome window will appear with a description of the functions of the ROM Manager. Click "OK" to continue.
- Then click on the three vertical dots in the upper right corner and select the previously downloaded recovery file. It will be installed exactly.
- Then, in the "Recovery Mode" section, select the "Recovery Setup" item.
- In the next window, you will need to click on the item responsible for TWRM (it will be located next to "ClockworkMod Recovery" in the section Install or Update Recovery).
- Finally, in the last window, you must click on "Install", wait until the download of the desired file and its installation is completed. The user can only observe this process, but not participate in it.

Rice. 7. Using ROM Manager
As you could already understand, in this case it is necessary to manually download the .img file in advance, that is, the one that is needed to install the recovery.
And you can do this on the official website of this custom extension twrp.me. The download process is as follows:
- First you need to go to the me / Devices page and use the search bar to find your device there.
- Among the proposed options that will appear under the search, select the one you need. There may be several .img for one device - they differ depending on the processor model or other features.

Rice. 8. Selecting the installation file on twrp.me
- Then scroll down the page to the "Download Links" section. If you are in America, click on the link "Primary (Americas)", and if in other countries, then your option is "Primary (Europe)".
 "Choose a file" and indicate where the previously downloaded file is located.
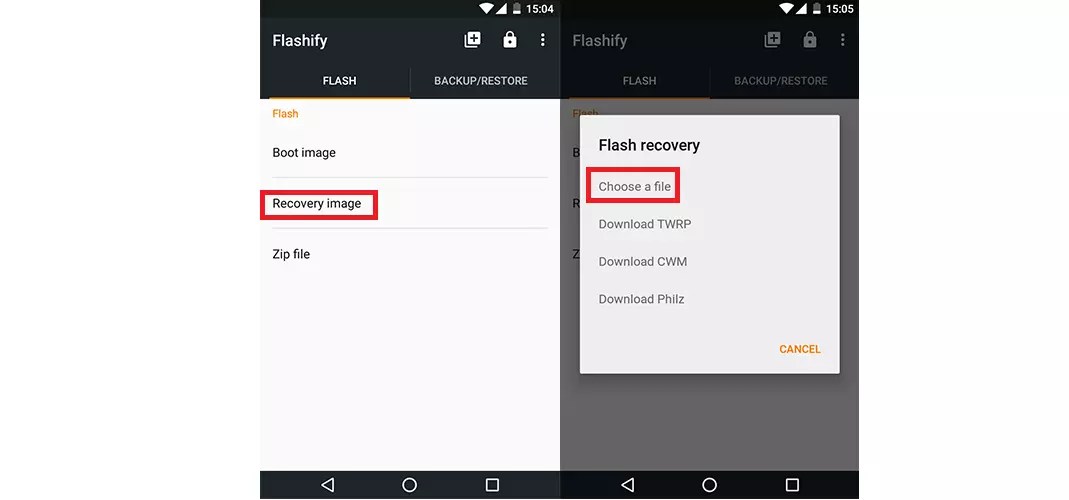
Rice. 10. Using Flashify to Install TWRP Recovery
Actually, this is where the installation ends. You can safely use the new Recovery.
Option number 5. Rashr
This is truly the easiest option in our roundup today.
All you need to do is download the program on Google Play, in the main menu click on "TWRP Recovery"
Sooner or later, we all want something new and interesting, even if it concerns firmware on a smartphone. Now it's time to replace the standard picture, which has long been boring, with something more original. But smartphone owners are interested in the question of how to install TWRP Recovery on Xiaomi. The fact is that many users on "you" communicate with various applications, and even changing the firmware for them is something like a feat.
Here's a tip - before thinking about the firmware, it doesn't hurt to make changes to the recovery. Many forums advise you to pay attention to TWRP, pointing out that TWRP has one distinguishing feature - it is stable and convenient work. Moreover, there is an opportunity to work on touch control, which is very beneficial. In general, we will figure out how to install TWRP on Xiaomi.
To use this method, you need to have root rights. Since we are considering Xiaomi, advanced users already have the rights here, it remains only to transfer them to the application. If there are no rights, then you need to get them, and only then install the recovery.

Further instructions are as follows:
- Go to Google Play (https://play.google.com/store/apps/details?id=com.jmz.soft.twrpmanager&hl=ru) and find a suitable application there;
- Install it and run it;
- When the application is installed, you must agree with everything that the application offers, grant it root access, etc.;
- Select your device and download the Xiaomi TWRP file by clicking on "Download TWRP";
- Next, select the downloaded img file and through the key "Flash to recovery" install it.

After the program is installed, the mode will turn on reboot to recovery mode, that is, reboot. But after that, all manipulations can be carried out from this menu without completely changing the system. And who is afraid that the stock firmware will fly off, then with proper operation this will not happen.
Give gifts
Installing Mi Recovery via fastboot
The second method, how to enter Recovery, is no longer so simple, but with sufficient concentration and attentiveness, it can also be mastered by an ordinary user who decides to dig a little deeper than the standard smartphone settings. The only thing that really does not hurt here is the skills of using the console and ADB.
Disable driver digital signature verification
For Windows 8
- Press the combination of buttons "Win + I"... Crawl out on the right "Options".
- Clamp "Shift" and click.
- After rebooting, a window will appear "Choice of action"... We choose "Diagnostics" -> "Extra options" -> Boot options -> "Reload".
After rebooting, we will see the window " Restart options " push "F7" and wait for the Windows to reboot.
For Windows 7
When turning on the computer, after the BIOS boot stage, we often press "F8"... A menu will appear "Additional download options"... Choose Disable Required Driver Signing.
P.S: F8 does not always work the first time, so if it doesn't work, you can either repeat it 2-3 times, or resort to an alternative method.

Process description
- The first step is to download and install the drivers and download and unpack them. It is very important that the file path is not in Chinese. You can use only Latin characters, otherwise the system will generate an error.
- The second step is to enable USB debugging. This is the simplest procedure. It consists in the following manipulations: on the Xiaomi phone, you need to open the item "About the phone"... When you have found the menu you want, eight times (sometimes seven is enough) click on the MIUI version. After clicks, a message will appear "You are a developer"... A sub-item "for developer" will appear in the settings menu and select "USB debugging" in it. If there is nothing, then you do not have access rights or you already have one.
- In the third step, login and run command.bat from the ADB folder. Next, we indicate the command "Adb devices" but after checking if there is a smartphone connection. If the phone does not respond, then something is wrong, therefore it is better to connect again.
- If the connection is established, start Fastboot Mode by running the command "Adb reboot bootloader"... Once this is done, the smartphone will automatically reboot and enter bootloader mode. When it is over, you can install custom recovery.
- Since we do not have the recovery itself, in this case I use the recovery files that are on the Internet, download them on the forums, etc. For example, you can find Mi Recovery 3 at this link. You need to save the recovery in the folder with adb and name it TWRP.img
- And using the installation is generally very simple, since its whole essence boils down to one simple command "Fastboot flash recovery TWRP.img".

In fact, this is where it all ends, although in order to make sure that the device is working properly, you need to enter the TVRP mode from the device. Launching is pretty straightforward. To do this, you should perform the following manipulations:
- Press and hold the power and volume buttons in the "down" position;
- We wait for the vibration signal and immediately leave;
- We are waiting for the utility that we just installed to start.
If all is well, you can go to the system, and if your goal is to install the firmware, then continue working.

Problems
Of course, not everyone will be able to carry out these manipulations, but a user of an average degree of advancedness must still figure out how to work in recovery mode.
If the smartphone simply does not enter this mode, no matter what options you use, then you can look for alternative options on how to enter the desired mode. But we strongly advise against using unverified methods, because this can cause the complete collapse of your smartphone. It is much safer to entrust this business to a professional, preferably who has already dealt with Xiaomi smartphones.
The main reason that the user cannot enter the recovery is the conflict between the utility code and the firmware. Solving this trouble is simple - you can reinstall the recovery itself. But this is only a temporary solution, and then you will have to look for another way to enter the system menu of interest.
During the flashing process, all important information will be deleted so save it to. Make sure that the battery is at least 75% charged.
Important! If you want to flash an update (Incremental ROM pack), first erase all information in Recovery mode. If you want to rollback, that is, install an earlier version, you need to download the full assembly (MIUI full ROM pack). Due to the differences in the recovery mode interface, this method is not entirely suitable for some Redmi smartphones with MediaTek processors, as well as devices with a locked bootloader.
Step 1: download xiaomi firmware
Visit the official MIUI resource, select your model and download the latest or current firmware version for you. Change the name of the downloaded file to "update.zip".
Step 2.
Connect your device to a computer or laptop using the supplied USB cable. Copy or move the downloaded firmware to the internal memory of the device. It is important not to put it in a folder, let it be in the root directory.
Switch to recovery mode on your device in any way convenient for you:
- Open the “Updater” application, click on the icon in the upper right corner as shown in the picture and select “Reboot to Recovery mode” and enter it.
- Turn off your device completely by holding down the power button and selecting the appropriate item, then simultaneously hold down the power button and the volume "+" button, and then hold it for a while and enter Recovery.
- Some applications, such as ROM Toolbox, allow you to reboot into various modes, including recovery mode.
Step 4: flashing xiaomi
While in recovery mode, use the + \ - keys to toggle up / down and the power key to confirm.
After entering Recovery, select a convenient interface language, then click on "Install update.zip to System One" and confirm the action. The device will start updating automatically, and when everything is complete, you just need to select "Reboot to System One" and wait for the operating system to load.
Was the article useful to you?
Rate it - support the project!
Sooner or later, the standard firmware starts to get bored or buggy, which is why most of the users begin to "comb" mobile forums in search of a solution. There, an understanding comes to mind: to change the firmware, you must first reinstall the recovery. Forum users advise installing TWRP, referring to its maximum stable operation and the ability to work with touch controls. Therefore, it is worth telling how to install twrp recovery on Xiaomi, what problems may arise with this and reveal options for solving them.
What is it and why is TWRP needed
In general, this is an abbreviation, and it stands for team Win Recovery Project, thereby saying what the project is: a modified recovery that allows you to do much more than factory utilities. First of all, it is installed by those who want to install custom firmware on their device, which is why the purpose of TWRP is appropriate: a full backup of the system, installation of software, firmware, kernels, full wipes and a bunch of everything that "stock" (factory) hides from the user menu.
With Xiaomi, the situation is standard: basic recovery is not suitable for installing custom firmware, because the former simply does not allow this, which is why people come to TWRP. In addition to everything previously mentioned, Team Win can fully restore the firmware from the recovery file. So, this is an excellent tool for those who like to play it safe: even if the smartphone “died” after changing the firmware, it can be “revived” without any problems.
In addition to such a killer feature, TWRP can provide full-fledged work with device files, creating partitions in memory, approximately like on the HDD of your desktop, connecting to a PC in flash card mode, while the system will not be required to start. It is very convenient, for example, the wipes have already been made, and no one has transferred the firmware to the memory device, which has repeatedly happened to your humble servant.
Installing TWRP Recovery
Through the official app
It's worth starting with the fact that there are several ways. The first, the simplest, is to use a proprietary application or its analogs, you just need to remember: they are necessary for correct operation. In Xiaomi, as a rule, advanced users already have them, all that remains is to give them to the application. Otherwise, you will first have to get those same rights, after which you will have to think about installing a recovery.

The action itself takes place literally in a few steps:
- Find an application in the vastness of Google Play;
- Install it and run it;
- Agree with all permissions, grant root access if not already done;
- Select your device and download the file using the "Download TWRP" button;
- Select the downloaded img file and install it via the "flash to recovery" button.
Here, perhaps, it is worth making a reservation: the name of the IMG file must correspond to the program: usually this is recovery.img, but proprietary applications like TWRP may require you to name the files in a special way. In the case of Team Win, this is twrp.img, however, before installing, you should carefully read the description of the program, where, most likely, the required name will be indicated.
After such an installation on Xiaomi Mi3, for example, the smartphone will automatically start in Recovery mode, from which all the manipulations necessary for the user will already be performed. It should be noted: the stock firmware will not "fly" when installing the custom menu in any case, and this applies not only to Xiaomi.
Via fastboot
The second method is a little more complicated: here you will need the most basic skills in working with the console and ADB, since the option is to install recovery via fastboot. Your device should be. So, the installation itself is carried out in several stages.
- The first is to download the ADB drivers and unpack them. Here you should make sure that the file path contains only Latin characters, otherwise the console will generate an error.
- We install the drivers for your device, taken.
- The next step is to enable USB debugging. It is very simple to do this: first, open the "about phone" item on your smartphone, after which you need to press 8 times on the MIUI version. The message "You are a developer" should appear. If this does not happen, then you either already have access to the settings for developers, or the firmware simply does not allow you to do this.
- The next step will be to directly enable debugging, which is done in the settings "for developers".

- Run the command.bat file from the ADB folder, run the command "adb devices" and check if the smartphone is connected correctly, for which you may need to confirm authorization on the smartphone screen. If nothing happens during such manipulations, check the device connection, reinstall the drivers. It's better to play it safe here.

- Launch Fastboot Mode on your smartphone using the "adb reboot bootloader" command. After the command, the smartphone should automatically reboot and enter bootloader mode. We are now ready to install custom recovery.

- Now you need to download the TWRP recovery file. Find your device and go to the "Download Links" section and select "Primary (Recommended)" there.

- The whole point of the installation comes down to entering the command "fastboot flash recovery twrp.img". It is worth noting the following: the firmware file you downloaded should be called twrp.img or recovery.img, depending on the ADB version. You can find out where you download the corresponding programs or by reading the readme file, or just try both options.

That's all, in fact, the installation of twrp on xiaomi redmi note 3 pro (in our case) is complete. However, there is no need to rush: you need to launch the smartphone in TWRP, for which we press the power and volume keys down. We hold the power button until the vibration response, then release it and wait for the installed utility to start.

From here, you can already boot into the system or start installing custom firmware. All the methods described on the Internet are variations of the first and second, described here, moreover, there is usually no description of how to enter TWRP, so there is no point in describing them once again.
Possible problems
And the problem, in fact, is only one: after the firmware, if the custom is placed on top of MIUI 8 version and newer, many users intensively googled the phrase "how to enter twrp recovery xiaomi", because the possibility of a normal login simply disappeared. This happened due to a conflict between the utility code and the firmware: the emmc_appsboot.mbn file corresponding to MIUI, overwriting which simply does not make it possible to log into tvrp.
The solution is quite simple: you can simply reinstall the recovery. There is only one nuisance: such an action will help for exactly one flashing, which is why the guys with w3bsit3-dns.com found a more reasonable and durable fix.
So, to fix the bug, you need to download this file (only suitable for redmi 3, use at your own peril and risk), turn off the phone, hold down the power and volume buttons down, connect the USB cable to the phone and computer, run the file "1 run me.bat "From the archive, which, if successful, should write" OKAY. Finished ". After that, we disconnect the cable and hold both volume and power buttons for 15 seconds, wait for vibration. That's all, TWRP after such manipulations should work fine.
conclusions
You should only install the Team Win project if it is really necessary. It is extremely difficult to ruin the phone with such a thing, but it is possible. By the way, without the standard mention that you carry out all the manipulations with your devices at your own peril and risk, you will not be able to do it. I hope we managed to convey to you information about Team Win Recovery Project and how to install it. The method, by the way, is relevant for any Redmi and Mi models, even for Mi5 and Mi5s.
You will need to connect your Android phone with the computer. For that, please make sure you have installed the USB drivers for Xiaomi Mi 3 properly. If not, you can download the latest official drivers from our Android USB Drivers section here:
Backup and Other Important Tips
Done with the USB drivers? Perfect. The tutorial is on the next page, but first, please take a look at the following tips and important points you need to take care of. These are important, as we don’t want anyone losing their personal data or apps:
Always backup your important data that you might need after you install a new custom ROM, an official software update or anything else. Make a backup for just in case, you never know when anything might go wrong. See below for some tips on how to backup data:
- Backup your Apps. How? ->.
- Backup your SMS messages. How? ->.
- Backup Contacts, Gmail and Google Data. How? -> Sync with Google Sync.
- Backup Call History. How? ->.
- Backup WhatsApp Messages. How? ->.
- Backup APN Settings: GPRS, 3G, MMS Settings. How? Note down everything from: Settings> Wireless & Networks (More ...)> Mobile networks> Access Point Names.
If you already have a custom recovery (ClockworkMod, TWRP etc.) installed on your phone, we strongly recommend a backup using that as it creates a complete image of your existing phone set up.
A few more optional tips that you should remember:
1. Having problems connecting your Android phone to the computer? You need to enable USB debugging mode. See here: - for Gingerbread, Ice Cream Sandwich, Jelly Bean, KitKat and Lollipop.
2. Make sure your Android device is charged up to 80-85% battery level. This might help you:. Why? Because, if your phone goes off suddenly while installing a custom ROM, flashing an official firmware update or installing mods etc. - your phone might get bricked or go dead permanently. No one wants that, right?
4. Most of the tutorials and how-to guides on Team Android are for factory unlocked Android phones and tablets. We recommend not to try our guides if your phone is locked to a carrier, unless we have specified the carrier name or device model.
If you find the above tips useful and they were helpful to you, please consider giving us a +1 or LIKE to thank us!
All set and ready? Good. You can now read below and install TWRP Recovery on Mi 3 with the given step-by-step tutorial.
HOW TO: Install TWRP 3.0.0 Recovery on Mi 3
We have put together a detailed step-by-step instructions guide on how to install TWRP recovery on Xiaomi Mi 3. This is a very simple tutorial and if you have been updating or installing new custom recoveries on Nexus / Google Play Edition phones, then this one should not be any different for you.
Please read every line carefully below. We suggest that you should read the tutorial once before actually performing it on your phone.
To Remember:
- This TWRP Recovery tutorial is only for unlocked Xiaomi Mi 3. Please don’t try this on any other variants of the phone.
- Make sure you backup all your data in your phone before proceeding.
- This will void your warranty.
- You need to have working Fastboot / ADB on your computer. Download links are posted below.
- Bootloader should be unlocked. How? -> How to Unlock Bootloader on Mi 3.
If you have fulfilled all the requirements above, then proceed to the actual tutorial.
Complete Step-By-Step Instructions:
Step 1 - Download Fastboot / ADB package from the following links depending on your OS and extract it anywhere in your computer.
- Windows:
- OS X:
- Linux:
Step 2 - Turn OFF your phone.
Step 3 - Connect your Mi 3 to your computer using a USB cable.
Step 4 - Download TWRP (twrp-3.0.0-0-cancro.img) and save it into the same directory as the extracted Fastboot / ADB package files.
Step 5 - Now go into Fastboot / Bootloader Mode on Mi 3. How? Press Volume Up + Volume Down + Power keys for a few seconds till you see some text on the screen. This is Bootloader Mode.
Step 6 - Navigate to the same directory now as where you have Fastboot (i.e. Step 1) and on Windows: Open Command Prompt (Shift + Right-click> Open Command Prompt). For Mac OS X and Linux, use Terminal to navigate to this directory.
Step 7 - Type in the following command and press Enter.
Fastboot flash recovery twrp-3.0.0-0-cancro.img
Step 8 - Once completed, choose RECOVERY from the Fastboot menu using your volume keys and enter Recovery Mode.

 Why the computer does not see the new hard drive
 Minecraft crashes, what should I do?
 Excel - paint cells by condition
 Email forgot password
 How to completely uninstall Avast!
 Updating iPhone without problems
 How do I clear the cache on my computer?