How to use the program for bandits. How to use Bandicam: set up correctly. Purpose and basic capabilities
Bandicam is designed to record video from the screen of personal computers. It is one of the best in the industry. It features good performance even on the most primitive devices.
Bandicam use process
It is installed quite simply. After downloading the installation file from the official website of the company, you need to start the installation process, which is Russified. This will help you install this software with ease. Due to the fact that it is lightweight, it quickly installs to the selected folder on your hard drive. The start window of this software after launching starts with home tab... On it, you can select the mode of saving the video from the screen.
The user has a choice such regimes like: rectangular and full screen shooting, game recording and around the cursor, or from a third-party device. In shooting mode “ Rectangular area»Everything that happens in a window with a certain resolution is recorded, which can be selected before the start of shooting, and hot keys are also selected before the start with which the recording starts and ends. V full screen mode the program records everything that happens on the screen. In addition to the methods described above, it is possible to save video during the passage of games. It differs in that the DirectX program is used during recording.
Bandicam has a wide a set of settings which will make video recording much easier. Here you can configure the storage location of the files, the program launch mode, set the auto-start timer for saving the video from the monitor in a certain way. You can also assign hotkeys to help speed up the process of creating videos. You can choose the format in which the video will be described, as well as the sound quality. 
With this software, you can take quick screenshots by assigning a hotkey for this. You can also select directory in which they will be saved. The developers provided an additional choice of the format of the saved image, the ability to take screenshots at a certain frequency, show or hide the cursor, add a logo. You can also turn on the shutter sound by presetting it. 
After selecting the desired mode and making the necessary settings, you can click Rec button located in the upper right corner to start recording video. The buttons for pause and screen capture are also located here. The appearance of a new version of the program is also tracked on this tab.
In chapter " About the program»You can read all the information about Bandicam, its version, find out whether it is registered or not and full version cost... You can also buy the full version of the program here. 
Bandicam spreads on a paid basis however, there is a free option for beginners with a number of restrictions. Owners of the free version cannot shoot videos longer than 10 minutes, and a label is placed for each captured video.
Nowadays there are a lot of different programs for capturing images from the screen, the most popular of them are NVidia Shadowplay, Fraps and Bandicam. What exactly can Bandicam boast of, considering such a monster as Nvidia - the leading developer of video cards? In the case of "Shadowplay" everything is obvious, if a person is an adherent of the "red" camp of AMD / Radeon then he will not see such a feature.
Fraps, next on the list, seems to be an excellent option, but the resulting video files are unrealistically large. 1 minute of material takes up several gigabytes of hard disk space. And the frames are sagging, be healthy, so Bandicam remains.
Program setting
In the "General" tab in Bandicam, you can select the output folder for the captured files. Also here you can set such parameters as "On top of all windows", "Start in tray", "Start with Windows". By clicking on the "Advanced" button, you will be allowed to configure in detail various parameters of the application, such as the settings for "capturing" images, output to a folder and marking of video files, the choice of languages and work with the properties of video capture. In general, all the settings, but one button at a time. On the same tab, you can automate the process according to several conditions.
Recording options
The first section of Bandicam that is important when recording is "Video". Install the button, by pressing which the "capture" will begin. We also assign the key to pause if necessary, then mark such things as "cursor display" or not. For the same purpose, you can turn on the "effect of mouse clicks", that is, with each mouse click, its cursor will blink, highlight, in general, show in every possible way that a click has occurred. By checking the "add video from webcam" option, a recording from the camera will also be added to the footage.
In the "Recording" section in the "Video" tab, the "Settings" button and we get advanced options for setting up the video. Here we indicate from which source the sound will go, you can specify up to two sources, for example "WIN mixer" + "Microphone" as a result it will give you the sound of what is happening in the system and the sound from the microphone. If desired, these sources can be recorded into two different audio tracks by unchecking the box "Shared audio track with the main device". If suddenly you need the sound recording to take place at a certain moment, then set "The sound is given while holding the key" and assign the key.
For users who also record from the webcam there is a “Webcam” tab, everything is done simply and clearly. First, we choose which camera to write from, then we get the size of the picture as a percentage, there is a preview of what happened. Next, we choose where the webcam will be on the screen, either using pre-prepared positions or manually specifying the percentage of offset from the edges. If you do not want to steal your video, then you can add your logo over the video, all the settings are the same as on the webcam, we indicate the path to the logo, and then we find its place on the video. You can choose the effect of clicking the mouse, the color and only. The last tab "Options", select the priority with which tasks will be recorded. If you set it low, then the application will sag less in FPS, but the video quality is poor, and, accordingly, on the contrary, when you select the maximum parameter.
Format selection
We click on "Settings" in the "Format - AVI" section and drove. The first point is to select the format of the media container to which the recording will be made. If we do not go into technology too much, then with a calm soul we will stop at "avi", stylishly fashionable and youthful. Next, according to your taste and your needs, we select the resolution of the output file. Either the full size, or a pre-prepared version, you can specify your own by choosing the "Special" option. The next stop is FPS, how many frames per second there will be in the video, set it to 60 if you are confident in your PC. Codec, well, here everyone shoots as he wants, go to Google and read the information about different codecs, this cannot be described within the framework of the article. We set the "quality" parameter to 100, if, again, the hardware allows, and so we select it experimentally.
Sound settings of Badikam, and again a codec, and again the same advice to use search engines, but here I can recommend to put MPEG-1 L2. The bitrate is set in accordance with your wishes, the higher, the better the audio quality, but the larger the file size (insignificantly) and the greater the load on the computer. At the crossroads between stereo and mono sound, it is better to choose stereo. With frequency, the principle is the same, higher is better.
The latest feature of Bandicam is simply screen shots. In the "Image" menu, you can adjust the screen format, capture key, cursor, and many pictures in a few seconds.
Outcome
Bandicam is the most cost-effective screen capture option. Unless you own Nvidia graphics cards, if you don't have a lot of hard drives of several terabytes and you don't have an I7 processor. At the same time, the quality of the final material is the same as that of Fraps. At the moment, no better one has been invented.
Bandicam is used when it is necessary to record video from a computer screen. If you watch webinars, video tutorials or play games, this solution will be of great help to you, because in the future all the material can not only be reproduced, but also posted on a social network or transferred to removable media. In this article, we will show you how to use the basic functions of Bandicam so that you always have at hand a record of important data and access to its distribution.
Registration in Bandicam is needed if you need to remove the restriction on the size of the recorded videos and remove the annoying watermark. Of course, this software is distributed for a fee, so the procedure for creating a profile involves purchasing a license key on the official website. However, with frequent use of software, such a contribution of funds is absolutely justified. All detailed instructions for purchasing a license can be found in our other material by clicking on the link below.

Setting your own logo
Above, we mentioned the branded watermark, which disappears after purchasing a license, but this function can be used for your own purposes by replacing the logo with any one you need. Such a solution will allow you to designate the authorship of the video and protect it from copying. This operation is done through the Bandicam settings, which is described in detail in our other article below.

Sound setting
When capturing what is happening on the screen, it is important to adjust the audio capture source, its sensitivity and the codec used in order to ultimately get quality footage. This should be done before you start recording the main content, and be sure to check to make sure the configuration is correct. Editing all parameters does not take much time and is carried out directly in Bandicam.

Microphone activation
Some users prefer to use Bandicam for recording the passage of the game or dubbing video lessons. The creation of such a video almost always requires recording a voice track in live mode, which is done using a connected microphone. In the program itself, you need to set certain settings so that the capture is correct and the tracks do not interrupt each other in volume, because after the end of the recording, all this will be very difficult to adjust.

Selecting the target window for recording
Usually, several applications are running on a computer at the same time, so when recording, Bandicam's focus should be aimed exactly at the required area so that only the desired image gets into the frame. To do this, inside the software there is a setting for selecting a target window. The user only needs to indicate what exactly is worth recording, and after that you can start the capture process itself.

Change voice for recording
Not all users want to record material in which their natural voice will be heard. To do this, some change its key and timbre for various reasons. When working with the application in question, it is possible to use a distorted voice, but for this you need to perform certain actions. Read more about this in the article below.

Setting up for recording games
A fairly large circle of users use Bandicam precisely for the purpose of recording the passage of the gameplay or to capture specific moments. Then, before starting such a capture, you will need to set additional parameters in order to improve the recording quality and get a good picture and sound at the output. There is nothing difficult in this, the main thing is to understand the functionality of the program.

Correcting codec initialization error
One of the most common problems is a codec initialization error that appears immediately after an attempt to start recording and is accompanied by an automatic shutdown of the program. It consists in conflicts between video card drivers and this software and is solved by adding certain DLL files to the root of the Bandicam directory.

As part of this article, we have demonstrated the basic lessons that should help a novice user understand Bandicam and record the required content without any problems.
Hello everyone! Yesterday we talked about how to use Fraps, but today let's see how to use Bandicam, which is the main competitor of Fraps. If you have not read the previous article, and want to familiarize yourself with it, then you can do it at this link.
Today I will tell you in detail, step by step, how to use Bandicam. We will start by installing the program, and will end with an examination of all the basic settings and functions that Bandicam has. After reading this article, you can easily use all the advantages of the program and, most importantly, you will know what is what and why you need it at all.
A small note. The version of Bandicam that we will be looking at today is as follows: 2.3.3.860 , that is, the newest, and since it may not match your version, I advise you to update your Bandicam or download the 30-day trial version from the official site: "Bandicam.com". Subsequently, you can easily upgrade to the full version of the program.
How to use Bandicam. Installation
First, let's see how to install Bandicam. After downloading the Bandicam installer, launch it by double-clicking the left mouse button. Having done this, a window with the choice of the installation language will appear in front of you:

Select the very first item, that is, the Russian language (if you wish, you can choose any other), and press the button " OK"to go further:

This is the initial welcome screen where you just need to click the " Further":

Here you will need to accept the license agreement (although no one reads it, you can become an exception) by clicking on the " Accept":

At this step, you can choose where the program shortcut will be after its installation. By ticking the " Program Group", after installing the program, a shortcut will be created in the program group," Desktop Icon"- to the desktop, and" Pin to Taskbar"- to the taskbar.

Here you can select a folder to install. Having done this, press the button " Install"to proceed to the actual installation of the program.
After waiting for the installation of Bandicam to complete, a new window will appear, where, without removing the check mark from the " Launch Bandicam", press the button" Ready"The installation of Bandicam can be considered complete.
Now let's move on to examining the program interface, and we'll start with the very first menu, called " General".
General menu

Here (1) , at the top, you can select the folder where the captured videos will be saved. Again, select only the folder that is on the hard drive that has a lot of free space, if you do not want to lose all your videos when recording. Also, a little below, there are three items and a button " Advanced":
- Bandicam window always on top... By selecting this item, Bandicam will always be above all other windows.
- Start Bandicam minimized to tray... When you start Bandicam, the program will automatically be minimized to the computer tray (located in the lower right part of the screen).
- Run Bandicam on Windows startup... Here, as is clear from the description, you can make Bandicam run together with Windows.
Here, with the help of the second point (2) You can set a timer for auto recording video.
Well, here (3) by clicking the " Setting", You can define after how much time or place the video recording should end, as well as what to do after that.
Let's see what's behind the button " Advanced":
General tab

In the first tab, " General", there are several already familiar and several new points. Let's consider only the second of them, that is, new ones.
We'll start with the top three points (1) :
- Show FPS in captured video / image (Only in "Game Recording Mode")... Allows you to record the number of frames in the game in a separate text file.
- Show tip / information bar... Here you can hide the Bandicam's bottom information panel. This function works only in the full version of the program.
- Turn off tray balloon notifications... Checking this box will no longer show tray notifications.
Start full-screen recording on Bandicam startup... This item (2) allows you to automatically start recording a full screen after starting the program.
Output Tab

Here, again, there is one that we have already considered and a couple of new points.
The first two points (1) :
- Create output sub-folder when writing a file... Allows, for convenience, to create a subfolder where files will be saved.
- Enable write caching on the disk... Enables caching of captured videos on disk.
Here (2) You can change the file naming format. Let's say you can make the first part of the video title not contain the name of a particular game or program, but your name, and the second - the serial number of the video.
Hooking Tab

In this tab you can make Bandicam stop recognizing applications that run on certain versions of DirectX and OpenGL. Just click on the desired item and cancel Bandicam support for this or that version of the libraries. If you need it, of course.
Language Tab
In this tab you can change the language of the program.
Others Tab
We'll look at this tab a little later.
FPS menu

- Here you can change the quick button for changing the position of the frames per second counter and activate the display of the counter in a certain place on the screen.
- Well, here you can turn on the frames per second limit and change the corresponding hotkey.
Video menu

We have come to the main menu of the program, " Video", in which you can change certain video and audio settings.
At the very top (1) there are five following items:
- Record / Stop Hotkey... Change the video recording shortcut key.
- Pause hotkey... Change the shortcut key to pause video.
- Show mouse cursor... Show mouse cursor when recording video.
- Add mouse click effects... Allows you to add special animation around the cursor when you click the mouse.
- Add webcam overlay... Add overlay to recorded video, webcam video.
Click on the " Settings"to go to detailed settings.
Sound tab

First, consider the first two points (1) :
- Record sound... Activates sound recording.
- Save audio tracks while recording (.wav)... Save audio files separately from video, in .wav format.
Here (2) , You can select the main audio device for your computer. By clicking on the " Settings"a little to the right, a window with Windows sound settings will open.
Here (3) the second sound device is selected and, basically, this device is a microphone. Again, by clicking the " Settings", You will go to the sound settings of Windows, namely - in the section" Recording".
Webcam tab

In this tab, you can activate webcam recording, change the location of the webcam, etc.
Add webcam overlay to video (1) ... Add webcam video when recording.
In the left column (2) there are the following items:
- Webcam... Choosing a webcam.
- Video size... Resize webcam video. By default, 20%.
- Position... Change the position of the webcam video on the screen.
And now the right column:
- Settings... Go to the software settings of the webcam.
- Preview... See what the webcam video will look like when recording.
- Left / R Margins... Indentation of video from the webcam to the left and right (in percent).
- Top / B Margins... Top and bottom offset of webcam video (in percent).
And the bottom two points (3) :
- Preview webcam on a screen (Only DX 8 or later, and OpenGL)... Show webcam video when recording video. Will only work if the game or application supports DirectX 8 or higher or OpenGL.
- Enable preview toggle hotkey... The video from the webcam will appear only when you press a certain key, which you can change.
Logo Tab

Using the tab " Logo", You can add a logo to your videos. To change the logo (watermark), click to the right of the" Image". You can control the transparency of the image using the slider" Opacity".
The rest of the points are very similar to those in the previous tab, so to save time, we will not consider them.
Effects Tab

Mouse animation effects are configured here. In the upper part, the animation color is selected when the left and right mouse buttons are pressed, and in the lower part, the highlight from the cursor is selected.
Options tab

The last tab of the recording settings contains the following items:
Here (1) the priority of the program is changed. That is, this means how much RAM will be allocated by the system for Bandicam and taken away from the rest of the programs.
Three more points (2) :
- Skip recording while frame is not updated... Skip recording when no frames are updated.
- Use enhanced capture method (faster, only DirectX 9)... Use an advanced capture method, which increases the speed of the application. Valid only if application supports DirectX 9 library.
- Use enhanced capture method (faster, only Windows 8 or above)... Use an advanced capture method, which increases the speed of the application. Only works on Windows 8 and above.
Click the " OK"to go back.
Back to the menu again Video... Here (2) the format of the recorded video is shown, as well as the audio that is located in it. By clicking on the " Settings", a new window with format settings will open:

Selecting the format of the recorded video (AVI or MP4) (1) ... I wrote about this in the article: "Which video format is better for Youtube. # 1". If you are filming a video on Youtube, then I recommend reading this article.
In the middle of the window are the following items:

Let's move on to audio settings (3) :
- Codec... Codec for compressing audio files.
- Bitrate... "Bitrate" of audio files. The higher the value, the better the audio quality.
- Channels... Audio channels. Stereo is two channels (right and left) and Mono is one.
- Frequency... Audio frequency in hertz.
Press the button again OK"to go back.
In this tab, it remains for us to consider one more button, called " Presets":

Here you can choose a template according to which your videos will be recorded, or, in other words, what your videos will be focused on. For example, by selecting the item " YouTube (720p)", Your video will be" sharpened "for the Youtube site, and have a resolution of 1280x720.
Image menu

And we are getting closer to the end. Let's move on to the "Image" menu.
Capture area (1) :
- Hotkey... Selecting a "hotkey" for taking screenshots.
- Repeat screen capture XX seconds... Automatically take screenshots every XX seconds.
- Show mouse cursor... Show mouse cursor in screenshots.
- Enable shutter sound... Play the sound of the camera when taking screenshots.
In this area (2) You can choose a screenshot format like: BMP, PNG, JPG (Normal) and JPG (High quality).
Output menu

Here you can take a look at the latest recorded videos and screenshots. Press " Play"to play the video," Edit"to edit video (requires 3rd party Bandicut software)," Upload"to upload the video to Vimeo.com and" Delete"to delete a video or screenshot.
About Menu

And the last menu, which contains information about Bandicam, such as version, license, home page, and so on.
How to use Bandicam. Video recording
To record video using Bandicam, select one of the two modes at the top of the window and click on the record button. Who does not know where you can change these modes, that here is a screenshot for you (on the left is the game mode, and on the right is the windowed mode):

That seems to be all. I told you about how to use Bandicam, and now you know about all the basic settings and functions that are present in the program. Finally, I wish you good luck with filming!
Bandicam is an incredibly popular video recording and screenshot software that is used by a huge number of users on the Internet. This utility is used to create game videos, training guides and other video content that we use almost daily.
Bandicam has a fairly simple interface, but still some users have minor problems installing and configuring the program for various purposes. In our today's guide, we will consider a number of questions: how to set up bandits for recording games, how to set up sound in bandikam, how to set up bandits for weak PCs, etc.
How to set up bandicam to record games?
First, let's take a look at the basic setup of the Bandicam utility for recording footage from video games. Go to the developer's official website and download the Windows version of the program. Be aware that the utility is distributed in both free and paid versions. What, in fact, is the difference between them? Well, having downloaded the free version, two not very pleasant restrictions are imposed on the program: Watermark and 10-minute videos.
Accordingly, if you want to remove these restrictions, you will need to purchase a licensed copy for the amount indicated on the site, or ... use a pirated copy of Bandicam, which we in no way urge, of course. In general, install Bandicam in the system and let's move on.
So Bandicam has been installed and now it's time to launch it. The following window should appear in front of you (its appearance will depend on the version of the program, but the functionality, in principle, should be the same):


Ok, let's start configuring video recording. First, click on the button made in the video of the gamepad. Then click on the "General" tab to go to the basic settings of the program. A window will appear in front of you, in which you can select a folder for video output, as well as some other additional options.

Select a folder on your computer where your videos will be stored. Also check the boxes next to those options that seem necessary to you. Now let's move on to the second settings tab. Go to the "FPS" tab.

There shouldn't be any problems here either. In this tab you can set the position for the FPS counter, set the keys to hide the counter and change its position. Also, do not forget about the possibility of setting the frame rate limitation.
Regarding the limitation: you can set any value here. For example, if you record a video at 60FPS, but you need to slow down the frequency to 30 at a certain moment, then set the desired FPS and a button that activates this function. Also, do not forget to check the box next to the "Only when capturing" option if you want the FPS lock to work only when recording video.
Ok, we're done with the FPS counter settings and frame rate limiting. Let's move on to the most important part, namely the Video tab. Click on it and go to this window:

In this window, you can select a hotkey to activate the recording and to pause it. Plus, other useful options that should only be chosen based on your wishes. Also, you should notice an option like "Add video from webcam". If you want the footage from the webcam to be added to your recording (if any), you can check the box next to it.
Great, we're done with the basic setup of the program. Already with these settings, you can start recording videos or taking screenshots. However, we still have to deal with setting up the sound, microphone, video format for Bandicam.
How to set up bandits for sound and microphone?
You should still have the previous window open. Click on the "Settings" button in the "Recording" section, after which a separate window with other parameters will open. To get started, go to the "Sound" tab. Many users are wondering how to set up a bandik to sound. But it's pretty simple.

To activate sound recording, first, you need to check the box next to the "Sound recording" option (if you want to separately save audio files in WAV format, you can check the box next to the corresponding option).
As soon as you check the box, you will be presented with a number of settings that will be related to the sound device and your microphone. Use the drop-down menus and select your equipment from the available lists. For example, you can select Speakers for the main device, and Microphone for the Secondary device. How to set up bandits to hear a friend on Skype? To do this, you need to set the Microphone and Win7Sound in the hardware (if you have Windows 10, then Win10Sound).
As you can see, adjusting the sound is incredibly easy. Let's move on. Go to the "Webcam" tab. By opening this tab, you will realize that Bandicam has extensive settings related to the webcam.

So, if you want to record video from your webcam while recording video of the gameplay, check the box next to the option "Save video from webcam in parallel". You also have a choice of how to record video from a webcam: over the main, recorded video, or as a separate file. Choose the option that suits you.
Using the drop-down menus below, select your webcam (it must be connected to your computer) and video format. You can also choose the position for your webcam on the recorded video. Ok, let's move on to the next configuration step. Go to the "Mouse" tab.

In this tab, everything is quite simple: check the box next to the "Show mouse cursor" option if you want your pointer to be displayed in the recorded videos. Accordingly, if you don't want to, then uncheck the box. Also in this tab you can find other options that may be useful for you.
How to customize the video format in Bandicam?
That's all. We're done with the recording parameters. Now it's time to move on to setting the format in which your video will be recorded. Close the window where you set the Record settings. If you want to record the gameplay for your Youtube channel (most likely, this is exactly the case), then we have good news for you: you can simply use the choice of the desired template.


As you can see in the screenshot above, you can bypass the manual format setting process by using one of the prepared templates located in the video format setting. Select a template and look at the video options. However, let's take a closer look at customizing the format:

Again, if you are recording video for your YouTube channel, then choose MP4 as the media container (although it is quite possible to choose the AVI format). Next, select the settings you need for the video format. For example, the timeless classic: 1920 × 1080, 30FPS, H264 codec for video, AAC codec for sound, stereo, 192kbps bitrate.
You are now ready to record the footage of your gameplay. Start the game and you will see the FPS indicator in the selected corner of the screen. If it does not appear, then click on the button selected in the settings to display the FPS counter. When you see the FPS counter, press the video recording button and then the pause or stop button to end the recording. As soon as video recording starts, the FSP counter will change from green to red. It's as simple as that.
How to set up bandits for weak PCs?
We figured out in detail with you how to set up bandits for recording games. Plus, we also covered how to set up the sound, microphone and other useful aspects for recording. It wasn't all that difficult, right? We just showed you where the settings are and what they do.
Well, you start recording video from the game and understand that it is simply impossible to do at least something in it due to the incredibly low FPS. What went wrong? Perhaps your PC simply does not pull the recording settings that you set when you followed the steps from the guide above.
How to set up bandits so that they do not lag during recording? Let's figure it out. First, you need to revise the settings that you have chosen. So, let's say you decide to record video in FullHD at 60FPS, but games start to lag severely with such a recording. First of all, you should try changing the priority of the recording. Go to the "Video" tab and go to the Recording settings.

If you are experiencing any problems while recording in-game video with Bandicam, try setting the Above Average priority. Then try recording the video again. If nothing has changed or has become a little better, then try setting High priority.
Setting High priority can sometimes fix lags in games during video recording by Bandicam. However, this may not be enough. If everything is so, then you can try to lower the quality of the recorded video. Open the Video tab again and go to the video format settings.
Try setting the video resolution lower, for example, go from FullHD to just HD. Be sure to lower your frame rate: you can lower it down to 29.970 or even a cinematic 24FPS. Set the video codec to MPEG-4. As for the sound: set the bitrate to 128 or even 96 (terrible quality), and the PCM codec if you record video in AVI format.
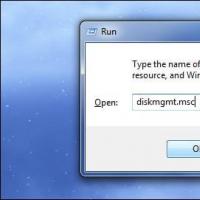 Why the computer does not see the new hard drive
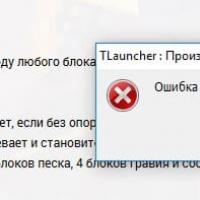 Minecraft crashes, what should I do?
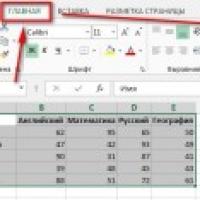 Excel - paint cells by condition
 Email forgot password
 How to completely uninstall Avast!
 Updating iPhone without problems
 How do I clear the cache on my computer?