Installing Jumla. Installing Joomla in pictures. And there is a way better - contact a specialist
Go to the next lesson to create a site on Joomla. After we have created a server on local computerThe installation of the site engine itself should be set. Remember that before installing the engine you must have at least some idea of \u200b\u200byour future site. Must know the name of the site, its subjects. Get rid of the Internet, see how sites are implemented in the theme you want, decide what you like that I do not like. Find several sites that will serve as an example for you. You can spend not one day for it than more carefully you will reveal to this issue now, the easier it will be in the future. After you have already formed the idea that is no longer being crazy to implement in life, proceed to the installation of the engine!
The first thing you do is run the server, click on the Start Denwer label on the desktop. After we launched the server, you should have local disk, With the letter you have chosen when installing a local server.
Go to the next X: \\ Home \\ Localhost \\ www directory. In the WWW folder, you will need to create a new folder, name for folder Write to English letters. For convenience yourself and in order to be clear to you, I will create a folder named "sajt". Restart the server, click on the "Restart Denwer" on the desktop, then download the Joomla engine itself. After you downloaded the engine, unpack the archive with the Jumal. All the contents of the archive copy to the X: \\ Home \\ Localhost \\ www \\ sajt folder.

Open the browser and type http: // localhost / sajt /, while moving on this address will start setting the engine. The installation consists of 7 steps.
1 step. Select language on the engine, I think here and so everything is clear, choose Russian. Click Next!
2 step. Check minimum system requirements. Click Next!
4 step. In this step, you should fill out information on the site database. Since we have no database yet - it needs to be created! Do not close the installation tab! In the new tab, go to HTTP: // Localhost / Tools / PhpMyAdmin /. The window that opens has a form to create a new database. We write a name for the database so that there is less confusion to call the database as well as the folder with the site, I have this sajt. Click to create!

Everything, the base is created, we return back to homepage phpmyAdmin (To go to the homepage, click on the house on top, on the left). Next, you need to create a user for just created database. We go to the item "Privileges", there is the item "Add a new user" click on it. In the window that opens, fill in the username, host, password, and be sure to assign all the privileges to the new user!

And click on the button "went." That's all, we created a database and a new user with all privileges. Go back to the engine installer, and now we can fill out all forms. Database type and leave as it is. Host name - Localhost. The user name is sajt, the password for it is also prescribed. And the name of the database also has SAJT.

5 step. FTP access configuration, do not touch anything. Click Next!
6 step. Here it is necessary to register the site name, as well as an e-mail and administrator password. Click Next, then click OK!
What should I start?
In order to put Joomla on a home computer, you will need an installation package of the engine itself and a set of various extensions for organizing local hosting. By the way, the set is not small enough: browser, PHP interpreter, Web server (IIS or Apache), the database with which CMS will work (PostgreSQL or MYSQL), as well as various programs for working with PHP.
System Requirements U. different versions Joomla to this package may differ. For example, for the third version will be optimal:
- Apache (necessarily the presence of modules: mod_xml, _zlib and _mysql) - version 2.x +;
- PHP - version from 5.3.1+;
- MySQL - version from 5.1+;
- Microsoft IIS - version 7.
Of course, any operating system should be standing on the computer. In principle, any: Linux, OSX, Windows.
Installing all these programs and extensions turns a regular computer to the server. However, you should not forget that you can use the CMS to install remote server. Therefore, it is not at all necessary to download all of the above on your PC. In principle, if the development of the site does not require its testing on the local server, it is much easier to immediately buy a platform for the site on one of the paid hostings. They already have servers with which users get access to all sites, running their browsers.
Joomla Web Installer!
To start working with Joomla, it is, of course, you need to download. To do this, it is better to visit the official website http://joomla.org or his Russian-speaking analogue http://joomla.ru. On the this moment (Beginning of 2015) The latest version is a modification of 3.3.6. In Russian translation - version 3.3.3. By the way, in the Russian-speaking site you can download and earlier versions of this engine.
Installed Joomla quickly and simple. First you need to unpack the archive with CMS and copy all the files to the WEB server root directory (as a rule, it is called / hdtocs). After that, the Joomla Web Installer will be available, which, almost independently, will do the rest of the work. You can open it through the browser on the http: // Localhost /, but this is if the engine is installed on the local hosting. If the third party is used, with already purchased domain name, then you should enter the address of the newly registered site.
Possible problems
The main problems with installing Joomla occur mainly because each provider has its own versions of Web servers, PHP, databases and other management tools.
Most often the following difficulties arise:
- apache Rewrite Engine (MOD_Rewrite module) is not activated and, as a result, a ban on rewriting paths with Apache arises;
- PHP interpreter works with function included Safe Mode.;
- excellent Windows Permissions Catalogs (on OSX and Linux Operations).
As a rule, it is not difficult to get around these difficulties.
Downloaded Archive S. installation package Joomla is unpackled in a separate directory, and copied from it (the easiest way via FTP) to the third-party server or in the local installation directory.
As mentioned above, this directory is usually called Htdocs. Although it can be referred to as otherwise: public_html, just HTML, etc. In most cases, the engine is not necessarily installed in the above directories, but also in the subdirectories created in them. As a rule, hostings allow you to do this by tying the domain name and the corresponding directory.
To install the CMS, you will need to enter a login and password to access the database. Most often, the hosting service includes the possibility of using several databases. However, to start the database, you need to create using the appropriate interface in the browser (how to do it, you can read on the help pages of each provider). Although some hostings themselves create databases and provide their names, logins and passwords directly to the user.
Pre-check before installing
The convenient server of the Joomla Web Installer is the pre-installer before installation (Pre-Installation). In the event that all server settings comply with the requirements of the CMS installed, all tags will be green. If the extension package is not the one that is needed, then a red color mark appears next to any configuration parameter and the message about the impossibility of further installation. During the presverrush, the parameters of the operating system, PHP and Web server are considered.
Problems are also possible with incorrect installation of access rights. As a rule, they occur when working with UNIX Operations, i.e. Mac OSX and Linux. This is due to the fact that the installer cannot receive permission to write to the directory, which ultimately leads to the termination of the installation. Also, access rights are important in the formation of configuration.php, which is created at the very end of the installation process.
Eliminate similar problem easily. You just need to remember the permissions and again run the predeterrude by clicking the "Repeat Check" button.
Figure 1: Pre-checking Installation
Stage No. 1. Configuration Configuration
The first thing that will be required when installing Joomla is to configure the site configuration. At the same time, it will be necessary to describe the site itself, to register its administrator, as well as allow or prohibit the show of the site to visitors, i.e. Put on or offline mode. The last setting is useful if CMS is installed immediately to the ready hosting.

Figure 2: Installer - Basic configurations
Stage No. 2. Database Connection
At the next step, the installation will need to connect the site with the database. Since Joomla can work with various database servers, you must first select it, and then enter the parameters of the database itself.
If the CMS installation passes on a local hosting in OS Ubuntu Linux, When using the MAMP set, the default word "root" is the default. However, this is not the only one possible variant. The password may vary due to differences in WEB server environments, for example, there is no password on XAMPP.
But on the ready hosting, the user name and password are issued by providers.

Figure 3: Installer - Database Configuration
But back to practice. The corresponding fields should be driven by the above information. And as a computer name, we specify "localhost".
Next, you must specify the name selected to work with Joomla, database. As a rule, hosting providers are provided to their customers with the ability to use several databases. They can be created in personal Cabinet On the website of the company providing hosting. The name and password for the newly created database should be entered into the Joomla Installer Fields intended for them. In some cases, if there is permission from the database server, you can simply enter the name of the base, and the Joomla itself organizes it.
You can use the already existing database, but it must be clean. Although it is not necessary. Old tables can be saved under the prefix Bak_.
Table prefixes are very convenient. Filling the database, Joomla before each new table will set the prefix, driven into it during installation. Thus, you can use the same database immediately for several sites created on Joomla, simply by specifying them various prefixes. It is worth recalling that the saved tables are always designated by the Bak_ prefix.
Step number 3. Completion of the installation process
The last step of the installation is more control functions: Joomla clarifies the configuration parameters, and also offer to establish demo information.

Figure 4: Completion
In contrast to more early versions, Joomla 3 offers not one version of the demosite, and several:
- blog;
- website business card;
- standard themed site;
- guide CMS Joomla.
This is done with the goal so that any user can configure one or another site layout to their needs, regardless of the experience with this engine. It is only bad that changing the type of demosite is impossible after the installation is completed.
It is possible to install and "clean" Joomla. This option is optimal for those developers who already know what kind of engine it is and how to work with it.
By choosing a type of demonstration site, you can click "Set". Next, Joomla will do everything yourself.

Figure 5: Joomla! Installed
After the installation is completed, the CMS warns that you need to remove the folder with the installation package from the root directory. It is done in order to protect the future site from hacking. As soon as the folder is removed, you can start working with an administrative panel (site address / administrator). Before this Joomla will offer to choose need Language And, of course, enter the username / password of the administrator. That's all - you can safely work with the site.
Local server Denver, ready-made Local Wamp Server (Windows + Apache + MySQL + PHP) Russian production.
- Creating a Joomla site on a local computer;
- Installing and configuring Denver;
- Where to download joomla;
- Create on Denver Domain;
- Download Joomla folders to Denver;
- Joomla installation wizard.
Creating a Joomla site on a local computer
Creating a Joomla site on a local computer without accessing the Internet is a common webmaster practice. This allows you to work on a project for free and only after it is ready to transfer to a paid hosting. The site created in this way is called local. To create a local site you need to install on the local machine, special set software products. This is the so-called platform that is called a local server after installation.
Platforms for a dynamic local site consist of three main products:
- HTTP server,
- Database management systems
- Programming language.
All of them are going for related work and specifically to work in certain operating systems. There are platforms that work only under Windows are only under Linux, there is under OC wt. True there are also universal crossplatforms.
The most common platforms consisting of
- hTTP Apache servers
- database management systems (MYSQ via phpMyadmin),
- programming language (PHP).
For Windows, such platforms call Wamp. For OC Linux, called LAMP. The names of such platforms represent the acronyms of components included in its composition, for example, Wamp (Windows + Apache + MySQL + PHP).
One of the ready-made platforms for creating a local site is the ready-made assembly of Denver. This is a Russian product that has its own characteristics, but historically conquered a lot of users. There is Denver and dignity and shortcomings, not about them. I will only note that the tasks for creating a local site Denver decides, and problems in its work allows you to solve a rich forum material on Denver, which accumulated on the network.
Joomla installation begins on local server Denver, of course, from setting the set to your computer.
Installing and configuring Denver
For installation, take the latest version of Denver on the developer's website www.denwer.ru/. Part latest version PHP 5.3.13 is included, which is just necessary for installing Joomla 3, only these requirements are minimal.
The Denver Installation is well described on the official website, and duplicate it, I consider it too much. I will stop on some nuances.
- For the work of Denver, it is necessary that the computer "seen" address 127.0.0.1. Read: Enter Windows to "Start -\u003e"
- Download Denver will be able only after registration;
- Denver creates virtual disk for work. The name of the disk is set when installed. In the example, the virtual disk [z];
- A folder with a local Denver installed server is called WebSerwers, and it lies on system disk [C];
- The PHPED configuration file is at:
- The PHPTENER setup file is located at:, this is a php.ini file
- Manage Start Denver Three Start Labels, Stop and Restart. Denver Management Programs are located at:
Important! After any changes in the Denver settings you need to restart it (Restart label)
- All office programs are easier to call from the page Denver "Hurray, earned!". To call it, enter to the address bar;
- By default, Denver assigns a user with an empty password for authorization.

Go to the installation of Joomla. Installing Joomla on the local server Denver includes the following steps.
- Download Joomla Distribution;
- Create on Denver Domain, he is hosting, and a folder for the site;
- Install the Joomla Denver folders;
- Create a database for Denver in phpMyAdmin;
- Install Joomla from browser window in local network.
Download Distribution Joomla
Distribution Joomla Take from here. This is the official site of Joomla. For example, I took Joomla version 3.0. You can install any version of Joomla to Denver.
Create to Denver Domain, he is a hosting, and a folder for the site
Like any other site, the local site should have its own name (domain). Domain Local Site is needed to identify the site inside the local network. To the Internet, this domain has nothing to do.
To create a local site domain, and at the same time creating a hosting for a local site, you need to create a folder in the Latin name, in the directory. Let it be a folder. In this folder you need to create a folder, it is needed to store folders and CMS Joomla files and the future site.

So, hosting and the directory of the local site are created. In the example it.
Overload Denver. Now \\ joomla3 \\ www can be observed in the folder

Upload Joomla folders to Denver
Here you will need a unpacked archive of the downloaded Distribution Joomla. All its content must be pushed into the folder. For this, FTP is not needed. Download you directly or via Commander.


Create a database for Denver in phpMyAdmin
Go to the creation of a database for the local site. To do this, you need to enter the PhpmyAdmin Denver. In the browser address bar, enter. The transition will open the Denver page where you will find a table with references - prompts. To enter phpMyadmin, use the link :.

Database of any site must have: Name; User; Password for authorization; And the host on which it is located.
To create the database, open the Databases tab. Give the database name (any). You can not choose a comparison, it will default UTF8_GENERAL_CI.

After creating a database, you need to create a user.
In principle, the user has already been created. This is with an empty password. You can leave so, and do not create a new user. But I will create a new user. It's not hard. The user must have a name and all privileges in the database management. You also need to set a password.
class \u003d "Eliadunit"\u003e
Open the Databases tab. In the database line, click "Check Privileges", in the next window "New User".


The database with the user is created.

Joomla installation wizard
Go to the installation of Joomla. Run Denver.
From the address bar of the browser, we start the "Joomla installation wizard". You enter this in the address string. In the example :. The first page "Masters ..." opens. Next, on the "Joomla installation wizard" items with the "Back" and "forward" buttons.
1. Siteconfiguration

Admin login and password. Need to remember.
2. Database configuration
In the database configuration, you enter the data of the database created slightly higher.

3. Survey
If you wish, you can install demo data, this is an example of a finished site.


The Joomla Language Package can now be installed from the Installation Wizard ... ".
If you decide to install language package From here, while, do not delete the "Installition" folder.


At the last stage, remove the folder from the installer window or manually from the folder.

All Joomla installation to the local Denver server is completed.
When Denver is enabled, the local site opens at:

The administrative panel of the Joomla site opens at:


In general, installing Joomla to the local server Denver in principle does not differ from the Joomla installation on a paid hosting. What can be read in other articles of the site.
From the author: Greetings to you dear readers. In this article we will talk about how to run Joomla on a computer from backupcreated by expansion Akkeba Backup. Since quite often, the project that is located on real hishing on the Internet must be transferred to a home computer to add some functional or error correction. At the same time, as practice shows, many newbies do not know how to restore the site from the backup of Akeba.
So, suppose that the real hosting is located some site created on CMS Joomla. At the same time, using the Akeba Backup extension, a backup has been created, which is one single format file.jpa, which is subsequently downloaded to the computer. Now actually the question is how to run Joomla on the computer?
As you know Joomla is a rather complicated engine, which is written using various web programming languages. In this case, the main logic is formed using php. language. So, to launch CMS Joomla on your home computer We are interested in the interpreter of the above language. And what is it difficult to tell you? You just need to install this interpreter and run the site. But there is little problemwhich is that a web server is required to work the interpreter, which will not be simply installed on the computer, but is properly configured to interact with the interpreter and the correct operation of the sites. Moreover, to store various system information and the engine content, a database is required, which means that the database management system is also needed, which is usually taken out to a separate server on a real hosting.
Thus, to start the Joomla engine, you must install all of the above items and correctly with them to configure. Of course, for a beginner - this is a task not to be satisfied, but at the moment special software builds have been developed that include all required tools.


The product setting is extremely simple, just run, downloaded file and select a directory to which the files and web server modules will be unpacked.
After installation, you must start OpenServer using the startup file that is located in the installation directory root. Once the web server is running, the next green program icon will be displayed in the tray.

If the flag of the icon is red or yellow - it means that the errors that need to be corrected by setting up during startup.
Next, go to the installation directory and then to the Domains folder. In which, we will create a new virtual domain called Joomla.loc, which is essentially an ordinary folder. After creating, in this catalog Copy the backup file CMS Joomla in format.jpa. Then you need to restart the web server using the icon in the tray.

Next, to restore the site from the backup, you need a special Akeba Kickstart tool, which can be downloaded on the official Akeba website.

Therefore, using the menu, go to the description page of this tool.


After that, open the browser and appeal to the Akeba Kickstart tool using a virtual domain: http: //joomla.loc/kickstart.php.


At the same time in the "Record to Fal" field, you must select the "directly" parameter, thereby pointing out that the backup is located in the same directory. And also choose the archive file in the file "file file". Next, click on the button "Start".

After unpacking the archive with a backup CLICK on the button - "Run the installer".
Modern trends and approaches in web development
Learn a rapid growth algorithm from scratch in the website building


At the initial stage, checking the compatibility of the system with the current installed version of the CMS is launched, and the scan result is displayed on the screen. If a certain parameter The systems satisfy the requirements of the engine - it will be displayed on a green background, otherwise on red. Go to the next installation step.

Now you need to create a database into which tables will be unloaded with content from the backup archive. To do this, go to the phpMyAdmin tool, which is located at http://127.0.0.1/openserver/phpmyadmin (for authorization, specify the root user name, leave the password field empty).


Now we return to the installation and at the current stage add the connection settings in the database:
Database type - Extension to work with the database - select MySQLI:
The name of the database host is the path to the database management system - LocalHost;
Username - username - default root;
Password - password for connecting - leave empty;
Database name - the name of the database has just been created.
After adding settings, proceed to the next step, which creates the database tables and filling them with content.

After recovering the database, you need to add the name of the future site and specify data for access to the Joomla admin panel.

it last step Recovery Joomla, which means after the following link "Next" we will see a message that the recovery is completed.

Close a tab with this page and click "Clear" to remove Akeba Kickstart.

After that, the recovery of CMS Joomla is completed and in fact we answered the question how to run the jumlow on the home computer. That is, now you can go to http: //joomla.loc and check the performance of the site.
If you wish to learn Joomla at a professional level you will be useful for a course.
This lesson completed. All kind of good and successful coding !!!
Modern trends and approaches in web development
Learn a rapid growth algorithm from scratch in the website building
Panic ... where and what to download? Where to install? What for? How?
In order to install Joomla! On your computer, you need to create a local hosting for which you will need a browser, a web server, a PHP interpreter, as well as a database system that Joomla supports. Let's call this solutions and client-server system.
Decision package is a set softwarethat will create a fully functional website.
We need a solution package consists of:
- operating System (Linux, Windows, OSX)
- web Servers (Apache, IIS)
- databases (MySQL, PostgreSQL)
- script Language (PHP)
You can set a set of solutions on your home computer or buy or rent it from any hosting company. The table shows specific requirements of Joomla 3.x.
|
Software |
|
|
MySQL (InnoDB support required) |
|
|
(with MOD_MYSQL, MOD_XML, |
|
Table 1: Requirements for Joomla 3.x
If the solution package works properly, we call the result. They can be both local and any other computer. Guests and users of the website inevitably use the browser in order to access your site created using Joomla. We call them customers.
This is what the "classic" package LAMP looks like.
Figure 1: LAMP solutions pack
Web Installer Joomla
Thanks to the web installer, you can install Joomla! within a few minutes. Joomla files! Will be copied to the root folder of the documents and are configured by the Joomla web installer.
Download Joomla 3 from the Joomla.org site and unpack the files to the shared root folder of the web server documents (for example: / htdocs).
Stumbling stumbling stumbling
This topic is quite complicated, because exists great amount providers and no less installed web servers, versions php. and MySQL and web space management tools.
Difficulty during installation often conclude that:
- activated "Safe Mode" PHP interpreter prevents you from downloading files;
- "Forbidden" to rewrite paths from the Apache web server, because the so-called Apache Rewrite Engine (mod_rewrite) is not activated;
- linux and OSX permissions catalogs are installed differently than in Windows.
The easiest way that almost always works is as follows:
- Download the current file package from Joomla.org and unpack into a temporary directory.
- Download unpacked files via FTP to your server or in the local installation directory.
Files must be installed in the general directory. Usually they are called Htdocs, Public_HTML or HTML. If there are already other objects there, you can create a subdirector in which the Joomla files will be installed. Many web hosts allow you to link the name of your rented domain with the catalog.
- Learn the name of your database. In most cases, one or several databases are already included in the web hosting. Sometimes user names, database and password are already given, and sometimes you must install them yourself. As a rule, this can be done using the browser interface configuration. You will need information about access to databases for Joomla Web Installer!
Pre-checking Installation
Pre-checking the installation helps to determine if your server is suitable for installing Joomla. If you see a red label, it means that the solution package is not configured correctly, and the installer refuses to put Joomla. Depending on your configuration, small differences may be observed. Instant Joomla! Squises the configuration parameters of the web server (in our case Apache), PHP, and operating system. When using UNIX systems (Linux, Mac OS X), pay attention to file access rights, this is especially important for the Configuration.php file. This file will be created at the end of the installation with your values. If the installer cannot register in the folder, Joomla! Not installed. In this case, go to setting the rights and click the "Repeat Check" button.

Figure 2: Pre-checking Installation
Step 1 - Configuration
In the main configuration window, describe the site and administrator. There you can customize the visibility of the site: Will it be visible to visitors (online), or will it be displayed the content of the page in offline mode (Offline). This setting is useful when installing Joomla directly on hosting (Fig. 3).

Figure 3: Installer - Basic Configurations
Step 2 - Database
You can use various database servers with Joomla. Choose which database server you will use, enter the database parameters (Fig. 4).
Using Mamp set on ubuntu system Linux, user, default, has a root login and password. He is an administrator. Password depends on the server environment, you do not need a password on the XAMPP.
On hosting, these parameters will be issued by the provider.

Figure 4: Installer - Database Configuration
Enter the following values \u200b\u200bin your local setting:
Computer Name: Localhost
Username: root
Password: set according to a variety of server and its settings
Now select the database name. In the production environment, on the provider server, you will probably have a database quota, and their credentials are defined in advance. If you have permission on the database server, you can enter the name of the new database. Then Joomla! Create it.
You can choose any of existing tables Joomla! Installation in this database must be cleaned or saved and designated Bak_ prefix.
In fact, the tables with the prefix are practical. Before each name of the table that a web installer created, he writes the text that you entered into the appropriate field. By default, the web installer will propose to create one table, for example W02RH_. This is a simple explanation. Sometimes the provider provides you with only one database mySQL data. If you need to run two or more sites with Joomla, then there may be a problem, since the tables will not differ from each other. Tables with prefix can be divided into several tables (W01Client_ or W02Client_). In this case, you need to use the default W02RH_. The prefix is \u200b\u200balso used to designate the saved data (BAK_), see above.
Step 3 - Completion
At the third stage, the Joomla installation will introduce you to configuration parameters and ask if you want to set the demonstration data (Fig. 4).

Figure 4: Completion
IN previous versions Joomla could choose only one kind of demo. With Joomla 3, you can choose from several. This can be used to configure certain site layouts, for example, for a blog (Fig. 5), website-business cards (Fig. 6), the site with the Joomla guide inside (Fig. 7) and the usual site (Fig. 8).

Figure 5: Weblog

Figure 6: Business card

Figure 7: Joomla Guide

Figure 8: Flame-free site
Depending on your needs and knowledge, you can try different types Demonstration data.
Unfortunately, it is impossible to change the selected type after the installation is completed.
In addition, you can install Joomla and without it. "Empty Joomla" is the best option if you already know how to use Joomla.
To describe in subsequent chapters, we will use the "empty" Joomla without any demonstration data.
But you can figure out the material regardless of the pre-installed type.
So choose the type you want to use, and click the Set button. Joomla will create a database and configure the site (Fig. 9).

Figure 9: Joomla! Installed
For security reasons, you need to delete the installation folder by clicking on the corresponding button. After deleting the installation folder, you can view the site and log in to the control panel (/ administrator). In this case, the site looks like in Figure 10.

Figure 10: Joomla site without data sample
Panel management joomla Located at http://example.com/administrator
The login screen appears with the ability to select a language (Fig. 11) and, after a successful input, the administration area will appear (Fig. 12).

Figure 11: Login screen

Figure 12: Control Panel
 How to pay a domain name
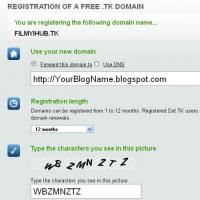 Domain zone of tokelau islands
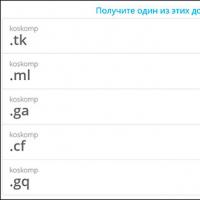 What is domain what problems may be
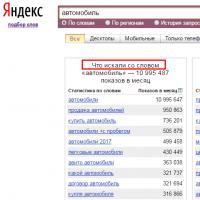 Yandex Wordstat: detailed instructions for using the service and grouping operators and a complicated request
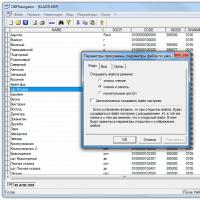 Editing DBF files
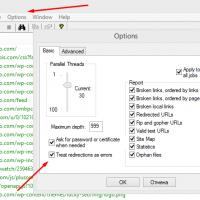 Xenu Link Sleuth - What is this program how to use the Xenu program
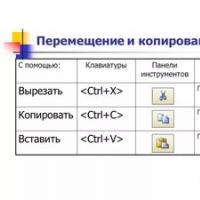 Methods Copy and insert text from keyboard without using mouse