How to work in the program Ebby Fine Rider. How to use ABBYY FineReader program. Scanning in PDF.
History ABBYY FineReader has been more than 20 years. The anniversary 2013 company noted the release of the full (compared to Express Edition from 2009) ABBYY FineReader Pro for Mac, and after a couple of months, in February 2014, his "gift" received and windows users - ABBYY FineReader 12 Professional and Corporate. Let me remind you that the previous version appeared in 2011, and two and a half years a lot of time - let's understand how significant changes are.
general information
System requirements for new version Not completely changed. The platform can serve Windows or Windows Server Starting from XP and 2003, respectively. Hardware queries in current times and are not modest: a processor of any bit with a frequency of 1 GHz, RAM at least 1 GB plus 512 MB for each computing kernel, etc. Several only increased the need for disk space - now it is not required to install 700, and 850 MB (plus, still, another 700 MB for working files).
Naturally, we are talking on minimum requirements; Fully Abbyy FineReader 12 Professional will be revealed only for relatively modern systems. In particular, I remind you that the program can effectively parallelect the processing of individual pages, uses all the processor kernels and loads any processor by almost 100%. But it is really not greedy to the RAM, and even 32-bit remains.
The installation procedure has not changed: the minimum of questions and options. Included with ABBYY FineReader 12 Professional, there is still ABBYY Screenshot Reader, which becomes efficient only after registering the user.

After that, access to technical support will also open.

Even on the basis of this modest information, it can be assumed that we have the result of evolution. Accordingly, in the future I focus on the description of the changes compared to previous versionwhich can be divided into two main groups: work with the program (interface, auxiliary tools, ease of use) and OCR (quality and performance of actual recognition).
Working with the program
ABBYY FineReader 12 Professional demonstrates some refinement in the user interface. This is immediately noticeable on the task window that opens by default when the program is started. It obviously imitates the concept of Windows 8.x tiles and is adapted to control the fingers, especially since the program also supports the main gestures like scrolling and scaling. In fact, the changes affected only the "facade", and even partly - next to the tiles are adjacent to the usual controls and in the process of configuring any scenario will have to deal with standard dialog boxes. Working with them is quite problematic, especially on 8-10 screens, which are becoming popular with Windows tablets.

To submit that the user of such a tablet equipped with the camera may want to quickly "on the go" to introduce some kind of printed document, really easy. Meanwhile, the whole story of Windows, starting with the first edition of Tablet PC, confirms the meaninglessness of adaptation to the sensory control of the standard desktop interface. Apparently, for these purposes, it is much more correct to create a special shell that corresponds to all Metro canons, but using the same "engine". An example of such a solution serves Internet Explorer. From Windows 8.x. In addition, ABBYY even has a certain back in the form of ABBYY FineReader Touch for Windows 8, which uses the company's cloud service.
If you distract from sensory input, then there will be more changes this class - from the very expected update of the opening / preservation of documents, which, among other things, provide easy access to cloud storage (If there is an appropriate agent and folder in the system), up to several more important and useful.

Page processing in ABBYY FineReader 12 Professional is now performed in the background. This implies the absence of the previous modal window with the status of operations (now this role Plays the status string at the bottom of the screen) and, accordingly, the presence of access to the interface. Thus, the user has the ability to work with the program in parallel to the recognition process (if it is certainly long enough), for example, copy fragments of the resulting text or even adjust the marking of pages - the latter will be in the queue and processed.

Unlike the previous version, it also does not turn off the pages as it is recognized or when the document is started, if the automatic recognition is disabled. In ABBYY FineReader 12 Professional, the document is loaded and divided into pages almost instantly, and their sketches are built only as they are manually scrolling in the left pane. Among other things, thereby save computational resources, moreover, quite noticeable on large multi-page documents.
The remaining changes in this class are not so interesting, although they can come in handy in some scenarios, so they are brief about them.
If you need to not process the document entirely, but only to quote individual places, then you can turn off all automatic operations and select the necessary fragments of any types, immediately copying them to the clipboard - with the analysis and recognition will be performed on the fly.


To obtain a result with a simpler structure than the original, you can turn off the reconciliation of footers, footnotes and other layout elements. This can be useful, for example, when preparing e-books.

Continuing by electronic books - ABBYY FineReader 12 Professional Supports Epub 2.0.1 and 3.0 formats.

The conversion parameters in XLSX are extended, for example, it has the ability to clean formatting or save pictures.

When saving the resulting documents in the PDF with a text layer, you can now use new technology ABBYY Precise Scan, which is to smooth characters on the original pages images. It is available, by the way, only in color mode.

The effect of her work is sufficient noticeable, although not always, say, "academic". However, the readability of smoothed characters in any case should be higher, and in this example The original is really very low quality.


Ocr
Now let's deal with what improvements occurred in the mechanisms of recognition itself.
Developers report the next stage of improving the ADRT technology, which, remind, analyzes and recreates the logical structure of the document. It is declared that it began to work much more accurate, especially with tables, lists, diagrams. Demonstrate this adequate examples is not so simple, but not impossible. Here, for example, the recognition results (with default settings) of the same page in ABBYY FineReader 11 Professional (at the top) and ABBYY FineReader 12 Professional (bottom).


The old version allocated and processed only the main text block, possibly due to the low quality of the original, consider the remaining elements "garbage". New, on the contrary, correctly identified the list and tried to recreate it. The result, however, is not ideal: the fact that not all markers can be recognized, again, attributed to the quality of the image, but the program, apparently, still did not understand that it would be in front of it, otherwise it would not interpret the numbers as letters. Nevertheless, progress is on the more qualitative originals of such complaints, it may not have been.
But how the "implicit" table is processed without dividing lines - ABBYY FineReader 11 Professional (at the top) and ABBYY FineReader 12 Professional (below).


It is clearly seen that the old version, in contrast to the new, did not see the table structure at all and was limited to a set of unrelated text blocks. Do not be lazy to click on the images and compare the recognition results - ABBYY FineReader 12 Professional is close to the ideal.
Unfortunately, it does not always happen and already on the neighboring pages of ABBYY FineReader 12 Professional showed results similar to ABBYY FineReader 11 Professional. Although the ADRT should track the same "caps" and understand that in front of it a kind of flowing table.

But still it is clearly noticeable that the updated algorithms pay attention to more details than earlier. In the process of testing ABBYY FineReader 12 Professional was observed, for example, even an attempt to interpret as a table with an ordered placement of text information on it. Much more often, the new version is also trying to recreate various charts and schemes based on the background pattern, and not from individual graphic and text blocks.
There are some more new products designed to enhance in ABBYY FineReader 12 Professional recognition quality. As you know, one of the prerequisites for this is the quality of the original, especially if it is obtained using a non-scanner, but cameras. That is why at one time a means of pre-processing of originals appeared in FineReader. In the new version, their list has been extended, trimming along the edges of pages, lightening and aligning the background brightness, removal of color items. The latter can be useful, for example, for processing documents with seals and stamps. In addition, now the user can connect various methods individually.

Language support is also improved. First, the Russian alphabet appeared with stress, secondly, it is declared an increase in the quality of the recognition of Chinese, Japanese and Korean (up to 20%), Arabic (up to 60%), Hebrew (up to 10%) - this is achieved, apparently, By improving and additional training classifiers.

Well, finally, one of the most burning issues for many readers: whether the speed of the program has grown? It is reasonable to answer this question, especially with the numbers, not so simple - too many languages, each of which has its own nuances; too large variety of originals; Too many unknown factors of influence on the work of algorithms. Therefore, even the developers themselves are quite restrained about the performance of ABBYY FineReader 12 Professional Performance by 10-15%.
Such numbers are usually obtained by the results of the processing of sufficiently large arrays of documents and, accordingly, are something like the "average temperature in the hospital". Therefore, it is useful in more detail any demonstration cases, for example, similar to the two following:
- scanned in color with a resolution of 300 dpi 10 pages of a full-color A4 format booklet. Quality good, languages \u200b\u200bRussian and English, complex mock;
- PDF S. graphic images 138 pages of a book containing a small amount of Color and black and white illustrations, several tables. Quality is low (starting, apparently, with the "blind" print in a paper book), languages \u200b\u200bUkrainian and Russian, a simple layout.
Both documents were recognized in color mode, and the second is also in black and white, which was intended to imitate the process of preparing the e-book. All default settings were left unchanged, with the exception of the set of languages \u200b\u200band, accordingly, operating modes. As a test polygon, a PC with an I5-3450 processor and 8 GB of memory was used. The results are presented in the following table:
As can be seen, for PDF acceleration even exceeds the promised 15% - perhaps, it is just one of the special occasions that are well suitable for the latest optimizations in recognition algorithms. It should be borne in mind that programs, generally speaking, have done a different amount of work. Look at least on the illustration above the processing of the tables - it is difficult to say which of the versions I had to be more difficult.
As for the number of errors, it almost coincided in both versions, although it was noticeable that sometimes doubts cause different fragments and symbols - it seems to be evidence of training algorithms. In any case, most of the uncertainly recognized characters were absolutely correctly identified using dictionaries, and the "coarse" errors (the incorrect interpretation of special and decorative symbols, text on the chart, etc.) coincided. So the difference can be considered disappearing.
Another question is how much the performance increase is generally important? Apparently, winnings are half a minute at 138 pages that need to be checked anyway and may be corrected, there is a little worth it. If jobs similar to test tasks are supposed to be carried out on occasion to the case, then the performance can be accurately not worried. Another thing is, if it comes to the offline processing of large amounts of documents, which is available in ABBYY FineReader 12 Corporate. In this case, savings of 15% of the time is already quite noticeable.
Summary
Despite the fact that the new ABBYY FineReader 12 Professional did not promise anything revolutionary, at least a few changes in it deserve all sorts of praise. First of all, it is the improvements in the ADRT technology in terms of table recognition, diagrams and in general the logical structure of the pages, which in some cases allows you to get cardinally better results as well background mode Processing that opens up new features for interactive work with large documents.
There are also a lot of other changes, although they are less significant. The movement towards supporting the sensory control is certainly justified, but the path is selected by vicious - to provide in one interface equally convenient work Mouse and fingers are unlikely perhaps. However, while Windows tablets are just trying to break into the market, and developers from ABBYY still have time.
Prices for ABBYY FineReader 12 Professional:
- boxed version: 4990 rubles;
- download version: 4490 rubles;
- update: 2690 rubles.
As usual, the answer to the question "Is it worth changing old version To new? " depends on the situation. In any case, it is worth considering that the life cycle of FineReader is quite long enough, and if any of the described improvements play any significant role for you, then in 2-3 years, the update costs will surely pay off - if not materially, then morally. To solve, this question will finally help.
Work on recognition of images consists of the following steps:
- Get scanned images (scans).
- Open them in the OCR program (FineReader).
- Make the layout of pages to blocks. That is, split the page on the area, each of which will be either text, or pictures, or tables, or other homogeneous content.
- Actually recognition.
- Remote recognized, reconciliation of the resulting text and source scans.
- Saving the results obtained in one of the documentary formats (Doc, RTF, PDF, HTML, etc.).
When you recognize texts, two options are possible: or you scan the material yourself, or work with the already scanned text.
In the first case, the "Get Images" and "Open Images" steps are combined into one - FineReader received scans immediately opens in its package. In the second case, the step "get images" has already passed, it is necessary only to open them in the program.
Consider both options in turn.
Scan text in FineReader
Scanning starts via "File → Scan Pages" or "Scan", or Ctrl-k menu.
Fig. 1 scanning interface
However, before you start scanning, it would be nice to figure out how to get scans are the most optimal for recognition. And to do this, understand than "good" (from the point of view of FineReader) Skan differs from "not very good."
For high-quality recognition, the program requires three things. First, the ability to reliably distinguish text and illustrations from the background of the page. Secondly, letters, numbers and other contents are clear and legible, so that no situations arise "here and the human eye will not always understand what is printed." Thirdly, the strings of the text on the scan should go just as smoothly as they are printed on the page of the book, without distortion and distortion. There are also other requirements for a qualitative scan, but these can be considered key.
1. For reliable distinction, "here the text, and here the pages background" is required to ensure that the transition between topics and the other is sharp, not blurred. Here are samples of pages with bad and with good clarity. In the first case, naturally, will be recognized worse, with large quantity Errors.

Fig. 2. Blurred limiter boundaries

Fig. 3. Clear limiter boundaries
The usual cause of the blurred text-background borders is scanning with disturbed focus, what is commonly called "not in focus". Therefore, before starting work, it is desirable to check your scanner at this moment.
Another reason that can interfere with the distinction of text and the background is too "dense" pages background. Normally, it should be or pure white, or white with a small impurity of some color. If the books of old editions are scanned, where paper is often yellowed, the background can also be yellowish (but moderately).
If the background looks noticeably overhemes, then such pages will again be recognized worse.
What kind of background will be in the background depends on the displayed scan brightness. It can be adjusted through the "Brightness" engine. To begin with, it makes sense to put 50%, check that it will be, if necessary, correct.
2. Obstability The text liter mainly depends on the brightness and scan resolution.
If the brightness is too large, the lines of letters will be torn, they will fall as if crumbling on separate pieces. If the brightness is small, the details of the letters begin to merge among themselves, formless stains arise. Both are not very edible "food" for recognition programs.
The brightness is adjusted here in the same way as in the previous case - we put 50% in the scan interface, and then on the situation.

Fig. 4. Page with too big brightness

Fig. 5. Page with too small brightness (overcame page background)

Fig. 6. But the same page, but in normal form
The scan resolution determines how many pixels in the scan will have to come to each letter. If these pixels are sufficient to draw the outline of the letter, then there will be no problems in recognition. If not enough, then letters can become poorly distinguishable even for human eyes, not to mention the recognition programs.

Fig. 8. The same, but 200 points

Fig. 9. The same, but by 400 points
When choosing a resolution is usually guided by the following rules:
- 300 points are chosen for books of mass publications (pages filled with text of the usual size, almost without patterns);
- 400 points are selected for books and magazines with a noticeable volume of text with small bowls (notes, signatures under pictures, tables, inserts with small text);
- 600 points are chosen for books printed by very small bowls (many reference books and encyclopedias, miniature books). Or with finelylated patterns, for example, engravings. This also needs to include many books of editions of the 1990s - then the publishers saved on paper and often printed completely crumbtic letters.
The scanning interface in FineReader allows you to select only 300 points or 600 (string "Resolution"). Therefore, if you have a lot of material, which is desirable to make 400points, it is better to scan not from under FineReader, but from the program that comes along with the scanner.
Or in the FineReader settings, switch from your own program interface on the TWAIN interface of your scanner ("Service → Settings → Bookmark" Scan / Open "→ Click at the bottom of the" Use Scanner Interface "). Then you can scan from FineReader, but you will work in the scanner interface (usually there is a larger amount of settings and functions).
3. Smooth, neatly looking lines of text are mainly ensured by the precession of the image ("pre-" in this case means "executed after scanning, but before recognition"). After properly made POSSPOP, the contents of the pages will be recognized with higher quality.
FineReader It has a fairly rich set of functions that can be seen in the program settings on the Scan / Open tab. Also, this window can be called through the "Settings" button in the scanning interface window.

Fig. 10. Precalation settings
"Share a reversal of the book" must be chosen when the book was not afraid, but reversal. Then for recognition they will be cut chaproof.
"Determine the orientation of pages" is used if the book was scanned by the opposite side. Then it will be deployed in its normal position. But if there are pages in the book that are printed turned 90 degrees relative to the bulk, then the tick here is better to remove. Otherwise, when the PDF is derived in PDF, you can get part of the pages in the "book" orientation, and part in the "landscape". Rotate the desired pages in this case is better manually, in the built-in image editor
"Fix the Drying" eliminates blocks of pages. The setting is uniquely necessary, but it should be borne in mind that PDF "Text under the image of the page" received from such scans will have a not quite neat species - gray wedges around the edges of the page (where a turn was made).
"To fix string distortions" lines the bends of lines, which when scanning are often formed near the binding (they are also called "mustache").

Fig. 11. An example of a page bending
"Eliminate trapezoid distortions" corrects deformation of pages that appear if the book is not very tight pressed to the glass of the scanner.
"Invert images" is needed if there is a lot of text "bright letters on a dark background" in a scanned material and you want to convert them to normal "dark letters on a light background".
"Delete colored elements" is useful if on the page of the "black letters on a white background" you need to remove different unnecessaries, like marking the handle on the fields, signatures and seals (office documentation), and even just spots. But if on the same page there are some kind of "need" - graphics, charts or photos on the same page, then you can not put the tick. Otherwise, they will be removed.
"Fix the image resolution" is an item requiring more detailed explanation than previous ones. The fact is that the recognition process in FineReader is very sensitive to what permission is set in the properties of this image. From this significantly depends on how exactly the text of the text, interbust and arreary distances and other similarities will be determined. Therefore, the tick here is needed. Also, you should not be surprised if you will constantly receive FineReader messages "on the page so incorrectly set permission and it would be good to correct it."
In addition to the preprocessing settings on the Scan / Open tab, there is a "General" settings block. Here sets a set of basic actions that will be completed above the open pages. Options for such actions may be the following:
- just open scanned images, without doing anything with them. To do this, you must remove the checkbox "automatically process added pages".
This makes sense only if you have such a high quality scans that they do not even improve them. You can immediately send to recognition. It happens of course that, but much less often, what would I like :-), so the tick is better to leave. - open images, execute a prediction, but to your team while nothing else to do. To do this, you need to select the "POSSIBLE OF PREPARATION".
So usually do if you need to not start the recognition immediately, but first see what happened as a result of the preprocessing, as far as it worked well by this set Images. - open images, execute the predict, perform marking on blocks, recognition until you start. To do this, select the item "Analysis of images (including POSSPACK)".
The most frequently selected option. You have a completely decent quality scans, the fact that you will make a predefining with them. You imagine well, check after it is not necessary. So we connect to one three stages described above and begin to watch how well the markup is made. - all stages of recognition are automatically, without any intermediate control. You immediately receive a ready-made result and start reading it. To do this, select the item "Image Recognition (Including Position)". So it makes sense to do only if you have good quality scans and with a very simple appearance - for example, a solid text in one language and nothing more. In all other cases, it is better to choose option 2 or 3. Especially if you have pages with complex formatting, tables, diagrams, figures, etc.

Fig. 12. An example of a page with a complex layout

Fig. 13. An example of a page with a complex layout
View images in FineReader
This is the second option to work with images: do not scan them yourself, and get in the ready-made form and open in FineReader. It is done through the "Open" button in the main window menu or via "File → Open PDF or Image", or via Ctrl-O.

Fig. 14. Window "Open Image"
In the opened conductor window that opens, select the images, set the necessary settings ("Settings" button and click "Open". Settings Here are used the same as described for scanning, it is necessary to work with them the same.
When the pages are open in FineReader, the default package is created by nameless ("Document without a name") and is stored in the TMP folder, only within the current session. To accidentally not lose the results of the work, it is recommended immediately after creating Save the package under some permanent name ("File → Save FineReader" document).
Marking of pages to blocks
After you opened the scans, you need to mark the blocks of blocks to blocks. This is done through the "Document → Document Analysis" or via Ctrl-SHIFT-E.
The main work goals at the markup two.
First, separate the fact that the page has text, from the fact that the text is not. "Text" in this case is all that FineReader is able to recognize. "Not-text" accordingly, everything is considered not to recognize. Basically, this is an illustrative part of the page - drawings, drawings, graphics, diagrams, and so on like. Formulas, handwritten records and notes from this point of view are also considered non-text - to recognize their FineReader is not able to recognize. So, when marking them, they must be tagged like a "picture".
Secondly, it is still necessary that there is text, posting by category - just text, tables, notes (footnotes), footers, table of contents, and the like. To then when you read recognized in text editorAll these elements would look exactly the way you are accustomed (would be formatted accordingly).
The posted page may have about the following type:

Fig. 15. Image "Image" window with a page marked
Now you need to view the markup made by the program on each of the pages and, if necessary, correct it.
Marking errors are usually the following species.
1. Some part of the page content (text, drawing, etc.) is highlighted correctly in the sense of the boundaries of the region, but it is assigned not the contents. For example, a text fragment is marked as a drawing or vice versa.
In this case, you need to click on such a area, open the context menu, select "Change Area Type" in it, in the submembling submenu, select the required type ("text", "Table", "picture", "background picture", "Stroke the code").

Fig. 16. Context menu "Change area type"
Quickly see where what area can be in color frames. The "text" stands out by the frames of a dark green color, "Table" - blue, "picture" - a light red, "background picture" - dark red, "barcode" - light green.
2. In the sense of the contents, the area is allocated correctly, but in the sense of dimensions (boundaries) not all that in this case was required. Or, on the contrary, it fell a piece from the neighboring area with another contents.

Fig. 17. Page with incorrect marking
To the upper area of \u200b\u200bthe "picture", the surrounding signatures surrounding it (should be marked as "text").
A part of the image did not hit the bottom area "picture".
To fix it, you must first click in the "Image" window on the "Arrow" button.
And then click on each incorrect area marked and move its borders. Approximately the same way, as usually moves the borders of the open programs.
3. Some part of the contents of the page markup is generally missed, did not get into any of the created areas.

Fig. 18. Formula fell out of the markup (I didn't get into one of the blocks)
Here it will be necessary to create a new area on the page (highlight the missing part of the page frame), and then assign the desired type created area.
To do this, first click in the "Image" window on the "Select the recognition zone" icon
After that, to circle the desired section of the frame (as usual in graphic editor Select part of the figure) and finally set the type of area. The last operation is already described in paragraph 1.
If you need a text part of the page just as solid text (which most often happens), this is quite enough. If you want in Word, the various elements of the declaration of recognized pages (notes, footers, footers) would look exactly as notes and footers, then you need to check and this moment.
It is adjusted through the context menu. Click on the desired text area on the page being checked, in the context menu you select the "Purpose of text" item, see what item is a check mark (usually "auto-detection"). If it is not where it is necessary, switch to the desired item.

Fig. 19. Context menu "Purpose of text"
Recognition
After the errors in the markup are corrected, recognition can be launched. This is done through the "Document → Recognize Document" or via Ctrl-SHIFT-R. Before that, do not forget to set the recognition language and set the necessary settings.
The language is set via the "Document Language" window in the button panel of the main program window.

Fig. 20. Select language via the main menu
Or in the settings ("Service → Settings → Bookmark" Document ").

Fig. 21. Select language via FineReader settings
If there is no language you need in the list that you need, then click "Select Languages" at the bottom of the list and in the window that opens, check the box against the language you need (set languages). After that, it will be added to the list.
In the recognition settings ("Service → Settings → Recognition tab), the recognition mode is better to leave as default (" thorough recognition "). "Fast recognition" makes sense to put only if you have something simple in appearance and with very good scan quality. For example, a text document scanned in black and white without illustrations.

Fig. 22. Settings, tab "Recognize"
From the rest of the settings, the "Definition of Structural Elements" group has a basic meaning. Here are the details of the page design: footnotes (notes), footers, lists, table contents. When a check mark is set against the element, it will be recognized and saved in DOC / RTF / DOCX not just as part of the text on the page, namely, as a footnote, footer, list or table of contents.
Just do not forget at the same time important moment. If you have to recognize areas with a similar content, then one checkbox in the settings of the "Recognitive" bookmark may turn out to be a little. In addition, it is still required at the markup stage correctly mark these areas "Purpose of text" from the context menu.
Subtangle
The deduction of recognized text in FineReader can be done in two ways. Or using the "Check" function, or in the usual way, viewing the pages in the built-in FineReader editor. Through the "Close-up" window with a scanner, where there are errors - correct.
The "Check" function is started with the button in the upper right corner of the menu or via CTRL-F7. Its work is built on the fact that during FineReader recognition marks characters and words that have been recognized with a high level of reliability. That is, the program for their occasion is some doubt "Maybe this is indeed the character that you are presented, but maybe something else." During the inspection, such dubious places in turn are shown to the user so that it corrects them if necessary.
The check window is simple enough. In the upper part it shows a fragment of a page in which the character is checked. The bottom of the recognized text is displayed in the lower part with this symbol, as well as several buttons for easy editing.

Fig. 23. Window "Check"
If everything is fine, the character is defined correctly, then click on "skip". If it is defined incorrectly, we enter the correct value or using the keyboard, or if there is no such keyboard, then using the button "Paste a symbol" (Greek letter "Omega"). After that, click on "confirm".
Similarly, act if the symbol is recognized correctly, but its formatting is incorrect. For example, in the text of the book in some place it is in pointing, but he recognized as a regular font. To reformatting, use the buttons at the bottom of the window.
But the possibilities of the check window are still quite limited. And by what size a piece of the page can be shown at the top of the window, and by editing capabilities that are here. Therefore, all movements on the text, from one check point to the other, are also tracked in the "Text" and "Close-up" windows. All the time, while working, cursors in the "text" and "close-up" are moved synchronously to their position in the "verification".
If the page (in his scan) suddenly needed to see more than a few words shown in the "check", then you can do this in a "close-up". If the editor's capabilities are required to edit the current error, you can switch to it for a while (simply clicking on its window), make the necessary job and return back to the "check" (clicking on its window). After returning to "verification", there will be displayed all the changes you made in the "text".

Fig. 24. An example of work in at the same time open windows "Check", "Text" and "Close-up"
If you have a "check" window with it limited features Not very convenient (used to working with all the comforts of text editors and you are not going to change the habit), then you can do this work from the very beginning in the "Text" window.
Places requiring checks are displayed in full - these are symbols and words allocated by light blue. The ability to move from an error to an error without browsing the entire page entirely, also there is the "Next Error" and "Previous Error" buttons on the button panel on the left side of the window.
Theoretically, by the plan of the FineReader creators, the "Check" window must be quite enough for a full-fledged deduction of recognized text. All dubious places are marked, moving along them, the rules of the error, we get a completely sidranted text at the output.
But, as often happens, the theory here dispels with everyday work practice. In recognized texts, erroneous places are systematically found, which, as errors, are not marked. That is, FineReader recognizes some symbol / word incorrectly, but with full confidence that recognized correctly.
Therefore, for a full-fledged fusion of alone, the "Check" window is usually not enough - especially if there are many scientific or technical terms in the text, professional jargon and the like "non-conservation". We must also go through the manually recognized manually - carefully view it in the "Text" window and check all the dubious spaces.
The end of the text in the "Text" window is not much different from the usual design work. Configure the "Text" and "Close-up" window so that they occupied most of the program's working window, go to the next page being verified, view its text. If you find a dubious or explicitly erroneous place, then click on it - while the cursor in the "close-up" is set exactly in the same place of the original (scan). Compare the original and recognized, if necessary, rule, moving on.

Fig. 25. Remote with the "Text" and "Close-up" windows
The functionality of the text of the text "Text" is not particularly different from the functionality of any textual editor of the average degree of complexity. The appearance of the buttons in the menu is quite typical, there should be no problems when working with them. If you need to correct some character, which is missing on the keyboard, the way, as in the "Check" window, you need to click on the button with the Greek "Omega" and select the necessary one in the table.
Saving results
When the scanned material is recognized and calculated, it must be saved in one of the documentary formats - doc, docx, rtf, pdf, html, etc. This is done through "File → Save the document as → Select the desired format" or through the "Save" button In the main menu FineReader.
In the opened conductor window, select the format, via the "Settings" button set the save parameters, click "OK". If you want to immediately see if there are no noticeable errors in the appearance of the saved text, then please check the "Open Document After Save". Then it will immediately be opened in the editor (browser, viewer).

Fig. 26. Recognized text conservation window
The usual practice of recognition is to enter the scanned text of the book or log, on the output all its pages are saved to the file with the name of this book. It is this configuration "Create a single file for all pages" is default in the "File Options" string. If you are not recognized by some one-piece text, but simply a scratch of pages (for example, office documentation), then it will be necessary to set "save separate file. For each page. "
Conservation Settings in Doc, DocX, RTF Formats

Fig. 27. Conservation Settings in Doc / DOCX / RTF
The key and main thing that you need to choose is with what degree of accuracy in the saved document will be displayed the appearance of the original (one of the preservation modes in the "Document Design"). All other settings are no more than refinement and detailing this item.
Selection options Here are four: "Accurate Copy", "Editable Copy", "Formatted Text" and "Simple Text".
1. "Accurate copy".
According to the plan of developers, there should have been a practically mirror image of a recognized page. That is why it is called. With precise reproduction of fonts, the size of letters (kegles), the distances between the letters in the words, distances between the words, rows and paragraphs and other layout details. The idea, in general, is not bad, but the opportunity to realize it in the planned volume of FineReader is usually missing.
Fonts and their drawing (Normal, Italic, Bold) are often reproduced according to the principle "as it comes out and will succeed." Can be transmitted exactly. It may happen that the font used on the recognized page will be substituted with another font (similar to the view, but others). It may happen that the Normal inscription will be recognized as Bold or vice versa. And so on and so forth.
With the playback of kegiles, distances and other formatting, the situation is not much better - more or less accurately reproducing the appearance (layout) of the recognized page usually manages only in cases of something not very complex.
As a result, it turns out it is not very clear what - a Word document that can only be read (well, and copy the text from there). Edit it outside the "pair of letters to remove, a couple of letters insert" madly. And it is necessary to edit the same - he will continue to go into some kind of work, which means it will be necessary to redo the formatting for the need for future use.
On the one hand, the whole text here is Raskidanadan on numerous frames, which pretty complicates work with it. On the other hand, during the recognition, the program generates a bunch of Word'ovo styles - all formatting in the text is made exclusively through styles. It is usually when a few hundred different styles are generated on the text of the book of medium sized (300-400 pages). What more complicates editing.
Summary - You have no particular sense to choose this mode of preserving a special sense, it is quite inconvenient to work with the saved text.
If you need full reproduction of the appearance of the original, it is simpler, and it's more practical to make in the form of PDF "text under the page" or PDF "Only text and pictures" (about these output methods are slightly lower).
2. "Editable copy".
In meaning, this is a lightweight version of the "accurate copy". Appearance The original is reproduced not with such a degree of meticulousness, as in the previous case, frames with text are noticeably smaller (although periodically come across). However, at least this option is called "editable", work with him too, not to say comfortable.
If the Word document is needed, as it is, only for viewing its contents and copy the desired fragment of the text, you can also use this option. If you need to redo a lot, reformat and so on, it is better to choose something else.
The reason the same is too much of the conversion of text from the type that the "editable copy" will be issued, to the view that you may need. There was still some number of text in frames, the trend is still preserved in formatting the appearance (layout) of the original. Yes, and the habit of generating a bunch of styles is not doing anywhere.
Summary - working with the text here is not so troublesome as in the "accurate copy", but still leaves much to be desired.
3. "Formatted text".
The degree of compliance of the original here is minimized - reproduction of fonts and kegles, approximate location of the material on the pages of the original, general view text and tables.
Work with this option is noticeably easier than with previous ones, but still difficult because large number Styles. But it is just enough to be treated - you can quickly go through the text and impose your own set of styles on it.
4. "Simple text".
Although it is called "simple text", but here you can save both the text and text with pictures. Formatting in this option is reduced to a minimum - ordinary Word's paragraphs from one edge of the page to another, plus stove between them pictures. Care of the previous options, a lot of styles is also not generated.
But if you wish, even here you can leave the original breakdown on the strings and on the pages. Plus, keep the font drawing is normal, italics, bold.
Usually, it is selected or "formatted text", or "simple text" - depending on what you are going to do next and how to use recognized.
Now about the other settings of this window.
- "Default paper size."
Here's Word Setup "Page Settings → Paper Size", that is, on paper of which format you will make a printout. Usually set A4. But it should be borne in mind that in the "Accurate Copy" and "Editable Copy" modes one to one is stored not only the contents of the recognized page, but also its initial size. As a result, if you put a paper format here, more than the page size, then when printing around the text there will be empty fields. If you put a smaller format, then some of the page material may be lost (it turns out beyond the boundaries of the paper sheet). - "Save Transfer and Decision to Lines."
If the tick is set, then the breakdown will be saved on the string, which is in the original. Row transfers in this case are made soft. If you not put checkboxes, then the text will go ordinary Word-ox paragraphs, with rows from one edge of the page to another. - "Save division to pages."
If the checkbox is set, then the breakdown on the page, which is in the original will be saved. If the checkboxes do not put, then the text on the page will break Word itself. - "Save footers and page numbers."
If the tick is delivered, the text marked and recognized as footers and page numbers will be saved and placed in the corresponding Word-Wrist fields. If you do not put a tick, then this part of the text is not displayed at all. - "Save string numbers."
If the checkbox is set, then the numbering of these rows will be saved in the lists with numbered strings. - "Keep the background color and letters."
If the tick is delivered, then the text printed in color (or on a colored background) will be derived, as in the original. If the checkboxes do not put, then the whole text will be output in the usual way - black on a white background (or on white on a black background). - "Save a bold font, italics and underscore in the simple text."
The output to "Simple Text" can be made according to the principle of "all the same intensity, Normal", and it is possible to preserve the drawing, which was in the original. Here just this moment and regulated. - "Select unsurely recognized symbols."
This checkbox must be installed if you prefer to deduct recognized text not in FineReader, but in some text editor. Then all the marks of the characters and the words that you had in the "Text" window will be played in the saved document. - "Save pictures."
It will be determined whether the images also be saved. - "Quality of pictures."
Here the degree of compression of images from the original is determined. It can be adjusted in three directions - through various compression algorithms, through the rescue image resolution and through the depth of the color in it. Details can be viewed if you select the "Custom" option in the "picture quality" string. It is most practical to use it, and not presets "small size (150 dpi)" and " High quality (Source image resolution). "
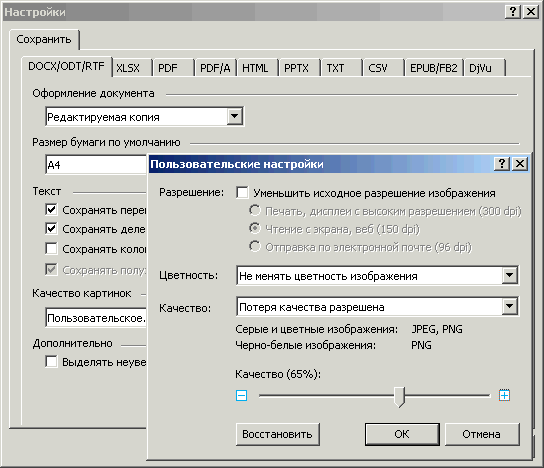
Fig. 28. Image Quality Settings Window
Since with a decrease in the initial resolution and subsequent compression, poorly predictable distortions are possible, the checkbox "reduce the original image resolution" is better removed.
Color depth by the situation. If the images are needed, as it is, you choose "not changing the color of the image". If simply just a common type, the exact playback of colors is not necessary, you choose "convert color images into gray". The conversion of color and gray images in black and white is better not to choose, because binarization can give a lot of distortion (and poorly predictable). The item "Automatically" is also better not to choose - it is not very clear what logic of the work there is laid and that you will receive at the exit.
Conservation settings in PDF and PDF / A formats

Fig. 29. Conservation Settings in PDF
The save modes here are also four: "Only text and pictures", "text on top of the page image", "Text under the image of a page", "Only an image".
- "Only text and pictures".
Here you actually get the PDF option of what is issued in the "accurate copy" - recognized text and illustration from the "Text" window in the form as close as possible to the original. The quality of the original playback here is higher than in Doc / DOCX / RTF, since the PDF format has more possibilities for this. - "Text on top of the page page."
This PDF consisting of two layers is the original image (bottom layer) to which recognized text (upper layer) is applied. This option is quite convenient if PDF will later be edited. - "Text under the image of the page."
This PDF compiled from the same two layers is the original image and recognized text. Only they go in reverse order - the image of the upper layer, the text below (invisible) layer. This output method is also called "PDF with a text substrate" and is used when it is necessary to obtain on the one hand the exact copy of the appearance of the original, and on the other hand the ability to copy the text of this original. - "Only an image."
This is a PDF assembled from source images. In addition to the images themselves there is nothing there.
Now about the rest of the settings of this window.
1. "The default paper size."
In PDF-output, the meaning of this setting is the same as in the previous case - the sheet format on which the page will be printed.
In the previous case, it was said about the rule "if a page is smaller than the specified format, then there will be empty fields around the text, if more - part of the text will be cut." In PDF, it is still fulfilled even more rigidly, because here the original page is played in any option one to one. Therefore, it is most reasonable to put here "use the size of the original."
2. "Keep the background color and letters."
3. "Save footers".
The meaning of these two settings is the same as in the previous case.
4. "Create a table of contents."
If a check mark "Defining structural elements → Table of contents" was set in the recognition settings, the book contents recognized in this way can be used for automatic creation Table of contents in the PDF file.
5. "Allow PDF tags."
In PDF tags, this is a functional analogue of Word styles, the method of structural markup of the contents of the PDF file. With their help, information is stored on the breakdown of text on the chapters, headers, tablehouses, illustrations, tables, notes, hyperlinks, mathematical formulas And otherwise like.
If you need to often copy from PDF pieces of text, then the tick here is worth putting. Then the copied text will be much more match what it looks like on the PDF page.
Also tags are useful if PDF has to be viewed on screens different sizes - From desktops to smartphones. In such cases, PDF readers have to reformat the contents of the pages under the current screen size and with the tag markup it passes much more accurately, without noticeable distortions of the initial type.
6. "Use Mixed Raster Content (MRC)".
MRC (Mixed Raster Content) is the name of compression technology capable of giving noticeably large multiplicities of compression than well-known JPEG and JPEG 2000. Many are familiar with it on the DJVU format - it is based on the MRC database. The choice of "need to put a tick or not" here is ambiguous and determined on the basis of your conclusion.
The main plus is the size of the resulting PDF. It may be several times less than the PDF obtained with the same compression settings, but without MRC.
What could be minuses:
Mrc compression is so arranged that when working always gives a poorly predictable number of distortion. Due to the fact that the distortions here only part depend on the compression settings, and in a fair extent from the contents of the page. Text, drawings, graphics, photos - with MRC compression, they all behave markedly differently and give a different number of distortion.
Noticeably large resource intensity when compressing and viewing such PDF. Even at today's computers, MRC-PDF can open and scroll without familitively smoothly, and jumps, when the next page is displayed on the screen not all at once, but in parts.
7. "Save pictures".
8. "Image quality".
The meaning of these settings is the same as in the previous case - it is necessary or not necessary when creating PDF to save images and with what level of compression to save them. Recommendations are also similar - to remove the check mark from "Reduce the initial resolution", the color is better not to change, the "quality" engine is set by analogy with compression in JPEG 2000.
9. "Fonts".
If you put "use windows fonts"The recognition and subsequent output will use the set of fonts that are installed on your computer. If you put "use predefined fonts", then only one set of fonts that is installed when FineReader is installed.
It is preferable to set the first option, since it will be used a much greater variety of fonts and the program will be easier to select compliance with the fonts of recognizable books.
10. "Embed fonts."
If you need, when viewing a PDF file on another computer, he was visible exactly how you got it (it was in these fonts), then you need to put a tick here.
11. "PDF protection parameters."
Here you can exhibit password protection on the view PDF., Printing, copying from it text and drawings, editing.
If you have questions about the work of FineReader, for which you have not found a response in the article text, you can specify the program developers.
The conversation will go about the ABBYY FineReader 12 program, that is, about its latest version. Not looking too far, we chose the most famous product of ABBYY, which, to its merits, is perfectly Russified. Already at first glance, Fine Reader (FR) gives the impression of a program with good Russian-speaking support: in this regard, indeed, everything is done on a very worthy level, including reference information.
Initially - retreat. The question is always relevant how to translate the whole or some of the archive into a digital format (and that, in fact, to understand under the word "digital"). Hardly buying the scanner solves all the problems. Of course, a disk or several with the branded is complete with the documentation for the scanner. software. However, already at the stage of sanitation it turns out that the quality of the scanning program leaves much to be desired or a format in which it is saved, unfortunately, is not suitable for storage. Why? Most of the graphic formats do not separate the text from the non-intestine space of the document, and therefore copy any excerpt from such a file is not possible.
It is in such cases that functional programs "recognizers" of the text come to the revenue, the possibilities of which, in particular, include the extraction of text from the image.
Acquaintance with ABBYY FineReader
Package ABBYY FineReader 12. - Optical text recognition system (OPTICAL CHARACTER RECOGNITION - OCR). Designed both to automatically enter printed documents to the computer and convert PDF documents and photos to editable formats. (from the manual for the program)
Abbreviation "OCR" is applicable to all applications for data recognition (and not just text). The source for data extraction can be printed or electronic document. Once not for a long time about OCR, in one form or another, few people knew, and the process of translation of text into electronic form turned into a sort of routine, up to the manual reprint of the text of the original. Today, possessing tablet scanner (manually use units at home) and fineReader 12.- Be sure it will not arise any difficulties in scanning and recognition.
Starting with the sixth version, FineReader supports import and export to PDF format, patented by Adobe. Many readers were probably faced with the difficulties of transfer from this format in any other (Doc, etc.), since there are not so much useful programs in this area (attention is worthy. Is the subsidiary of ABBYY - PDF TRANSFORMER). The fact is that such programs are performed by the recognition of the text only once, as a result of which the "identity" of the result is at all small (depending on the complexity of the document), plus the document formatting is presented.
In the case of FineReader, everything is different. The ninth version of the program introduced a technology called Document OCR. It is based on the principle of solid recognition of the document: it is analyzed and recognized as a whole, and not postparted. At the same time, all sorts of columns, footers, fonts, styles, footnotes and images remain intact or replaced close to the original.
Installing a package
DEMO-version FineReader 12 can be downloaded on the website abbyy.ru, in the Download section, the full licensed version is distributed on the CD. About the way of buying can be found on the same site in the "Buy" section.
On the ABBYY developers website, you can download the demonstration version of the ABBYY FineReader package version 12 (or other, relevant today)
ABBYY FineReader extends to several versions: Professional Edition, Corporate Edition, Site License Edition and others. Difference version of Professional The rest is what is designed to work in corporate network With the ability to collaborate on recognizing documents. Otherwise, the difference is insignificant and depends on the choice of terms of the license agreement.
It is difficult to imagine that 12 years ago existed FineReader 2.0, which occupied about 10 MB disk space. Over time, the package "grown" tenfold and now in the prescribed form takes up to 300 MB. It's a lot or a little - judge for yourself. The new FR supports 179 recognition languages, among which there are little-known artificial languages \u200b\u200b(IDO, INTERNINGWA, OCCIDENTAL AND ESERARTO), programming languages, formulas, etc. We will not forget about the support of various formats, scenarios. So, if for some reason you want to limit the place occupied by the package, check only those components that will be in demand when working.
The selection of components affects the duration of the installation, which, however, should not take a long time. In the process of installation, you will be familiar with the main possibilities of FR. After activation (on the Internet, via e-mail, using the received code, etc.) the program is ready for full-featured work. In Demo mode, you will certainly encounter various restrictions, which, unfortunately, do not allow full use of the package.
FineReader interface. Functionality
Access to the capabilities of the program is available both using scenarios that will appear in the main menu immediately after the installation process and, in fact, through the main interface.
 Screensaver when started FineReader
 The appearance of the program from the version to the version does not undergo special changes: the developers do not see sense to change it radically. Considerable attention is paid to ergonomics, which is noticeable on all ABBYY products (Lingvo, PDF Transformer, Flexicapture ...). In other words, the FINE READER 12 interface is well thought out and is predisposed to all users, not excluding newbies. The principle of "getting the result for one press" will have to taste those who are not used to customize something and change. On the other hand, more experienced users can carefully configure FineReader via the settings dialog (service -\u003e options ...). The only nuance: It is advisable for comfortable work in the application to set the screen resolution in 1280? 800 so that all tools have always been, which is called, at hand.
After starting the Fine Rider program, a window will appear with buttons. quick access to program functions. This menu Also available through the Tools menu -\u003e ABBYY FINEREADER, the "Basic Scenarios" button in the extreme right corner of the program or through a Ctrl + N key combination (by analogy with Word, where a new document is called this combination).
Scan in Microsoft Word: In the ninth version of FineReader, support has not yet had time to become popular Microsoft Word 2007. In turn, on the toolbar in Microsoft Office applications, in the add-on section after installing the FR, the "branded" red icon appears.
 Menu for exporting FineReader recognized document
  Select language for scanning and recognition of documents
 In addition to Microsoft Office, FR supports Microsoft Outlook integration, provides export of recognition results to the same Microsoft Word, Excel, Lotus Word Pro, Corel WordPerect and Adobe Acrobat. These opportunities will deteriorate to some extent and speed up work with the program, especially if you have to work regularly.
PDF or image in Microsoft Word: Recognize data from a PDF - or a graphical file of another type, supported by FineReader 12 version. It should be noted that the technology for extracting text from PDF -File in FR is not just "peeling" textual filling (text layer in PDF may be missing) from graphic. In fact, the recognition technology is quite difficult: After analyzing the content of the document, the program decides that and how to do with the text: just extract or recognize, and so as applied to each text fragment.
Scan B. Microsoft Excel.: Scanning XLS (Microsoft Excel Format) can be justified if the scanned image contains tables.
Scan in PDF: There may be many reasons for scanning in PDF. One of them is security: this is the only format, familiar FR, in the settings of which you can set a password blocking. The password is set not only to open the document, but also to print and other operations. It is possible to choose one of the three encryption levels: 40-bit, 128-bit based on RC4 standard, 128-bit level based on the AES (Advanced Encryption Standard).
Convert photo in Microsoft Word: Translation of a file from a graphical format (and this may be PDF or a multi-page image) in Doc / DOCX.
Open in Fine Rider: Open graphic file (PDF, BMP, PCX, DCX, JPEG, JPEG 2000, TIFF, PNG) for FineReader Recognition.
Work in FineReader.
Now - briefly about the features of the program. The whole process is divided into scanning, recognition and preservation of results. After you have selected the type of action of the program, the file or the device for scanning, the FineReader phasately performs its task, by the way, is quite resource-intensive for the central processor.
If you are a happy owner of a dual-core processor, then working in the FINE READER 12 package, you can evaluate the power of computer performance. The fact is that FR, finding a dual-core processor, it recognizes not one, but at once two pages of the document parallel. Trifle - but nice.
At first, scanning, then recognizing and exporting a temporary document to the selected format.
 PDF document recognition process
 Scanning. Nic preliminary settings In the Finereader application (except for selecting the reader), you do not need to do before scanning. That is why scenarios were invented: they are designed to simplify the implementation of the same type of actions.
Recognition. Simplification touched on other little things. So, if you remember the past versions of the program, before we had to manually change the language (languages, if there were several) of the document. Now it happens automatically, though not always. In the latter case, FR unobtrusively offers to check the document language.
Returning to FR recognition technology: Why is the program first scans the entire document entirely, and not postpony? As already mentioned, the text is recognized, based on the entire content: similar to the size / headset fonts, tables and boundaries, indents, etc. are selected.
Do not be surprised if the FineReader 12 program will give a message, they say, the page cannot be recognized, since no text area found. For the sake of the experiment, we photographed on a mobile phone from the LCD screen - a text document area (however, knowing, the result is already in advance). Fine Reader 12The recognized the text of the image, since it was clearly of this quality, which is clearly not enough for this. With the second approach, we photographed a digital camera page with text during normal lighting.
FineReader recognized the excerpt without any problems, retaining formatting and marking the markers of some dubious moments or symbols that can be a variable writing.
As can be seen in the image, mainly this point, hyphens, commas - in general, small characters. In addition, it is clearly seen that the program of unevenness, the curved of the photographed page and leveled the text strings. Conclusion - FR perfectly coped with his own even a very difficult task.
Occasionally, they can remain unnoticed by the Fine Rider program some minor moments, but they are easily corrected manually. Fortunately, there is a WYSIWYG in the package, the capabilities of which is enough to make the final editing of the document. Spell check is also available.
How to improve recognition accuracy to then to a lesser extent to engage in editing text? First, you can connect the Microsoft Word user dictionary. True, it is difficult to judge the increase in accuracy, except that the increase in the vocabulary of the Spelchkeker (module inspecting spelling and grammar). Among other things, it makes sense to improve the recognition to familiarize yourself with the settings of the program (service -\u003e options) and select one of two modes:
careful recognition - It can be chosen when recognizing documents of any "complexity": with tables without mesh lines, text, graphs, tables on a color background, etc. Also can also help with a poor-quality source for recognition
fast recognition - This mode is recommended for processing large amounts of documents with simple design or in the event that time does not allow careful recognition. In most cases, when you have with black printed text on a white background, you can dwell on rapid recognition.
In general, improving the quality of operation FineReader is a separate topic for the conversation, the details of which you can learn from the official help, namely in the section "How to Improve the results obtained".
Saving a document. The last stage of work in the Fine Reader 12 program is to save the final result in a specific graphic / text format. Pre-setting up the save can be specified in the FR: Service -\u003e Options, Save tab. For each format provides its settings. When saving in DOCX Format, the formats compatibility (DOCX FILES are not recognized in Word 2003<). В txt-файлах не забудьте проверить правильность кодировки (особенно в случае с текстом в кириллице).
ABBYY Screenshot Reader.
Many bulk packages are very often developers like to add minor service utilities. For example, a well-known application for recording Nero discs includes a set of 3 - 5 utilities, allowing something that even Nero himself cannot. Review (here you can also download as part of Fine Rider 12).
As for FineReader, one small ScreenShot Reader application is found in its composition. With it, you can take a snapshot of the screen and quickly translate it into the desired format by FR. The program is available through the Start menu (Start -\u003e All Programs -\u003e ABBYY FINEREADER 12.0 -\u003e ABBYY SCREENSHOT READER.).
The capabilities of the Screenshot Reader are somewhat wider than it may seem at first glance. (And otherwise it would be possible to do with a simple press of the "Printscreen" key on the keyboard). In addition to the fact that Screenshot Reader takes the screen shot (or, more precisely, the selected screen area), the program is closely integrated with FR.
When you click on the "Snapshot" button on the ScreenShot Reader panel, the cursor changes the form and the screen selection tool is turned on. The selected area of \u200b\u200bthe image is the frame for further text recognition (it starts automatically).
In the drop-down list, you can choose the desired action: In fact, Screenshot Reader duplicates quick FR scenarios with the difference that instead of a picture from the "on the input" scanner enters the screen shot.
It should be noted, the program, along with the entire package, requires activation. When registering a product ABBYY FineReader 12 Professional Edition Screenshot Reader is free, as a "bonus".
Conclusion
FineReader - an indispensable program To scan and recognize graphic data. The Russian-language interface and the availability of settings will not scare up an inexperienced user. Support for the latest formats, innovative technologies and, as a result, high-quality recognition make the program with an optimal choice, especially since the competitors in this area have ABBYY FineReader still not foreseen.
Hot keys FineReader 12
- Create a new ABBYY FineReader document - Ctrl + N
- Open ABBYY FineReader Document 12 - Ctrl + SHIFT + N
- Save Pages - Ctrl + S
- Save image to file - Ctrl + Alt + S
- Recognize all document pages - Ctrl + SHIFT + R
- Close the current page - Ctrl + F4
- Recognize dedicated ABBYY FineReader Document Pages - Ctrl + R
- Open scenario manager - Ctrl + T
- Open dialogue option "Fine Rider"- Ctrl + Shift + O
- Open certificate - F1.
- Go to the Document window - Alt +1.
- Go to window image - Alt +2.
- Go to the Text window - Alt +3.
- Go to the Close-up window - Alt +4.
Text translation to digital format is a fairly common task for those who work with documents. ABBYY FineReader will help save a lot of time, automatically transferring inscriptions from raster pictures or "readers" to editable text.
In this article, consider how to use ABBYY FineReader to recognize texts.
How to recognize text from the picture with ABBYY FineReader
In order to recognize the text on raster image, just download it to the program, and ABBYY FineReader automatically recognizes the text. You can only edit it, highlighting the desired and save in the desired format or copy to the text editor.
Recognize text can be directly from the connected scanner.
Read more on our website.
How to create a PDF and FB2 document using ABBYY FineReader
The ABBYY FineReader program allows you to convert images to a universal PDF format and FB2 format for reading on e-books and tablets.
The process of creating such documents is similar.
1. In the main menu of the program, select the E-Book section and press FB2. Select the type of source document - scanning, document or photo.

2. Find and open the required document. It will boot into the program charter (it may take some time).
3. When the recognition process is completed, the program will propose to select the format for saving. Select fb2. If necessary, go to the "options" and enter additional information (author, name, keywords, description).

After saving, you can stay in text editing mode and translate it into format Word. or PDF.
Text editing features in ABBYY FineReader
For text that recognized ABBYY FineReader has several options.
In the outcome of the document, save the pictures and footers so that they move to a new document.

Perform a document analysis to know what errors and problems may occur during the conversion process.

Edit page image. Options for cropping, photo correction, resolution changes are available.

So we told how to use ABBYY FineReader. It has quite wide text editing and conversion capabilities. Let this program help in creating any documents you need.
Hello. Today I will talk about how using the ABBYY FineReader program to recognize the text C image that you could get as a result of scanning. Your scanned text will be fully in Microsoft Word document and this recognized text can be edited! Recognize text using ABBYY FineReader can be useful to those who study, works with texts and translations. The program, unfortunately, is paid. Somehow I have been trying to try one of the free options. similar programsBut very well-scanned text is simply terrible ... And to recognize the text in ABBYY FineReader it turns out very high quality! Now I will show you how to use ABBYY FineReader to quickly recognize text from the image.
ABBYY FineReader has trial version For 30 days with the ability to recognize up to 100 pages and save no more than 3 pages from the document. Those. During this time, you can see the possibilities of the program and take a weighted solution - whether it needs you whether it is worth buying it or not.
How to install ABBYY FineReader!
Before you use ABBYY FineReader it must be installed. Consider the installation process of this program ...
To begin with, select the language of the program. Click "OK".
We accept the terms of the license agreement (if you wish, you can read the license agreement if you are interested in what is there). Click "Next".
Next you must select the installation mode. Under normal mode, the program will not ask you and sets what the program is specified by default, namely all the components: the ABBYY FineReader program itself for text recognition, component for Microsoft Office programs and a component for Windows Explorer (allowing you to quickly recognize images without opening Separately program). I advise you to mark a selective installation to set up as you need. Especially it does not take 15 minutes :) below the folder is indicated where the program will be installed. It is advisable to leave the default selection so that there are no problems when using the program. Click "Next".
Program components. This window will appear in case you select the "Custom" setup. Components are something like auxiliary application applications. The first component "Integration with Microsoft Office programs and Windows conductor" This component will be displayed in the Microsoft Office menu and if you click on the image on your computer right-click, then there will be an item with this program. That's how your menu will look like in Microsoft Office after adding this component.
But what will happen if you right-click on the image:
Those. A menu appears in which you can make a quick text recognition with sending results in Word, Excel or PDF.
The second component will allow you to recognize the text from the computer screen. This means that you can make a screenshot and also recognize the text. If you do not want to install one of these components, or do not want to install both, then you need to click on the down arrow and select "This component will not be available." Then the component will not be installed. I left both.
Next 4 points. The 1st means that information about how you use the ABBYY FineReader program will be transferred to the developer. This item I advise not to note that the program is once again not published on the Internet for the sake of sending information about working with it. Moreover, you never know what other information will be sent :) 2nd item creates a program shortcut on the desktop. 3rd means the program will start when the computer is turned on, and the 4th will check the program updates. I leave only the second and opposite it leave a tick. Close all Microsoft Office applications, because it requires the installer and click "Set".
You need to wait a couple of minutes to boot and click "Next."
All installation is completed! Press "ready."
How to recognize text with a scanned or any other image using ABBYY FineReader?
Consider how to use the program. For example, you have scanned text. Now, to recognize the text in ABBYY FineReader, open the program. Click "Open".
Choose the image you need and click open.
When you open the desired document, ABBYY FineReader will begin to recognize the text. The more document, the longer the recognition will last. Single page recognition may take a few seconds.
After the text is recognized, you will only save the result in microsoft document Word so that you could edit anything in it. To do this, click the "Save" button on the top of the toolbar, after which you select which folder will be saved document Word. and under what name.
If you are connected to a computer scanner, you can start scanning directly from the program, and after which the scanned document will immediately be recognized. To do this, on the top toolbar, click the Scan button. Next, the actions will depend on the driver program for your printer. You only need to follow the instructions of the scan wizard.
As you can see, everything is very simple and fast. Now you know how to use ABBYY FineReader to recognize text from images! I hope that this information will greatly help many :) Good luck!
 Causes of why Flash Player does not work, and troubleshooting
 The laptop itself turns off, what to do?
 HP Pavilion DV6: Characteristics and Reviews
 Format representation of a floating point numbers How negative numbers are stored in the computer's memory
 Computer fries and does not turn on what to do?
 Why does not work mouse on a laptop or mouse?
 How to increase or decrease the scale of the page (font) in classmates?