Instructions for the use of Chinese radio stations. How to configure the radio correctly: step-by-step instructions. General view of the radio station
On use
RV-1.1M radio station
1. INTRODUCTION
This instruction on using the radio station "Transport RV-1.1M" is intended to familiarize the service personnel with the work of this equipment in the systems of train and station radio communications on the railway transport of Russia.
The radio station is established on mobile railway transport sites (train and shrouded locomotives, drinkers, automobiles, etc.).
Instructions by the machine to use the radio station "Transport RV-1.1M" is provided in the application.
2. Purpose
The increasing dual-band simplex locomotive radio station "Transport RV-1.1M" is designed to work in systems of train and station radio communication in the ranges of 160 MHz (MV-Range) and 2 MHz (GMV-Range) at ambient temperature from minus 40 to plus 55 ° C (With the exception of the control panel of the main Pu-LP, which provides operation at a temperature of minus 10 to plus 55 ° C. At temperatures below minus 10 ° C, there is no indication on the Tablo Pu-LP).
For ease of use of control panels, Pu-LP and PU-D (optional), push-press field panels are separate for each range.
On the left, the buttons designed to work in the GMV range are located on the left, in the center - buttons to work in the MV range. In addition, there is a limited access keyboard located on the right under the lid.
On the left, the buttons designed to work in the GMB range are located on the right - the buttons to work in the MV range. "#" Buttons ("Reset") and "" ("confirmation") are common to both ranges. The corresponding indicators indicating the state of the remote control are located above each button of the ranges: when working with PU-D, the indicator of the wave range is lit in which the communication session is carried out.
3. Inclusion of the radio station
On the locomotive control panel, turn on the radio toggle switch. Open the lid located in the right half of the control panel of the radio station, and press the red "" button, turning on the radio station. At the same time, the microthelphone tube must be installed in the holder in such a way that a part of the tube containing the phone is opposite the inscription "DR" (duty mode) of the microphone holder (hereinafter referred to as the position "DR").
On the inclusion of the radio station in the work indicates the appearance of an indication on the Tablo Pu-LP.
PU-LP control panel display panel (hereinafter referred to as the indicator or scoreboard) has a 20 acquaintance, where the letter, digital and symbolic information can be indicated. Expensive acquaintance is carried out from left to right.
When the radio station is turned on, automatic control of the Ba automation unit is carried out, on the right side of the Pu-LP indicator for one second, the version of the PU-LP remote control program is displayed, followed by the display of the on duty mode: on the first acquaintance of the operating channel number of the GMB range; The second is the seventh acquaintance - gaps; On the eighth, the number of the working group of the MB range frequency; At the eleventh - thirteenth acquaintances, the abbreviated conventional name of the communication system in which the radio station is operating: the SRS is a system of station radio communications, PRS - a train system; At the seventeenth - twentieth generators, the train number in the memory of the radio station. If necessary, the regulator with engraving "" adjusts the contrast of the image of the remote control indicator, the "" button, if necessary, it turns on or off the backlight of the control panel buttons, or with insufficient cabin light, the backlight of the buttons of the buttons is turned on automatically after 15 seconds from the moment of inclusion.
Volume adjustment is carried out using a smooth controller on the Pu-LP remote control with engraving "" located in the upper right corner of Pu-LP. The volume level automatically increases with an increase in the level of ambient noise. The volume will be minimal when the volume knob (when the volume control is rotated counterclockwise until it stops).
Remember!
In the variant of the radio station, controlled from different locomotive cab, the inclusion of the PU-LP remote control of one of the cabin blocks the ability to turn on Pu-LP from the second cab and control from it by the radio station. To go to control a radio station from the second cab, you must first turn off the first cabin PU LP by pressing the red button "", and then go to another cab and turn on the Pu-LP with a similar button.
4. Radio Station Modes
The radio station has 3 modes of operation: duty reception, reception, broadcast.
Mode duty reception- The mode when the radio station is enabled, the microthelphone tube is in the holder in the "DR" position, the low-frequency path is blocked, nothing is listening in the loudspeaker.
In mode duty receptionthe radio station becomes in the following cases:
With the initial inclusion of the radio station after self-testing and each time at the end of negotiations, when you press the "#" button;
When installing the microthelphone tube into the holder to the "OR" position;
Automatically through (60 ± 10) seconds after receipt of the last command control command "Reception / Transfer";
Automatically through (15 ± 3) seconds after receiving a tone call and unconfiguration of it (the microphone tube was not removed, the negotiations were not conducted or the confirmation button "");
Installation of the microthelphone tube to the holder to the "DR" position (if it was removed before).
Mode reception -such a radio station operating mode when all negotiations in the radio channel are listened to the loudspeaker (microthephon tube telephone). In this case, the receiver of the call signal that controls the low-frequency path is turned off.
In mode reception The radio station becomes automatically for 15 seconds when receiving from the tone call radio channel with the removal of the microthelphone tube, by pressing the confirmation button, by pressing any calling the range button in which the call is taken. In this case, the output of the receiver connects to the phones of the main and optional radio station control panels in the cabin, in which the control panels are included in the loudspeaker (telephone), the received call signal is listened, the indication of the received call is displayed on the PU LD Tablo.
If negotiating is negotiating the radio station becomes reception with each release of the tangent of the microthelphone tube.
Also, when installing a microthelphone tube to a position other than the "DR" position, the radio station will remain in the "reception" mode (listening) on \u200b\u200bthe channel on which the operation was carried out, during (60 ± 10) seconds, if the service personnel of the radio station set the mode Automatic output to duty mode, and unlimited long ("Open channel" mode - see p. 8) if the automatic mode is not installed.
Mode transmission -the mode in which the low-frequency signal from the microphone of one of the control panels or from the control panels (when transmitting calls or messages) is fed to the modulation transmitter input
In mode shows The radio station becomes when transmitting messages or to remove the microthelphone tube and pressing the tangents on it when negotiating.
5. Operation of radio stations in communication systems
The conditional designation of the communication system (train or station), to work in which the radio station is configured, is displayed at the eleventh-thirteenth grades of the PU-LP remote control indicator letters of the SRS (for station radio communications) or ORS (for train radio).
5.1. If you need to transition from one communication system to another, click on Pu-LP successively buttons "F, VAS".
6. Verification of radio station performance
The performance of the radio station is performed using a special program that is started by the sequential press of the "T1 (test1) buttons," the main Pu-LP and the additional PU-D control panels in the "DR" positions in the holders of microthelphone tubes.
When starting the test on the right side of the scoreboard, "Test1" appears, which is replaced by the abbreviation designation of the scanned blocks (the program conducts a generalized test of component parts and radio stations). Checked: the main control panel PU-LP (indicated as "PU", the automation unit (indicated as "ba"), the MV-range transceiver (indicated as "PPU"), the transceiver of the GMB range (indicated as "PPK"), low-frequency The tract (indicated as "CR. NF").
NOTE. To check the low-frequency path, it is necessary to remove the microthelphone tube and pronounce the phrase "Communication check" into the microphone, listening to it in the radio station loudspeaker. Then the microthelphone tube is set to the "DR" position.
On the left side of the board, the characters "__" (underscore) appear, indicating the start of the testing of blocks that are replaced with the characters "!" (exclamation mark) - the process of testing each block is underway. At the end of the test when opt condition Blocks of the radio station symbol " ! "Replaced by the" + "sign (plus) in the appropriate acquaintance and the result is in the form of the" P / C-norm "inscription. For faulty state blocks symbol " __ »Replaced with a digit corresponding to the malfunction number and the inscription" P / C-C-marriage! ". If a malfunction is detected by the test results, then you need to press the "#" button, after which you repeat testing, repeatedly pressing the "T1," buttons on Pu-LP. If again, at the end of testing on Pu-LP, the "R / s-marriage!" Will be erected, the radio station is considered faulty.
The time of complete passage of the "Test1" mode is 25-30 s.
With a positive result of testing, press the "#" button. The radio station will go into the reception mode, after which it is necessary to conduct negotiations with the control station operator or on duty at the station for checking the radio channel.
7. The work of the radio station on the locomotive
7.1. Call subscribers from the main console
Control Pu-LP in the GMB range
Remove the microphone tube from the holder, while the radio station will go into the reception mode in the GMV range, the "PRM" appears on the scoreboard on the left side. Listen to the state of the radio channel and make sure that it is free.
Click the calf call button with which you want to establish communication, on the HmB-Range button field:
Rem - when calling the head of the repair unit.
In this case, on the left side of the scoreboard, the abbreviated designation of the subscriber corresponding to the pressed button will be displayed.
The radio station becomes in the transmission mode in the GMB range, the microthelphone tube and the loudspeaker are sent to the package of a tone call to the radio channel. The tablo displays the abbreviated name of the subscriber and the "*" transmission symbol. At the end of the parcel call, press the microthelphone tangent and voice to bring the desired subscriber, for example: "train driver № ..." or "duty at the station ..." (in accordance with the regulations of negotiations) and talk. Letting go to the tangent.
On the extreme left acquaintance of the indicator, the Channel number of the GMB range is displayed on which the radio station is running. If necessary, switch the channel Press the "1K / 2K" button.
ATTENTION!
ATTENTION! When calling stationary subscribers working on the radio stations of the old sample, on the part of these subscribers, in response to the call sent from PB-1.1M, a tone call control signal is transmitted, which entails the appearance of the "#" symbol on Pu-LP and listening to the tone in the phone. Only after the end of the tone and the disappearance of the "#" symbol on Pu-LP can be negotiated or press the tangent.
When receiving a group call in the GMW range on the left side of the scoreboard, the "Call" inscription is displayed, and a speech message is listed in the loudspeaker (telephone). The radio station for 15 seconds is translated into the "Reception" mode. Listen to the message, if necessary, remove the microthelphone tube and negotiate.
If after 15 seconds after receiving a group call, the microthelphone tube was not removed and the negotiations were not conducted, the radio station will go into the reception mode.
Radio station will go to the reception mode.
7.2. Call subscribers from the main console
Control Pu-LP in the MV range
The radio station is enabled, the microthelphone tube is in the holder in the "DR" position.
Remove the microthelphone tube from the holder, while the radio station will switch to the reception mode in the GMB range, "PRM" appears on the Tablo PP-LP tab. To go to the MV-Range, click the Subscriber's Call button with which you want to establish a connection, on the button field relating to the MV range:
DNC - when calling a train dispatcher;
PMM - when calling a locomotive driver;
Chipboard - when calling on duty at the station;
Rem - when calling the head of the repair unit;
BRG - when calling a train brigadier;
Depot - when calling the duty officer of the depot;
OKR - when calling workers engaged in the protection of railway transport facilities;
DSC - when calling the formation park on duty.
The abbreviated name of the subscriber corresponding to the button is displayed on the right side of the board. The radio station will switch to the reception mode in the MV range.
Listen to the channel, determine his freedom. If the channel is free, re-press the same output button. The radio station becomes in the transmission mode in the MV range, the microthelphone tube and the loudspeaker are sent to the package of a tone call into the radio channel. The scoreboard is displayed on the board and the "*" transmission symbol is displayed. The duration of the call is at least 2 p. At the end of the parcel call, press the microphone tangent and voice to bring the desired subscriber, for example: "train driver No. ..." or "duty at the station ..." and talk. Letting go to the tangent.
When receiving a group call in the MV range on the right side of the scoreboard, the "Call" inscription is displayed. The radio station on 15 s is translated into the reception mode. Listen to the message, if necessary, remove the microthelphone tube and negotiate.
When finding a radio station in the "Reception" mode of more than 120± 20 seconds The radio station switches automatically into the reception.
NOTE. The driver in the process of briefing before leaving the line should be notified of the nature of the radio station in accordance with the technology of the locomotive (train mode (ORS) or station (SRS) radio communications, the working channel number in the GMW range, etc.), which should be done about Record in the pre-trip instruction log.
7.3. Call subscribers with additional
Control panel PU-D in the GMB range
Remove the microthelphone tube, while the "PRM" appears on the left side of the PPP score, on PP-D, the GMV-band indicator will turn on, located above the GMW-Range keyboard field. The radio station will go to the reception mode in the GMB range.
Remember! Working with Pu-D is carried out only at frequency basic Radio channel.
Listen to the channel, determine his freedom. With the freedom of the channel for transmitting a call, press the call button of the desired subscriber on the button field relating to the GMB range: DNC - to call the train dispatcher, chipboard - to call the duty station at the station, CMC to call the locomotive driver. The transmitted call is controlled by listening to the tone in the loudspeaker and the microphone tube telephone. The Pu-LP PU LP scoreboard displays the abbreviated name of the subscriber and the "*" transmission symbol. Upon completion of the call, press the tangent on the microthelphone tube Pu-d, voice to bring the required subscriber and negotiate.
If the radio station is in the on-receiving mode when the microthelphone is removed, then press the button to call the desired subscriber to the GMW range, while the indicator of this range will be lit. Next, the algorithm of work is similar to the above in the previous paragraph.
When receiving a call on PU-D, the range indicator is lit, by which the call is taken. Listen to the message, if necessary, remove the microthelphone tube and negotiate.
If after 15 s After receiving a tone call, the microthelphone tube was not removed and the negotiations were not conducted, the radio station will go into the reception mode.
7.4. Call subscribers with additional
Control panel PU-D in the MV band
The radio station is included, the microphone tube PU-D is in the holder.
Remove the microthelphone tube from the holder, while the radio station will switch to the reception mode in the GMB range, "PRM" appears on the Tablo PP-LP tab. To go to the MB range, click the Subscriber's Call button with which you want to establish a connection (DNC - to call a train dispatcher, a chipboard - to call the duty station at the station, the PCM to call the locomotive driver). On PU-D, the MV-band indicator will be enabled above the MV-RAN keyboard field. The radio station will switch to the reception mode in the MV range.
Listen to the channel, determine his freedom. If the channel is free, re-press the same output button. On the right side of the Pu-LP scoreboard, the abbreviated name of the subscriber corresponding to the pressed button and the "*" symbol will be displayed. The radio station will transmit a tone call to the radio channel. The duration of the call is at least 2 s. Call transmission is controlled by the presence of sound tone in the loudspeaker. At the end of the parcel call, press the microphone tangent and voice to call the desired subscriber, for example: "train driver № ..." or "duty at the station ..." and negotiate.
When receiving a call, the range indicator is lit by which the call is taken. Listen to the message, if necessary, remove the microthelphone tube and negotiate.
If after 15 s After receiving a tone call, the microthelphone tube was not removed and the negotiations were not conducted, the radio station will go into the reception mode.
At the end of the negotiations, click the "#" button and set the tube to the holder. Radio station will go to the reception mode.
7.5. Simultaneous work with Pu-LP and Pu-D
The radio station is included, microphone tubes PU-LP and PU-D are in holders.
If you work from the PU LP or PU-D in one range, and the radio station received a call in another range, the received signal is listed in the loudspeaker. Confirmation of call acceptance on a free console to produce any of the following ways:
By pressing the confirmation button "";
Removing the microthelphone tube from the tube, if it was installed in it;
By pressing the corresponding calling the range button in which the call is taken.
After confirming the call, the loudspeaker is disabled.
To refuse to negotiate, press the "#" button on the free console or set the free console tube into the holder if it was removed. If at the time of receiving a challenge in the MV range with Pu-LP negotiations are underway in the GMW range, then within 15 with the decision: to continue the negotiations in the GMV, click the "#" button, refusing a call to MV, or confirm the reception and subsequent Work in the MV band by pressing the confirmation button "". In this case, communication with the subscriber in the GMB range will be interrupted.
If at the time of receiving a challenge in the GMW range with Pu-LP negotiations are underway in the MV range, then within 15 with the decision: to continue negotiations to the MV, press the "#" button, refusing a call to the GMW, or confirm the reception and subsequent Work in the GMB range by pressing the confirmation button "". In this case, communication with the subscriber in the MV range will be interrupted. If, after 15 seconds after receiving a call, no manipulations on the remote control were executed, the radio station will automatically go into the mode of reception in the GMB range.
Upon completion of negotiations, press the "#" button and install the microthephon tube into the holder. Radio station will go to the reception mode.
If calls are accepted at the same time in two ranges, then confirm the reception of the call of interest to a single pressing of the call button on one of the control panels or PU-D of the band in which you want to establish communication.
During the transfer of a call to the GMW range, a call to the MV range is blocked, while pressing any call button automatically extends the duration of the transmitted call.
If negotiations are underway in the MV band or from the PU-D remote control, then the conversational chains of another (free) console can also be included and also negotiate with the same subscriber. To do this, on the free remote, you must once press the call button in the MW range with the same subscriber name that is connected. Then keep negotiations in simplex mode.
If another call button is pressed on the free remote, then the radio station will go to the reception mode at the incidence of this subscriber, and negotiations with the previous subscriber will be interrupted.
If negotiations are conducted in the GMB range, it is also possible to include conversational chains of another (free) console and also negotiate with the same subscriber. To do this, on the free remote, you must once press the call button in the GMW range with the same subscriber name with which communication is underway. Then negotiate.
With simultaneous communication with Pu-LP and PU-D in different ranges, the loudspeaker is turned off. When communicating with the GMW and continuing the connection to the MV after switching from the "Transmission" mode to "Receive" mode, the loudspeaker connects to the MV-range receiver.
At the end of the negotiations from the Pu-D remote, press the "#" button, while the Pu-LP panel board in the part belonging to the range in which communication with Pu-D was conducted (and continues to be carried out with Pu-LP), it will be highlighted The sign "__" (underscore) on the second acquaintance, if the connection was carried out in the GMW, or on the tenth acquaintance, if the connection was carried out in the MV band.
If the link is completed from the Pu-LP remote, and the Pu-D is still underway, then you must click on the Pu-LP "#" button. At the same time, the conversational chains of the Pu-LP console will be disconnected and the signs "__" (underscore) will differ on its scoreboard.
In the case when the connection is completed from one remote (it was pressed the "#" button and the microthelphone tube is installed in the holder), and negotiations are completed from another remote control, pressing the "#" button on the last remote control, and install the microthelphone tube to the holder will lead to Transition of the radio station to the duty regime in the range in which the last negotiations were conducted.
7.6. Service Communication Between Pu-LP
It is used to negotiate members of a locomotive brigade located in different locomotive cabins.
To enable the service communication mode, press the "SS" button on one of the two Pu-LP pulses installed in the locomotive cabins. At the same time, the incoable Pu-LD remote control automatically turns on, "Service Communication" appears on the panel of each of the Pu-LP panels.
Holding the "SS" button is pressed, negotiate in simplex mode using the tangent of the microthelphone tube.
The button release automatically returns a radio station to the standby mode.
When receiving a call in the GMB range in the "SS" mode on the left side of the indicator, the inscription "Rev." is displayed. To confirm the call to release the "SS" button and click the confirmation button ". At the same time, the MRI mode stops and negotiations on the GMB range in the telephone mode are underway.
NOTE. When taking a conversation on the GMW on another Pu-LP, these negotiations are not auditioned.
When receiving a call on the MV-range in the SS mode in the right part of the indicator, the "Call" inscription is displayed. To confirm the call to release the "SS" button and click the confirmation button ". At the same time, the MR mode stops and negotiations on the MW range in the telephone mode are underway.
NOTE. When conducting a conversation on MV on another Pu-LP, these negotiations are listened.
To cancel the call, not the release of the "SS" button, click the "#" button.
8. The work of the radio station on the maneuver locomotive
The radio station is translated to work in the mode of station (maneuver) radio communications in accordance with P.5 of this instruction. The microphone tube is in the holder.
Then set the required channel. To do this, it is necessary to remove the microphone tube Pu-LP from the holder and briefly press the button of the required channel on the MV-band keyboard (the first channel corresponds to the engraving button 1, second - 2, etc.). When the button is pressed, the "channel-x" is displayed, where X is a digit from 1 to 6 equal to the number of the installed channel.
Listen to the channel and determine its freedom. With the freeness of the channel, press the one-required call button on Pu-LP (button 7 corresponds to the parcel of the frequency of 700 Hz (DNC), 8 - 1000 Hz (PMP), 9-1400 Hz (chipboard), 0 - 2100 Hz (Rem)) or on PU-D double pressing key (DNC - channel listening (first keystroke) / tone-call transmission (second key) frequency 700Hz, PCM - channel listening (first key pressing) / tone-call transmission (second key pressing) 1000Hz frequency, chipboard - Listening to the channel (first keystroke) / Tonal call transmission (second keystroke) 1400 Hz frequency on a channel that was set on the Pu-LP remote control). Call transmission is controlled by the presence of sound tone in the loudspeaker. Communication is similar to normal working in the telephone mode.
If instead of the inscription "Call" is highlighted " ! ", Confirm the reception of the call is not required.
ATTENTION! Automatic return lock in the duty mode to ensure the "Open Channel" mode; prohibition of work in the range of kV (call reception and automatic transition in the range of KV on the removal of the microthelphone tube); Blocking the transition to the main channel when you go to the duty mode with the indication on the table Pu-LP, the number of the installed channel to the right of the SRS symbol. Considered situations should be specified in advance at the pre-trip instruction of the machinists.
9. The operation of the radio station on exporting locomotive
When operating a locomotive as an export, the radio station "Transport RV-1.1m", installed on it, can work both in the mode of training radio communications when locomotive on the distance and in the station mode when the locomotive works as a maneuver. In these cases, the radio station operating modes are similar to those discussed above: to work on the radio system of radio communications - see clause 7, for work in the station radio communications - see paragraph 8.
10. The work of the radio station in refusal
Separate elements
The radio station retains performance in the event of a failure of one (any) from its two power supplies. At the same time, in the loudspeaker, the phrase "Attention" will once again be brought, and the Pu-LP control panel displays the indication "BP?". The radio station fully retains its technical characteristics and functionality, with the exception of simultaneous operation in transmission mode in two ranges.
In case of disobability of the automation unit on the right side of the Pu-LP remote indicator, "BA?". In this mode, the radio station retains performance only in a range with the following features:
Switching to the duty mode when unconfirmed calls after 15 s;
After turning off and on again, the radio station is installed on the 1st channel;
When switching to duty mode, the radio station remains on the channel that was previously set.
11. Turning off the radio station
Indication on Pu-LP should turn off. Transfer the locomotive control paler to the off position.
NOTE. Setting the train number and the operation of the radio station in the stop mode are shown in Appendix 1.
ATTACHMENT 1
Setting the train number
To change the train number, press the "F, No.N" buttons under the cover closing the inertatic buttons (herein the limited access keyboard), in the right part of Pu-LP. "NP-XXXX" appears on the table, where NP means the phrase "train number", and XXXX - four digits of the train number. If necessary, the 0-9 buttons enter the new value of the train number. Dial Complete the confirmation button (PBD), which has engraving "". At the same time, the new number is recorded in memory and after 1-2 with the display on the board will be replaced by the indication of the duty mode. If after 10 s from the moment of pressing the "F" button or the buttons with numbers will not be pressed the confirmation button or type "F, #", the radio station will automatically go into the reception mode and the train number will not be changed.
Work in the "Stop" mode
1. The transmission of the "Stop" signal is carried out to prevent drivers of counter and follow-up trains, as well as the nearest station duty in the event of an unplanned forced locomotive stop.
To transfer the command to press the "OST" button on the remote control, while the "stop" will appear on the scoreboard.
If at the time of transferring the "Stop" command, a call to the MB range (group or individual), the transfer of the stop command is blocked by 10 seconds when receiving an individual call and 15 seconds when receiving a group call. To confirm call reception, click the confirmation button "". The transfer of the "Stop" command stops. If the call reception is not confirmed during the specified time or the "#" button is pressed, the command transmission is resumed.
Upon completion of the "Stop" command, click the "F," # "buttons.
To transmit a call to the subscriber in the MV-RAM during the "Stop" command, click the "#" button on PU-LP, then transfer the call in accordance with paragraph 7.2.
2. When receiving the "Stop" signal on the Tablo Pu-LP, the "Call" indication is first highlighted when receiving a first tonal signal of 1000 Hz, then changing to "stop. CHN "or" Stop. NN "When receiving a second tonal signal of 1400 Hz, respectively, from an even or odd direction. The loudspeaker listens to the alternation of the received stop signals.
Receiving the "Stop" signal indicates a stop in an emergency situation ahead of a walking or oncoming locomotive.
|
Instruction
Machine driver for use
RV-1.1M radio station
1. Inclusion of the radio station
On the locomotive control panel, turn on the radio toggle switch. Open the lid in the right half of the main control panel of the PU-LP radio station and press the red button "".
The driver when taking locomotive is obliged to make sure that the radio station is managed.
2. Checking the performance of the radio station
The radio station is included, microthelphone tubes are in the control holders of the PU-LP and PU-D control panels (optional remote) in the "DR" position.
Press the T1 (Test1) button sequentially, on the Pu-LP keyboard. In the right part of the indicator board, Pu-LP will first highlight the inscription "Test1", then indicating the abbreviated designation of the audited blocks. With the appearance of the inscription "Prov. HF "Remove the microthelphone tube, press the tangent and say the phrase" Check Communication ", listening to it in the Radio Station Loudspeaker. After checking, install a microthelphone tube to its original position.
At the end of the test when opt condition Blocks of the radio station on the Tablo Pu-LP displays the inscription "P / C-norm". For faulty state The inscription "P / s-marriage!" is displayed. If a malfunction is detected according to the test results, press the "#" button, after which it is repeated testing, repeatedly pressing the "T1," button on Pu-LP. If again, at the end of testing on Pu-LP, the "R / s-marriage!" Will be erected, the radio station is considered faulty.
If the radio station malfunction is detected while receiving the locomotive, the machinist should record in the onboard magazine Tu-152, to inform the electromechanics of the control point of the depot. If the radio station fails to make an entry in the Tu-152 logbook and inform the train to the dispatcher personally or through the station duty.
With a positive result of testing, press the "#" button.
Send a call and negotiate with a control point operator or station duty officer.
3. Work in the train radio network (ORS)
On the Pu-LP tabla, the mode of communication system "PRS" is indicated. If the "SRS" inscription is displayed, press the "F, VSP" button, switches the radio station to the reception mode in the train radio system.
3.1. Calling a train dispatcher and negotiating in the GMW range
The radio station provides for the priority of the GMB range when removing the microthelphone tube.
3.1.1. Remove the microphone tube Pu-LP or Pu-D from the holder. The inscription "PRM" will appear on the Tablo Pu-LP on the left side. If negotiations are taught in the loudspeaker and the tube, the endings should be waited.
3.1.2. With the freedom of the channel, press the "DNC" button to call the train dispatcher with Pu-LP or PU-D. In the microthelphone and the loudspeaker, a tone call signal to the radio channel should be brought. In the left side of the scoreboard should indicate the abbreviated designation of the subscriber.
3.1.3. At the end of the call sending to wait to confirm the reception of the call in the form of a short (1c) tonal signal. Then press the microthelphone tangent of that console from which the challenge was sent, and the voice call the subscriber in accordance with the negotiation regulations. Let go of the tangent.
3.1.4.
3.1.5.
3.1.6. When negotiating, you should first press the tangent, and then speak to the microphone microphone tube and release the tangent - after the end of the phrase. With continuous holding, the tangers more than 60 s radio station automatically enters the reception mode. To continue the transfer, you must let go and press the tangent again.
3.1.7. At the end of the negotiations, press the "#" button and install the microthephon tube into the holder.
When finding a radio station in the "Reception" mode of more than 120± 20 seconds Radio Station turns automatically into the reception.
NOTE. On the extreme left form of the indicator, the Channel number of the GMB range on which the radio station is running is displayed. If you need to switch the channel, press the "1K / 2K" button on Pu-LP.
Remember! When receiving, call transfer, negotiating, it is necessary to monitor visually on the display board of the channel number on which the radio station works.
3.1.8. The radio station provides for the possibility of simultaneous negotiations in the two bands.
ATTENTION! one.When transmitting calls simultaneously in two ranges with both remotes PU-LP and PU-D, you must first send a call in one range from one remote control, then wait in the end of the end of this tonal call in the loudspeaker and make the following call from another remote already in another range.
2. If during negotiations with the Pu-LP or PU or PU-D correlators in one of the ranges (MV or HmB), a call was made in another range on the remote control, from which negotiations are underway to continue to continue the "#" button on this remote, refusing From the came to the call, or confirm the reception and subsequent work in another range by clicking on the same remote control button "". To negotiate. In this case, communication with the first subscriber will be interrupted.
If after 15 seconds after receiving the call, no manipulations on the remote control were not executed, the radio station will automatically go into the reception mode.
3. Upon completion of negotiations, press the "#" button and install the microthephon tube into the holder.
4. When working with one of the control panels, Pu-LP or PU-D is allowed to connect to the operation of the second remote control with the possibility of negotiating with the same subscriber. To do this, on the free remote, you must once press the call button in the same range with the same subscriber name that is connected, and negotiate.
5. At the end of the negotiations with one of the remote controls, click on it the "#" button and install the microthelphone tube to the holder, at the end of the negotiations from the second console, also press the "#" button and install the microthelphone tube into the holder.
3.2. Calling the train dispatcher and negotiating in the MV range
The call of the train dispatcher in the MV range is similar to the call to the GMB range, except that the calling button "DNC" must be pressed twice. After the first pressing of the button, the radio station goes into the reception mode, you must listen to the radio channel and press the second time call button when it is free.
3.3. Receiving a call from the train dispatcher and negotiating
3.3.1. When receiving a call on the left side of the Pu-LP scoreboard, the "Call" inscription is displayed, and the speech message is listed in the loudspeaker (telephone). Listen to the message, if necessary, remove the microthelphone tube and negotiate.
If after 15 seconds after receiving a call, the microthelphone tube was not removed, and the negotiations were not conducted, the radio station will go into the reception mode.
3.3.2. At the end of the negotiations, press the "#" button and install the microthephon tube into the holder.
3.4. Challenge at the station and negotiating
The radio station is included, microthelphone tubes are located in the holders of the Pu-LP and PU-D control panels in the "DR" position.
The call to execute is similar to clause 3.1, but instead of the "DNH" button, press the "chipboard" button.
3.5. Receiving a call from the station duty and negotiating
3.6. Calling the driver of the locomotive and negotiations (used when calling drivers of counter and follow the walking locomotives)
The radio station is included, microthelphone tubes are located in the holders of the Pu-LP and PU-D control panels in the "DR" position.
The call to execute is similar to clause 3.1, but instead of the "DNC" button, press the call button "Tchm".
3.7. Receiving a call from Locomotive Machine and negotiation
Similar to those shown in clause 3.3.
3.8. Call the head of the repair unit and negotiation
(used when calling the head of the repair unit operating on the distance)
Remember!The call is made only from the Pu-LP remote.
The radio station is included, microthelphone tubes are located in the holders of the Pu-LP and PU-D control panels in the "DR" position.
The call to perform is similar to paragraph 3.1, but instead of the "DNC" button, press the "Rem" button.
4. Work in the network of station radio communications (SRS)
The radio station is included, microthelphone tubes are located in the holders of the Pu-LP and PU-D control panels in the "DR" position.
4.1. On the Tablo Pu-LP, the "SRS" should be displayed. If "PrS" is highlighted, press the "F, VSP" button, switches the radio station to operation mode in the station radio system.
The radio station is implemented a call to receive a call in the GMB range. The work is carried out using keybuilding fields of the MV of the Pu-LP and PU-D control panels.
The driver must be informed about the frequency group number on which the radio network is running in each maneuver area and at each station.
4.2. Remove the microthelphone tube on PU-LP or PU-D, the radio station will automatically go into the reception mode on the first working channel of this station or the maneuver area. Listen to the channel. If negotiations are taught in the loudspeaker and the tube, the endings should be waited.
4.3. For challenge maneuver dispatcher Press the "7" button once or on the PU-D twice button "DNC" if the call frequency is 700 Hz. If the call frequency is 1400 Hz - on Pu-LP, to once press the "9" button or on the PDP button. In the microthelphone and the loudspeaker, a tone call signal to the radio channel should be brought.
4.4. At the end of the parcel call, press the microthephon tangent of that console, from which the challenge was sent, and voice the subscriber in accordance with the negotiation regulations. Let go of the tangent.
4.5. The response of the subscriber must be brought in the loudspeaker and the phone. If the subscriber did not answer - repeat the call.
4.6. Hearing the response of the Subscriber, negotiate.
4.7. At the end of the negotiations, press the "#" button and install the microthephon tube into the holder.
4.8. For challenge foreign trains Repeat clause 4.2., Then click on Pu-LP once the "8" button or on the PU-D double button "Tchm". In the microthelphone and the loudspeaker, a tone call signal to the radio channel should be brought. Next, repeat item p. 4.4 - 4.7.
4.9. If the radio station is implemented "Open Channel" (Automatic return to standby mode), then the radio station is constantly in the reception mode. To call the desired subscriber, remove the microphone tube on Pu-LP or PU-D and voice to call correspondent. Communication is similar to normal working in the telephone mode.
5. Communication between the driver and the driver's assistant, located in different locomotive cabins (the service relationship between the control panel of the radio station installed in different cabins of the locomotive)
The radio station is included, microthelphone tubes are in the holders of the control panels in the "OR" position.
5.1. Press the "SS" button on the Pu-LP bundled. At the same time, the incoable Pu-LD remote control automatically turns on, "Service Communication" appears on the panel of each of the Pu-LP panels.
5.2. Holding the "SS" button is pressed, negotiate using the tangents of the microthelphone tube. The button release automatically returns a radio station to the standby mode.
5.3. When receiving a call in one of the ranges in the "SS" mode on the left side of the indicator, the inscription "Recruitment" is displayed. To confirm the call to release the "SS" button and click the confirmation button ". At the same time, the MRS regime stops and negotiations are underway for the called range.
5.4. To refuse to work on the radio channel, not releasing the "SS" button, click the "#" button.
NOTE. According to clause 5.3, when conducting a conversation in the GMW with Pu-LP, this negotiations are not listened to the work of the radio station on another Pu-LP. When conducting a conversation in MV with Pu-LP, this negotiations are listened to the work on the operation of the radio station on each other.
6. Turning off the radio station
6.1. Upon completion, press the red button on the Pu-LP radio station ".
6.2. Transfer the locomotive control paler to the off position.
Thank you for purchasing a portable two-band radio station Baofeng UV-5R. The radio station Baofeng UV-5R is easy to use and provide you with a safe, operational and reliable link. Please read this instruction carefully before use. The information presented here will help you get the maximum performance from the radio.
1. Security Information
2. Features and functions
3. Unpacking and verification of completeness
4. Additional accessories (purchased separately)
5. Initial assembly and connection
5.1. Install antenna
5.2. Installing belt clip
5.3. Connecting an external headset
5.4. Battery installation
6. Battery charging
7. Battery information
7.1. First use
7.2. Battery Tips
7.3. Extend battery life
7.4. Battery storage
8. Composite parts and controls
8.1. General view of the radio station
8.2. Purpose of control keys
9. LCD screen
10. Working with a radio station
10.1. Turning on / off, Volume adjustment
10.2. Select frequency or memory cell
10.3. Reception / Transfer
10.4. Modes of operation of the radio station
11. Description of the built-in features
11.1. Squelch (SQLCH) (SQL menu)
11.2. Function "VOX"
11.3. REVERSE function
11.4. Alarm feature
11.5. Tone 1750 Hz to access repeater
12. Menu, description settings
12.1. Working with menu
12.2. Description of menu items
13. CTCSS Tone Table
14. DCS Tone Table
15. Specifications
15.1. General
15.2. Transmitter
15.3. Receiver
16. Possible malfunctions and ways to eliminate them
1. Security Information
The following precautions must be respected when working, maintaining and repairing this device.
Repair and technical inspection of the Baofeng UV-5R radio should be made by qualified personnel in a specialized service.
Do not make changes to the design of the radio station!
Use charger and rechargeable batteries manufactured or certified as a substitute by Baofeng
Turn off the radio before entering the zone of finding explosive and flammable substances.
Do not use the raised antenna. When touched a damaged antenna to parts of the body, the likelihood of burning is large.
Do not charge the battery in the zone of explosive and flammable substances.
To avoid creating electromagnetic interference or compatibility problems, turn off the radio station in places where it is required, especially where there are information plates with a reminder of this.
Turn off the radio station before boarding the plane. Any use of the radio station must comply with the rules of the airline or crew instructions.
Turn off the radio station before entering the explosive area zone.
For vehicles with airbags: Do not place Baofeng UV-5R wagon in the airbag area of \u200b\u200bairbags or directly on their covers.
Do not subjected to a radio station direct sunlight, do not leave the heat source near the heat source.
When conducting transmission using a radio station, keep it vertically at a distance of 3-4 cm on behalf. Keep an antenna at least 4 cm from your body.
2. Features and functions
Dual-band portable receiver transmitter (transceiver) with LCD screen
Signal support
Li-Ion High Capacity Battery
Receiver (65 MHz - 108 MHz)
Support 105 subtons "" and 50 subtones "" with the ability to set up the user
Function
Alarm feature (anxiety)
128 Memory cells
Broadband / narrowband modulation
Transmitter power adjustment
Programmable color backlight color and its inclusion
Function "Beep" on the keyboard
Simultaneous reception of two different frequencies
Selectable step change step: 2.5 / 5 / 6.25/10 / 12.5 / 25/50 kHz
Offset function (frequency shift to work with repeaters)
Battery Save Conservation Function (Save)
Transmission time limit adjustable (TOT function)
Three modes
BCLO function (BUSY CHANNEL LOCKOUT) (prohibition of transfers, if the transmission is already in this frequency)
Built-in CTCSS / DCS Subtons Scanning Function
Built-in LED Flashlight
Programming a radio through a special cable
Customized threshold of the noise-voltage (from 0 to 9)
Simultaneous reception on different bands
Tone ending transmission
Blocking keyboard
3. Unpacking and verification of completeness
Gently unpack the transceiver. Be sure to check the presence of all necessary components, if there are inconsistencies, please inform the seller immediately.
From left to right depicted:
1. Radio station
2. Charger adapter type "Glass"
3. Battery.
4. Network Adapter for Charging Stacker
5. Antenna
6. Clip for fastening belt
7. Lace on the wrist
8. Instructions in Russian

4. Additional components (purchased separately)
1. Car Charger
2. Tangant
3. Cable for programming
4. Headset: Headphone with microphone and transfer button

5. Initial assembly and connection
5.1. Install antenna
 To install the antenna gently screw it on the thread, rotating clockwise until it stops.
Important! Keep the antenna at the base, and not for the tip.
Important! If you use an external antenna, make sure that its parameter is approximately equal to or less than 1.5: 1, otherwise the transmitter output cascade can be burned in the transceiver.
Important! During the transmission, do not hold the antenna with your hand, because This reduces the quality and signal level.
Important! Never (!) Do not turn on the transmission without an antenna, otherwise the transmitter's output cascade can be burned in the transceiver.
5.2. Installing belt clip
 If necessary, set the clips to wear a radio station on the belt to the back of the housing using the two screws included in the kit, as shown in the image.
Important! Do not use glue to fix mounting screws. Solvents contained in glue can damage the battery case.
5.3. Connecting an external headset
Connect the outer headset into the "SP & MIC" connector of the device. When connected, insert the Baofeng UV-5R Baofeng UV-5R warfare plug. Do not turn on the gear at the time of attachment.
5.4. Installation and Removal Battery
 When installing the battery, make sure that it is parallel to the aluminum chassis case. The lower part of the battery must be 1-2 cm below the lower edge of the radio station.
Align the grooves of batteries with guides on the case and slide up the battery up to click.
Before removing the battery, be sure to turn off the device.
Click on the battery latch (Push), slide down by 1-2 cm, then disconnect it with the case.
6. Baofeng UV-5R Battery Charging
Charging Status Display color Waiting (without load) red blinking, green burning red red is constantly fully charged green burning constantly error red flashes, green burnsPlease observe the following charging order:
1. Connect the power adapter into the AC outlet.
2. Connect the network adapter to the charger.
3. Place the device with a battery or battery separately into the charger.
4. Ensure that the battery contacts are securely contact with metal charging glass contacts. A red LED should turn around.
5. After about 4.5 hours, the green LED will light up. This means that the battery is fully charged. Remove the battery from the charging glass.
7. Rechargeable Battery Information
7.1. First use
New batteries come from the manufacturer fully discharged. Before first use the battery must be charged within 5 hours. The maximum capacity of the battery is achieved after three "Full charge / complete discharge" cycles. If you notice that the battery power fell, recharge it.
A warning! To reduce the risk of injury, charge only the batteries specified by the manufacturer. Other batteries can explode and cause injury or damage to property. Do not throw the battery into the fire. Dispose of the battery according to the laws and standards in your country. Do not throw away the battery with everyday garbage. Never try to disassemble the battery.
1. Charge and store the battery at temperatures from 5 s to 40 from degrees. If the temperature mode is disrupted, the battery may flow or damage.
2. During charging, turn off the radio station to provide a full battery charge.
3. Do not disconnect the power adapter and do not remove the battery from the charging glass during the charging process.
4. Never charge the battery if there are traces of moisture. Wipe it with a dry soft cloth before charging.
5. Batteries have a limited life. When the service time of the radio station was significantly reduced compared to normal time, the battery must be replaced with a new one.
7.3. Extension of battery life
1. The performance of the battery is significantly reduced at temperatures below 0s (zero) degrees. Cold weather may require a spare battery. If the battery does not work in cold conditions, it can still work at room temperature, so do not hurry to charge it.
2. Contaminated and oxidized battery contacts may result in work or charging. Before connecting the battery, wipe the contacts with a dry soft cloth.
7.4. Battery storage
Fully charge the battery before longer storage to avoid damage to the battery due to overlap.
During storage, recharge the battery every 6 months to avoid overlap.
Keep your battery in a dry cool place at room temperature to reduce self-discharge.
8. Composite parts and controls Baofeng UV-5R
8.1. General view of the radio station


1. Antenna
2. Flashlight
3. Controller knob (on / off, loud)
4. LCD screen
5. Call button (Radio, Alarm)
6. MONI button (flashlight, ether monitor (temporary shutdown))
7. PTT button (transmission)
8. VFO / MR button (Channels / Frequencies)
9. LED indicator
10. Lace loop on wrist
11. Foreign Headset Connector
12. A / B (Selecting the Upper / Lower Receiver)
13. Band
14. Keyboard
15. Speaker / microphone
16. Battery.
17. Battery contacts
18. Battery retainer
8.2. Purpose of control keys
(Push-to-Talk)
Press and hold the transfer key, release for reception.
Press the key to enable FM radio mode. Press again to disable FM radio.
Press and hold the key to turn on the Alarm function. Press and hold the Alarm function again.
Press the key to turn on the flashlight. Click again - the flashlight will begin to flash evenly (not in all versions of the device). Click again - the flashlight will turn off.
Press and hold the key to disable the automatic noise cancel for the frequency wire.
Pressing the key Switches the mode of operation of the radio station: Channel / frequency.
Press the key to select an active receiver (upper [A] or Nizhny [b] on the screen).
Press the key to change the frequency range. In the Range mode switches between and.
Pressing this key at the time of the transfer displays a call of 1750 Hz to the air (to work with radio amateur repeater).
Single pressing includes / off the Reverse function. Holding for 2 seconds starts scanning. Pressing the key in the FM radio mode launches FM Station Search. Pressing the key in the CTCSS / DCS subtons selection menu starts scanning subtons.
Pressing the key switches the transmitter power: large / small. Holding for 2 seconds includes / disables keyboard lock.
The key is used to enter the menu, to enter the value of the values \u200b\u200bof a specific menu parameter, as well as confirm the change of the parameter.
[▲] and [▼]
Frequency mode:
A single pressing changes the frequency of the active receiver towards zooming or decreasing with a specified step (see Setting the STEP menu).
Holding the key changes the frequency of the active channel with a specified step constantly until the key is released.
Channel mode:
Enabling the next / previous memory cell with a saved channel.
Menu Mode:
Go to the next / previous configuration.
Change the current setting to the following / previous value.
[Digital Keyboard]
Frequency mode:
Used to manually enter the desired frequency of the selected channel.
Channel mode:
Used to enter a memory cell number with a saved channel.
Menu Mode:
Used to enter the sequence number option. You can also set non-standard frequencies in the change mode of the corresponding settings.
9. LCD screen
The image shows all segments of the LCD screen. Each segment lights up when the specific function is turned on.

188 - Current channel, or frequency, or name
75/25 - Frequency joke, if you put a step 6.25 kHz
Art - Activated "CTCSS" mode
DCS. - Activated "DCS" mode
+/- - direction of the frequency shift when working through the repeater
S. - activated two channel monitoring feature
R. - Reverse frequency
N. - Selected "narrow" strip
Battery level
The keyboard lock is enabled
L. - work at low power
[▲] [▼] - indicator of the selected receiver (upper [A] / Nizhny [b])
145.125 - The main scoreboard, the frequency is displayed, the menu item name, the menu setting value
Signal level
5T2T
Dtmf. - The transfer of service signals on the air is enabled
On the screen there are two main scoreboards. Each scoreboard corresponds to its receiver: Upper [A] or Lower [b]. This allows you to set a separate frequency in each receiver and quickly switch between them using the button. Also, for each receiver, the frequency switching step, the transmitter power, transmission frequency offset from the reception frequency, can be set.
10. Working with a radio station
10.1. Turning on / off, Volume adjustment
Make sure the antenna and the battery are installed correctly and the battery is charged. Turn the knob of the regulator (3) clockwise to turn on the radio station. Rotate the handle clockwise to increase the volume, and counterclockwise to reduce the volume.
10.2. Select frequency or memory cell
Keys [▲] and [▼] Used to serial frequency change with a specified step or to select the next / previous memory cell. Also, in the frequency mode, the frequency can be entered manually using a numeric keypad.
If the entered value is incorrect, the channel will remain working at the same frequency.
If the entered frequency does not coincide with the frequency, which must be at a given step (Menu, Option No. 1 STEP), the frequency will be installed in the channel, with a specified step immediate to the manually entered. For example. Set 6.25 kHz is set. You enter the frequency of 446.005 MHz. The channel will automatically establish the frequency of 446.00625 MHz, because At this step (6.25 kHz), 446.000 MHz and 446.00625 MHz are faithful.
If the input frequency is correct and is in another range relative to the current, the range will automatically switch.
10.3. Reception / Transfer
Turn on the radio station, adjust the volume (see paragraph 11.1). Activate the upper or lower receiver (button), select the desired frequency value on which the communication session will occur (see Section 11.2).
To transfer the voice message to the air, press the button and hold it during the message transfer. When the message is completed, release the button. Listen to the answer.
When transmitted, the indicator (9) is glowing in red, when receiving - green, in the absence of a signal, the indicator does not shine.
10.4. Modes of operation of the radio station
The Baofeng UV-5R radio station provides for two main operating modes: 1) channel, 2) frequency. Switching modes is carried out with a button
.
In channel mode for transmitting / receiving, frequencies are used previously stored in the device memory cells. The main digital field displays the frequency / number / channel name (depending on the menu setting No. 21.22), and the number of the selected memory cell is displayed on the right of the smaller numbers. Together with the frequency of the channel, its settings are saved as: CTCSS or DCS subtones for transmission and reception, transmitter power, modulation, frequency shift (for working with repeater). In total, the device has 127 memory cells. Keys [▲] and [▼] In this mode, include the following / previous memory cell.
In the frequency mode, the transmission / reception frequency is set manually either by the digital keyboard keys or repeatedly pressing the keys [▲] and [▼] until the desired value is reached. In this case, the frequency changes to the value specified in the P. number 1 menu (STEP). On the screen in the main field displays the current frequency value.
11. Description of the built-in features
11.1. Squelch (SQLCH) (SQL menu)
Disables the speaker in the absence of a signal at frequency. With a properly installed threshold of the noise canceller, you will hear only useful signals, and this will significantly reduce power consumption. Recommended level 5.
11.2. VOX function
When the function is turned on, there is no need to put pressure on the PTT button to transmit. The transmission will be enabled automatically as soon as the microphone will "hear" voice. When the voice disappears, the transmission will automatically stop and the device will switch to the reception. Using the VOX menu, you can set the voice volume threshold level at which the transmission will be activated.
11.3. REVERSE function
When using frequency data (Menu, Options №№25,26) It is possible to quickly change the frequency of reception and transmission frequency by turning on the function Reverse. Click on the key [* Scan]The screen will display an indication R..
11.4. Alarm feature
Allows you to ester special disaster tones.
11.5. Tone 1750 Hz to access repeater
Amateur repeaters, which are activated after receiving the signal-tone of 1750 Hz are used to communicate over long distances. Press and hold the button then click To transfer 1750 Hz to the air.
12. Menu, description settings
12.1. Working with menu
The radio station menu contains 40 different items responsible for setting up its operation modes.
1. To enable the settings menu, press the key.
2. Go to the desired menu item using keys [▲] and [▼]
3. To change the selected option, press the key again
4. Select the desired value of the option using the keys. [▲] and [▼]
5. Save the installation by pressing the key.

Please note: in some regions it is possible to limit on the use of some frequencies! Carefully learn local legislation. If necessary, register an acceptance transmitter (radio station) in the prescribed manner!
The manufacturer and the seller is not responsible for the use of the radio station by the buyer not by appointment or with a violation of the established norms!
Proper radiation setting makes it possible to optimally maintain contact at a given distance, regardless of weather conditions, mobile coating or terrain. Such system functions due to radio waves on different ranges. A significant role in the operation of the instrument is played by its competent setting. To do this, it is necessary to study the supplied instructions and take into account the features of the device (some of them have a narrow specialization: rail, hunting, automotive options).
Setting up the radio of any type involves the feed adjustment and reception at a certain frequency. Otherwise, amateur or professional modifications will work on incomplete power or with interference. The most modern modifications are configured automatically, do not require special adjustment. However, they cost more. Other models are divided into portable or stationary devices. The device and adjustment of both options is approximately identical, though, there are features.
Configuring Baofeng
Below are recommendations for configuring Baofeng's radio. At the UV 5R model, the default operating frequency is 2.5 kHz. Standard adjustments are comparable with similar recommendations for most portable radio stations. Programming the simplex channels of the device consists of the following steps:
- First, transition to VFO A. mode.
- Then, using the Band key, select VHF.
- The main menu activates the '27' icon, after which the MENU option is pressed.
- Next, the information is saved in a free memory cell, which can be found using the UP / DOWN keys.
- The elected range is fixed by re-activating the menu button.
- Exit via the Exit key.
To adjust the UV 5R radio, the following manipulations are made in terms of channels with repeater shift:
- Go to VFO A. mode.
- Select the UHF or VHF option using the Band key.
- Save a suitable receiving frequency.
- In the "Menu" section find the '27' icon, and then come in the menu.
- Selects a free memory cell.
- The final choice is confirmed by another press of the "Menu" key.
- The exit button is used to exit.
- Once again, the "Menu" is activated, where the '27' icon is selected, after which you double-click "Menu".

Features
Adjustment of amateur type wagon is usually carried out in the range of 433-434 MHz. These devices do not require registration in the center of radio frequencies, therefore, their adjustment is not particular problems. For users who want to strengthen the power of the apparatus, models equipped with additional antenna are provided on the market. In order for the radio to work together correctly, it is necessary to set the same values \u200b\u200bof numbers and a special code on each instance.
After the specified settings, you will get the devices that will work to work. To start chat, click the Turning button. After deactivating the button, the device switches to the signal. IMPORTANT: Portable-type wound configuration provides for the choice of individual call sign. It can be a letter or digital cipher unique for the selected communication type.
"Kenwood"
Using the example of this manufacturer, consider the adjustment and installation of the stationary type wagon. Initially, a number of requirements that contribute to an increase in the effectiveness of the subsequent operation of the apparatus are minimized, the possibility of failure of the transceiver. The station itself is a block installed in a vehicle cabin equipped with a remote antenna. In many respects, setting the "Kenwood" of the stationary type depends on its proper installation.

Basic installation rules:
- Do not install an element on carrier parts, it is best to do this on the housing. Such a solution reduces the loss when transmitting and receiving a signal.
- It is advisable to mount the antenna at the highest point of the body, which increases the quality of the reception.
- The working part of the receiving device should be located at least 0.5 meters from other parallel metal surfaces. This will give the opportunity to level the absorption of the incoming pulse.
- It is necessary to be recorded in a stable position that ensures the most sustainable reception and data transmission.
"Megazet"
This is another of the most famous manufacturers of stationary rates. All nuances settings can be found in the manual attached. Below are the main recommendations:
- First, the "240 channels" mode is activated. To do this, use the AM / FM-ON key combination. The Russian signal transmission grid is selected by switching on DW / M2-ON. It is worth noting that most European channels ends with an index 5, while domestic waves at the end have a digit of 0.
- The radio is included by the VOL / OFF toggle, after which the desired volume transmission volume is set.
- Using the SQ knob optimize noise suppression level.
- The required channel is chosen using the UP / DN keys.
- Adjusting the gear mode is performed by means of the PTT toggle. The optimal distance to the microphone during the setting is 5 cm.
- Acceptance of information is carried out by releasing the tangents, after which the received message is listed with the possibility of adjusting the volume and noise suppression level.

Motorola TKR
Below is a brief instruction on setting up a width of another well-known manufacturer:
- To turn on the device, press "Menu" button is pressed and held. Volume adjustment is made by adjusting the arrow keys.
- When you press the buttons, the radio station gives a characteristic sound. To deactivate this sound, it is necessary to press the "Menu" key 5 times, after which the tone indicator will flash. The up arrow activation turns on the sound, the lower analogue contributes to its disconnection.
- Negotiations with another radio become possible after pressing the RTT key. It is kept pressed, the conversation lead 50-80 millimeters at a distance. Release this button implies the inclusion of the reception mode of the response message.
- You can study additional options for the unit in the menu item in which all possible options for the functioning of the device are presented.
UV 5R
The station under consideration is a compact walkie-talkie, which has many features for negotiating. More information about setting up channels, monitoring, voice control and other options is provided in the user manual.

Configuration of the radio antenna
To configure antenna, it is advisable to use a professional analyzer. With its absence, the FCM meter is most often used. All manipulations are performed on a clean and smooth surface, away from potential interference in the form of concrete or metal structures. In addition, there should be no similar devices nearby, the range of operation is 27 MHz.
After connecting the FCM meter, it is measured on grids and channels. This makes it possible to display an extensive picture of the reception. The following is calibrated by the FCM meter by incorporating a toggle to the FWD position. On the device itself, the range is set at number 20 in AM mode. Next is activated and held the conversation button. Synchronously rotates the CAL controller clockwise until the radio pointer becomes an extreme right position (SET).
Further adjustment of the channels of the radio is carried out by switching the FCC-meter to the REF mode. In this case, the button on the tangent should be kept pressed. Then the information is removed that the device produces is determined by the minimum of the CCC meter, the antenna is adjusted for the required range. In case of overestimation or lowering the required limit, the antenna is kept shorter or longer. The control removal of measurements is repeated until the CCC coefficient becomes less than 1.5.

It is worth noting that the lower the figure of the FCS, the better the transmitting and receiving power of the pulse will be. Ideally, the coefficient should be close to one. However, it is almost impossible to achieve such an indicator due to the presence of a variety of interference. If the value exceeds 3, the failure of the transmitter cascade and the entire device is likely.
Channels for truckers
Modern shipping on long distances is difficult to submit without racies. They help adjust the route, report road and transport problems. To work reliably, it is necessary to correctly implement it. As a rule, it is performed in the following sequence:
- An antenna is installed on the central part of the roof, the protective cap is removed, the adjustment screw is fixed to the limit.
- The forage and the antenna connects the FCC-meter.
- The device is turned on, then the long-range mode is set (usually 15 channels).
- Press and hold the tangent, while simultaneously arguing the PC handle to the SET position.
- Then the handle is transferred to the REF position, the current value of the unit will appear on the top of the scale. The coefficient with the help of the adjusting screw is adjusted to the indicator not higher than 1.5.
- The control screw is fixed by means of a lock nut, the protective cap is put on, additionally check the FAC settings information.
When configuring the radio of this type, consider that this device refers to narrowband devices, and therefore the settings are better to produce on the main wave.

Finally
The above describes the configuration of the Baofeng UV 5R radio and its analogues. This process is one of the most important factors affecting the efficiency of the use of the device and its performance. It is worth noting that when choosing a station, take into account its main purpose. In the current market, without any problems, you can choose amateur models, as well as analogues for hunters, tourists and people whose specialty requires a constant connection that does not depend on the location and cellular coating.
 How to pay a domain name
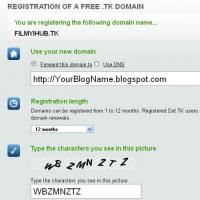 Domain zone of tokelau islands
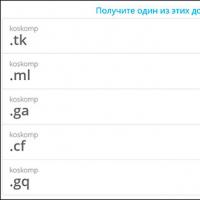 What is domain what problems may be
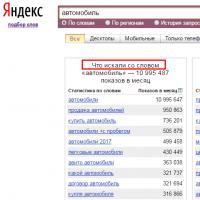 Yandex Wordstat: detailed instructions for using the service and grouping operators and a complicated request
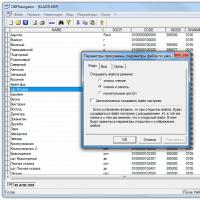 Editing DBF files
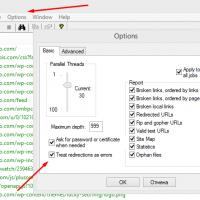 Xenu Link Sleuth - What is this program how to use the Xenu program
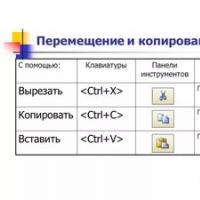 Methods Copy and insert text from keyboard without using mouse