How to create a Wi-Fi access point in Windows (mobile hot spot)
Windows allows you to turn your computer to access point, i.e. Act a Wi-Fi router, which provides Internet connection any Wi-Fi support devices.
This can be useful, for example, when you have only one wired connection, and you need to provide online connections all your gadgets.
Another application option is to enhance the Wi-Fi signal: usually there are more powerful Wi-Fi receivers that "see" and can work with wireless networks remote to considerable distances that phones simply do not see. You can try to connect the computer to a distant wireless network, and for your gadgets, create a new Wi-Fi so that they connect to it.
Regardless of your goals, there is a minimum three ways to create your Wi-Fi network in Windows:
- in the Windows settings menu (only for the latest versions of Windows 10)
- in the Windows command prompt (suitable for Windows 7/8/10)
- using third-party programs (suitable for Windows 7/8/10)
Regardless of the selected method, all of them have one limit - you cannot create an open access point, i.e. Wi-Fi network to which you can connect without a password. Nevertheless, options still have - details at the very end.
Setting your Wi-Fi network in Windows
Starting with Windows 10 Anniversary Update Build 1607 Add settings Mobile hot spot"He is responsible for creating a Wi-Fi's own network. To get to it, click on the button. WIN.and then on Parameters:

Now the tab Mobile hot spot:
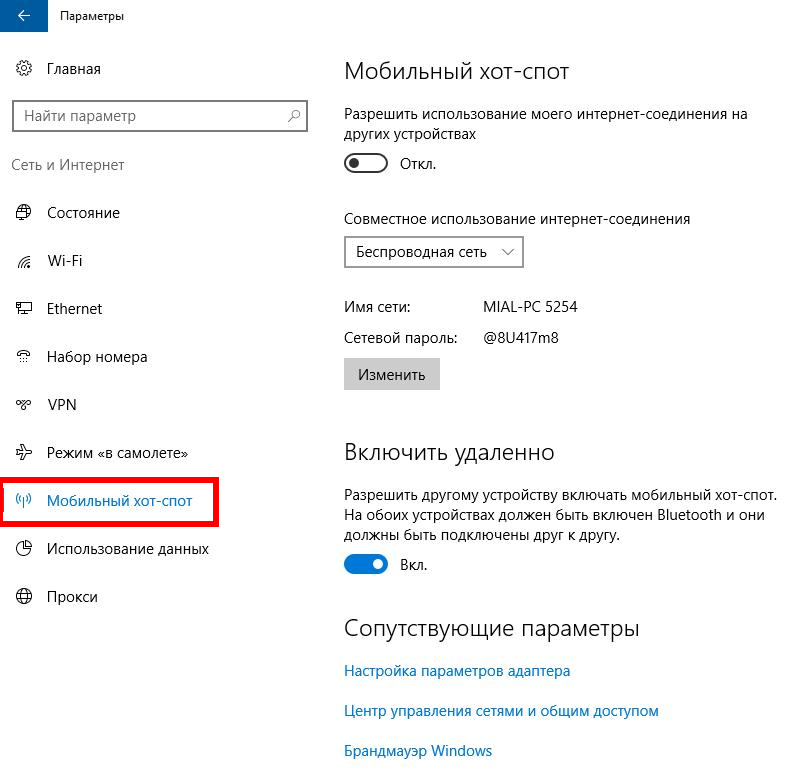
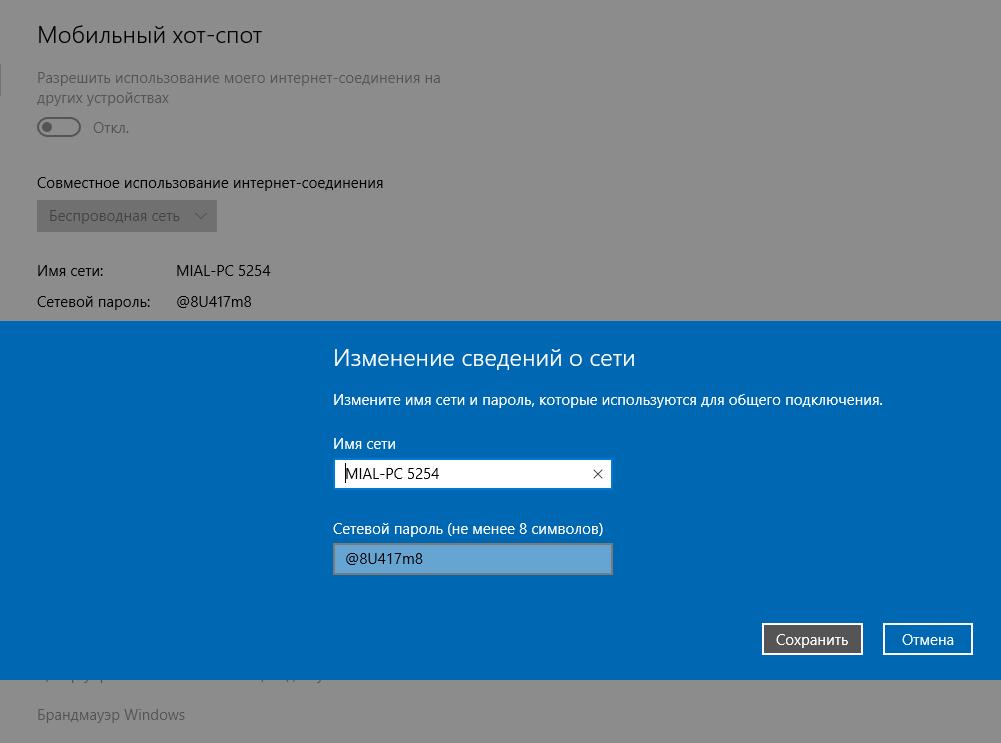
If you wish, you can change the name of the network and its password:
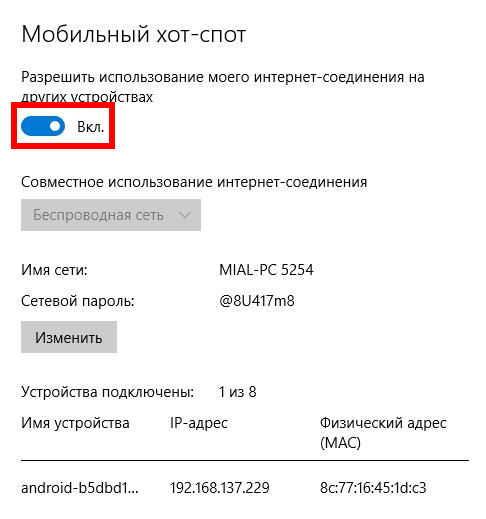
When everything is ready to press the corresponding button:
Enabling Wi-Fi network in Windows from the command line
The previous way is very simple, but as too simple things, has some limitations: but does not allow you to select a Wi-Fi adapter to create your wireless network (if you have several of them), it does not allow you to check whether your Wi-Fi work card supports as an access point. The next way is devoid of these shortcomings.
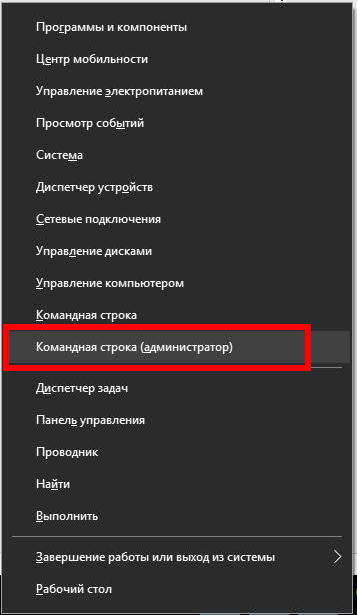
To enter a subsequent commands, open the Windows command prompt, for this click Win + X., and in the menu that appears, select " Command Line (Administrator):
Now copy the following line there and press ENTER:
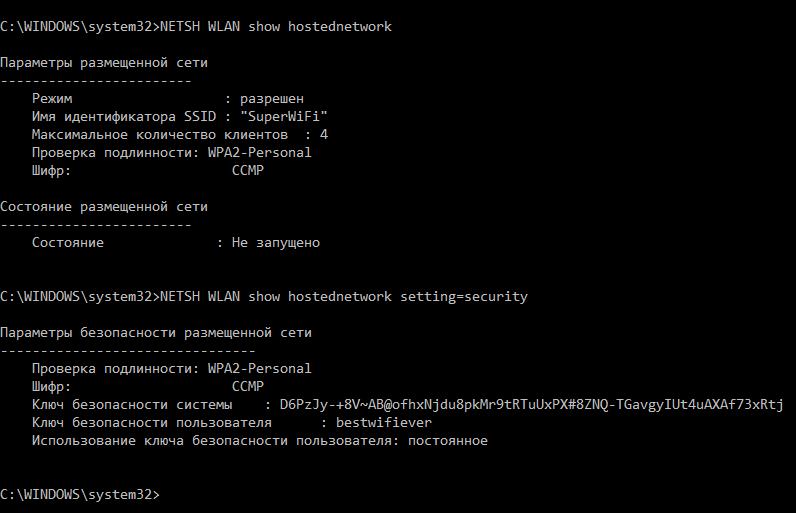
NETSH WLAN SHOW DRIVERS
Look inscription Support for the posted network:
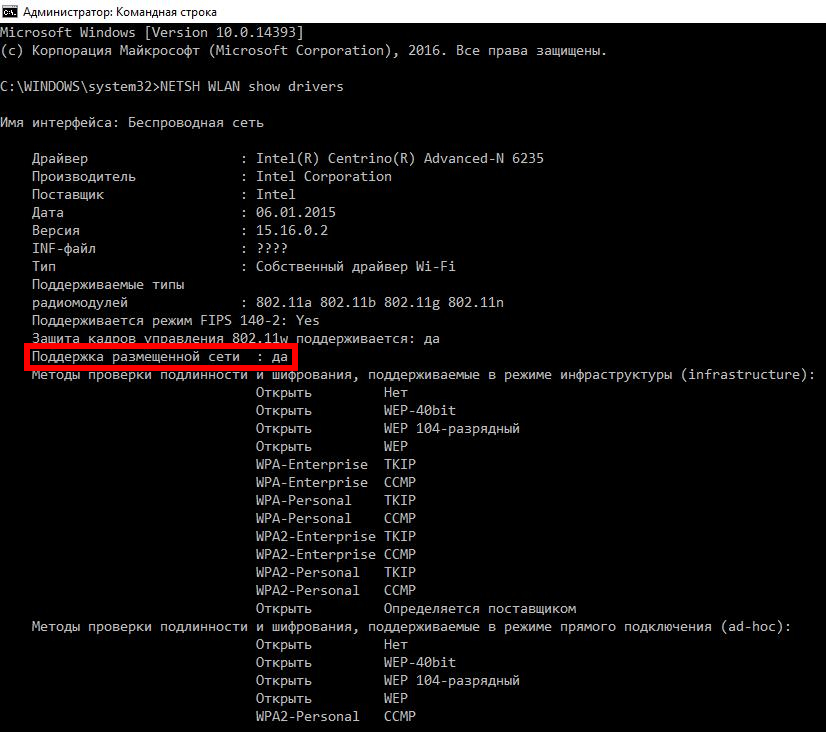
I have two Wi-Fi adapters, and they both support this feature:
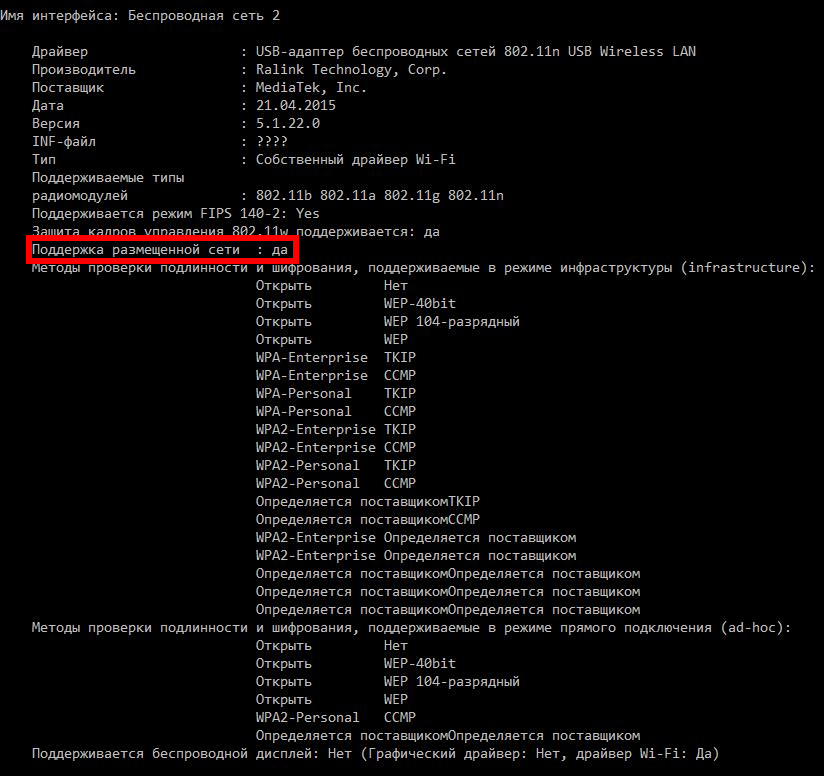
Those. It should be written " Support for the posted network: yes».
The command to start your own access point is as follows:
Netsh WLAN Set HostedNetwork Mode \u003d ALLOW SSID \u003d Your_ssid Key \u003d Your_Pall
In Ne. Your_ssid.replace on your network name, and Your passwordreplace the password that users must enter when connecting to a wireless network.
For example, I want to create a network named SuperwiFi.with password access bestwiFiever., then the team will look like this:
Now to activate the posted network, execute the command:
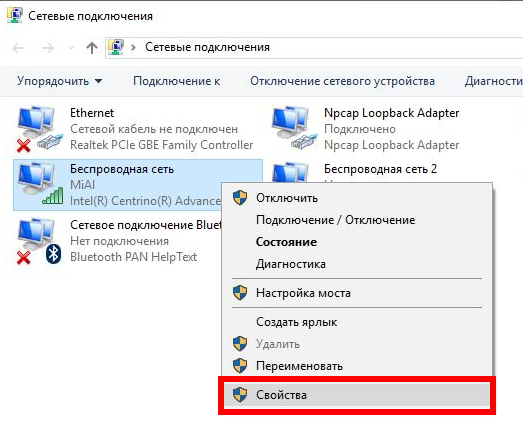
Now select an adapter that is used for the Internet connection, it may be Ethernetor Wireless network.
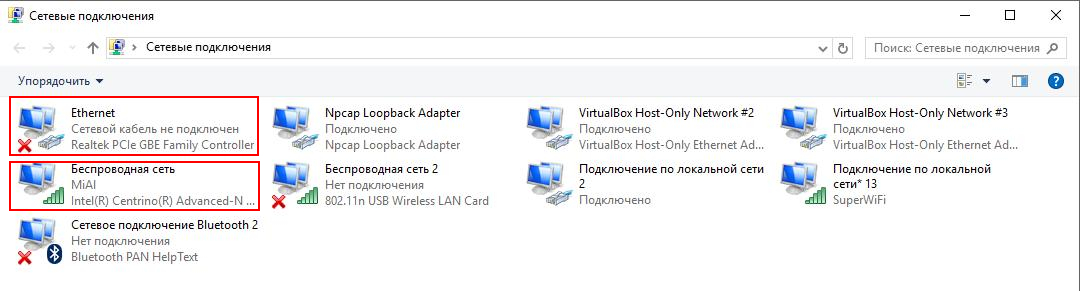
Right-click on the appropriate adapter and select Properties:
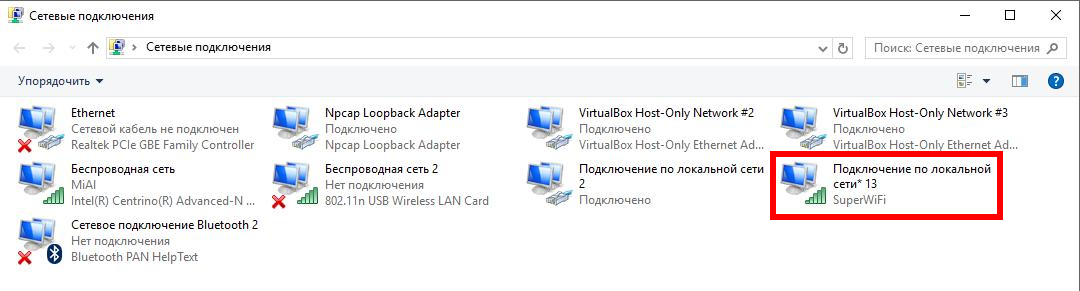
By the way, pay attention to the new label connection over the local network named our Wi-Fi network:
Now go to the tab Accessand check the box on Allow other user users use the Internet connection of this computer.. Then, in the drop-down list, select the appropriate Connection:
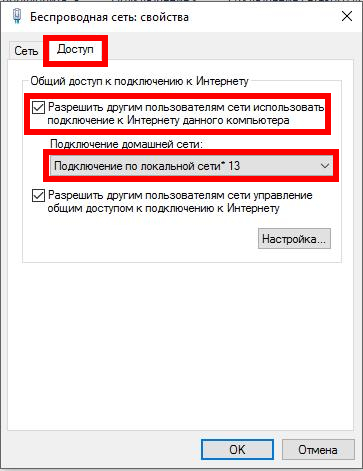
Click OKto finish. Now your Wi-Fi network has a connection with the Internet.
To disable your Wi-Fi Access Point, execute the command:
Netsh WLAN Stop HostedNetwork
You can include it at any time:
Netsh Wlan Start HostedNetwork
If you want to change the name, use the following command (do not forget Your_SSIDchange to the real name):
Netsh WLAN Set HostedNetwork SSID \u003d Your_New_ssid
To change the password (do not forget Your new passwordchange on the real password):
Netsh WLAN Set HostedNetwork Key \u003d Your_New_Pall
To see the current TD settings, follow:
Netsh Wlan Show HostedNetwork
The previous command will not show the password to see the TD password.
Netsh Wlan Show HostedNetwork Setting \u003d Security
Select the adapter to create a wireless network in Windows
Windows has no option to select a wireless adapter that will be used when creating a Wi-Fi network. However, this restriction can be circumvented. The algorithm is the following:
1) We turn off the first adapter
2) raises the Wi-Fi network (it will be launched on the second, because first at the moment is not available)
3) turn on the first adapter
To turn it, we need to know the name of the interface, you can see it with a team:
NETSH WLAN SHOW DRIVERS
Interface Name: Wireless Network
Means that the interface is " Wireless network».
Use the following command (" Wireless network»Replace the name of your interface) to disable the adapter:
Netsh Interface Set Interface Name \u003d "Wireless Network" Admin \u003d Disabled
Install the wireless network settings (if you have not done before)
Netsh WLAN Set HostedNetwork Mode \u003d ALLOW SSID \u003d Name\u003e Sset Key \u003d Password
In the previous team, replace Name networkand Passwordon the corresponding values, for example:
Netsh WLAN Set HostedNetwork Mode \u003d ALLOW SSID \u003d SUPERWIFI KEY \u003d BESTWIFIEVER
Run the network:
Netsh Wlan Start HostedNetwork
Now you can turn on the first adapter again (replace the "wireless network" to your adapter name):
Netsh Interface Set Interface Name \u003d "Wireless Network" Admin \u003d Enabled
Program for creating Wi-Fi in Windows
There are dozens of programs under Windows to create their Wi-Fi network. And they all work according to one principle - are a graphical interface for the above commands. Those. They do not add any functionality and have the same limitations.
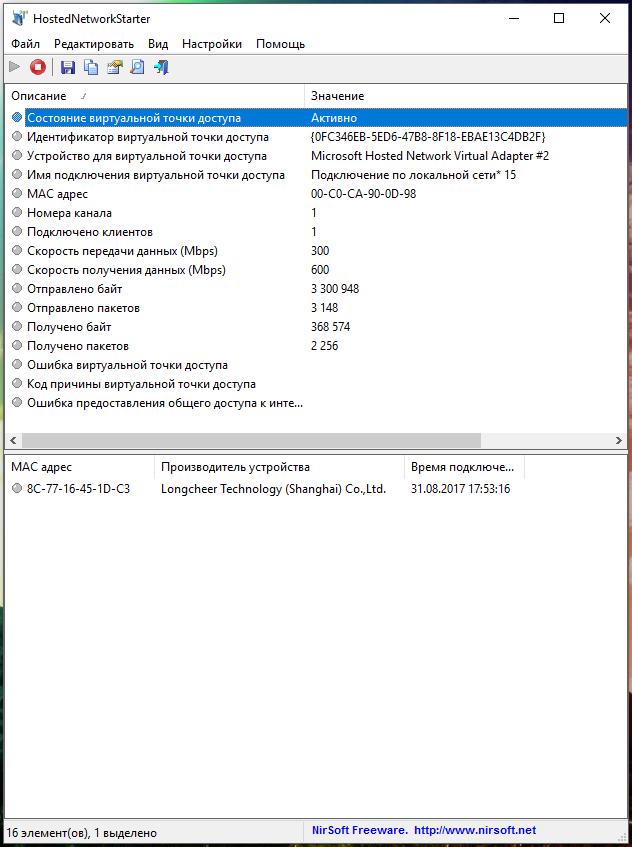
After starting, the program will prompt you to enter the name Wi-Fi network and its password, as well as select an adapter that will share the Internet connection:
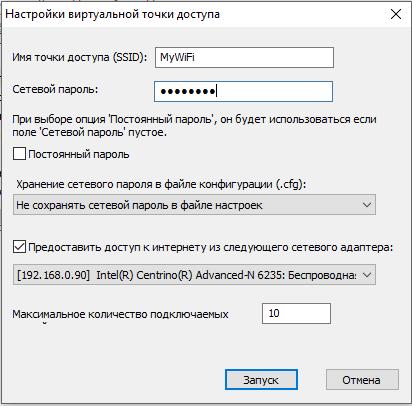
Additional setting is not required:
Creating a Wi-Fi network in Windows from the Linux virtual machine
This is an exotic way that requires external (USB) Wi-Fi adapter and knowledge of the basics of working with Linux. Its essence is that the VirtualBox creates a virtual machine into which Linux is installed. The virtual machine connects an external Wi-Fi card. Then with, for example, the Create_AP program creates an access point.
Despite the seemingly confusion, the way is not so complicated. It is possible to create open Wi-Fi networks, as well as freely choose which adapter you want to use.
Conclusion
In order to use the network created in Windows Wi-Fi, it is necessary that the computer is always turned on; It should not be in sleep or hibernation mode.
It is possible to reduce the speed of the connection compared to the use of the router as an access point.
However, sometimes Windows configured to create Wi-Fi can help in unusual or problematic situations when, without having a router, one wired connection is needed to share between several devices.
 How to make an emergency restoration of the firmware of the ASUS router
 How to set up a D-Link DIR 615 router: Step by step instructions with photos
 How to enable bluetooth (Bluetooth) on a laptop in Windows 7
 How to set up a Wi-Fi router D-Link DIR-615 yourself
 On Android does not turn on Wi-Fi: possible failures and methods for eliminating
 How to transfer the Internet from the phone to the computer in modern conditions
 Distributed the Internet from a laptop, Wi-Fi network is there, and the Internet does not work?