How to set up a d-link dir 300 router
In today's article, we will talk about how to install, connect and configure the D-Link DIR 300 router. This manual is not tied to a specific Internet provider, it contains general information about the settings and capabilities of the WiFi router. Therefore, the instruction considered here is suitable for many DIR 300 owners.
The D-LINK DIR 300 router allows you to quickly organize a wireless network in the office or at home. You can connect the Internet by the Ethernet line and distribute it to Wi-Fi. By the way, if you do not have a router, you can.
D-LINK DIR 300 Router Review
The D-Link DIR 300 router is equipped with a 4-port switch for connecting computers, laptops and other devices via Ethernet adapters. This router is able to create a full-fledged wireless access point - Wi-Fi network of 802.11b / g.
WiFi router has many features. It supports security standards: WPA / WPA2, WEP, IEEE 802.1x, filtering on a MAC address and several modes of operation: client, bridge, access point.
The D-Link DIR 300 router is equipped with a firewall, and its advanced security features will limit access to undesirable sites.
Consider the appearance of the device: indicators, buttons and connectors.
Front panel indicators:

- Power: not lit - off, green is on - enabled, it burns yellow - loading (after turning on the modem) or failure (after loading).
- Internet: Constantly burns green - the connection is set, blinking green - data is transmitted, it burns yellow - the connection is not installed.
- Wi-Fi: Gorite green - Wireless Network is on, blinking green - data is transmitted.
- Local Network: Green Lights - The device is connected to the corresponding port, the green flashes - there is traffic.
Rear panel of the D-Link DIR 300 router:
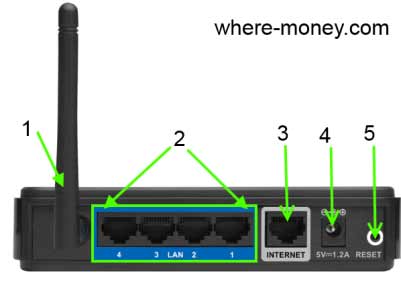
- Wireless network antenna.
- LAN 1-4 - four Ethernet ports for wired connections to a local network.
- Internet is an Internet connection port on an Ethernet line or DSL modem.
- Power connector.
- RESET - button reset settings to factory settings. To reset the settings - press and hold RESET for 10 seconds.
On the side panel of the D-Link Dir 300, the quick add button to the WiFi network is located. The WPS button is the LED indicator, meaning:
- Flashing blue - attempt to install the connection.
- Blue is burning - the connection is established.
- Yellow is burning - error when connecting to a wireless network.
The device management occurs through a web interface - we will talk about it in the section, but first consider the installation and connection of the modem.
Installing and Connecting D-Link DIR 300
Select a convenient location of the router, but do not place it in the utility rooms: in the attic, storage room, etc. The wall barrier can reduce the wireless network area. In general, see by circumstances if the Wi-Fi signal is weak, move the modem to a more suitable place.
Connecting a router to a computer is an easy task that we have considered in previous articles, however, we will touch on this question again.
The following figure shows what cable where to connect. In one of the four LAN ports (Better in the first), stack an Ethernet cable running from a computer network card. In another connector, signed by the Internet, plug the provider cable.

Turn on the power and wait for the router loading.
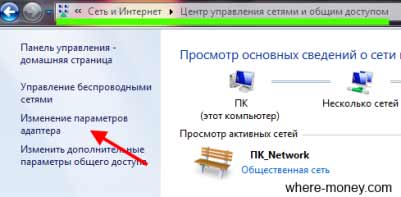
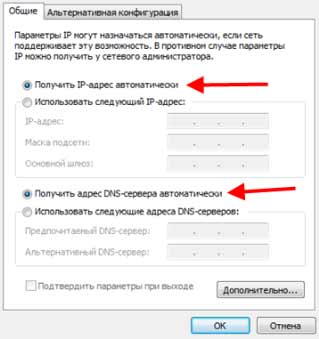
Then check the connection settings over the local network. In Windows 7, go to "Start" - "Control Panel" - go to the "Network and Internet" section - "Network and Shared Access Center" and click on "Changing the Adapter Settings" in the menu on the left.
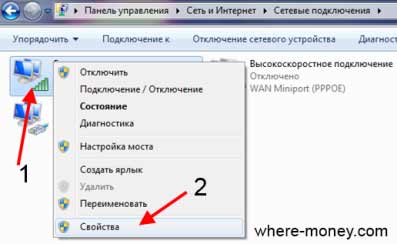
In the window that opens, select your network, click on it right-click and go to "Properties".
Highlight the version 4 (TCP / IPv4) protocol and click Properties.
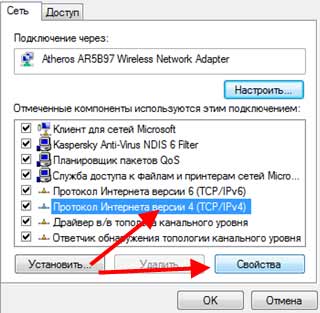
In the next window, check that the automatic method for obtaining the IP address and DNS server.
The connection of the DIR 300 router was reviewed by now moving to its direct configuration.
Configuring the D-Link DIR 300 router
Because We are not talking about the settings of a certain Internet provider, consider the basic settings of the DIR 300 router. You select and specify those that are needed in your particular case.
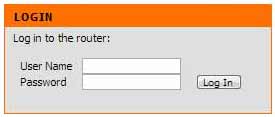
So, to enter the DIR 300 router settings, type in the browser address bar (not in the search bar) 192.168.0.1 and press ENTER.
Entering the router settings, the first thing is that it is recommended to be updated the firmware. It will not stop at this, was considered in the previous article.
Configuring the Internet in the D-Link DIR 300 router
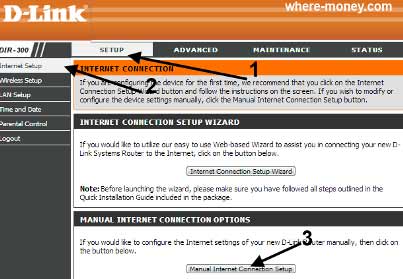
To configure the Internet, in the D-Link DIR 300 router, in the horizontal menu, select the Setup tab, and on the left section of Internet Setup, then press the MANUAL Internet Connection Setup button.
In the window that opens, pay attention to the Internet Connection Type section, the type of connection to the Internet-dependent type is selected here, which depends on the provider.
So, consider more details setting the types of connectivity to the worldwide network.
Dynamic IP.
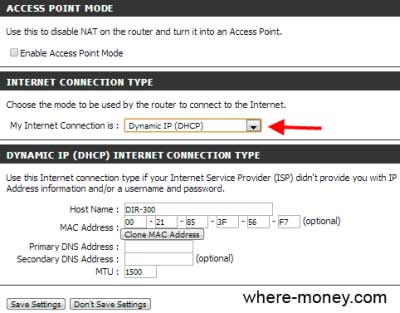
- Access Point - This mark disables NAT (Network Address Translation) and makes a regular access point from the router.
- Dynamic IP - activates the automatic receipt of IP addresses.
- Host Name is an optional property that is sometimes required by the Internet providers. By default, the name of the router model is indicated.
- Mac Address - The default MAC is recorded by WAN. It is not recommended to change it if this does not require the provider.
- Clone Mac Address - Here you can replace the MAC address WAN on the MAC address of the router.
- Primary DNS Addresses - Enter the primary DNS address of the server specified in the settings of your Internet.
- Secondary DNS Addresses - optional, optional DNS.
- MTU is the maximum transmission unit used to optimize the performance of the provider's network.
PPPoe
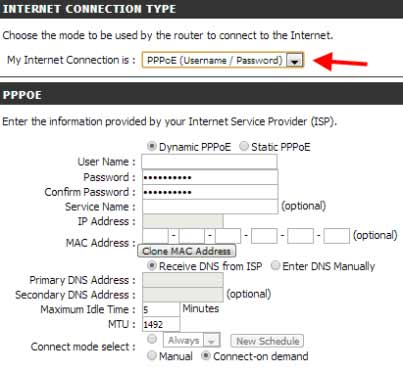
This type of connection implies the user with a username and password to access the network.
- Chekbox Dynamic PPPoE or Static PPPoe depends on the settings of the Internet provider.
- User Name - username.
- Password - password.
- Service Name - optional, service name of the provider.
- IP Address - Used if the Static PPPoe is selected.
- PRIMARY / SECONDARY DNS Addresses - primary and secondary (optional) DNS server.
- MTU is the maximum transfer unit, the default costs 1492.
- Connection Mode Selec - to choose from: Always (permanently enabled), Manual (manually), Connect-on Demand.
PPTP.
With this type of connection, the user receives a login and password.
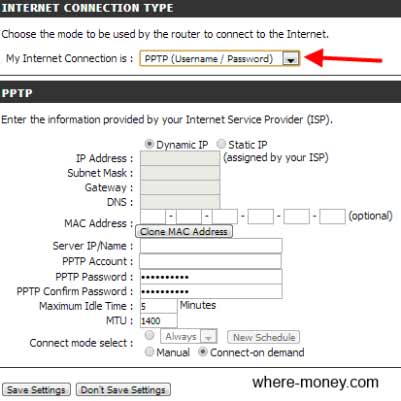
- Dynamic PPPoE or Static PPPoe is a setup parameter depending on the provider.
- IP Address - Aypishnik is indicated for Static PPTP.
- Subnet Mask is the primary and secondary DNS address (used for Static PPTP).
- Gateway - IP Gateway provided by the Internet Provider.
- DNS - DNS server address.
- Server IP - Aypishnik Server.
- PPTP Password - Password.
- PPTP Confirm PPTP - Password re-entering.
- Maximum IDle Time is the maximum Internet downtime.
- MTU is the maximum transmission unit used by the provider.
- Connect Mode - the value to choose from: always, manually or on demand.
L2TP.
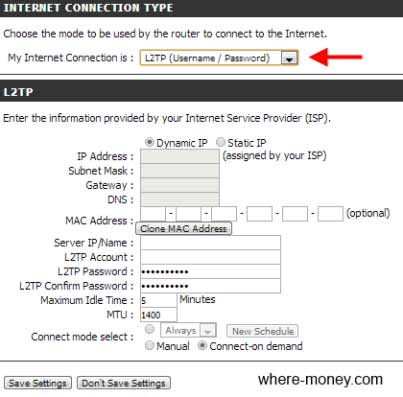
- Dynamic or Static IP - Values \u200b\u200bto choose depending on the settings of the provider.
- IP Addres - Enter "IP" for Static L2TP.
- Subnet MASK - primary and secondary (optional) DNS addresses for Static.
- Gateway - IP address of the gateway.
- DNS - DNS address provider.
- Server IP - Server IP.
- L2TP Account - Account Name.
- L2TP PASSWOR - Password.
- Maximum IDle Time is the maximum downtime of the Internet connection.
- MTU is the maximum transfer unit, if necessary, you can change this parameter.
- Connect Mode - Values \u200b\u200bto choose from.
Static IP.
This type of connection is used when the provider provides full information about IP WAN.
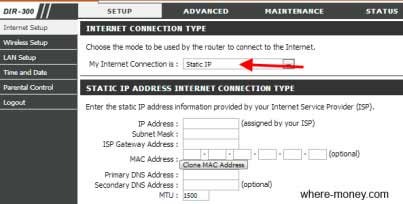
- IP Address - reported by the provider.
- Subnet Mask - Mask input field.
- ISP Gateway - Gateway.
- Mac Address - the default WAN MAC address is installed if required - change the necessary you.
- Clone Mac Address - Using this button, the MAC address of the Ethernet specified by the provider is copied and Mac WAN varies on the MAC router.
- Primary and Secondary DNS Address - Primary and Secondary DNS Server.
- MTU - by default costs 1492, but you can change it according to the network settings.
Russian PPPoe
This type of connection is often used by Russian Internet providers.
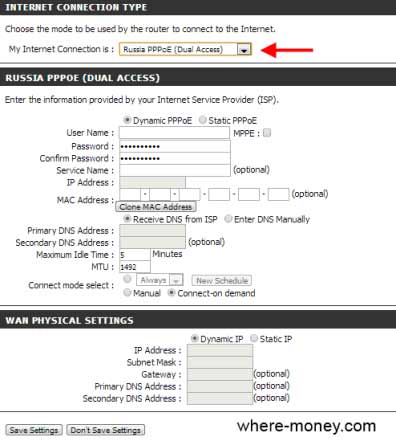
- User Name - username.
- Password - password.
- SERVICE NAME - service name of the provider.
- IP Address - "IP" (indicated for Static PPPoe).
- Mac - optional.
- DNS - primary and secondary DNS server.
- MTU - 1492, can be replaced with another.
- Connection Mode Selec is a choice.
Bully below, under the inscription WAN PHYSICAL SETTING, WAN settings are specified. If Static IP is used - fill in the required router setup fields. For dynamic IP, select Dynamic, the remaining parameters are not needed.
Russian PPTP.
Another type of connection, which is often used by Russian Internet providers.

By analogy with the settings described above:
- IP Address - IP address for Static PPTP.
- Subnet Mask - Primary and secondary DNS Static PPTP.
- Gateway - IP Gateway.
- DNS - information about DNS servers.
- Server IP - "IP" server.
- PPTP Account - Account Name.
- PPTP Password - Password.
- Maximum IDle Time - idle time.
- MTU - indicated the standard value that can be changed.
- Connect Mode - option to choose from.
As you can see, settings for different types of connections are similar to each other, but this does not change the fact that you need to enter them carefully, otherwise you will not be able to connect to the Internet.
Now consider how to configure Wi-Fi in the D-Link Dir 300 router.
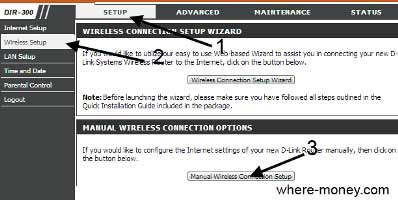
To select a wireless network settings in the horizontal menu, select Setup, and on the left section Wireless Setup. Then press MANUAL WIRELESS CONNECTION SETUP.
In the window that opens, there are basic Wi-Fi settings in D-Link DIR 300.
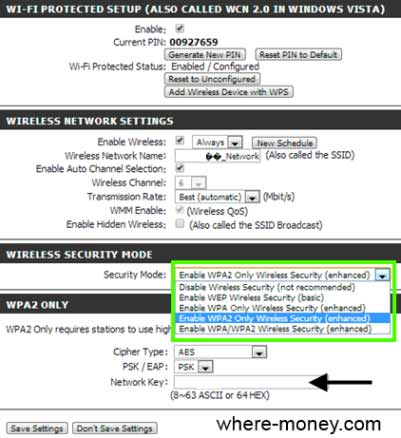
- Wi-Fi Protected Setup - Application Wi-Fi protection. Put a tick next to Enable and click the Generate New Pin button (for generating PIN) or Reset Pin to Default (for reset to the original settings), then go to the settings below.
- Enable - turn on the wireless network.
- Wireless Network Name - Wireless Network Network.
- Wireless Channel - DIR-300 Channel Settings.
- TRANSMISSION RATE - selection of data transfer rate.
- WMM Enable - select priority by type of traffic.
- Enable Hidden Wireless - when you turn on this feature. Wireless network will not be swirling. To connect to Wi-Fi you need to know SSID.
The next subsection Wireless Security Mode is responsible for the security of a wireless network. Here, the choice is proposed security modes, in our case it is WPA2 Only.
Below, in the field, Cipher Type indicates the type of encryption. In PSK / EAP, select PSK. In Network Key - specify the password from your wireless network.
Setting up LAN LAN
The following menu changes the local network settings and sets DCHP (dynamic node configuration). To open the necessary settings, go to the Setup - LAN Setup section.
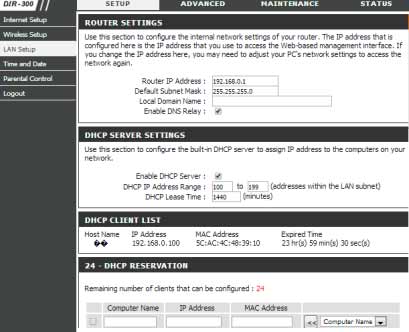
- Router IP Address - responsible for setting up the IP address of the router. Initially, DIR 300 is set 192.168.0.1
- DEFAULT SUBNET MASK - subnet mask. Initially costs 255.255.255.0.
- Local Domain Name - optional, domain name.
- Enable DNS Relay - If the DNS information is received from the provider to the computer. If this parameter is not selected, a router will be used as a DNS server.
Parental Control (Parental Control)
This feature prohibits access to the created site list.
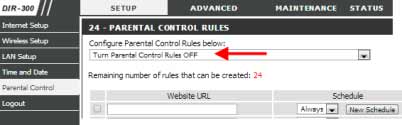
From the drop-down list, select Turn Parental Control ON (Enable) or Turn Parental Off (Disable Parental Control Off.
In the WebSite URL field, enter the URL address, access to which you want to allow or block. Also, here you can specify keywords, in case of detection of which in the addresses of sites, they will be blocked.
The Schedule parameter is responsible for setting up the time - schedule when parental control should be activated.
That's all, the description of the main settings Wi-Fi router D-Link DIR 300 is completed. The remaining possibilities of the router will study yourself.
 How to make an emergency restoration of the firmware of the ASUS router
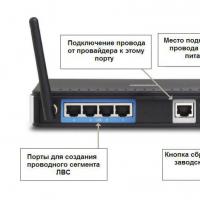 How to set up a D-Link DIR 615 router: Step by step instructions with photos
 How to enable bluetooth (Bluetooth) on a laptop in Windows 7
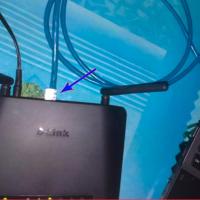 How to set up a Wi-Fi router D-Link DIR-615 yourself
 On Android does not turn on Wi-Fi: possible failures and methods for eliminating
 How to transfer the Internet from the phone to the computer in modern conditions
 Distributed the Internet from a laptop, Wi-Fi network is there, and the Internet does not work?