How to distribute the Internet to computers on a local network (Windows setup)
Hello.
When several computers are connected to a local network, you can not only play together, use shared folders and files, but also when you connect at least one computer to the Internet, share it with other PCs (i.e. give them access to the Internet too).
In general, of course, you can install router and by configuring it appropriately (You can read about self-configuring the router here :) , make it possible to connect to the Internet for all computers (as well as phones, tablets and other devices). In addition, in this case, there is one important plus: you do not need to keep the computer constantly turned on, which distributes the Internet.
Nevertheless, some users do not install a router (and not everyone needs it, to be honest). Therefore, in this article I will consider how you can distribute the Internet to computers on a local network without using a router and third-party programs. (i.e. only due to built-in functions in Windows).
Important! There are some versions of Windows 7 (for example, starter or starter) in which the ICS function (with which you can share the Internet) is not available. In this case, you better use special programs (proxy servers), or upgrade your version of Windows to professional (for example).
1. Setting up a computer that will distribute the Internet
The computer that will distribute the Internet is called server(as I will call it later in this article). The server (donor computer) must have at least 2 network connections: one for the local network, the other for Internet access.
For example, you may have two wired connections: one network cable comes from the provider, the other network cable is connected to one PC - the second. Or another option: 2 PCs are connected to each other using a network cable, and Internet access on one of them is carried out using a modem (now various solutions from mobile operators are popular) .
So ... First you need to set up a computer that has Internet access. (i.e. from which you are going to share it) ... Open the "Run" line:
- Windows 7: in the START menu;
- Windows 8, 10: shortcut buttons Win + R.
In the line write the command ncpa.cpl and press Enter. The screenshot is shown below.
Method how to open network connections
A window should open in front of you network connections that are available on Windows. There should be at least two connections here: one to the local network, the other to the Internet.
The screenshot below shows how it should look approximately: the red arrow shows the connection to the Internet, the blue one - to the local network.
Next, you need to go to properties your internet connection (to do this, just right-click on the desired connection and select this option from the pop-up context menu) .
In the "Access" tab, put one check mark: " Allow other users to connect to the internet of this computer«.
Note
To enable users from the local network to manage the network connection to the Internet, check the box next to Allow other network users to manage the shared Internet connection.
After saving the settings, Windows will warn you that the server's IP address 192.168.137.1 will be assigned. We just agree.
2. Setting up a network connection on computers in the local network
Now it remains to configure computers on the local network so that they can access the Internet from our server.
To do this, go to network connections, then find a local network connection there and go to its properties. To see all network connections in Windows, press the button combination Win + R and enter ncpa.cpl (in Windows 7 - through the START menu).
When you go to the properties of the selected network connection, go to the properties of IP version 4 (how this is done and this line is shown in the screenshot below).
Now you need to set the following parameters:
- IP address: 192.168.137.8 (instead of 8, you can use another number other than 1. If you have 2-3 PCs in the local network, set a unique IP address for each, for example, 192.168.137.2 on one, 192.168.137.3 on the other, etc. ) ;
- Subnet mask: 255.255.255.0
- Default gateway: 192.168.137.1
- Preferred DNS Server: 192.168.137.1
Properties: IP version 4 (TCP / IPv4)
After that, save the parameters and test your network. As a rule, everything works without any additional settings or utilities.
Note
By the way, you can also set “Obtain an IP-address automatically”, “Obtain a DNS-server address automatically” in the properties on all computers of the local network. True, this does not always work correctly (in my opinion, it is still better to specify the parameters manually, as I gave above).
Important! Access to the Internet in the local network will be as long as the server is running (i.e. the computer from which it is distributed). As soon as it is turned off, access to the global network will be lost. By the way, to solve this problem, they use simple and inexpensive equipment.
3. Typical problems: why there may be problems with the Internet in the local network
It happens that everything seems to be done correctly, but there is no Internet on the computers of the local network. In this case, I recommend paying attention to a few things (questions) below.
1) Does the Internet connection work on the computer that distributes it?
This is the first and most important question. If there is no Internet on the server (donor computer), then it will not be on the PC in the local network either (an obvious fact). Before proceeding to further configuration, make sure that the Internet on the server is stable, the pages in the browser are loaded, nothing disappears after a minute or two.
2) Are the services: Internet Connection Sharing (ICS), WLAN Auto-Config Service, Routing and Remote Access working?
In addition to the fact that these services must be running, it is also recommended to set them automatic start(i.e. so that they start automatically when the computer is turned on).
How to do it?
First open the tab service: to do this, press the combination Win + R, then enter the command services.msc and press Enter.
Run: Opens the Services tab.
Next, find the service you need in the list and open it by double-clicking it (screenshot below). In the properties, set the launch type - automatically, then click the launch button. An example is shown below, this needs to be done for three services (listed above).
3) Is sharing configured?
The fact is that, starting with Windows 7, Microsoft, taking care of the safety of users, introduced additional protection. If it is not configured accordingly, then the local network will not work for you. (in general, if you have a local network configured, most likely you have already made the appropriate settings, which is why I put this advice almost at the very end of the article) .
How can I check this and how do I set up sharing?
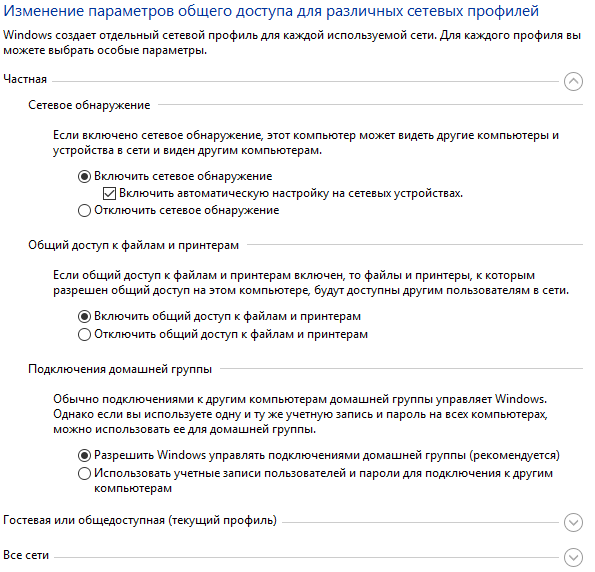
First, go to the Windows Control Panel at the following address: Control Panel \ Network and Internet \ Network and Sharing Center.
Then you will see two or three profiles, most often: Guest, Private, and All Networks. Your task is to open them one by one, remove the sliders from password protection for general access, and enable network discovery. In general, in order not to list every checkbox, I recommend making the settings, as in the following screenshots (all screenshots are clickable - enlarged by mouse click) .
 (but you will find dozens of them without me :)). On this I will round off, good luck and patience ...
 How to make emergency firmware recovery for ASUS router
 How to set up a D-Link Dir 615 router: step by step instructions with a photo
 How to enable Bluetooth on a laptop in Windows 7
 How to configure Wi-Fi router D-Link DIR-615 yourself
 Wi-Fi does not turn on on Android: possible failures and methods of their elimination
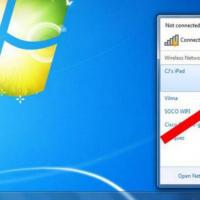 How to transfer the Internet from a phone to a computer in modern conditions
 Distributed the Internet from a laptop, is there a Wi-Fi network, but the Internet does not work?