Configuring the D-Link 320 router on Windows 7 and Windows 10
The D-Link DIR-320 router is considered one of the most popular. The situation is not rare when the Router D Link is buying, will bring home, and then calls the Internet provider and says: "That's, I bought and not configure." Consider brief specifications and appearance.
Appearance and characteristics
Regarding the characteristics, there is little that can be said, because all routers are extremely similar. The standard wireless network 802.1g / b is used. On a Wi-Fi router, in addition to LAN ports, there is 1 USB port. The antenna on the modem is removable. To be more accurate, then it is only one antenna. The device itself supports PPPOE, L2TP, PPTP connection protocols.
On the front of the apparatus there are various indicators, light bulbs that allow you to monitor the state of those or other characteristics:
- First there is a standard power indicator showing whether the router is enabled
- Next, indicators showing the status of the Internet, Wi-Fi wireless network.
- After there are 4 indicators of local ports. They show if there is any connection of the router via the LAN cable, and if so, then through which port.
- The last USB indicator, which shows whether the USB port is enabled.
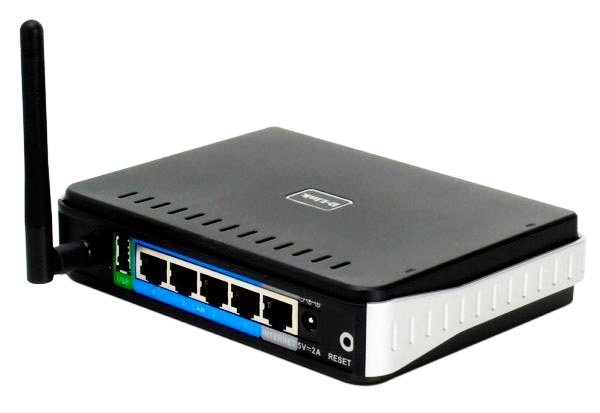
On the back of the device there are various ports and connectors in which you want to insert cords and cables for the correct installation:
- First there is one antenna that allows communication to get further around the house or apartment.
- Then there is one USB connector, it has a green stroke.
- Then there are 4 blue local ports, they are needed to attach with the LAN cable.
- Then one WAN or Internet connector for connecting the Internet to our modem.
- The penultimate connector is needed to connect the power supply.
- The last button is signed as "Reset". It is needed to reset the settings, using it to reset the password. The button is located inside the hole, which protects it from accidental press, because after resetting the password, the router has to configure again.
Installing the router
Before you configure anything, the modem needs to be unpacked and installed on a convenient place for us. It is important that the rosette was near, so that I got the Internet cable there, so that there was a PC nearby.
There is nothing complicated in the installation. For the correct installation, you just need to connect the electricity to the router, attach the computer and the Internet through the cords. Internet cable is provided by Internet company. At this stage, the configuration and installation D Link DNS on the required place ended.
Full setting of the router
Before starting to configure the Internet and wireless network, before setting up a D LINK DIR 320 router, we need to check if the computer is connected correctly to the modem.
Check compound
To check the computer connection that works on the Windows 7 operating system, we need to go to "Start", then in the standard computer control panel. (It's easier to do as in the instructions in screenshots, it will help you configure D Link Dir 320). 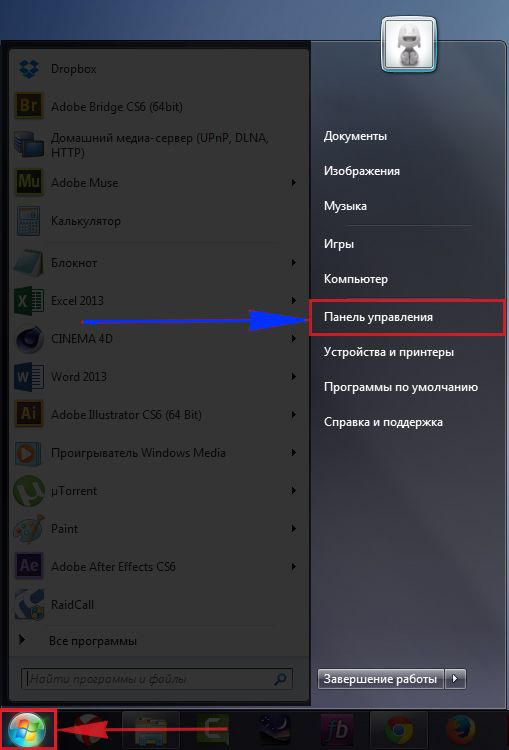
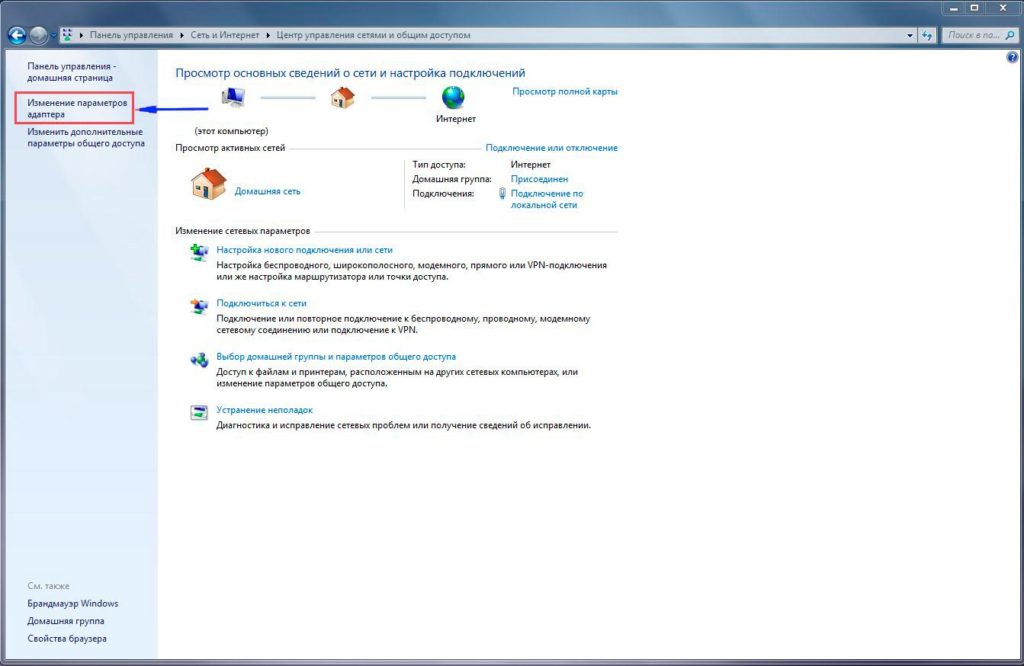
Now we need to choose "View network status and tasks."
![]()
After you have chosen the necessary item, we need to click "Change the parameters of the adapter".
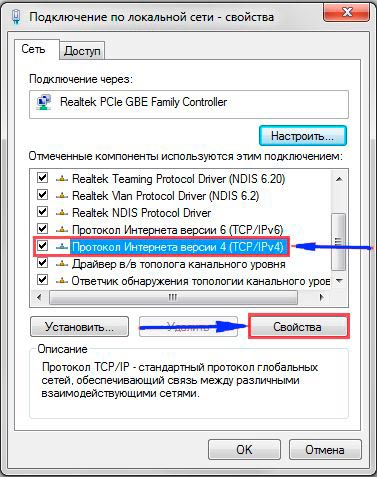
Now you need to look at the "Local Connection" properties.
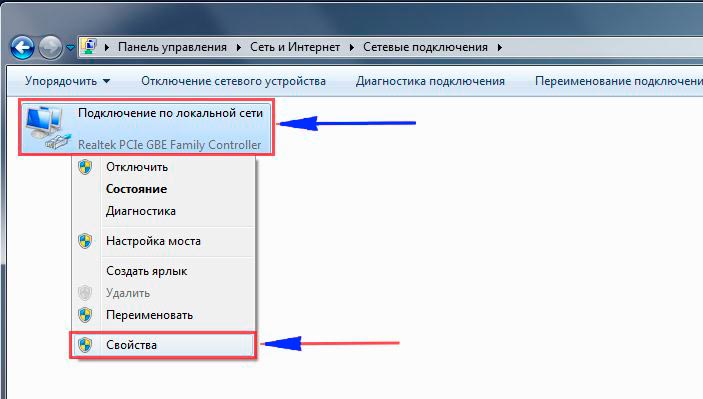
We need to be viewed whether the properties of the Internet protocol version 4 are standing there.
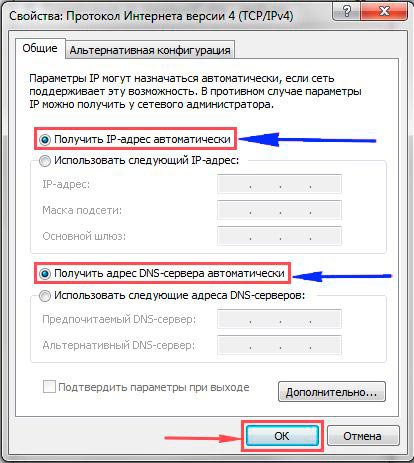
Here we put the checkboxes if there are no, everything is all opposite the automatic setting, as in the screenshot. And click "OK".
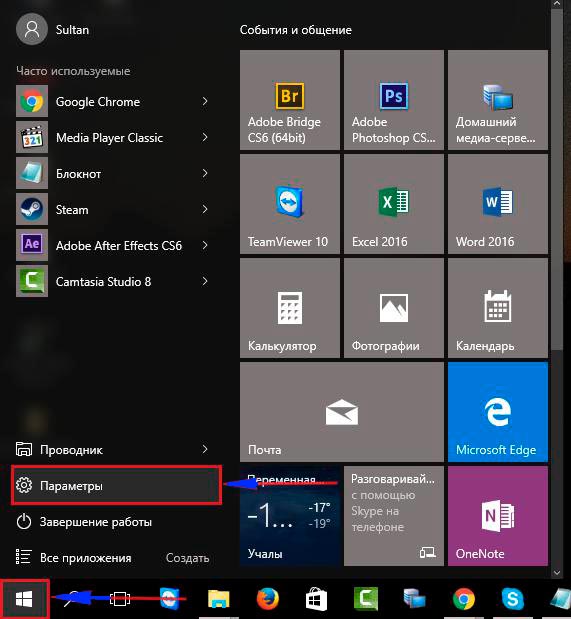
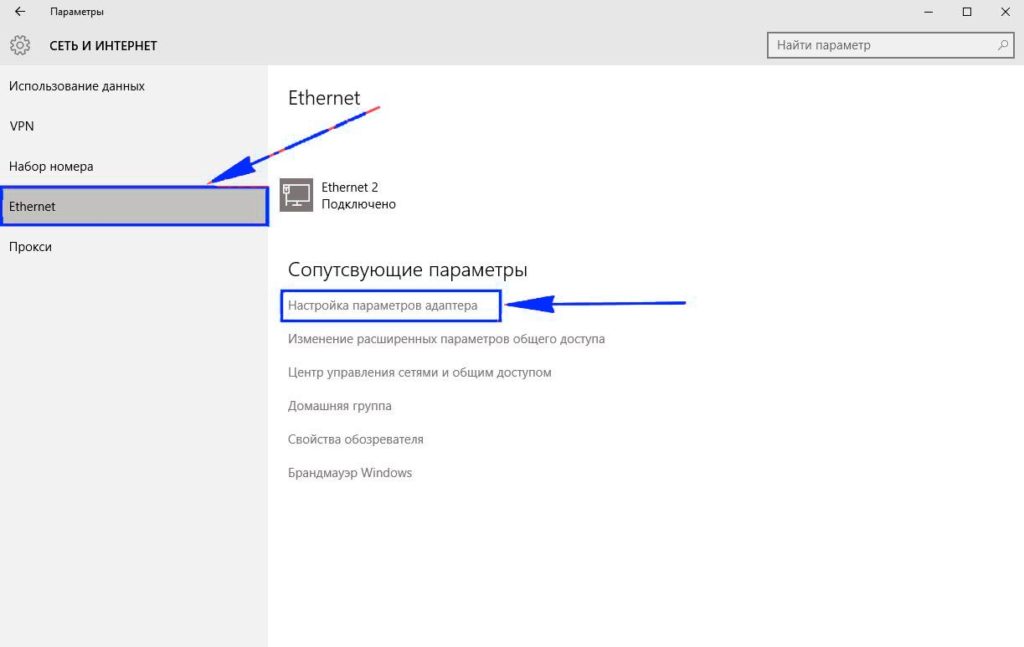
In the event that you have Windows 10 on your PC, then follow another instruction. "Start", and then you need to click on "Parameters".
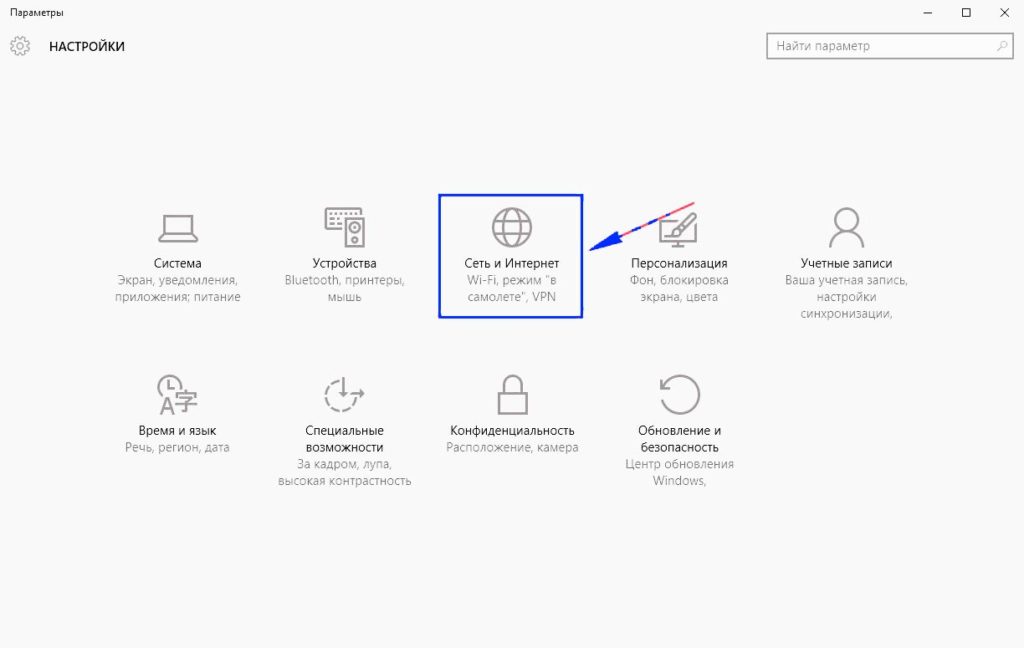
Click on subparagraph "Network and Internet".
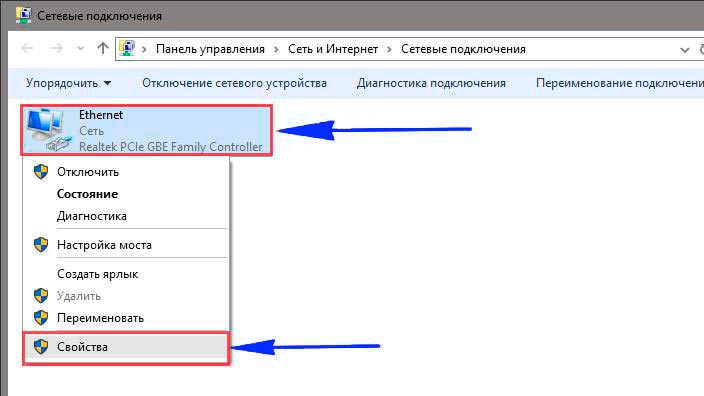
On the left in the menu you need to click on Ethernet, then we look at the adapter parameter setting, as in the first instruction.
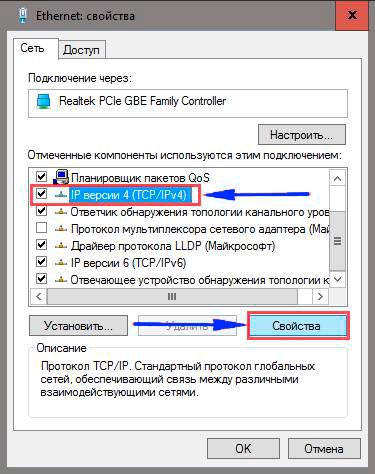
Now also see the properties of the LAN network.
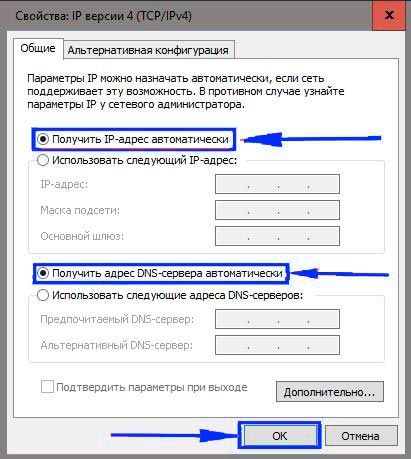
We see properties for the fourth version.
Again, install automatic configurations and click "OK".
Now we are confident that the connection is working properly if not, then update by software. And on the updated router now you can already perform some actions.
Configuring Internet Connection
To fulfill any further actions, we need to enter the router settings. This happens through the browser, we go to 192.168.0.1 or 192.168.1.1 - these are sites. This should be done on a PC, which has no connection to the Internet.
In that window, which has revealed, we are offered to enter Login & Password. According to the standard, the name and password are identical to Admin.
![]()
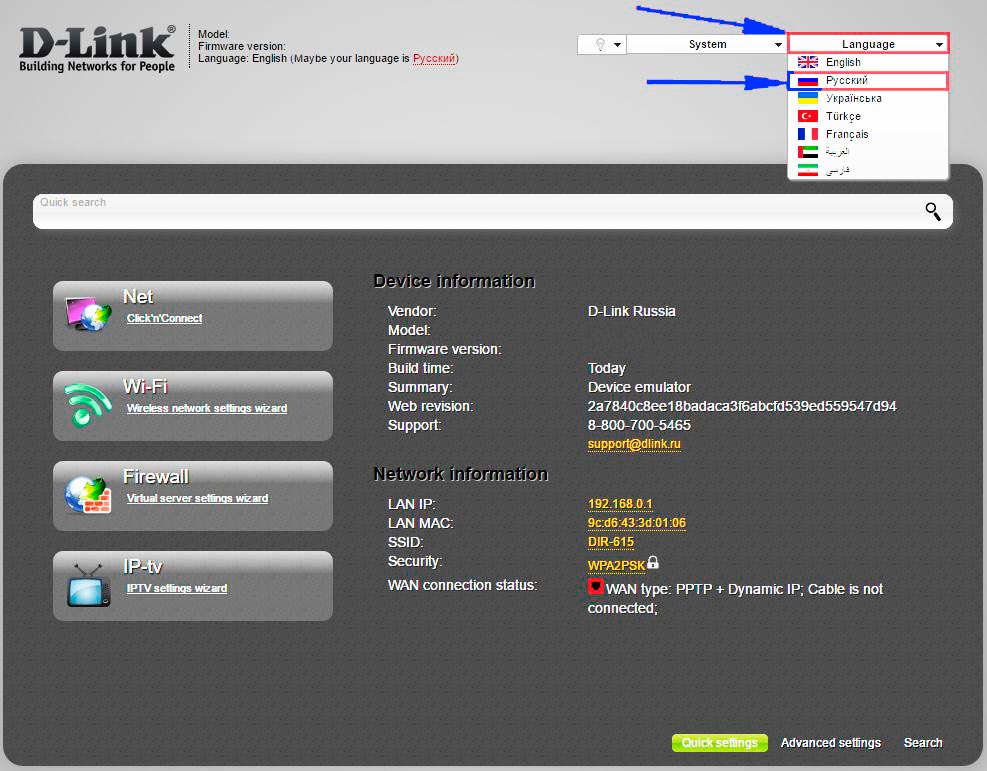
Now we entered the center of all configurations, we need to change the language of the interface into Russian, so it was easier. In the upper right corner, where Languag, choose "Russian".
PPOe
Consider the standard PPPoE setting. The latter is the type of compound, it needs to be clarified by the provider. All important configuration information may be in the contract. So, first of all, look there.
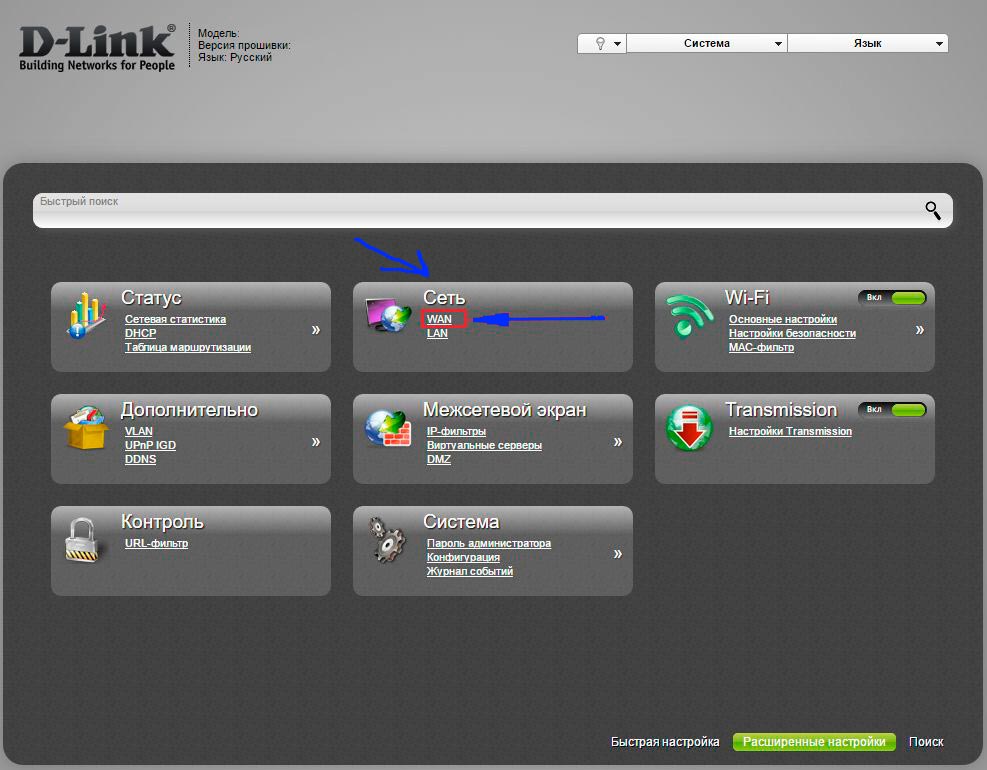
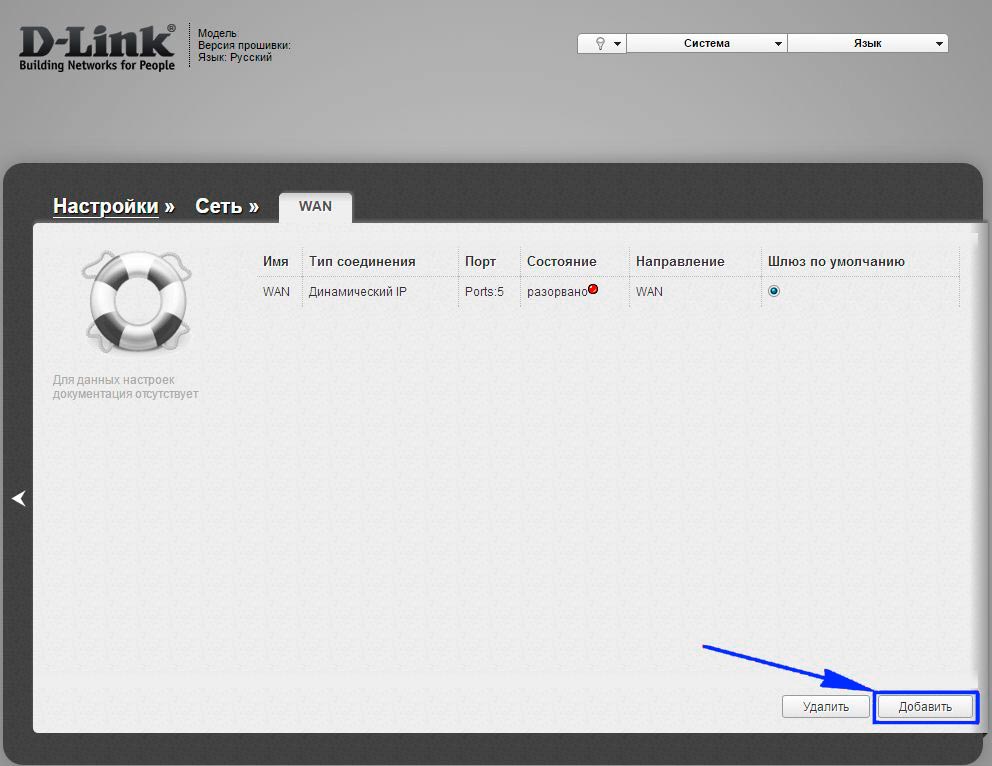
In the "Network" block we click on WAN. In the window, which was discovered just that, you need to click "Add". Here we do as shown in the screenshot.
The connection type must be selected PPPoE, or the one that is registered by the Internet company in your contract.
Then you specify the username and password, they are numbered 2 and 3.4. This data is in the contract with the Internet company.
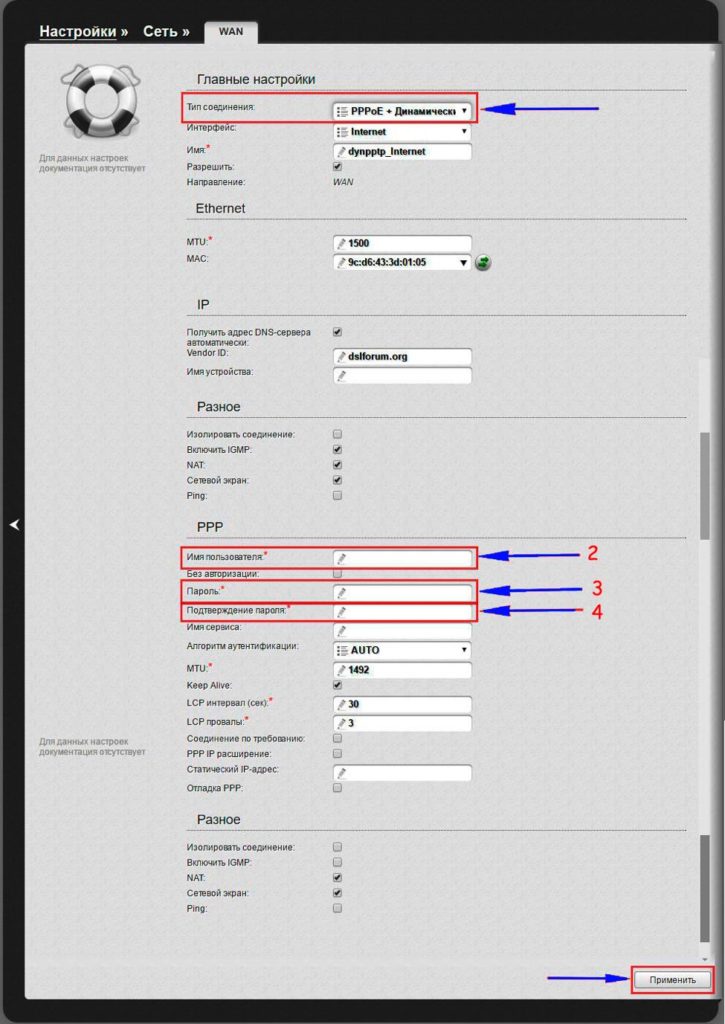
After that, click "Apply". Now online should appear on your computer.
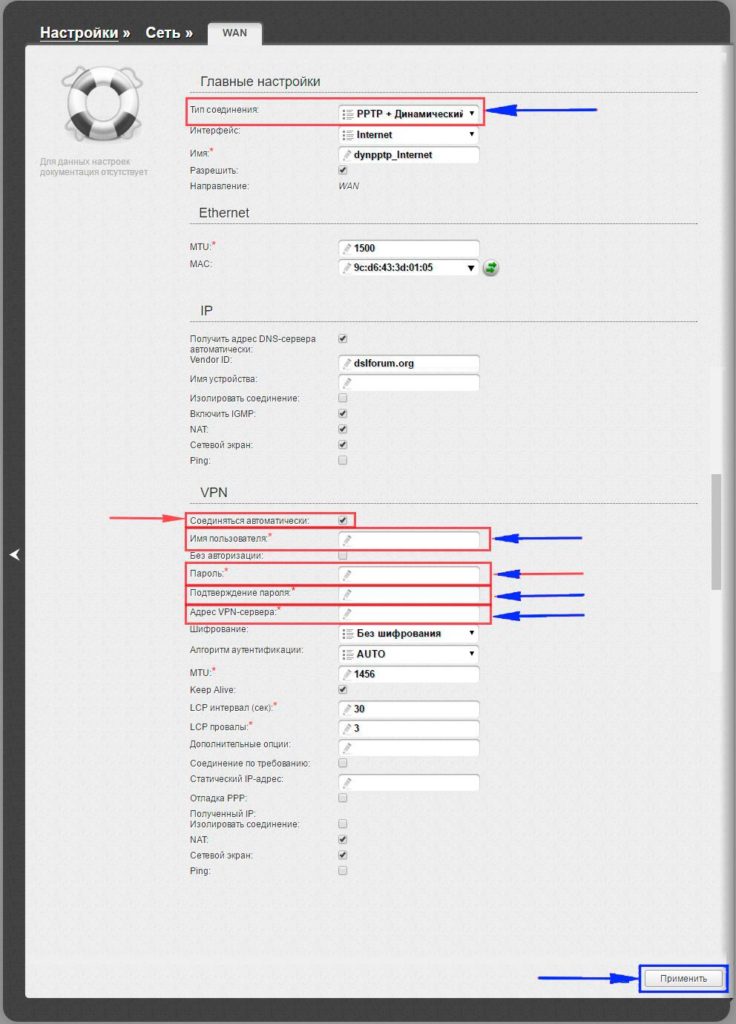
PPTP with a dynamic address
First, to execute debugs, we need to follow the WAN link, which is in the "Network" block. On the new Stanza, click "Add".
1. Connection type, as in the name of this subparagraph, PPTP with a dynamic address.
3. Then we need to specify the username and password. These data must be provided by the provider.
4. Also itself and with the VPN server. It must be provided by the provider.
5. Click apply.
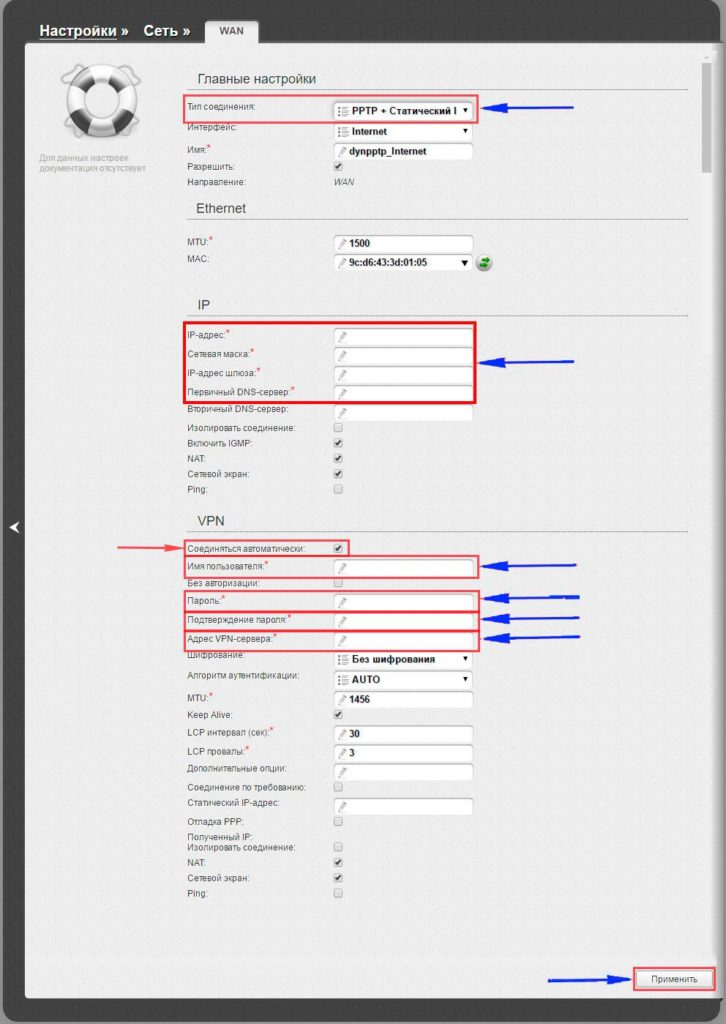
PPTP with static address
In order to configure the static connection, you must add a new connection. It must be done in the WAN window, it is in the "Network" block. The connection type is chosen the one that we need is PPTP + static.
1. After you need to fill in the fields in IP item. All fields that are required to be completed must be spelled out. And the data we can request the provider, support services, or found in paper contracts.
2. Now settings of the VPN item. Immediately a tick opposite the automatic configuration. After prescribe all selected fields. This is the username and twice password, they must be in the contract. Like the address of the VPN server.
3. Click apply.
Setting up a wireless network
Configure Wi-Fi is even easier. To do this, select the basic settings in the Wi-Fi block (if you can't find, you first need to click on the advanced settings at the bottom of the page).
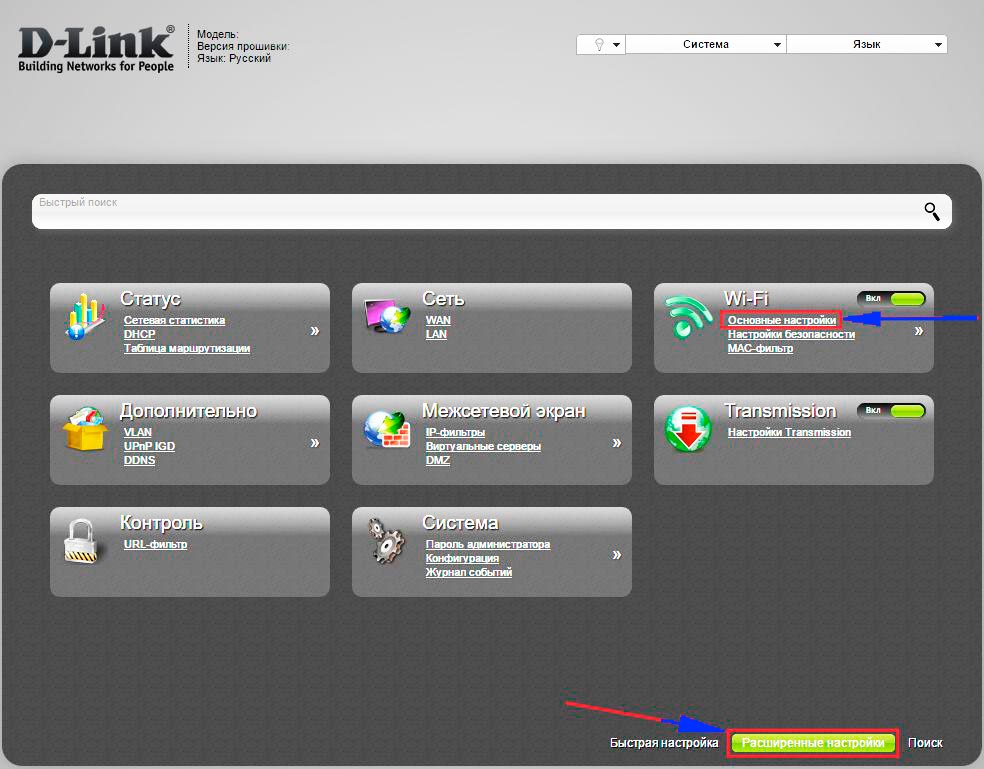
After you need to put a tick opposite "Enable Wireless Connection". Then you specify the necessary data. SSID is the name of your wai fi. Here we write any, just in English letters. Click "Apply."
![]()
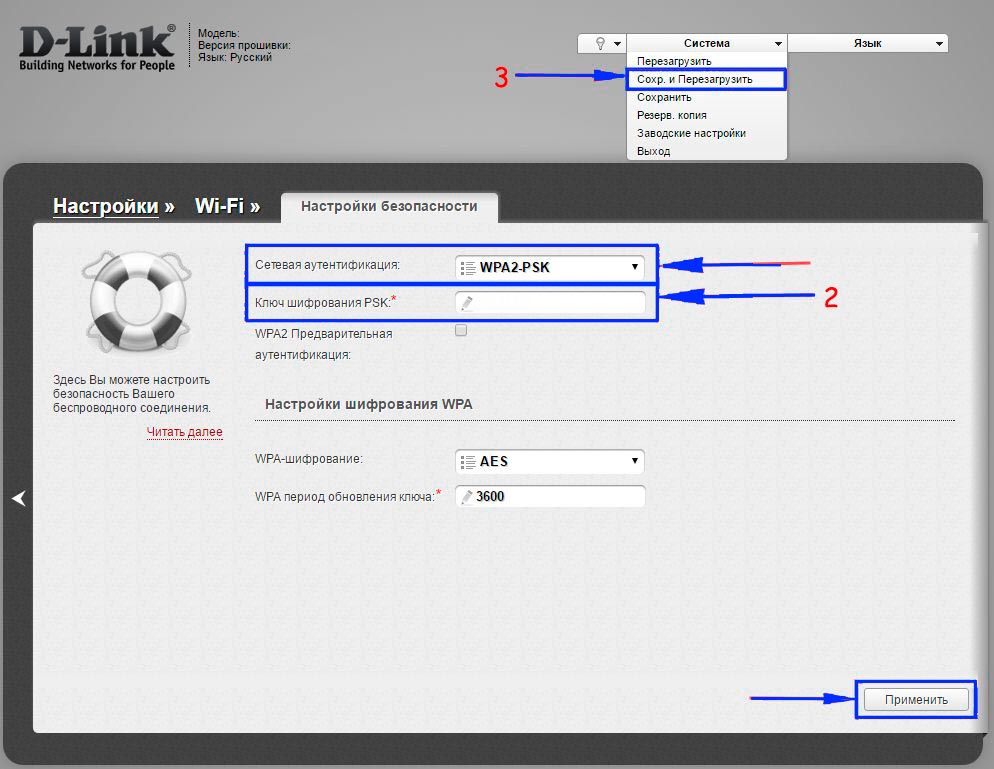
Now you need to put a password on Wi-Fi. To pass the wi fi, select "Security Settings".
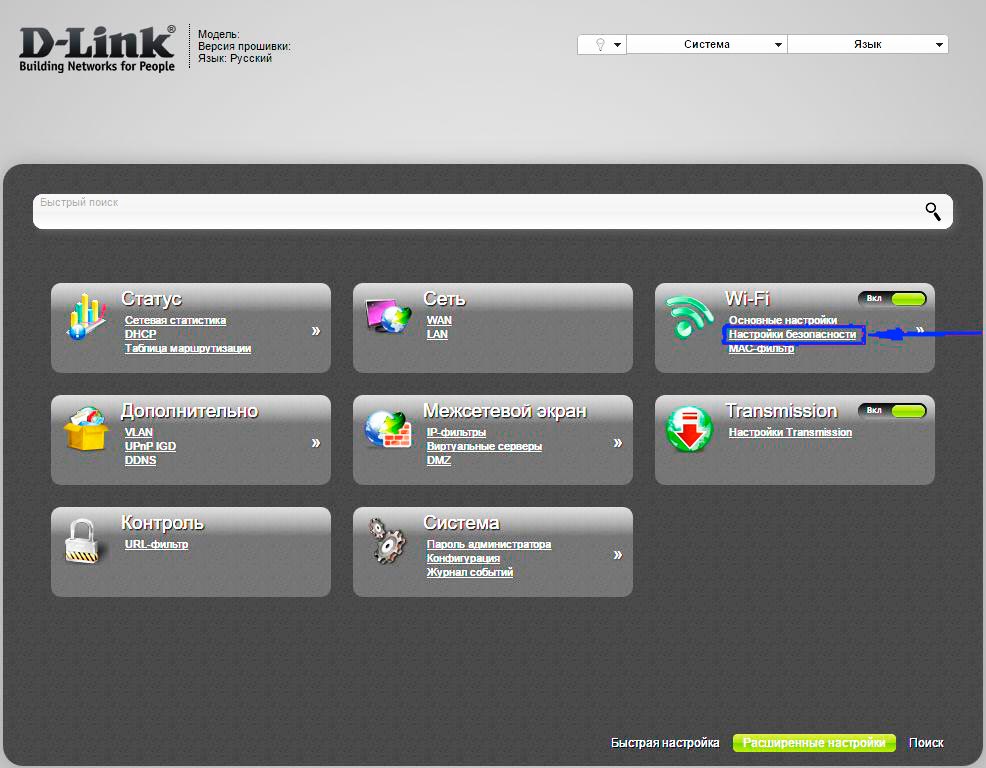
In the "Network Authentication" field, select WPA2-PSK. Encryption key, which is number 2, this is a wifi password. After the new password was introduced, we need to be preserved. To do this, click on "Save and reboot", it is at number 3.
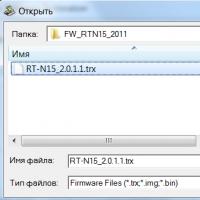
Now all questions about how the router D Link DIR 320 NRU is configured, must disappear. Sometimes, before setting up a router, we need to learn how to flash the D LINK DIR 320 router. But about this, and how to create a network storage with a router D-LINK DIR, we will tell in another article.
Video on the topic
Quickly you internet!
 How to make an emergency restoration of the firmware of the ASUS router
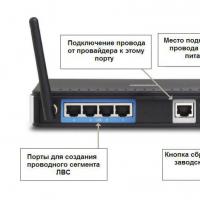 How to set up a D-Link DIR 615 router: Step by step instructions with photos
 How to enable bluetooth (Bluetooth) on a laptop in Windows 7
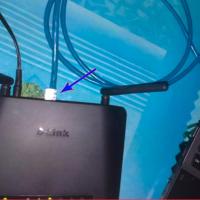 How to set up a Wi-Fi router D-Link DIR-615 yourself
 On Android does not turn on Wi-Fi: possible failures and methods for eliminating
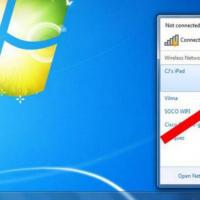 How to transfer the Internet from the phone to the computer in modern conditions
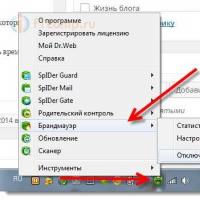 Distributed the Internet from a laptop, Wi-Fi network is there, and the Internet does not work?