How to set up a DOTER D LINK DIR 300
Good day, dear blog readers, in today's article we will talk about how to set up a douter D Link Dir 300. After all, it is rare from the first time to distribute Wi-Fi from the device. About everything in order
This review will describe in detail the Description of Wi-Fi Device D-Link DIR-300The main nuances of its settings. In addition, it will be described in detail the installation and connection of the device, its firmware, characteristic, methods for adjusting the connection with Internet resources used by providers connections. You will be able to learn about adjusting the wireless network to access, install Wi-Fi password, connecting different equipment.
With the help of the DIR-300 device, you can quickly create a wireless network in an office space or home, to which the Internet can be connected by a special line, distributing it by wi-Fi.
Modern DIR-300 equipment can distribute the ADSL Internet, but it cannot be connected directly to the telephone line. In this case, it will be necessary to connect it to the DSL modem with a telephone line. Such a connection scheme is used if there is a simple modem without, from which you need to make a wireless network. However, when you easily out of the device, the Wi-Fi device remains without the Internet or network without Wi-Fi. Therefore, to implement all the needs you need to have one device.
Device Overview
D-Link DIR-300 It has a four-port switch to connect a laptop by ethernet adapters. The router can create wireless access network Wi-Fi Standard 802.11b / g. The device can operate in access point, bridge or client mode. There are also many options: filtering over the MAC address, maintaining security standards (WEP, IEEE 802.1x, WPA / WPA2). Security options block access to undesirable resources.
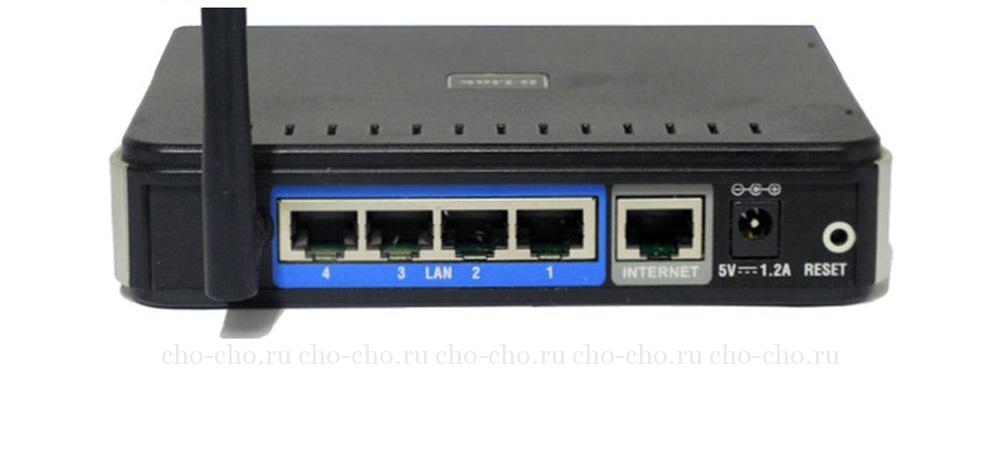
The router has a firewall, buttons, indicators and connectors. On the front panel there is a power indicator, Internet, LAN and Wi-Fi. When the button is enabled, the buttons are burning green. The rear panel has an antenna, power connector, RESET key, 4 ports for wired connections to a wireless network, a DSL modem connections port or via an Ethernet line.
With side, the operational add key to the Wi-Fi network is located. The WPS button contains an indicator, a blue flashing of which reflects the connection attempt, burning in blue - a mounted connection, burning in yellow - an error connecting to a wireless network. The device is controlled via the web interface.
Manipulation before adjusting the device
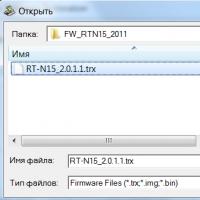
Before connecting the router for further configuration, it is advisable to download the firmware file for hardware revision. There are several versions of DIR-300 devices:
- Nru B5 / B6,
- NRU B7,
- A / C1.
Everyone has an individual firmware. The revision is reflected on the sticker, which is located on the back of the device. You can download the firmware on a personal resource, press the buttons pub., router, device modification, then "firmware" and hardware revision. The selected folder will be old and new firmware.
Also before further work, you need to reset the settings. There are two ways for this:
- Key Reset. (on the back), to which you need to press half a minute, release and wait for the restarting device with adjustments from the manufacturer.
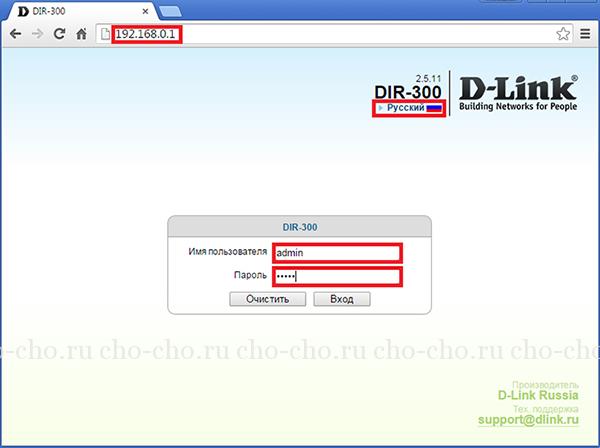
- Connection via the Internet browser. We gain address 192.168.0.1 , Login " admin.", Go to the" Tools "page (" System / Configuration "), click on the" Reset to Default "(" Factory Settings ") and approx.
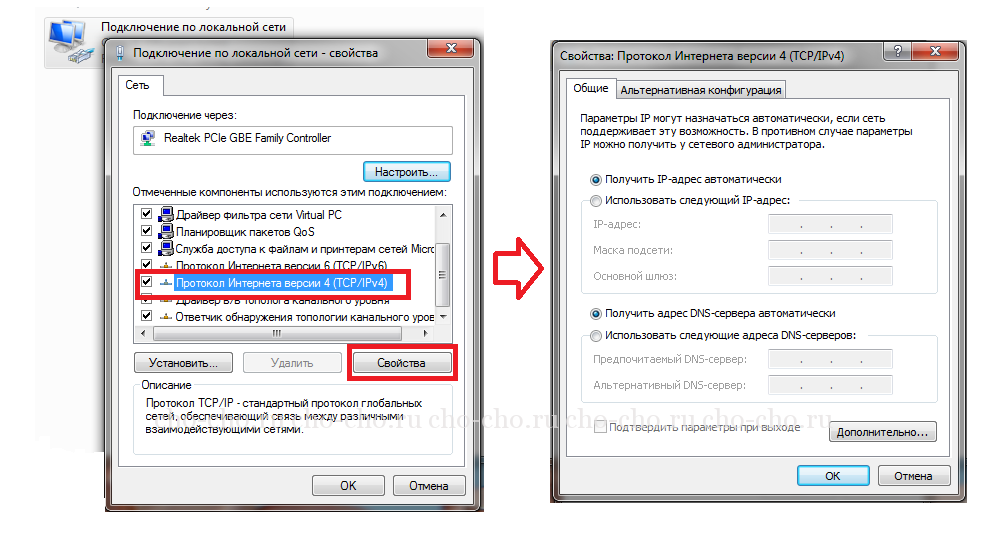
To find yourself in the setup control panel, in the connection properties on the local network, you must specify the auto-slip of the IP address and the automated receipt of the address of the DNS server.
Installation and Connection Instructions D LINK DIR 300
To place the device, select the appropriate place, but you do not need to install it in the utility rooms (pantry, attacks), since due to the presence of walls, the network action area is reduced.
Connecting the router does not cause special difficulties.
- The Internet Provider Cable is connected by the port, the network card is connected to the LAN port of the router through the RJ-45 cable, which is included in the bundle.
- Next turns on the power and the router is loaded, the settings on the local network are checked.
- You need to go to the start, the control panel and click on the "Network and Internet" section, in the "Network and Shared Access Center" you need to click on the "Changing Adapter Settings".
- The window selects the network to click on the right mouse button and go to properties.
- You should select the protocol of the 4r version and press the properties. In the window that appears, check the availability of an automated DNS server and IP address method.
Adjusting the device connection
The essence of the device configuration is to initialize the Internet connection and distribution to other connected devices. Connection setup is carried out in the interface and is the necessary operation.
Go to configuring connection. On the main page of the router settings, you need to press "Extended Settings" at the bottom and select "WAN" in the "Network" tab, click on the Add key, where the connection to the dynamic IP address will be reflected.
In the next step, it is necessary to correctly compile fields in accordance with the type of connection used for each provider individually:
- Beeline (Beeline) - dynamic IP with L2TP;
- Onlay - dynamic IP address;
- Stork - dynamic IP address with PRTR;
- Dom.ru, Domolinka and Rostelecom - RPRY;
- Interzet - IP static.
Information about the connection used can be found on the web resource of the official provider or explore the properties of the connection used on to receive Internet access. In many situations, in addition to the type of connection, you must fill in a login with a password received by the user from the service provider, including the address of the VPN server providers that use L2TP or PPTP. connection.
Next, the save key is pressed and the page with the created connection opens. Also at the top is an indicator that reflects the change in the router settings and the need for reusing them. Such actions should be done so that after rebooting or turning off the router, all settings did not drop. You should upgrade the list of connections.
If the settings have been completed correctly, it will burn green and the Internet connection will be available. After that, you can configure the wireless Wi-Fi network.
Wi-Fi Access Settings
To configure the wireless network, you need to go to the advanced router page and click on the Wi-Fi tab on the main settings link. The page indicates the name of the SSID access point, on the basis of which the wireless network will be determined. Additionally, it is necessary to change the remaining criteria, but often it is not necessary. At the final stage, all settings are saved.
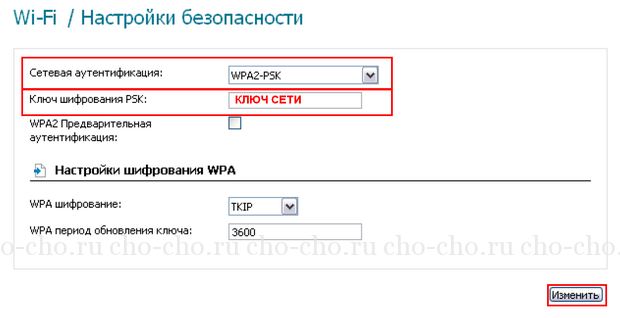
In the same tab, the Wi-Fi should select the "Security Settings" section, where you need to install a password on the Wi-Fi router. To do this, the mode of "network authentication" is selected mode WPA2-PSK., enter into the "PSK encryption key" the required password for the access point and save the entered data.
LAN-LAN settings
Using these actions, the functions will be changed over the local network and the dynamic configuration of the DCHP node is set. To open the desired settings, go to the LAN SETUP section.
In the column " Router IP Address»Setting the router address (initially sets the parameter 192.168.0.1). DEFAULT Subnet Mask is a subnet mask, first set 255.255.255.0. The graph "Local Domain Name) is the name of the domain.
 How to make an emergency restoration of the firmware of the ASUS router
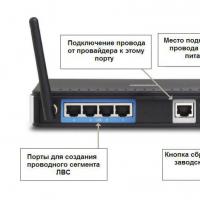 How to set up a D-Link DIR 615 router: Step by step instructions with photos
 How to enable bluetooth (Bluetooth) on a laptop in Windows 7
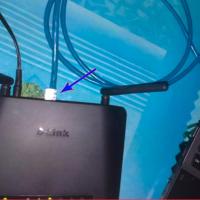 How to set up a Wi-Fi router D-Link DIR-615 yourself
 On Android does not turn on Wi-Fi: possible failures and methods for eliminating
 How to transfer the Internet from the phone to the computer in modern conditions
 Distributed the Internet from a laptop, Wi-Fi network is there, and the Internet does not work?